Unlike Windows, in the Linux operating system the graphical interface for displaying information on the screen is not the main one. To evaluate this system To appreciate it and feel all its power, you will have to use the command line one way or another. Of course, all users begin mastering the system with a graphical shell, but it seems that today you have come to the moment when you need to use a more complex control tool - the command line. In Linux, there are a lot of different commands, both for interacting with the system, files, folders, and for working with users, groups and access rights. From the table below you will learn all the necessary commands for working with Linux:
| Team | Description |
|---|---|
System information |
|
| arch |
display computer architecture |
| uname -m |
|
| uname -r | display the kernel version used |
| dmidecode -q | show hardware system components - (SMBIOS/DMI) |
| hdparm -i /dev/hda | display hard drive characteristics |
| hdparm -tT /dev/sda | test the performance of reading data from the hard drive |
| cat /proc/cpuinfo | display processor information |
| cat /proc/interrupts | show interrupts |
| cat /proc/meminfo | check memory usage |
| cat /proc/swaps | show swap file(s) |
| cat /proc/version | display kernel version |
| cat /proc/net/dev | show network interfaces and statistics on them |
| cat /proc/mounts | display mounted file systems |
| lspci-tv | show as a tree of PCI devices |
| lsusb -tv | show as USB device tree |
| date | display system date |
| Cal 2007 | display a calendar table for the year 2007 |
| date 041217002007.00 | set the system date and time MMDDDHHmmYYYY.SS (MonthDayHourMinutesYear.Seconds) |
| clock -w |
save system time in BIOS |
Stopping the system |
|
| shutdown -h now | Stop the system |
| init 0 | |
| telinit 0 | |
| shutdown -h hours:minutes & | schedule the system to stop at a specified time |
| shutdown -c | cancel a scheduled system shutdown |
| shutdown -r now | reboot the system |
| reboot | |
| logout | log out |
Files and directories |
|
| cd /home | go to the "/home" directory |
| CD.. | go to a higher directory |
| cd ../.. | go to the directory two levels higher |
| CD | go to home directory |
| cd ~user | go to user's home directory |
| cd- | go to the directory you were in before moving to the current directory |
| pwd | show current directory |
| ls | display the contents of the current directory |
| ls -F | display the contents of the current directory with symbols characterizing the type added to the names |
| ls -l | show a detailed view of files and directories in the current directory |
| ls -a | show hidden files and directories in the current directory |
| ls** | show files and directories containing numbers in the name |
| tree | show a tree of files and directories starting from the root (/) |
| lstree | |
| mkdir dir1 | create a directory named "dir1" |
| mkdir dir1 dir2 | create two directories at the same time |
| mkdir -p /tmp/dir1/dir2 | create a directory tree |
| rm -f file1 | delete file named "file1" |
| rmdir dir1 | delete directory named "dir1" |
| rm -rf dir1 | delete the directory named "dir1" and recursively all its contents |
| rm -rf dir1 dir2 | delete two directories and their contents recursively |
| mv dir1 new_dir | rename or move a file or directory |
| cp file1 file2 | copy file file1 to file file2 |
| cp dir/* . | copy all files in directory dir to current directory |
| cp -a /tmp/dir1 . | copy directory dir1 with all contents to the current directory |
| cp -a dir1 dir2 | copy directory dir1 to directory dir2 |
| ln -s file1 lnk1 | create a symbolic link to a file or directory |
| ln file1 lnk1 | create a “hard” (physical) link to a file or directory |
| touch -t 0712250000 fileditest | modify the date and time of file creation; if it is missing, create a file with the specified date and time (YYMMDDhhmm) |
Search files |
|
| find / -name file1 | find files and directories named file1. Search start from root (/) |
| find / -user user1 | find the file and directory owned by user1. Search start from root (/) |
| find /home/user1 -name "*.bin" | Find all files and directories whose names end in ". bin". Search start from "/home/user1" |
| find /usr/bin -type f -atime +100 | find all files in "/usr/bin" that were last accessed more than 100 days |
| find /usr/bin -type f -mtime -10 | find all files in "/usr/bin" created or modified within the last 10 days |
| find / -name *.rpm -exec chmod 755 "()" \; | find all files and directories whose names end in ".rpm" and change their access rights |
| find / -xdev -name "*.rpm" | find all files and directories whose names end in ".rpm", ignoring removable media such as cdrom, floppy, etc. |
| locate "*.ps" | find all files containing ".ps" in the name. It is recommended to first run the "updatedb" command |
| whereis halt | shows the location of binaries, source codes and manuals related to the "halt" file |
| which halt | displays the full path to the file "halt" |
Mounting file systems |
|
| mount /dev/hda2 /mnt/hda2 | mounts the "hda2" partition to the "/mnt/hda2" mount point. Make sure there is a mount point directory "/mnt/hda2" |
| umount /dev/hda2 | will unmount the "hda2" partition. Before executing, leave "/mnt/hda2" |
| fuser -km /mnt/hda2 | forcefully unmount the partition. Applies when the partition is occupied by some user |
| umount -n /mnt/hda2 | perform unmounting without entering information into /etc/mtab. Useful when the file has read-only attributes or there is not enough disk space |
| mount /dev/fd0 /mnt/floppy | mount floppy disk |
| mount /dev/cdrom /mnt/cdrom | mount CD or DVD |
| mount /dev/hdc /mnt/cdrecorder | mount CD-R/CD-RW or DVD-R/DVD-RW(+-) |
| mount -o loop file.iso /mnt/cdrom | mount ISO image |
| mount -t vfat /dev/hda5 /mnt/hda5 | mount file Windows system FAT32 |
| mount Windows network file system (SMB/CIFS) | |
| mount -o bind /home/user/prg /var/ftp/user | "mounts" a directory into a directory (binding). Available from kernel version 2.4.0. Useful, for example, for providing the contents of a user directory via ftp when the ftp server is running in a sandbox (chroot), when symlinks cannot be made. |
Disk space |
|
| df -h | displays information about mounted partitions showing total, available and used space |
| ls -lSr | more | displays a list of files and directories recursively sorted by ascending size and allows page-by-page browsing |
| du -sh dir1 | calculates and displays the size occupied by the directory "dir1" (Translator's note: the -h switch does not work on all *nix systems) |
| du -sk * | sort -rn | displays the size and names of files and directories, sorted by size |
| rpm -q -a - - qf "%10(SIZE)t%(NAME)n" | sort -k1,1n | shows the amount of used disk space occupied by rpm package files, sorted by size (fedora, redhat, etc.) |
| dpkg-query -W -f="$(Installed-Size;10)t$(Package)n" | sort -k1,1n | shows the amount of used disk space occupied by deb package files, sorted by size (ubuntu, debian, etc.) |
Users and groups |
|
| groupadd group_name | create new group with the name group_name |
| groupdel group_name | delete group group_name |
| groupmod -n new_group_name old_group_name | rename group old_group_name to new_group_name |
| useradd -c "Nome Cognome" -g admin -d /home/user1 -s /bin/bash user1 | create user user1, assign him /home/user1 as his home directory, /bin/bash as shell, include him in the admin group and add the Nome Cognome comment |
| useradd user1 | create user user1 |
| userdel -r user1 | delete user1 and his home directory |
| usermod -c "User FTP " -g system -d /ftp/user1 -s /bin/nologin user1 | change user attributes |
| passwd | Change password |
| passwd user1 | change user1 password (root only) |
| chage -E 2005-12-31 user1 | set the expiration date for the user account user1 |
| pwck | check for correctness system files accounts. The files /etc/passwd and /etc/shadow are checked |
| grpck | checks the correctness of system account files. The file /etc/group is checked |
| newgrp [-] group_name | changes the current user's primary group. If you specify "-", the situation will be identical to that in which the user logged out and logged in again. If you do not specify a group, the primary group will be assigned from /etc/passwd |
Setting/changing file permissions |
|
| ls -lh | viewing permissions for files and directories in the current directory |
| ls /tmp | pr -T5 -W$COLUMNS | print the contents of the /tmp directory and split the output into five columns |
| chmod ugo+rwx directory1 | add permissions to directory1 ugo(User Group Other)+rwx(Read Write eXecute) - full rights for everyone. A similar thing can be done this way: "chmod 777 directory1" |
| chmod go-rwx directory1 | take away all rights to the directory1 from the group and everyone else. |
| chown user1 file1 | assign file1 owner to user1 |
| chown -R user1 directory1 | recursively assign the owner of directory1 to user1 |
| chgrp group1 file1 | change the owner group of file file1 to group1 |
| chown user1:group1 file1 | change the owner and group of the owner of file file1 |
| find / -perm -u+s | find, starting from the root, all files with the SUID set |
| chmod u+s /bin/binary_file | assign SUID bit to /bin/binary_file. This allows any user to execute a file with the permissions of the file owner. |
| chmod u-s /bin/binary_file | remove the SUID bit from the file /bin/binary_file. |
| chmod g+s /home/public | assign the SGID bit to the /home/public directory. |
| chmod g-s /home/public | remove the SGID bit from the /home/public directory. |
| chmod o+t /home/public | assign the STIKY bit to the /home/public directory. Allows only owners to delete files |
| chmod o-t /home/public | remove the STIKY bit from the /home/public directory |
Special file attributes |
|
| chattr +a file1 | allow opening a file for writing only in append mode |
| chattr +c file1 | Allows the kernel to automatically compress/decompress the contents of a file. |
| chattr +d file1 | tells the dump utility to ignore this file during backup execution |
| chattr +i file1 | makes the file unavailable for any changes: editing, deleting, moving, creating links to it. |
| chattr +s file1 | allows you to make file deletion safe, i.e. the set s attribute indicates that when a file is deleted, the space occupied by the file on the disk is filled with zeros, which prevents the possibility of data recovery. |
| chattr +S file1 | indicates that when saving changes, synchronization will be performed, as with the sync command |
| chattr +u file1 | this attribute indicates that when a file is deleted, its contents will be saved and, if necessary, the user will be able to restore it |
| lsattr | show file attributes |
Archiving and Compressing Files |
|
| bunzip2 file1.bz2 | decompresses the file "file1.gz" |
| gunzip file1.gz | |
| gzip file1 | compresses file "file1" |
| bzip2 file1 | |
| gzip -9 file1 | compress file file1 with maximum compression |
| rar a file1.rar test_file | create a rar archive "file1.rar" and include the file test_file in it |
| rar a file1.rar file1 file2 dir1 | create a rar archive "file1.rar" and include file1, file2 and dir1 in it |
| unrar x file1.rar | unpack rar archive |
| tar -cvf archive.tar file1 | create a tar archive archive.tar containing file file1 |
| tar -cvf archive.tar file1 file2 dir1 | create a tar archive archive.tar containing file1, file2 and dir1 |
| tar -tf archive.tar | show archive contents |
| tar -xvf archive.tar | unpack the archive |
| tar -xvf archive.tar -C /tmp | unpack the archive to /tmp |
| tar -cvfj archive.tar.bz2 dir1 | create an archive and compress it using bzip2 |
| tar -xvfj archive.tar.bz2 | decompress the archive and unpack it (Translator's note: the -j switch does not work on all *nix systems) |
| tar -cvfz archive.tar.gz dir1 | create an archive and compress it using gzip |
| tar -xvfz archive.tar.gz | decompress the archive and unpack it |
| zip file1.zip file1 | create a compressed zip archive |
| zip -r file1.zip file1 file2 dir1 | create a compressed zip archive including several files and/or directories |
| unzip file1.zip | decompress and unpack the zip archive |
RPM packages (Fedora, Red Hat, etc.) |
|
| rpm -ivh package.rpm | install a package that displays messages and a progress bar |
| rpm -ivh - - nodeps package.rpm | install a package with message and progress bar display without dependency control |
| rpm -U package.rpm | update the package without changing the configuration files; if the package is missing, it will be installed |
| rpm -F package.rpm | update the package only if it is installed |
| rpm -e package_name.rpm | remove package |
| rpm -qa | display a list of all packages installed on the system |
| rpm -qa | grep httpd | |
| rpm -qi package_name | display information about a specific package |
| rpm -qg "System Environment/Daemons" | display packages included in a package group |
| rpm -ql package_name | display a list of files included in the package |
| rpm -qc package_name | display a list of configuration files included in the package |
| rpm -q package_name - - whatrequires | display a list of packages required to install a specific package by dependency |
| rpm -q package_name - - whatprovides | show capability provided by a rpm package |
| rpm -q package_name - - scripts | will display scripts run when installing/uninstalling a package |
| rpm -q package_name - - changelog | display package revision history |
| rpm -qf /etc/httpd/conf/httpd.conf | check which package belongs to specified file. The full path and file name must be specified. |
| rpm -qp package.rpm -l | displays a list of files included in the package, but not yet installed on the system |
| rpm - - import /media/cdrom/RPM-GPG-KEY | import public digital signature key |
| rpm - - checksig package.rpm | will check the package signature |
| rpm -qa gpg-pubkey | check the integrity of the installed package contents |
| rpm -V package_name | check the size, authority, type, owner, group, MD5 sum and last modified date of the package |
| rpm -Va | check the contents of all packages installed on the system. Proceed with caution! |
| rpm -Vp package.rpm | check a package that is not yet installed on the system |
| rpm2cpio package.rpm | cpio - - extract - - make-directories *bin* | extract files containing bin in their name from the package |
| rpm -ivh /usr/src/redhat/RPMS/`arch`/package.rpm | install a package built from source code |
| rpmbuild - - rebuild package_name.src.rpm | build a package from source codes |
YUM - package updater (Fedora, RedHat, etc.) |
|
| yum install package_name | download and install the package |
| yum update | update all packages installed on the system |
| yum update package_name | update package |
| yum remove package_name | remove package |
| yum list | display a list of all packages installed on the system |
| yum search package_name | find the package in the repository |
| yum clean packages | clear the rpm cache by deleting downloaded packages |
| yum clean headers | remove all file headers that the system uses to resolve dependencies |
| yum clean all | clear the rpm cache by removing downloaded packages and headers |
DEB packages (Debian, Ubuntu and the like) |
|
| dpkg -i package.deb | install/update package |
| dpkg -r package_name | remove a package from the system |
| dpkg -l | show all packages installed on the system |
| dpkg -l | grep httpd | Among all the packages installed on the system, find a package containing "httpd" in its name |
| dpkg -s package_name | display information about a specific package |
| dpkg -L package_name | display a list of files included in the package installed on the system |
| dpkg - - contents package.deb | display a list of files included in a package that is not yet installed on the system |
| dpkg -S /bin/ping | find the package that contains the specified file. |
APT - package management tool (Debian, Ubuntu, etc.) |
|
| apt-get install package_name | install/update package |
| apt-cdrom install package_name | install/update the package from cdrom |
| apt-get update | get updated package lists |
| apt-get upgrade | update packages installed on the system |
| apt-get remove package_name | remove a package installed on the system while saving the configuration files |
| apt-get purge package_name | remove a package installed on the system by deleting configuration files |
| apt-get check | check dependency integrity |
| apt-get clean | remove downloaded package archive files |
| apt-get autoclean | remove old downloaded package archive files |
Viewing file contents |
|
| cat file1 | print the contents of file1 to standard output |
| tac file1 | print the contents of file1 to the standard output device reverse order(last line becomes first, etc.) |
| more file1 | paging the contents of file1 to standard output |
| less file1 | page-by-page output of the contents of file1 to the standard output device, but with the ability to scroll in both directions (up and down), search by content, etc. |
| head -2 file1 | Print the first two lines of file1 to standard output. Ten lines are output by default |
| tail -2 file1 | Print the last two lines of file1 to standard output. Ten lines are output by default |
| tail -f /var/log/messages | Print the contents of the file /var/log/messages to the standard output device as text appears in it. |
Text manipulation |
|
| cat file | grep -i "Criteria" > result.txt | general syntax for performing actions to process the contents of a file and output the result to a new one |
| cat file | grep -i "Criteria" » result.txt | the general syntax for performing actions to process the contents of a file and output the result to an existing file. If the file does not exist, it will be created |
| grep Aug /var/log/messages | from the file "/var/log/messages" select and print to the standard output the lines containing "Aug" |
| grep ^ Aug /var/log/messages | from the file "/var/log/messages" select and print to the standard output the lines starting with "Aug" |
| grep /var/log/messages | select lines containing numbers from the file "/var/log/messages" and output them to the standard output device |
| grep Aug -R /var/log/* | select and print to standard output lines containing "Aug" in all files located in the /var/log directory and below |
| sed "s/stringa1/stringa2/g" example.txt | in the example.txt file replace "string1" with "string2", output the result to the standard output device. |
| sed "/^$/d" example.txt | remove empty lines from example.txt file |
| sed "/ *#/ d; /^$/ d" example.txt | remove empty lines and comments from example.txt file |
| echo "test" | tr "[:lower:]" "[:upper:]" | convert characters from lowercase to uppercase |
| sed -e "1d" result.txt | remove first line from example.txt file |
| sed -n "/string1/p" | display only strings containing "string1" |
| sed -e "s / *$ / / " example.txt | remove empty characters at the end of each line |
| sed -e "s/string1//g" example.txt | remove the string "string1" from the text without changing anything else |
| sed -n "1.8p;5q" example.txt | take the first to eighth lines from the file and print the first five from them |
| sed -n "5p;5q" example.txt | print the fifth line |
| sed -e "s/0*/0/g" example.txt | replace a sequence of any number of zeros with a single zero |
| cat -n file1 | number the lines when outputting the file contents |
| cat example.txt | awk "NR%2==1" | When outputting the contents of a file, do not output even lines of the file |
| echo a b c | awk "(print $1)" | display the first column. Separate, by default, by space/spaces or character/tab characters |
| echo a b c | awk "(print $1,$3)" | display the first and third columns. Separate, by default, by space/spaces or character/tab characters |
| paste file1 file2 | combine the contents of file1 and file2 as a table: line 1 of file1 = line 1 column 1-n, line 1 of file2 = line 1 column n+1-m |
| paste -d "+" file1 file2 | combine the contents of file1 and file2 as a table with a "+" delimiter |
| sort file1 file2 | sort the contents of two files |
| sort file1 file2 | uniq | sort the contents of two files without showing duplicates |
| sort file1 file2 | uniq -u | sort the contents of two files, displaying only unique lines (lines that appear in both files are not printed to standard output) |
| sort file1 file2 | uniq -d | sort the contents of two files, showing only duplicate lines |
| comm -1 file1 file2 | compare the contents of two files without displaying lines belonging to file "file1" |
| comm -2 file1 file2 | compare the contents of two files without displaying lines belonging to file "file2" |
| comm -3 file1 file2 | compare the contents of two files, removing lines found in both files |
Converting character sets and file formats |
|
| dos2unix filedos.txt fileunix.txt | convert text format file from MSDOS to UNIX (difference in backspace characters) |
| unix2dos fileunix.txt filedos.txt | convert text format file from UNIX to MSDOS (difference in backspace characters) |
| recode .. HTML< page.txt >page.html | convert the contents of the test file page.txt into the html file page.html |
| recode -l | more | display a list of available formats |
File system analysis |
|
| badblocks -v /dev/hda1 | check the hda1 partition for bad blocks |
| fsck /dev/hda1 | check/restore the integrity of the Linux file system of the hda1 partition |
| fsck.ext2 /dev/hda1 | check/restore the integrity of the ext2 file system of the hda1 partition |
| e2fsck /dev/hda1 | |
| e2fsck -j /dev/hda1 | check/restore the integrity of the ext3 file system of the hda1 partition, indicating that the log is located there |
| fsck.ext3 /dev/hda1 | check/restore the integrity of the ext3 file system of the hda1 partition |
| fsck.vfat /dev/hda1 | check/restore the integrity of the fat file system of the hda1 partition |
| fsck.msdos /dev/hda1 | |
| dosfsck /dev/hda1 | |
Formatting file systems |
|
| mkfs /dev/hda1 | create linux file system on hda1 partition |
| mke2fs /dev/hda1 | create ext2 filesystem on hda1 partition |
| mke2fs -j /dev/hda1 | create ext3 journaling filesystem on hda1 partition |
| mkfs -t vfat 32 -F /dev/hda1 | create a FAT32 file system on the hda1 partition |
| fdformat -n /dev/fd0 | formatting a floppy disk without checking |
| mkswap /dev/hda3 | |
swap space |
|
| mkswap /dev/hda3 | creating swap space on hda3 partition |
| swapon /dev/hda3 | activate the swap space located on the hda3 partition |
| swapon /dev/hda2 /dev/hdb3 | activate swap spaces located on hda2 and hdb3 partitions |
Creating backups |
|
| dump -0aj -f /tmp/home0.bak /home | create a complete backup copy/home directory to file /tmp/home0.bak |
| dump -1aj -f /tmp/home0.bak /home | create an incremental backup of the /home directory to the file /tmp/home0.bak |
| restore -if /tmp/home0.bak | restore from backup /tmp/home0.bak |
| rsync -rogpav - - delete /home /tmp | sync /tmp with /home |
| rsync -rogpav -e ssh - - delete /home ip_address:/tmp | synchronize via SSH tunnel |
| rsync -az -e ssh - - delete ip_addr:/home/public /home/local | synchronize a local directory with a remote directory via a compressed ssh tunnel |
| rsync -az -e ssh - - delete /home/local ip_addr:/home/public | synchronize a remote directory with a local directory via a compressed ssh tunnel |
| dd bs=1M if=/dev/hda | gzip | ssh user@ip_addr "dd of=hda.gz" | make a "cast" local disk to a file on a remote computer via an ssh tunnel |
| tar -Puf backup.tar /home/user | create an incremental backup of the "/home/user" directory to the backup.tar file while preserving the permissions |
| (cd /tmp/local/ && tar c .) | ssh -C user@ip_addr "cd /home/share/ && tar x -p" | copying the contents of /tmp/local to remote computer via ssh tunnel to /home/share/ |
| (tar c /home) | ssh -C user@ip_addr "cd /home/backup-home && tar x -p" | copying the contents of /home to a remote computer via an ssh tunnel to /home/backup-home |
| tar cf - . | (cd /tmp/backup ; tar xf -) | copying one directory to another while maintaining powers and links |
| find /home/user1 -name "*.txt" | \ xargs cp -av - - target-directory=/home/backup/ - - parents |
search /home/user1 for all files whose names end in ".txt" and copy them to another directory |
| find /var/log -name "*.log" | tar cv - - files-from=- | bzip2 > log.tar.bz2 | search /var/log for all files whose names end in ".log" and create a bzip archive from them |
| dd if=/dev/hda of=/dev/fd0 bs=512 count=1 | create a copy of the MBR (Master Boot Record) from /dev/hda to a floppy disk |
| dd if=/dev/fd0 of=/dev/hda bs=512 count=1 | recover MBR from floppy disk to /dev/hda |
CDROM |
|
| cdrecord -v gracetime=2 dev=/dev/cdrom -eject blank=fast -force | clean a rewritable cdrom |
| mkisofs /dev/cdrom > cd.iso | create an iso image of cdrom on disk |
| mkisofs /dev/cdrom | gzip > cd_iso.gz | create a compressed iso image of cdrom on disk |
| mkisofs -J -allow-leading-dots -R -V "Label CD" -iso-level 4 -o ./cd.iso data_cd | create an iso image of a directory |
| cdrecord -v dev=/dev/cdrom cd.iso | burn an ISO image |
| gzip -dc cd_iso.gz | cdrecord dev=/dev/cdrom - | burn a compressed ISO image |
| mount -o loop cd.iso /mnt/iso | mount an ISO image |
| cd-paranoia -B | rip audio tracks from a CD to wav files |
| cd-paranoia - - "-3" | rip first three audio tracks from a CD to wav files |
| cdrecord - - scanbus | scan bus to identify the channel scsi |
Network (LAN and WiFi) |
|
| ifconfig eth0 | show configuration network interface eth0 |
| ifup eth0 | activate (raise) interface eth0 |
| ifdown eth0 | deactivate (lower) interface eth0 |
| ifconfig eth0 192.168.1.1 netmask 255.255.255.0 | set the eth0 interface to an IP address and subnet mask |
| ifconfig eth0 promisc | switch the eth0 interface to promiscuous mode to “catch” packets (sniffing) |
| ifconfig eth0 -promisc | disable promiscuous mode on interface eth0 |
| dhclient eth0 | activate the eth0 interface in dhcp mode. |
| route -n | display local routing table |
| netstat -rn | |
| route add -net 0/0 gw IP_Gateway | set the default gateway IP address |
| route add -net 192.168.0.0 netmask 255.255.0.0 gw 192.168.1.1 | add a static route to the network 192.168.0.0/16 via a gateway with IP address 192.168.1.1 |
| route del 0/0 gw IP_gateway | remove the default gateway IP address |
| echo "1" > /proc/sys/net/ipv4/ip_forward | allow packet forwarding |
| hostname | display computer name |
| hostwww. yandex. ru | resolve name www . yandex. ru host to IP address and vice versa |
| host 93.158.134.3 | |
| ip link show | display the status of all interfaces |
| mii-tool eth0 | display status and connection type for interface eth0 |
| ethtool eth0 | displays interface statistics for eth0, showing information such as supported and current connection modes |
| netstat -tupn | displays all installed network connections By TCP protocols and UDP without resolving names to IP addresses and PIDs and the names of the processes providing these connections |
| netstat -tupln | displays all network connections via TCP and UDP protocols without name resolution to IP addresses and PIDs and names of processes listening on ports |
| tcpdump tcp port 80 | display all traffic on TCP port 80 (usually HTTP) |
| iwlist scan | scan the airwaves for the availability of wireless access points |
| iwconfig eth1 | show configuration of wireless network interface eth1 |
Microsoft Windows networks(SAMBA) |
|
| nbtscan ip_addr | resolve netbios name nbtscan is not installed by default on all systems; you may have to install it manually. nmblookup is included in the samba package. |
| nmblookup -A ip_addr | |
| smbclient -L ip_addr/hostname | display resources provided in general access on a windows machine |
| smbget -Rr smb://ip_addr/share | like wget can get files from windows machines via smb protocol |
| mount -t smbfs -o username=user,password=pass / / winclient / share / mnt / share | mount the smb resource provided on the windows machine to the local file system |
IPTABLES (firewall) |
|
| iptables -t filter -nL | show all rule chains |
| iptables -nL | |
| iptables -t nat -L | display all rule chains in the NAT table |
| iptables -t filter -F | clear all rule chains in the filter table |
| iptables -F | |
| iptables -t nat -F | clear all rule chains in the NAT table |
| iptables -t filter -X | delete all custom rule chains in the filter table |
| iptables -t filter -A INPUT -p tcp - - dport telnet -j ACCEPT | allow incoming telnet connection |
| iptables -t filter -A OUTPUT -p tcp - - dport http -j DROP | block outgoing HTTP connections |
| iptables -t filter -A FORWARD -p tcp - - dport pop3 -j ACCEPT | Allow POP3 connections to be forwarded |
| iptables -t filter -A INPUT -j LOG - - log-prefix "DROP INPUT" | enable kernel logging of packets passing through the INPUT chain and adding the prefix "DROP INPUT" to the message |
| iptables -t nat -A POSTROUTING -o eth0 -j MASQUERADE | enable NAT (Network Address Translate) of outgoing packets on the eth0 interface. Valid when used with dynamically allocated IP addresses. |
| iptables -t nat -A PREROUTING -d 192.168.0.1 -p tcp -m tcp - - dport 22 \ -j DNAT - - to-destination 10.0.0.2:22 |
redirecting packets addressed to one host to another host |
Monitoring and Debugging |
|
| top | display running processes, the resources they use, and other useful information(With automatic update data) |
| ps-eafw | display running processes, the resources they use and other useful information (one time) |
| ps -e -o pid,args - - forest | display PIDs and processes in the form of a tree |
| pstree | display process tree |
| kill -9 98989 | "kill" the process with PID 98989 "to death" (without respecting data integrity) |
| kill -KILL 98989 | |
| kill -TERM 98989 | Correctly terminate the process with PID 98989 |
| kill -1 98989 | force the process with PID 98989 to reread the configuration file |
| kill -HUP 98989 | |
| lsof -p 98989 | display a list of files opened by the process with PID 98989 |
| lsof /home/user1 | display list open files from the /home/user1 directory |
| strace -c ls > /dev/null | list system calls created and received by the ls process |
| strace -f -e open ls > /dev/null | display library calls |
| watch -n1 "cat /proc/interrupts" | display interrupts in real time |
| last reboot | display system reboot history |
| last user1 | display the registration history of user1 in the system and the time he spent in it |
| lsmod | display loaded kernel modules |
| free -m | show status random access memory in megabytes |
| smartctl -A /dev/hda | condition monitoring hard drive/dev/hda via SMART |
| smartctl -i /dev/hda | check SMART availability on hard drive /dev/hda |
| tail /var/log/dmesg | withdraw ten latest entries from the kernel boot log |
| tail /var/log/messages | display the last ten records from syslog |
Other Useful Commands |
|
| apropos ...keyword | displays a list of commands that in one way or another relate to keywords. Useful when you know what the program does, but don't remember the command |
| man ping | calling the manual for working with the program, in in this case, - ping |
| whatis ...keyword | displays a description of the actions of the specified program |
| mkbootdisk - - device /dev/fd0 `uname -r` | creates a bootable floppy disk |
| gpg -c file1 | encrypts file1 using GNU Privacy Guard |
| gpg file1.gpg | decrypts file1 using GNU Privacy Guard |
| wget -r www . example. com | loads the contents of the www site recursively. example. com |
| wget -c www . example. com/file. iso | upload file www. example. com/file. iso with the ability to stop and continue later |
| echo "wget -c www . example . com/files . iso" | at 09:00 | start downloading at the specified time |
| ldd /usr/bin/ssh | display a list of libraries required for ssh to work |
| alias hh="history" | assign an alias hh to the history command |
It's Friday, which means you can relax a little. This collection features 7 fun (and not so fun) commands that can be executed in the Linux terminal. Some are used as jokes, some are very useful.
cal - calendar in the terminal
Team cal displays a calendar in the terminal.
If you run it without parameters, the calendar for the current month is displayed:
You can specify the year, then we get a calendar for the whole year:

sl - train in the terminal
sl means Steam Locomotive - steam locomotive. The command was created for those who enter the command incorrectly ls(this command displays a list of files).
By command sl A steam locomotive passes through the terminal.
Install on Ubuntu:
Sudo apt install sl

rev - everything is the other way around
Team rev outputs everything you type in the terminal, but in reverse (from the word rev erse):

figlet - inscription
Team figlet displays in large letters the inscription that you indicated to it. The inscription is displayed in ASCII characters.
Installation on Ubuntu:
Sudo apt install filet
Figlet website

banner - banner
Team banner, as well as figlet, displays in the terminal in capital letters the characters that you specified to it. Only the first 10 characters are displayed.
Installation on Ubuntu:
Sudo apt install sysvbanner
Banner Penguin

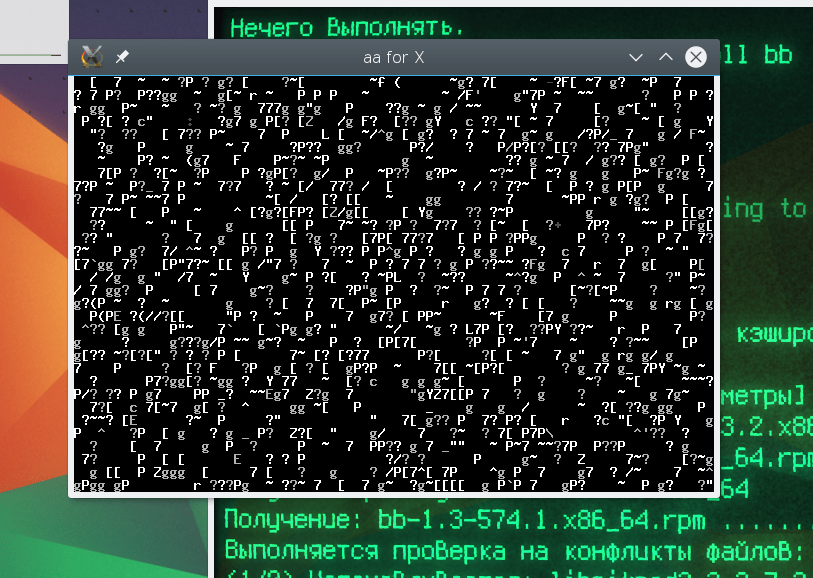
aafire - fire in the terminal
Team aafire for those who want to see fire in their terminal, ASCII fire.
Installation on Ubuntu:
Sudo apt install libaa-bin

w is the shortest command
Team w is notable for the fact that it shortest command in Linux.
The w command displays information about users who are in this moment use the system.
For each user, his name is displayed, information about what command line the user is using (shell), login time and idle time, and some other data.
In the first line that the command outputs w, shows the current time, uptime (uptime - system operating time), the number of users currently working and the average system load averages for the last 1, 5 and 15 minutes.

Almost all teams have additional features. To obtain Additional information about each command, execute in the terminal
Did you know that Linux is not just for serious admin work? You can play text games on it, talk to the terminal, or even create beautiful ASCII pictures on it. Yes, Linux is really fun if you know true commands. Let's look at commands that can make you smile or that you can enter at the end of a difficult work day and get a breath of fresh air in the form of positive emotions. You will return home in a good mood.
1)Get a random quote with the fortune command
You can get random quotes and funny predictions using the fortune command. In this case, it is necessary that the fortune package be installed on your system.
To install fortune on systems with apt or aptitude:
Linuxtechi@linuxarena:~$ sudo apt-get install fortune
To install fortune on systems with yum such as CentOS / RHEL / Fedora, enter following lines:
# yum install fortune*
Once the installation is complete, enter the fortune command. The result can be seen just below.

2) Team Rev
This command expands any string given to it. The command is available immediately after installing Linux.
# rev
LinuxTechi
ihceTxuniL
Linux Rocks
skcoR xuniL
Opensource World
dlroW ecruosnepO
Linux Mint Ultimate Desktop
potkseD etamitlU tniMxuniL
You can even create a file with a list of names and then provide this file to the team. In this case, all names from the file will be expanded.
# rev rev.txt
ihceTxuniL
skcoR syawla xuniL
dlrow ecruosnepO fo enobkcab eht si xuniL
ihceTxuniL moob moob
#
3) Yes command
The yes command will endlessly display the text given to it until you force it to stop (CTRL+C).
Syntax:
# yes TEXT
# yesLinuxTechi.com
LinuxTechi.com
LinuxTechi.com
LinuxTechi.com
LinuxTechi.com
LinuxTechi.com
LinuxTechi.com
LinuxTechi.com
LinuxTechi.com
LinuxTechi.com^C
#
4) Turn the terminal into an aquarium
Did you know that you can turn your Lnux system terminal into a beautiful aquarium with fish and algae? To do this, you will need to install the term animator, libcurses, and asciiaquarium packages on your system.
Before following the instructions, make sure you have the 'perl', 'perl-Curses' and 'perl-devel' packages installed.
For systems with yum:
# yum install perl perl-devel perl-Curses
For Debian systems:
Linuxtechi@linuxarena:~$ sudo apt-get install perl libcurses-perl
Now you can start installing this awesome command.
First, make sure you download the term animator package:
# wget http://search.cpan.org/CPAN/authors/id/K/KB/KBAUCOM/Term-Animation-2.6.tar.gz
Install the package as shown below.
# tar zxpvf Term-Animation-2.6.tar.gz
# cd Term-Animation-2.6
# perl Makefile.PL && make && make test
# make install
Attention: If you have difficulties with anything described above, then you can always use the cpan console and install the “Term Animation” package through it. You can do it like this:
Cpan> install Term::Animation
Finally download and install the asciiaquarium package. Here's how to do it:
# wget http://www.robobunny.com/projects/asciiquarium/asciiquarium.tar.gz
# tar zxpvf asciiquarium.tar.gz
# cd asciiquarium_1.1/
# cp asciiquarium /usr/local/bin/
# chmod 755 /usr/local/bin/asciiquarium
Now run the command
# /usr/local/bin/asciiquarium
#asciiquarium

5)Team Toilet
It is not at all clear why the team is called that way, because what it does has nothing to do with the latrine. This command produces beautiful titles made entirely of characters.
To install the toilet package on Debian based systems use the command below:
Linuxtechi@linuxarena:~$ sudo apt-get install toilet
For bases like CentOS or RHEL use:
# wget http://caca.zoy.org/raw-attachment/wiki/toilet/toilet-0.3.tar.gz
# tar zxpvf toilet-0.3.tar.gz
# cd toilet-0.3
# ./configure && make && make install
Linuxtechi@linuxarena:~$ toilet LinuxTechi Rocks

Toilet provides a wide range of features such as fonts, colorful symbols and filters. Use the man page for the toilet command to familiarize yourself with big amount opportunities.

6) Set your terminal on fire
Don't worry, this command will only display symbols that form flames in your terminal.
Install a package that will allow you to issue the aafire command on a Debian-based system:
Linuxtechi@linuxarena:~$ sudo apt-get install libaa-bin
linuxtechi@linuxarena:~$ aafire

7) Ask the cow to repeat what he wrote
cowsay is another fun Linux command that displays the entered sentence as a statement from a cow or any other animal of your choice.
Linuxtechi@linuxarena:~$ sudo apt-get install cowsay
linuxtechi@linuxarena:~$ cowsay Linux world Rocks

cowsay can be used in conjunction with the fortune command. An example can be seen just below:
Linuxtechi@linuxarena:~$ fortune | cowsay

8)Enter the world of the matrix
Let's brush up on the matrix using the cmatrix command.
The cmatrix command is not available by default. To install it on a Debian based system you need to enter the following:
The matrix starts like this:
Linuxtechi@linuxarena:~$ sudo apt-get install cmatrix

9) Do you love Jerry the mouse?
Are you tired of the old dark mouse pointer, so much so that you would like to do something special with it? The "oneko" package will help you. It attaches the famous Jerry mouse to your mouse pointer. As a result, wherever you point the pointer, the mouse will follow it. Quite funny, isn't it?
To install the oneko package on a Debian-based system, enter:
Linuxtechi@linuxarena:~$ sudo apt-get install oneko
Once the installation is complete, type the command "oneko" .

10) Make the terminal talk to you
Turn on your speakers, because with the espeak command you can make your Linux terminal speak. First, let's install the espeak package.
Linuxtechi@linuxarena:~$ sudo apt-get install espeak
For systems with yum:
Execute the espeak command with the text:
Linuxtechi@linuxarena:~$ espeak "LinuxTechi is the best Website for Linux guide and tutorials"
11) Steam locomotive in your terminal
Everyone knows the "ls" command, which can be used to display the contents of a directory, but do you know the "sl" command? This is a fun command that draws a steam locomotive in your ASCII terminal.
"sl" is not a basic command, so it's worth installing first.
For Debian based systems, enter:
Linuxtechi@linuxarena:~$ sudo apt-get install sl
For systems with yum:
# yum install espeak
Run the sl command and enjoy:
# sl

12) Let's watch Star Wars
Want to go back to school when you were fascinated by Star Wars characters? Of course, you can’t watch a movie in the terminal, but you can quite enjoy scenes from the movie in ASCII format.
# telnet towel.blinkenlights.nl
You just need to wait a little and the scenes will be displayed Star Wars in ASCII format.


To stop, hold down the combination ctrl+] . Once the telnet terminal appears, enter quit in it.
This is where the article ends. I hope you enjoyed the teams. If you know any other similar commands, be sure to share them in the comments!
In Linux, terminal commands can be used for almost any task. But in addition to serious commands designed to perform certain actions, this system also contains humorous commands. This is primarily various terminal graphics, banners, display of random phrases or screensavers. Most utilities need to be installed separately, but some come by default, at least on Ubuntu.
In this article on the eve of the holidays, we will look at cool Linux commands. But before we move on to the commands, let's start with the terminal itself.
Recently, a terminal emulator project in the form of an old screen was born. It looks really good:
To install on Ubuntu, you can use the PPA repository:
sudo add-apt-repository ppa:noobslab/apps
$ sudo apt-get update
$ sudo apt-get install cool-retro-term
In OpenSUSE, the package is available at software.opensuse.org. After installation is complete, you can run the program with the command:
It may not be suitable for constant work, but it’s just right for jokes and relaxation, and it’s also very reminiscent of a computer terminal in Fallout.
We have a suitable terminal, now you can watch existing jokes in the Linux terminal.
1. Cowsay
This utility applies to console graphics. You call the utility with the desired message, and it displays it in the form of a comic strip with an animal:

Very convenient to use for terminal greetings. You can install the program from the official Ubuntu repositories command:
sudo apt-get install cowsay
If you don't like cows, you can use any other animal, list possible options output by the command:
Cow files in /usr/share/cowsay/cows:
apt beavis.zen bong bud-frogs bunny calvin cheese cock cower daemon default
dragon dragon-and-cow duck elephant elephant-in-snake eyes flaming-sheep
ghostbusters gnu head-in hellokitty kiss kitty koala kosh luke-koala
mech-and-cow meow milk moofasa moose mutilated pony pony-smaller ren sheep
skeleton snowman sodomized-sheep stegosaurus stimpy suse three-eyes turkey
turtle tux unipony unipony-smaller vader vader-koala www
Then use the -f option to select an option. For example:
cowsay -f dragon "Hello world!"

Other options are also supported, to change the behavior of the program, see the man help.
2. Cowthink
A program very similar to the first one. It turns out that cows can not only talk, but also think. It is installed along with cowsay, so you don’t need to install anything additional:
cowthink "I'll still read this article to the end"

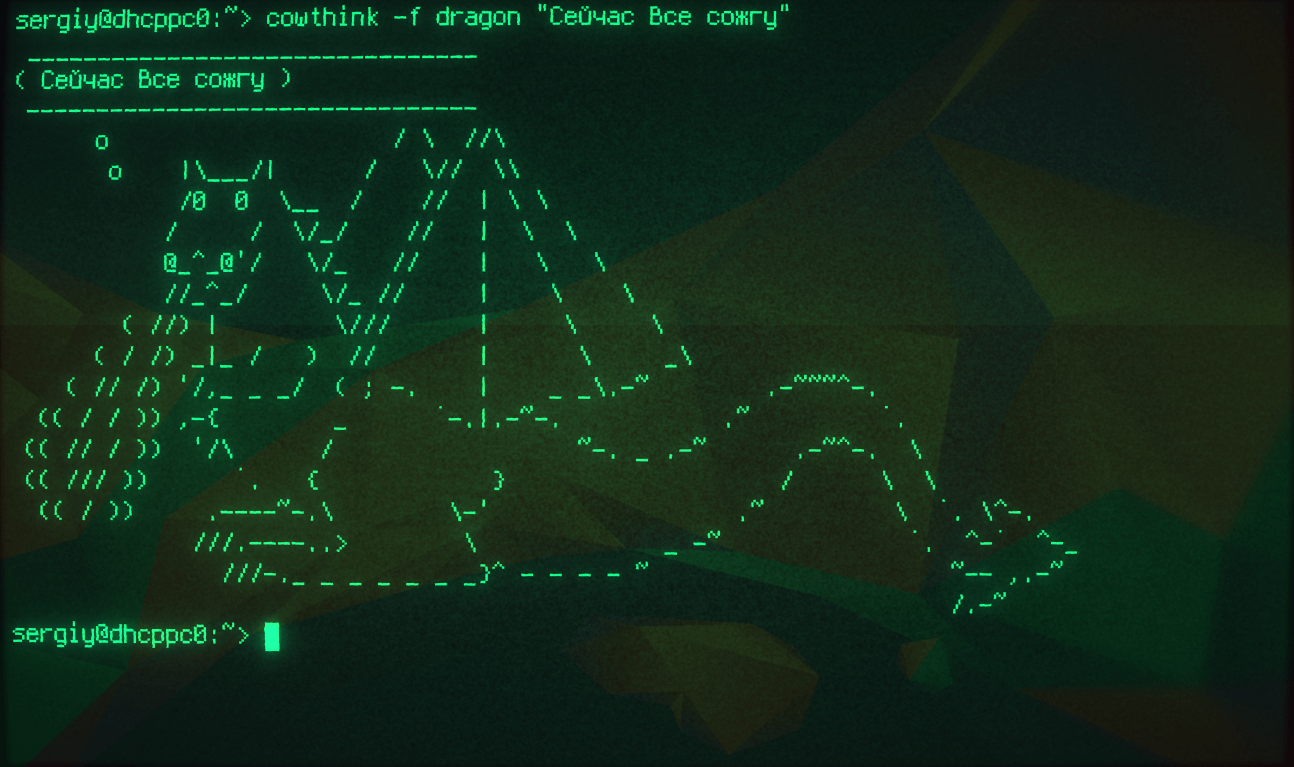
cowthink -f dragon "Now I'll burn everything"
The same options are supported.
3. sl
If you enter the ls command incorrectly and write sl instead, a steam locomotive will pass from right to left in the terminal. To install on Ubuntu, type:
sudo apt-get install sl
And now:

The -F option will make the train take off, and -l will shrink it to banner size.
4. figlet
The utility allows you to draw large text banners in the terminal. Such banners are used in greetings from ssh or telnet servers:

If not installed, use on Ubuntu:
sudo apt-get install figlet
Various fonts are supported, but no Unicode support:
figlet -f slant Hello

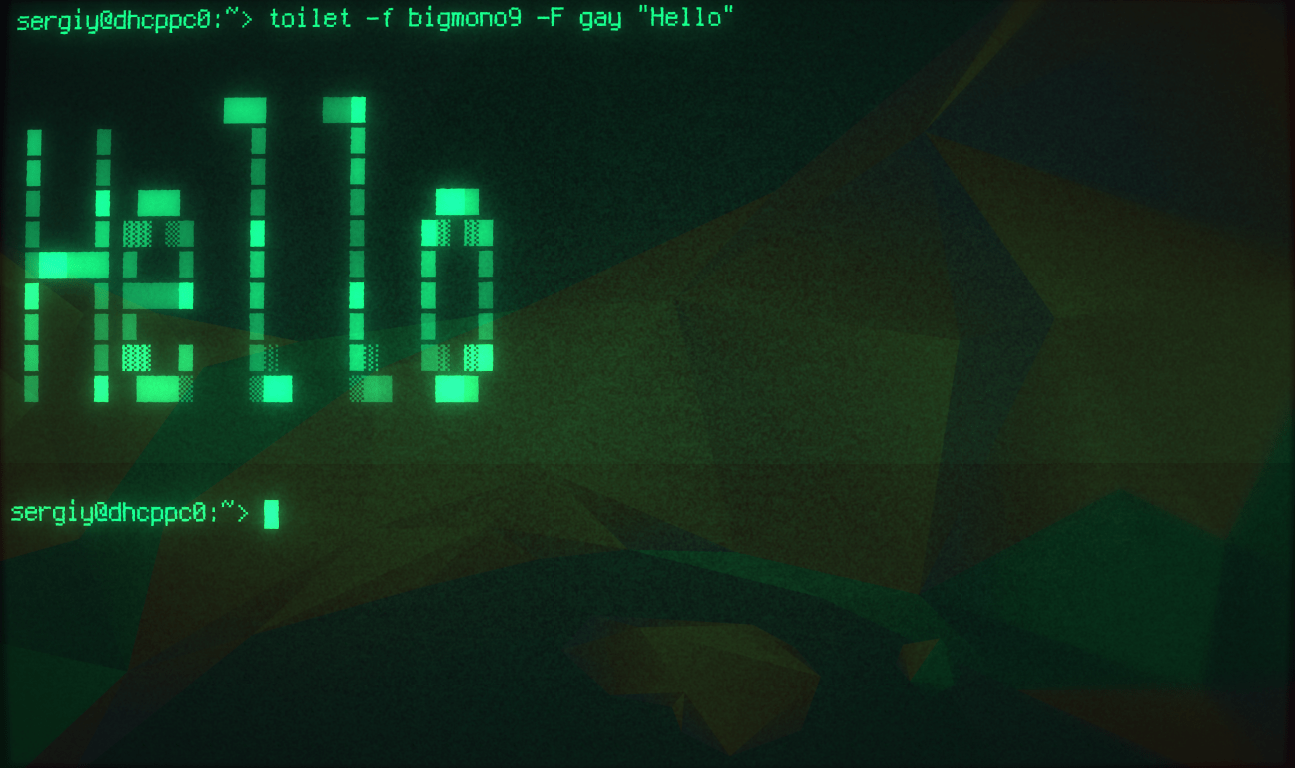
5.toilet
And again banners. This command is very similar to the previous one, here the symbols are used to draw banners:

The installation is the same:
sudo apt-get install toilet
The toilet command supports many more features, for example it has Unicode support, colored fonts (-f), filters (-F), etc.
For example:
toilet -f bigmono9 -F gay "Hello"
6.banner
This command, like the previous two, prints banners, but its capabilities are very limited, there are no options and only prints 10 characters:
Installation on Ubuntu:
sudo apt-get install sysvbanner
7.fortune
The fortune command prints one random but possibly useful quote:

The s option tells the utility to generate small citations.
To output a quote you can use cowsay:
fortune | cowsay

Installation on Ubuntu:
sudo apt-get install fortune
To install Russian quotes, run:
sudo apt-get install fortunes fortune-mod fortunes-min fortunes-ru
8. cmatrix
The program will draw a matrix, the same as in the movie of the same name in your terminal:

To install on Ubuntu run:
sudo apt-get install cmatrix
9.Rev
The command will turn words and sentences backwards, just run the command and then start typing:

10. Easter egg in apt-get
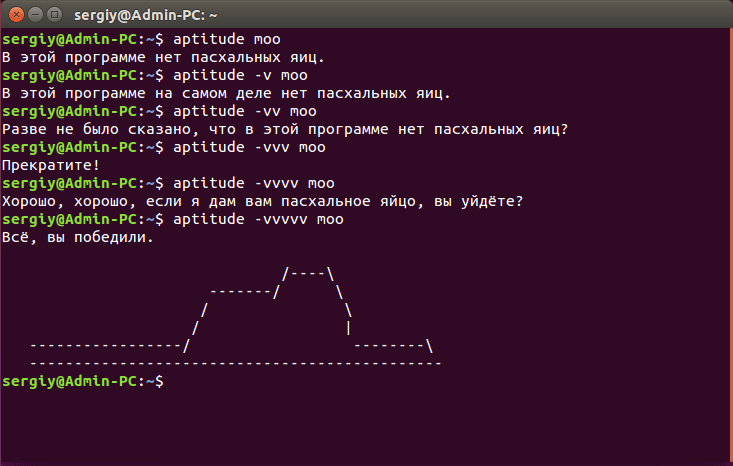
Easter eggs in Linux are quite rare, but they do exist. The apt-get command has this Easter egg:

11. Easter egg aptitude
Aptitude also has this Easter egg, but it doesn’t activate right away:
You can watch star wars in the terminal by connecting to the towel.blinkenlights.nl server using telnet:
telnet towel.blinkenlights.nl

If you only have access to the terminal and still have to wait a long time, you can watch a little Star Wars.
13. Yes cycle
The command will continue to print the specified word indefinitely until you press Ctrl + C. In most cases it has no use, but it can be useful when testing programs when you need to generate a large number of text information:

14. factor
This command will print all least common multiples of the specified number, for example:

15.pi
The pi command will print the number pi to the required number of decimal places, for example, look at the first 500 decimal places:
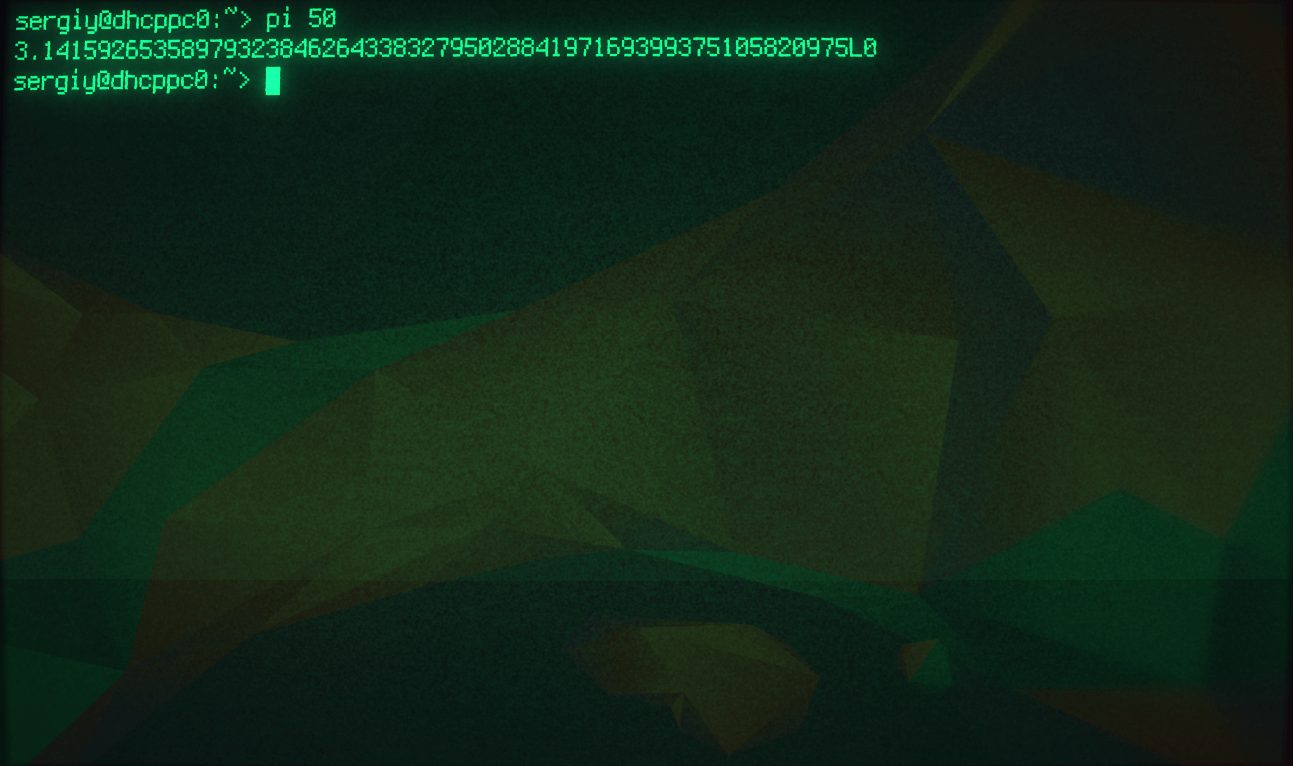
The factor and pi commands are not classified as fun Linux commands, but can be very useful in some situations.
16. xcowsay
xcowsay is a GUI for the cowsay command, you will need an X server running to run it. The program will not work only in the terminal:
xcowsay "Hello!"

To install on Ubuntu use:
sudo apt-get install xcowsay
17. xeyes
The xeyes program draws a pair of eyes on the desktop. They follow the mouse cursor, so you won't lose your cursor.
Then do:

18. asciiviewer
The aciiviewer program allows you to view images in the terminal in text format. Can be useful when there is no other way to open the image.
First you need to install it:
sudo apt-get install view
Then we check:
asciiview test.png -driver curses
Of course, the original picture looks much better, but even here you can make out something.
19. aafire
Do you like to look at fire? No problem, this command also belongs to the asciiart set and can be used to light a fire in the terminal:

Installation:
sudo apt-get install caca-utils
20.bb
This is an excellent quality audio visualization running in a text terminal. The animation uses only text, but in addition to the drawing there is also a background. She is very interesting to watch:
Installation:
sudo apt-get install bb
21. rig
The program generates random and most likely fake identification data:
Alberta Ramirez
990 Brandy Run
Chicago, IL 60607
(312) xxx-xxxx
You can install the program with the command:
sudo apt-get install rig
22. thefuck
This is not an ordinary utility, although judging by the name it was made as a joke, but it can be useful. The utility analyzes the previous command and tries to correct the error made in it. Watch the demo from the author himself:

In order to install the program, you can download it from GitHub:
wget -O - https://raw.githubusercontent.com/nvbn/thefuck/master/install.sh | sh - && $0
conclusions
That's all. If you know other fun, funny or cool linux commands that I missed - write in the comments!
In all operating systems, including in Linux, the term "command" means either a utility command line, or a specific feature built into the system’s command shell. However, for the users themselves this difference does not matter much. After all, both Linux terminal commands are invoked in the same way. You enter a word into your terminal emulator and get the command output.
I have already written about Linux terminal commands, but then I touched only on a few of the most interesting, most useful commands, relying on the fact that the user is already quite familiar with the capabilities of the terminal. But we need to make one more article, aimed at beginners, those who are just taking their first steps in mastering Linux.
And here she is. Its goal is to collect the basic simple and complex Linux commands that every user should know in order to most effectively manage their system. To make it easier to remember the command options, I added in parentheses the words from which they originated - it’s much easier, I’ve tested it myself.
This does not mean that I will list all the commands - I will try to cover all the most useful things that can be useful in everyday life. To make it easier to read, we will divide this list into categories of commands by purpose. Most of the utilities discussed here do not require additional installation, they will be pre-installed in any Linux distribution, and if not, then they are easy to find in the official repositories.
1.ls
A utility for viewing the contents of directories. By default shows the current directory. If you specify a path in the parameters, it will list the contents of the destination directory. Useful options -l ( L ist) and -a ( A ll). The first formats the output as a list with more detailed information, and the second includes showing hidden files.
2. cat
Prints the contents of the file passed as a parameter to standard output. If you transfer several files, the command will merge them. You can also redirect output to another file using the ">" symbol. If you only need to print a certain number of lines, use the -n option ( N umber).
3. cd
Allows you to move from the current directory to the specified one. If run without parameters, it returns to the home directory. A call with two dots returns one level up from the current directory. Calling with a dash (cd -) returns to the previous directory.
4.pwd
Prints the current directory to the screen. This may be useful if your Linux command line does not output such information. This command will be useful in Bash programming, where a script is executed to obtain a link to a directory.
5.mkdir
Creation of new directories. The most convenient option is -p ( P arents), allows you to create an entire subdirectory structure with one command, even if they do not exist yet.
6. file
Shows the file type. IN Linux files you don't always have to have extensions to work with them. Therefore, it is sometimes difficult for the user to determine what kind of file is in front of him. This little utility solves the problem.
7.cp
Copying files and directories. It does not copy directories recursively by default (that is, all subdirectories and all files within subdirectories), so be sure to add the -r option ( R ecursive) or -a ( A rchive). The latter includes a mode for storing attributes, owner and timestamp in addition to recursive copying.
8.mv
Moving or renaming files and directories. It is noteworthy that in Linux this is the same operation. Renaming is moving a file to the same folder with a different name.
9.rm
Deletes files and folders. A very useful Linux command: with its help you can clean up all the mess. If you need recursive deletion, use the -r option. However, be careful: of course, in order to damage the system you will need to seriously try, but you can delete your own important files. Rm does not delete files to the recycle bin, from which everything can then be restored, but completely erases them. Operator actions rm irreversible. Believe me, your excuses like “rm ate my coursework” will not be interesting to anyone.
10.ln
Creates hard or symbolic links to files. Symbolic or soft links- this is something similar to shortcuts in Windows. They provide convenient way access to a specific file. Symbolic links point to a file but do not have any metadata. Hard links, unlike symbolic links, point to physical adress the area of the disk where file data is stored.
11.chmod
Changes file permissions. These are read, write and execute. Each user can change the permissions for their files.
12. chown
Changes the owner of a file. Only the superuser can change owners. To change recursively, use the -R option.
13.find
Search the file system, files and folders. This is a very flexible and powerful Linux command, not only because of its sniffer abilities, but also because of its ability to execute arbitrary commands on the files it finds.
14. locate
Unlike find, the locate command searches the updatedb database for filename patterns. This database contains a snapshot of the file system, making searching very fast. But this search is unreliable because you can't be sure that nothing has changed since the last snapshot.
15. du
Shows the size of a file or directory. The most useful options: -h ( H uman), which converts file sizes to an easy-to-read format, -s ( S ummarize), which outputs minimal data, and -d ( D epth), which sets the depth of recursion across directories.
16.df
Disk space analyzer. By default, the output is quite detailed: all file systems are listed, their size, amount of used and free space. For convenience, there is an option -h, which makes the dimensions easy to read.
17.dd
As stated in the official manual, this is a terminal command for copying and converting files. Not a very clear description, but that's all dd does. You give it a source file, a destination, and a couple of additional options. It then makes a copy of one file to another. You can specify the exact size of the data to be written or copied. The utility works with all devices. For example, if you want to overwrite HDD zeros from /dev/zero, you can do this. It is also often used to create LiveUSB or hybrid ISO images.
18 mount/umount
These are the Linux console commands for connecting and disconnecting file systems Linux. You can connect everything: from USB drives, to ISO images. And only the superuser has the rights to do this.
Linux console commands for working with text
19. more / less
These are two simple terminal commands for viewing long texts that do not fit on one screen. Imagine a very long command output. Or you called cat to view a file and your terminal emulator took a few seconds to scroll through all the text. If your terminal doesn't support scrolling, you can do it with less. Less is newer than more and supports more options, so there's no reason to use more.
20. head/tail
Another pair, but here each team has its own area of application. Head prints the first few lines of the file (head), and tail prints the last few lines (tail). By default, each utility outputs ten lines. But this can be changed using the -n option. Another useful option is -f, which is short for f ollow (follow). The utility constantly displays changes in the file on the screen. For example, if you want to monitor a log file instead of constantly opening and closing it, use the tail -nf command.
21. grep
Grep, like other Linux tools, does one thing, but it does it well: it searches for text based on a pattern. By default it accepts standard input, but you can search in files. The pattern can be a string or a regular expression. It can display both matching and non-matching strings and their context. Any time you run a command that produces a lot of information, you don't need to parse everything manually - let grep do its magic.
22.sort
Sort lines of text by various criteria. The most useful options are: -n ( N umeric), by numeric value, and -r ( R everse), which reverses the output. This can be useful for sorting the output of du. For example, if you want to sort files by size, simply combine these commands.
23.wc
Linux command line utility for counting words, lines, bytes and characters.
24. diff
Shows the differences between two files in a line-by-line comparison. Moreover, only the lines in which differences are found are displayed. Changed lines are marked with the symbol "c", deleted ones with "d", and new ones with "a".
By the way, I have prepared another detailed article, which describes it using the terminal.
Linux commands for managing processes
25. kill/xkill/pkill/killall
Serve to terminate processes. But they accept different parameters to identify processes. Kill needs the PID of the process, xkill - just click on the window to close it, killall and pkill take the name of the process. Use the one that is convenient in a certain situation.
26.ps/pgrep
As already mentioned, to kill a process, you need its identifier. One way to get it is with the ps utility, which prints information about running processes. By default the output is very long, so use the -e option to see information about a specific process. This is only a snapshot of the state at the time of the call and the information will not be updated. The ps command with the aux switch displays complete information about processes. Pgrep works like this: you give the process a name, and the utility displays its ID.
27.top/htop
Both commands are similar, both display processes and can be used as console system monitors. I recommend installing htop if your distribution doesn't come with it by default, as it is an improved version of top. You can not only view, but also control processes through its interactive interface.
28. time
Process execution time. This is a stopwatch for program execution. Useful if you are interested in how far your implementation of an algorithm lags behind the standard one. But despite its name, it will not tell you the current time; use the date command for this.
Linux user environment commands
29.su/sudo
Su and sudo are two ways to accomplish the same task: run a program as a different user. Depending on your distribution, you probably use one or the other. But both work. The difference is that su switches you to another user, while sudo only runs the command on their behalf. Therefore, using sudo will be the safest option to work with.
30. date
Unlike time, it does exactly what you'd expect it to do: print the date and time to standard output. It can be formatted depending on your needs: display year, month, day, set 12 or 24 hour format, get nanoseconds or week number. For example, date +"%j %V" will output the day of the year and week number in ISO format.
31. alias
The command creates synonyms for other Linux commands. That is, you can create new commands or groups of commands, as well as rename existing ones. This is very useful for shortening long commands that you use frequently, or creating clearer names for commands that you use infrequently and cannot remember.
32. uname
Displays some basic information about the system. Without parameters, it will not show anything useful except the Linux line, but if you set the -a parameter ( A ll), you can get information about the kernel, hostname and processor architecture.
33.uptime
Tells you the operating time of the system. Not very significant information, but can be useful for random calculations or just for fun to find out how long ago the server was rebooted.
34. sleep
You're probably wondering how you can use it. Even without Bash scripting, it has its advantages. For example, if you want to turn off your computer after a certain period of time or use it as an impromptu alarm.
Linux Commands for User Management
35. useradd/userdel/usermod
These Linux console commands allow you to add, remove, and change user accounts. Chances are you won't use them very often. Especially if it's home computer and you are the only user. You can also manage users using GUI, but it's better to know about these commands just in case.
36. passwd
This command allows you to change the password account user. As a superuser, you can reset everyone's passwords even though you can't see them. It is a good security practice to change your password frequently.
Linux commands to view documentation
37.man/whatis
The man command opens a manual for a specific command. There are man pages for all basic Linux commands. Whatis shows which manual sections there are for a given command.
38. whereis
Shows the full path to the program's executable file. It can also show the path to the sources, if they are in the system.
Linux Commands for Network Management
39.ip
If the list of Linux commands for network management seems too short to you, you are most likely not familiar with the ip utility. The net-tools package contains many other utilities: ipconfig, netstat and other outdated ones, like iproute2. All this is replaced by one utility - ip. You can view it as a Swiss army knife for networking or as an incomprehensible mass, but either way, it is the future. Just deal with it.


 Key Specifications")


")


