Hello.
Setting up a router is quite simple and quick, but sometimes this procedure turns into real "ordeals" ...
The TP-Link TL-WR740N router is a fairly popular model, especially for home use... Allows you to organize a home local network with Internet access for all mobile and non mobile devices(phone, tablet, laptop, stationary PC).
In this article, I wanted to give a small step by step instructions on setting up such a router (in particular, we will touch on the Internet settings, Wi-Fi and local network).
Connecting a TP-Link TL-WR740N router to a computer
The connection of the router to the computer is standard. The scheme is something like this:
- disconnect the cable of the internet provider from network card computer and connect this cable to the Internet socket of the router (it is usually marked in blue, see fig. 1);
- then connect with a cable (which comes with the router) network card of a computer / laptop with a router - with a yellow socket (there are four of them on the body of the device);
- connect the power supply to the router and turn it on to the 220V network;
- actually - the router should start working (the LEDs on the case will light up and start blinking);
- then turn on the computer. When the OS is loaded, you can proceed to the next configuration step ...
Rice. 1. Back view / front view
Entering the router settings
For this, you can use any modern browser: Internet Explorer, Chrome, Firefox. Opera, etc.
Login parameters:
- Settings page address (default): 192.168.1.1
- Login for access: admin
- Password: admin
Important! If you cannot enter the settings (the browser gives an error that the password is incorrect), the factory settings may have been knocked down (for example, in a store). There is a reset button on the back of the device - hold it down for 20-30 seconds. As a rule, after this operation, you can easily enter the settings page.
Setting up Internet access
Almost all of the settings you need to make on your router will depend on your ISP. Usually, all the necessary parameters (logins, passwords, IP addresses, etc.) are contained in your agreement drawn up when connecting to the Internet.
Many Internet providers (for example: Megaline, ID-Net, TTK, MTS, etc.) use a PPPoE connection (I would call it the most popular).
If you do not go into details, then when connecting PPPoE, you need to know the password and login for access. In some cases (for example, MTS), PPPoE + Static Local is used: i.e. you will get access to the Internet when you enter your username and password, but the local network needs to be configured separately - you need an IP address, mask, gateway.
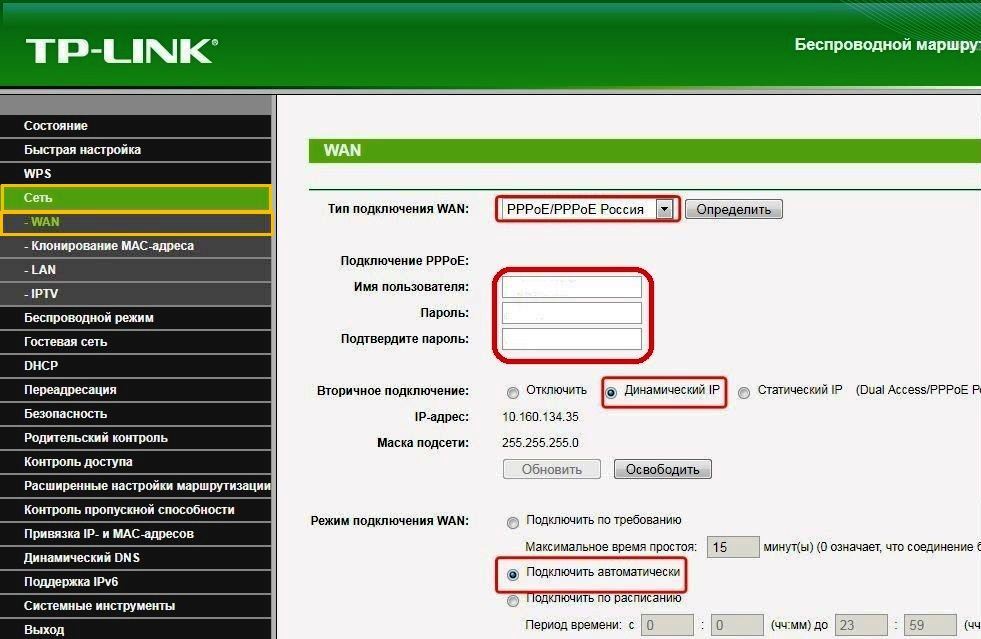
In fig. 3 shows the page for configuring Internet access (section: Network - WAN):
- Wan connection type: specify the type of connection (for example PPPoE, by the way, the type of connection depends on further settings);
- User name: enter your login to access the Internet;
- Password: password - // -;
- if you have a "PPPoE + Static Local" scheme, then specify Static IP and enter the IP addresses of the local network (in other cases, simply select dynamic IP or Disabled);
- then save the settings and reboot the router. In most cases, the Internet will already work (if you entered your password and login correctly). Most of all "problems" happen with setting up access to the local network of the provider.
Rice. 3. Setting up a PPOE connection (used by providers (for example): TTK, MTS, etc.)
By the way, pay attention to the Advanced button (Fig. 3, "advanced") - in this section you can set DNS (in cases where they are required to access the provider's network).
Rice. 4. Advanced PPOE settings (needed in rare cases)
If your ISP binds to MAC addresses, then you need to clone your MAC address of the old network card (through which you previously accessed the Internet). This is done in the section Network / MAC Clone .
Rice. 5.cloning the MAC address is necessary in some cases (for example, the MTS provider at one time bind to MAC addresses, as they have right now - I don't know ..)
By the way, for example, I made a small screenshot of the Internet settings from Billine - see fig. 6.
The settings are as follows:
- connection type (WAN connection type) - L2TP;
- password and login: take from the contract;
- Server IP address (server IP address): tp / internet.beeline.ru
- after that, save the settings and reboot the router.
Rice. 6. Setting up the Internet from "Billine" in the TP-Link TL-WR740N router
Wi-Fi network setup
For Wi-Fi settings you need to go to the next section:
- - Wireless / setup wi-fi ... (if English interface);
- - Wireless / Setting wireless mode(if the Russian interface).
Next, you need to set the network name: for example, " Auto"(See fig. 7). Then save the settings and go to the section " Protection wireless network » (to set a password, otherwise all neighbors will be able to use your Internet via Wi-Fi ...).
Rice. 8.protection wireless connection- password setting
Connecting to a Wi-Fi network and accessing the Internet
The connection, in fact, is quite simple (I will show it using a tablet as an example).
Going to the Wi-FI settings, the tablet finds several networks. We select our network (in my example Autoto) and try to connect to it. If a password is set, you must enter it for access.
Actually, that's all: if the router is configured correctly and the tablet was able to connect to the Wi-Fi network, then the tablet will also have access to the Internet (see Fig. 10).
In Russia WiFi router TP-Link TL-WR740N was quite popular in the market. And it owes its popularity to the low price - this model was one of the cheapest. Hence the complaints about the poor quality of work, unstable connection and ever-glitching WiFi.
At the same time, the configuration of the TL-WR740N router is no different from other TP-Link Wi-Fi routers. In this manual, we will show you how to set up a TP-Link 740 router to connect to the Internet and television from Rostelecom, Beeline, Dom.Ru and TTK.
Installing and connecting TP-Link TL-WR740N
The IP address of the TP-Link router that is used for the local network, usually either, or. Also, access to the router settings is available at the symbolic address - tplinklogin.net or tplinkwifi.net. You can always clarify this on the sticker located on the bottom of the device case.

Login to enter the router's Wi-Fi setting - admin and the password is - admin... There is only one thing here - I usually change the password to a more complex one when setting up a connection for the first time. In that case, when through the default login and password - you have to do it.

How to set up Internet on TP-Link TL-WR740N
The process of setting up a TL-WR740N router usually starts with configuring its connection to the Internet. To do this, go to the menu Network >>> WAN... So you can see what connection parameters are being used at this moment. At this stage, the main task is to choose the right connection type. If you do not know which type you need to choose for your telecom operator - consult his technical support... Usually, Dom.ru uses the PPPoE protocol, for Beeline - Dynamic IP, Rostelecom usually uses PPPoE in most regions, but in some it can also use Dynamic IP.
PPPoE connection
In the list "WAN connection type" select the item PPPoE / Russia PPPoE... In this case, it is necessary to register the login and password for the connection in the fields below. They are usually attached to the contract so that the client does not lose.

Usually, besides this, nothing else in the Internet connection settings on the TP-Link TL-WR740N router needs to be changed. Just check that the "Connect automatically" flag is checked in the "WAN connection mode" block. Click the "Save" button. Connect the provider's cable to the router and you can check the Internet connection.
Dynamic IP connection
If the provider uses the connection type Dynamic IP(it can also be called DHCP), then to configure it is enough just to correctly select this type of connection in the section Network >>> WAN..

Usually no additional parameters are required! By the way, the new router out of the box is already configured for such a connection! You just need to connect the provider's cable to it and it will be able to connect to the Internet by itself. Click the Save button and check the Internet connection.
Setting up WiFi on the TL-WR740N router
Wireless setup WiFi networks on TP-Link TL-WR740N is performed in the following order. First you need to open the menu item Wireless mode >>> Settings:

In the "Network name" field, enter the name of the wireless network - that is, write here what your Wi-Fi will be called. To do this, use any word or phrase in English.
"Region" is usually already set correctly - "Russia".
Set the WiFi channel width to TL-WR740N 40 MHz in the case when you need high speed... If you need a large network coverage radius, leave the value 20 MHz.
Click on the "Save" button.
Now we need to open the section Wireless Security... Here you can configure the WiFi password for the TL-WR740N:

Here put the flag on the line WPA-PSK / WPA2-PSK (Recommended) and write these parameters:
Version - WPA2-PSK Encryption - AES PSK password - enter a password of at least 10 characters here
Do not touch anything else and click on the "Save" button. After that, you need to connect a laptop or phone and check the availability of WiFI on the TP-Link 740.
Comment: If there is a WPS section in the menu, be sure to go there and disable this function, as it poses a very big threat to network security.
How to set up IPTV television on TP-Link TL-WR740N
If you want to set up digital TV on a TP-Link TL-WR740N router, you will need to ask the provider's technical support for the settings for this service. Usually at Dom.ru, TTK and Beeline it is quite simple separate one LAN port to connect an STB set-top box. To do this, go to the section Network >>> IPTV.
Attention! If you do not have an IPTV item in the router configuration menu at all, update its firmware (below in the instructions we will tell you how to do this).

Activate the "IGMP Proxy" mode. Below, in the "Mode" field, put the value "Bridge" and select the port for IPTV - "LAN4". Click the "Save" button. Now you need to connect your TV box to TL-WR740N and check the service.
There are times when IPTV setup on TL-WR740N implies the need to register the VLAN number on the router. This scheme is often used by Rostelecom). Then in the line "Mode" put - 802.1Q Tag VLAN:

In the parameters below, check the box Disable Vlan TAG for Internet... In the line "Multicast VLAN identifier for IPTV service" enter the VLAN ID number that you learned from technical support. In the line "Priority of Multicast VLAN for IPTV service" put the number "4". At the very bottom of the page, find the line "LAN4 port operation mode" and put the value "IPTV" in it.
How to open a port on TP-Link TL-WR740N
In order to open ports on the TP-Link TL-WR740N router for games or video surveillance (that is, to make the so-called port forwarding), go to the menu section Forwarding >>> Virtual Servers:

To add a port to the list of open ports of a TP-Link router - click on the "Add" button. This menu will appear:

In the line "Service port" and in the line "Internal port" you need to write the port number that you want to open on the TP-Link 740 router. Next, write down the IP address of the computer to which we are forwarding ports. In the line "Protocol" it is more optimal to put the value ALL. Otherwise, you will have to separately open the port for TCP and UDP. Click the Save button.
TP-Link TL-WR740N Firmware
If you need to poll TP-Link 740 router and update the router software, first download latest version Software of the manufacturer's official website. Download TP-Link firmware TL-WR740N is possible.
Once the file has been downloaded, unpack it from the archive if it is in zip or rar format. Then in the web interface open the menu item System Tools >>> Firmware Update:

Click on the "Select file" button to show the device where the file with software and click on the "Update" button. After that, the firmware of the TL-WR740N router will start. However, you cannot turn off or reboot the router. The process itself takes about 2 to 10 minutes, after which the router will reboot. This usually does not reset the settings.
Changing the settings access password
After configuring the TL-WR740N router, do not forget to change its factory password admin to something of your own, more complex. This must be done to ensure the safety of your home network... To change the password of TP-Link 740 router, open the menu section System Tools >>> Password:

At the top of the window, write down the username and password that are currently in use. But below you will need to specify a new password and its confirmation in the appropriate field. We save the settings of the router. After that, it is advisable to restart it.
TP-Link routers are one of the most common devices on the domestic market. The popularity of products from a Chinese manufacturer is due to optimal ratio prices, quality and reliability in work. And TP-Link's WR740n model, with support for both modern and past network connection standards, providing data transfer speeds of up to 150 Mbps and reliable protection against possible attacks from the outside, has become an excellent solution for building a home network.
TP-Link's WR740n router is a high-speed router based on 802.11n technology and is compatible with all devices supporting IEEE 802.11b / g standards. Its distinguishing feature from models based on these standards is a higher data transfer rate and a several times increased radius of the wireless network coverage. This allows you to watch streaming video, use IP-telephony and play online games without any problems. Thus, TP-Link WR740n combines the capabilities of a modern high-speed router with a budget price.
Appearance
 The design of the WR740n model is implemented in accordance with the classic device standards from TP-Link. The device is enclosed in a stylish plastic case with rounded edges. The narrowed front end and the harmonious combination of the black strip of the indicator panel with the matt white color of the rest of the case give it elegance.
The TP-Link WR740n indicator panel is not signed, but this does not make it difficult to determine their purpose. All indicator windows are made in the form of pictograms that are intuitive even for a novice user. From left to right, the panel contains:
- power indicator;
- built-in self-test indicator. Should flash during normal operation;
- Wi-Fi module;
- LAN ports (four indicators);
- indicator of connection of wireless devices;
- QSS function indicator.
 On the back side of the device there are four ports for connecting via a local area network (LAN), and one WAN port for connecting the provider's cable. To avoid confusing LAN and WAN connectors, the WAN port is color coded. On either side of the ports are a connector for a power supply, an on / off button and a non-removable Wi-Fi antenna, and on the other side - a WPS / RESET button.
On the bottom of the case there is a cooling grill and holes that allow you to fix the device to the wall. There are no more ventilation devices on the case, therefore, when installing it, care must be taken to ensure that there is a gap between the bottom and the surface adjacent to it.
In the center of the bottom of the router there is an information sticker with the main parameters of the device.
Connection and preparation for work
Before proceeding with the settings of the TP-Link WR740n, you need to choose a location for its location. It is best to place the router in the center of the room so that the distance to it from the farthest corners is approximately the same. It should also be borne in mind that walls, doors and ceilings containing metal elements interfere with signal propagation. The same applies to household electrical appliances: they are not recommended to be located near the router.
 Having chosen a place for the location of the router, you need to do the following:
- Connect the cable from the provider to the WAN port on the back of the device. If you access the Internet via a DSL connection, one of the LAN ports of the router must be connected to the LAN port of the modem.
- Connect TP-Link WR740n to your computer with a cable through one of the LAN ports.
- Power up the device.
This completes the connection of the TP-Link TL router model WR740n and its preparation for work.
Settings
Like other devices of the same purpose, the WR740n is configured via the web interface. To enter it, it is necessary that the computer and the router are in the same address space. In the overwhelming majority of cases, you do not need to do anything specifically for this, since in TP-Link devices, by default, the DHCP server mode is activated, which automatically assigns an IP address to all connected devices. It remains only to check that in the settings network connection automatic IP acquisition was set on the computer.
 In order to enter the settings of the TP-Link router, you must:
- In the address bar of your browser, type 192.168.0.1.
- In the window that appears, enter admin in the "login" line and then specify the password in the "password" line. The default username and password in TP-Link routers are identical.
The TP-Link WR740n router has been released for a long time and has undergone a number of changes. There are currently six modifications of this model. Therefore, in older devices, the default address is 192.168.1.1. You can find out for sure from the sticker on the bottom of the router case.
Automatic tuning
For users who are uncertain about owning a computer, or who do not want to delve into the intricacies of its functioning, the manufacturer provides the ability to configure tp-link tl wr740n routers in automatic mode... For this purpose was created special program supplied with the router on CD.
To use it, you need to take the following steps:
- Insert the CD into the drive and wait for the setup wizard to start automatically.
- Select TP-Link WR740n from the list of offered models and go to the quick installation assistant in the drop-down list.
- Do not make the next two steps, go to the "Next" button.
- At the “Configuring the router” step, enter the authorization data received from the provider.
- Reboot the router for the settings to take effect.
Automatic configuration of the router is also possible using universal utility Easy Setup Assistant designed specifically for TP-Link devices. After launching it, it is enough to click on the "Next" button for the program to automatically guide the user through all the steps of configuring the router. The whole process is accompanied by a demonstration detailed instructions on connecting and configuring the router.

Manually connect to the internet
To connect to the Internet in manual mode, you need to go to the "Network" section in the WR740n web interface and select the "WAN" subsection there. If you use a dynamic IP to connect to the network, just select it in the "WAN connection type" line and save the settings. The Internet should work. In other cases, the settings may differ from provider to provider.
Dom.ru and Rostelecom
Internet connection setup for TP-Link routers is the same for these popular providers. It can be done in a few simple steps:
- From the main menu of the WR740n settings, go to the WAN subsection as described above.
- Set as PPPoE connection type.
- In the next lines, enter the username and password provided by the ISP.
- Check the "Disable" checkbox in the "Secondary connection" line.
- Check the box next to “Connect automatically” in next line.

After completing the settings, you must click on the "Save" button at the bottom of the window. After a few seconds, refresh the page and make sure that the Internet connection is established.
Beeline
The Beeline operator uses a VPN connection when providing Internet services, so the TP-Link WR740n setting in this case has its own peculiarities. It is carried out as follows:
- Enter the WAN settings section in the same way as in the previous case.
- Set as L2TP connection type.
- Enter your username and password on the following lines.
- Check the "Dynamic IP" radio button.
- In the next line, enter the address of the Beeline VPN server: tp.internet.beeline.ru.
- Save the settings made by clicking on the corresponding button at the bottom of the page.
- After a short pause, click on the "Connect" button located immediately below the login and password lines.
If all the settings have been made correctly, the Internet connection will be established.
NetByNet
A feature of the NetByNet provider is that when connected to the Internet, it is bound by the MAC address. Therefore setting TP-Link router is carried out as follows: 
- In the main menu TP-Link settings WR740n in the "Network" section go to the subsection "Cloning the MAC address".
- In the window that opens, in the line "WAN MAC address" specify the address registered with the provider, or clone it from your computer.
- Go to the "WAN" subsection.
- Set connection type PPPoE.
- Enter your username and password.
- In the line "Secondary connection" check the "Dynamic IP" radio button.
- Install automatic connection in the next parameter.
- Save settings and reboot your TP-Link.
This completes the configuration of TP-Link WR740n for NetByNet.
Regardless of the provider, once the TP-Link TL WR740n has been configured, it is no longer possible to start a high-speed connection in Windows. WAN access is now fully router controlled. Therefore, it is recommended that you also clear the routing table in your operating system.
Backup connection via 3G, 4G
Currently, many users use Internet access as a backup Internet connection. mobile operator... But to set up such a connection for a home network, you need a router equipped with a USB port. The WR740n model is not suitable for this purpose, since such a connector is not provided in it.
Wireless network
In order to configure a wireless network in WR740n, you need to go to the "Wireless" tab in the web interface of your TP
("Wireless mode") and select the item "Wireless settings" there. Then you need to configure the following parameters: 
- In the "Network name" field, specify the desired name for your wifi connection or leave what is present there by default. It is recommended, however, to come up with your own name to make it easier to find your network among other available wireless connections.
- In the line "Region" select your country from the drop-down list.
- Save changes by clicking on the corresponding button.
Now you can proceed to the next step of Wi-Fi setup. To do this, you need to move to the subsection "Wireless Security", then do the following: 
- Uncheck the Disable Security radio button, if installed. Leaving this option on gives free access to the network for anyone within range of a Wi-Fi signal.
- Mark WPA-Personal / WPA2-Personal as active.
- In the PSK Password field, enter the desired password for connecting to Wi-Fi. It must contain at least eight Latin characters.
This completes the configuration of the wireless network on the WR740n from TP-Link.
Configuring in repeater (repeater), amplifier, adapter or access point mode
In cases where the existing coverage of the wireless network is not enough for the needs of users, it becomes necessary to expand it in some way. To do this, to the main device distributing Wi-Fi). Many Wi-Fi routers are used in this capacity, including TP-Link.
This requires:
- Assign a static channel number on the main device in the wireless network configuration (the default is "Auto").
- Change the IP address to the WR740n designed for use as a client. This is necessary to avoid conflict with the main device. However, they must remain in the same address space.
- In the "Wireless Settings" section, set the name of the second network and assign a static channel number. It must match the channel number on the main router.
- Check the box next to Enable WDS.
- In the new lines that open, in the SSID item, enter the name of the network to which you plan to connect.
- By clicking on the "Search" button, select from the list of available wireless networks the one with which you plan to establish a connection and click on the "Connect" link.
- Configure network protection by entering the encryption type and password similar to the one described in the previous section.
- Restart WR740n.

Alternatively, flash TP-Link WR740n using DD-WRT alternative firmware with repeater mode. but experienced users do not recommend using TP-Link products for this purpose.
IPTV
Currently, most providers, along with the Internet, also provide the service digital television IPTV. The WR740n firmware includes support for it. To configure this feature, you must:
- In the "Network" section, go to the "IPTV" subsection.
- In the mode line, select "Bridge" from the drop-down list.
- In the additional field that appears, select the LAN port to which the set-top box will be connected.
- Save changes.
That's it, the IPTV function on TP-Link is configured.

Individual settings for user connection
This functionality in TP-Link models The WR740n is missing.
Dynamic DNS
Users hosting their website or FTP server outside the router may need Dynamic DNS. With its help it is possible to assign a permanent node name and Domain name dynamic IP address. With TP-Link WR740n at its disposal, it is very easy to do this, since this function is implemented there.
To obtain dynamic DNS, necessary:
- In the main menu of the WR740n go to the section with the same name.
- Select the DDNS service provider from the drop-down list.
- Enter the username and password provided by the provider and enter the domain name.
- Check the "Enable DDNS" checkbox.
- Save changes.

In the future, enter and exit the DDNS mode using the "Enter" and "Exit" buttons.
Security Settings
To prevent possible attacks on the network from the outside, tp-link routers provide a fairly flexible system protection in the form of a built-in firewall. To configure it in WR740n, you need to open the Security section in the main settings menu. Here you can perform basic or advanced firewall configuration:
- enable or disable the firewall (it is enabled by default);
- configure permissions for VPN tunnels;
- configure ALG gateway parameters.
In the advanced protection settings, it is possible to configure Extra options security, in particular, protection against DoS attacks and other settings.
Parental control
For those who need to monitor the presence of a child at the computer and their activity on the network, the WR740n provides a parental control function.

To change its parameters, you need to enter the section of the same name from the main menu and do the following:
- enable / disable parental control function;
- add / remove rules for the selected resources and configure the schedule for their action.
All bindings for rules are made by the MAC address of the child's computer.
Changing the function of the buttons
This feature is not available on the WR740n.
DLNA setup on the router
This feature requires a USB port on the router, which the WR740n does not have.
Setting up a VPN server
The WR740n works with VPN connections only as a client.
Setting up a torrent client on a router
Many users would like to have such an opportunity, but this is unrealistic on the WR740n stock firmware. Pay attention to alternative firmware that are in sufficient quantity on the Internet. But their use is allowed only at your own peril and risk, without any guarantees of the correct operation of the device.
Setting up the printer
Model WR740n from TP-Link does not have the ability to configure the printer in its functionality. However, if you use a network printer with its own IP address for printing, the router will provide access to it just like other devices on the network. It is carried out using a cable connection, and if the printer has Wi-Fi support, then via a wireless network.
Possible malfunctions and ways to eliminate them
Although the WR740n is a reliable device that can function smoothly for many years, it also fails. Basically, they are associated with mistakes made during the configuration of the router.
Most frequent problems in the operation of the device, which users complain about, there are: 
- Unstable wireless network performance and low speed downloading through it. In this case, the wired network is working normally. Changing the Wi-Fi channel can help solve this problem.
- Unable to connect to the WR740n web interface at 192.168.0.1. Most likely, the reason for this situation is changing the IP address of the router to work in a different address space. If it is not possible to install it, a rollback to the factory settings will help.
- Devices on the network do not see Wi-Fi. This might be because the wireless network is disabled on the router. Therefore, you need to connect to it via a wired network and turn on Wi-Fi in the web interface. If everything is active there, check the network connection parameters on remote devices, in particular, the correct installation of the wireless adapter drivers.
- Frequent loss of internet connection occurs. Updating the WR740n's firmware may help resolve this issue.
If none of the above methods solve the problem, the problem may be due to physical damage devices. In this case, it is better to contact the service center.
Firmware upgrade
Keeping the firmware up to date is important point in ensuring reliable operation of TP-Link WR740n. It is recommended to update it immediately after purchasing the device before the initial configuration. To do this, you need to download the latest firmware from the TP-Link official website. Install new firmware can be done in two ways.
Through the web interface
 This is the easiest way to update the firmware, which requires:
- In the main menu, go to the "System Tools" section and select "Firmware Update" there.
- In the window that appears, open the explorer using the "Browse" button and specify the path to the previously downloaded firmware file.
- Click on the "Update" button.
After the performed actions, the firmware will be updated, after which the router will automatically reboot.
Via mobile app
If you don't have a computer or laptop at hand, and you really need to set up the WR740n, you can do it using your tablet or smartphone. For this, TP-Link has developed a special mobile app called TP-Link Tether. It is supported by devices under Android or IOS and is available for download at Google play and the App Store.
TP-Link Tether has user-friendly interface and many functions. With its help, the same actions are carried out as in the usual order through the web interface. However, there is no function for updating the firmware yet. But the development of the utility continues and it is likely that such an opportunity will appear in future versions.
Via USB device
This function is not available because the router does not have a corresponding connector.
Resetting the router settings to factory defaults
There are situations where the WR740n starts working with errors that cannot be corrected standard ways, or the password for accessing the device has been lost. In this case, resetting the router to the factory parameters helps; this is done in two steps: 
- Power on the device.
- Press and hold the WPS / RESET button on the back of the router for at least 10 seconds.
All indicators on the front panel of the WR740n will light up to indicate that the operation was successful. Then release the WPS / RESET button.
If access to the web interface of the router is not lost, reset to factory settings is carried out when you go to the section of system tools to the corresponding item and when you click on the "Restore" button.
Conclusion
Obviously, TP-Link's TL WR740n Router is recommended for home wireless or small office networking.
pros
The advantages of the device include: 
- affordable price;
- ease of customization;
- multifunctionality;
- uninterrupted work.
In this article, we will take a closer look at how tp link tl wr740n router configuration... This type of router is very common and is in enviable demand due to the combination of democratic cost and high-quality technical characteristics.
A feature of the router is its direct purpose - use only for home networks. This is important to consider: if the area of the house is large enough or the number of devices connecting simultaneously to the wr 740 n router is large, then it may not be able to cope.
Despite this and other disadvantages, the router has proven itself excellent. He possesses:
- Neutral design;
- Execution in matte, discreet colors;
- Wall mount option;
- The simplicity of the configurations is what interests us.
Let's go directly to the points of concern to us today - connection, network configurations, wi-fi, etc. Before starting, we note important detail: if the setting has already been carried out, then you must first drop the parameters. For this purpose, it is recommended to hold down the "Reset" button for 10-15 seconds when the power is on.
Connecting a tp link tl wr740n router to a computer with a cable
Let's figure it out in detail with how to connect a wr740n router by means of a cable. The first step is to connect the power adapter to the unit. After that, we plug the adapter into the electrical network. Now we plug the cable of the Internet provider into the connector marked in blue, called the WAN.

Back panel of tp link wr740n router

Cable for connecting the router to a PC or laptop, usually bundled with a router

Physical connection diagram
When connecting via ADSL, the wr740n router connects directly to the modem. In this case, the correspondence of the slots should be as follows: WAN to LAN.
supplied with wr740n. We select the WAN connector and connect the router and computer with a cable.
Configuring tp link tl wr740n router
After making the connection, it's time to think about how configure router tp link tl wr740n... If necessary, you can install the latest firmware. To do this, it is recommended to contact network resource in advance and download the necessary files.
Important! If for the implementation of the connection it was required to launch the high-speed option, now there is no need to: it will be installed by the router after configuration. It is also important to consider that in cases where the Internet functions through a wr740n router without launching a variety of environments and protocols, the service provider uses dynamic ip technology. In this case, configuration is required only for the purpose of creating a wireless network.
To solve this problem, it is necessary to consider the basic settings of the tp link wr740n router. Let's turn to the address bar of any available browser and enter the numeric combination - 192.168.0.1. Often, instead of 0, you need to enter 1, because older router models support exactly the combination with 1. Standard password and login to enter the configuration menu - admin / admin

login and password on the back of the router

browser address bar, copy and enter http://192.168.0.1 or http://192.168.1.1. and you will enter the router interface
Let's consider in detail, how to set up a tp link wr740n router for different types protocols. To correctly configure the equipment, it is recommended to first check with the service provider the necessary data: username, login combination - password, ip, etc.

Login and password entry window. Usually admin / admin


Referring to the settings menu, select the item "Network", then "WAN". In the section "connection type" or "Connection type" select the value "PPPOE / Russia PPPOE". You will also need to specify user data - username and password, followed by confirmation.
After filling in the required fields, you will need to set confirmation opposite the "Dynamic ip" and "Connect automatically" (or dynamic ip and connect automatically) fields.
PPPOE with static IP


PPPOE with static IP-address, register the IP-address
Let's consider how to set up a connection PPPOE with static ip address in the wr740n router. The order is the same, only instead of "Dynamic ip" you will need to select "Static" or "Static ip". Additionally, you will need to specify the IP address and subnet mask directly.
As already noted, the provider must provide you with all the data referred to in the article.
PPTP connection setup
To configure the wr740n router to work with PPTP, we turn to the “Network” menu again, and then go to the “WAN” tab. Having chosen the option already familiar to us, but for the PPTP protocol - "Russia PPTP", we indicate other necessary data - username, password, server address.
Other values are set by analogy with PPPoE protocol.
Important! If the tariff for using network services is a limit one, it is recommended to change the “Connect Automatically” value to “Connect on demand”. This option means the following: the connection is carried out on demand, that is, at the time of the start of use.
Finally - "Save".
PPTP with static IP
The configuration order is the same as for dynamic ip, with one exception - you need to select "Static ip", and then specify the server address and IP address, as well as the subnet mask.
Other parameters are set in the same way as PPPOE.
Configuring L2TP
We work in a way that is already familiar to us:
- "WAN Connection type" - "L2T / Russia L2T";
- Next, we indicate the username and password, its confirmation;
- After that, enter the server address;
- We choose the connection method - automatic, on demand - the one that is necessary based on the tariff plan.
Configuring an L2TP connection with a static IP address
All steps are similar to the procedure for configuring the wr740n router to work with the L2TP protocol, however, you will need to additionally set the values for the subnet mask, aspen gateway, server address, and set a confirmation checkmark in front of the “Static ip” line.
Configuring wi fi connection and password TP-Link TL-WR740N
After the router is configured, it connects to the Wi-Fi. Connecting the tp link wr740n router to a wireless network and the password is set according to the following scheme:
- We open the configuration menu of the router through the address bar, as it was done before, and turn to the “wireless mode” tab;
- Here we can set the name of the network, region;
- Immediately it is mono to organize the protection of our wireless wifi networks... We select the section "WPA / WPA2" - "Personal". Set in order: WPA2-PSK; automatic encryption; do not touch other configurations. Now it remains to come up with your unique password and drive it into the "Wireless network password" field.
Wi-fi password- an important component of the security of the created connection: this way you can exclude unauthorized attempts to hack and intercept data, as well as use your network.
Change Password and Password reset carried out through the same menu.
Connecting a computer to a wi-fi network
When the router is connected and configured, you need to connect your computer to Wi-Fi. To do this, we will carry out a number of actions:
- Find the wireless symbol in the lower corner of the toolbar on the desktop and click on it;
- We select our network from the list of available ones;
- After entering the data (password for access), we select the saving of the network and "automatic connection".
Now configure router tp link wr740n not required: connecting the computer to the network is the final stage.
Conclusion
This article examined the most important nuances and provisions regarding the configuration and connection of the wr740n router, as well as the scheme for setting a password and creating wi-fi networks.
Following the tips and instructions set out by us, you can easily carry out all the necessary procedures with a tp-link router and enjoy the Internet resources at full speed.


 new brushes in Photoshop?")


