In this article, we will talk about configuring user access rights to the objects of the 1C system.
In 1C 8DL, a separate metadata object is used, which is called Roles.
Note! This article is written to help programmers. Setting Rights In User mode using example 1C Accounting is considered in.
The role determines the user's rights set that it has. The mechanism of roles is very similar to Windows rights mechanisms Active Directory.. For each of the objects (directories, documents), the developer sets his own set of rights - read / write / add / change / ...
Set of available rights - a combination of all user roles.
If you open the Metadata Object, we can see the following picture:

The object has two bookmarks - the rights and templates of restrictions. Rights - Basic tab, Templates - Tab to configure rights at the level of recording in 1C ( RLS). This is a very important topic, I will try to describe it in future articles.
We will consider only the tab Rights.
- Objects - The list to which rights will be established.
- Rights - List of possible rights to set the rights.
- Data access restriction - Role fields for configuration
You should pay attention to the ticks at the bottom:
- Establish rights for new objects - If the flag is set by the role, allowing authorizing rights will be automatically installed on new metadata objects. I recommend installing if you often forget to establish rights to new objects.
- Install rights for details and tabular parts by default- Flag when installing which details and table parts will inherit the rights of the owner (directory, document, etc.)
- Independent rights of subordinate objects - If the flag is installed, then the system in determining the right to the configuration object will take into account the rights to the parent object
Settings rights to the entire configuration
If you open a role and click on the configuration root, we will see the following settings:

Read more about each of rights to the whole configuration:
Get 267 video tutorials for 1C for free:
- Administration - Administration information base (Data administration rights are required)
- Data administration - The right to administrative actions on data
- Updating database configuration - right to
- Monopoly mode - Use of monopoly regime
- Active users - View list of active users
- - Log of registration
- - Launch right thin client
- - the right to launch a web client
- Thick client - The right to launch a fat client
- External connection - the right to launch an external connection
- Automation. - the right to use Automation
- "All functions" mode - in managed application mode
- Saving user data - permission or ban on saving user data (settings, favorite, history). Especially relevant for 1C managed forms.
- Interactive opening external treatments - opening external treatments
- Interactive opening external reports - Opening external reports
- Output - print printing, writing and copying to clipboard
Setting the rights of 1C 8.2 to other metadata objects

For the rest of the main objects (directories, constants, documents, registers ...), the role of rights for the role is quite standard:
- Reading - reading (software)
- Addition - Adding (software)
- The change - Change (software)
- Removal - Delete (software)
- View - View
- Interactive addition - Interactive addition
- Editing - Editing
- Interactive removal mark - Interactive Removal Mark
- Interactive Removal Removal Removal - Removing Removal Removal
- Interactive removal of marked- Deleting marked objects
- Entering line - Using the input mode
- Interactive removal - direct removal (SHIFT + DEL)
Rights only for documents:
- Interactive conduct - Conduct
- Cancellation - Cancel of the documents
- Interactive conduct of non-utbitative - Conduct (standard forms) of a document in non-optical mode
- Interactive Cancellation - Interactive Cancellation
- Interactive change of spent - Editing a document conducted. If the role of the role is not set, the user cannot delete the conducted document, set the removal, bope or make it unprecedented. The form of such a document opens in view mode
P.S. If you still failed to figure out user roles, you can order.
Video with an example of setting the rights in 1C Accounting 3.0:
Work in the program 1C allows different users to assign functional access to documents and reference books. For example:
- If the user works as an accountant, then in 1s it is assigned a corresponding role that allows you to add, modify, delete documents and reference books on economic activity.
- If the user 1C works only with the reports and views the database data, let's say, then it is given to reading data.
- A user who can work with all the 1C-Administrator program objects has full rights and receives unlimited access to 1C database.
Access rights can only be configured Administrator - User 1C, which is assigned complete rights.
Setting access rights in 1C 8.3 Accounting 3.0
In 1C: Accounting 8 Ed. 3.0 4 main profiles are highlighted for working with the program:
- Administrator;
- Accountant;
- Chief Accountant;
- Synchronization with other programs;
- Only reading.
To understand the principle of task of rights in 1C, refer to the configurator. When analyzing configuration objects we will see a special branch Rolewhere all the possible access to the data provided by the developers 1C is listed:
Each role corresponds to a set of features for working with configuration objects, it is
- Reading;
- Adding;
- Carrying out;
- Cancellation;
- Editing;
- Removal.
If you open a specified role, then for each object you can view - what can be done with each configuration object:

It is important to know that the 1C user can be assigned any set of roles from the list developers. At the same time, if the object cannot be changed in some role, and in another, the role added to this user can, then the resulting user will be "change". Roles mutually complement each other. In order for the object to be able to be changed by the user, in any of the roles given to him should not stand "Change".
Setting the access rights in 1C 8.3 Accounting
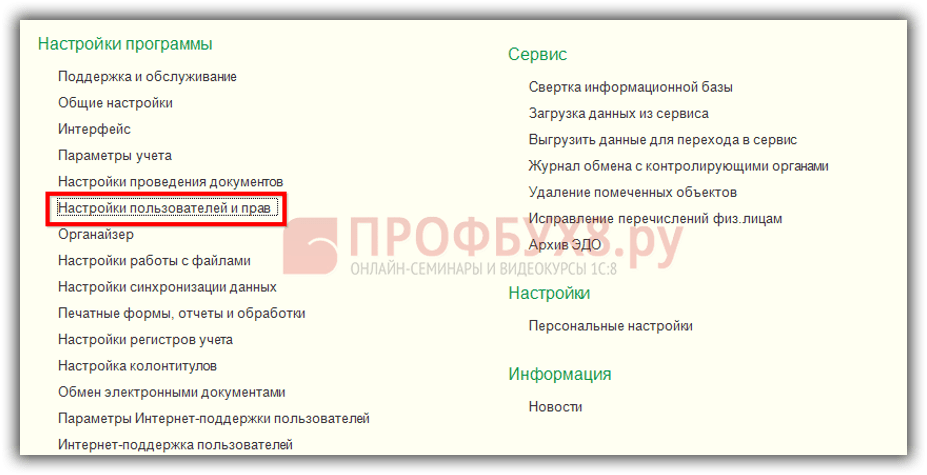
Setting the access rights in 1C 8.3 is carried out in the Administration section - User Settings and Rights:
User settings and rights window opens:

Consider the options for setting up 1C access.
How to create a new user in 1C 8.3

By default, the program 1C exhibits The program is allowed, Shift and the entrance to the program based on 1C login and password. Password can be set independently, but you can suggest to ask it program. As a rule, password, specified program 1C, meets a more serious level of checking and choose such a password when the system hacking is more difficult.
Password needs to remember! If the password is lost, then only the administrator can reboot it again. If passwords are lost and not enter into the database, you will have to "crack" the entrance to the database.
Specialists use a hex editor for this and in the right places change the information responsible for working with users. It is possible to make it possible, but not desirable.
How to configure access rights based on standard profiles in 1C 8.3
Each user (administration - user settings and rights users) assign access rights from the list of profiles, which is in the configuration. For example, for accountant Petrova S.B. We assign a profile accountant:

Here we can transfer the settings to the new user from the user already operating in 1C: setting up functionality, internal report settings, etc., so as not to spend time and not dial everything manually:

We note the settings for transferring a new user Petrova Accountant from the user Administrator:

Transfer Personal Settings, Print Settings and Favorites:

Press KN. Select and in the form of selection of settings "Copy and Close". All settings for the new user from the user administrator are transferred.
Setting access rights with adding new profiles in 1C 8.3
Create a new profile with limited access to reference books and documents. Access Group Profiles - Create:

A new profile is conveniently created by 1C subsystems. For example, for the calculation rights, we can note the following functionality:
- Reflection of salary in accounting;
- Reading taxes and contributions;
- Mutual settlements with employees;
- Personalized accounting;
- Salary accounting:

On kN. Only selected roles The list of selected user roles is shown. Personnel records can be set separately for the personnel profile.
How to set up additional access rights to the already available profiles in 1C 8.3
A specific 1C user with the selected profile can be added functionality. For example, for Petrov's user, in the accountant profile, the team is not available. All functionsBut we can add it to this user. We go to administration - user settings and rights - access group profiles. Kn. Create - Mode All Functions - add rights "All Functions" mode:

Add a new profile by Petrova Petrova S.B.:

Configure additional access rights to individual documents and reference books in 1C 8.3
This setting provides for working with the configuration extension. Suppose you need to configure access to the user 1C to an arbitrary set of documents and reference books. A set of these documents and directories may be different - the developers of 1c cannot provide all options for suitable roles that may be required by users in practice. Moreover, data access requests may be completely extraordinary.
In 1C 8.2, we had to remove the editing of the configuration and add a new role in the role objects, assigning access to the necessary reference books and documents, and, accordingly, there were difficulties with the subsequent update of 1C. Automatically such configurations are no longer updated, so only users of organizations that have in the state of programmers 1C could allow themselves.
In 1C 8.3, in connection with the appearance of a new opportunity to work with configuration applications, we can implement your task to delimit the rights of users without removing the prohibition of editing from the main configuration and leaving it completely typical. How to do it - now and consider:
- For reference book Users We introduce additional details of "access_tovarov", which will take "yes" or "no".
We go to administration - General Settings - Additional details and information. Turn on the ability to work with "details and information with common list values \u200b\u200b":

- Open hyperlink Additional details.
In the left column of the lists of the configuration objects we find Users And click on the book. Add. Opening form fill as shown below. The new props will have two meanings: "Yes" and "no". Combine values \u200b\u200bin the "Access" group. Fill the bookmark Main:

Fill out the value tab:

- Now fill this props for our users.
"Accountant Petrov" - no:

"Administrator" - yes:

All necessary actions in the 1C 8.3 database are made, now we will work with configuration extension.
- We enter the database configurator: Configuration - Configuration Extensions:

Add a new configuration of the CN. +:

We agree with the default expansion data selected or specify their own:

Open the CN expansion configuration. :

Now we will transfer data to work from the main configuration. The created extension of the "Extension 1" configuration is still empty:

In the main configuration, we find in the documents - the implementation of goods and services, and we carry the form with which we will work. For example, add "formadocumentes" to the expansion of the configuration, putting on the name of the form and clicking on it the right kN. Mouse. From the drop-down menu, select the "Add to Extension" command:

We open the form in the configuration expansion and create an event processing Oppose. When creating an event handler, the 1C 8.3 program will ask you to specify where to create a program code. Select: Create on the client and procedure on the server without context:

When creating an event, we will see in an empty sequence of events "overgo" designated by the program 1C 8.3 Event Processing Procedure: "RASCH1_PERNEPIST":

Go to the module of the form and insert the following program code:

We update the changes and run the database in user mode to check the changes made. We enter the user Accountant Petrov and edit a document of the implementation of goods and services, press the KN. Record:

For the administrator, the editing of the document will be held without problems.
The given program code can be put in the 1C 8.3 configuration extension for any document and reference book and this will allow you to not change the typical configuration, but at the same time solve the problem of access to the base objects for different users.
How to provide access to the report version with individual settings For other users in 1C 8.3 ZUP, look in our video:
Here will be told how to add a new user to work in the 1C system: Enterprise 7.7.
1. Adding a user in the configurator
Users in System 1C: Enterprise 7.7 Defined separately for each information base. To add a new user, you must run 1C in mode configuratorBy selecting the desired database.

In the configurator opened, go to " Administration» — « Users» .

A list of users registered in the current database opens. To add a new, go to the menu " Actions» — « New» .

Window opens Properties of users" On the tab " Attributes"Fill:

Now go to the tab " Role"Where choose Set of rights and Interface from the drop-down menu and click " OK» .

Further, we need to do, it is to create a password to log in. To do this, highlight the added user in the list and go to the menu " Actions» — « Change Password" After that, we enter the password twice.

This is completed on this. It remains only to save all changes by selecting " File» — « Save» .

Edit user properties similarly to creating, in the same list.
2. Settings by default values \u200b\u200b(for the configuration "Trade and Warehouse")
If the "Trade and Warehouse" configuration is used, it is possible to determine the default values \u200b\u200bfor the new user.
At the user login, 1C: the company is looking for in the reference book " Users»Element with name, similar to the name of the user specified in the configurator. For example, if the username in the configurator is specified as "onyanov", the element of the reference book must have exactly the same name (including spaces). If the item is not found (for example, when you first log in the system), you create a new position with the same name. And in the message window you can see the appropriate inscription:

In this directory, the default settings are stored, which will be used when entering new documents, opening reports, etc. Throughout the session. To install these values, open the reference book " Users"(Standard common interface « Directories» — « The structure of the company» — « Users") And we find in it the necessary element. Or you can click the button with the image sitting at the computer from under the session this user:

On the tab " Default valuesYou can actually choose these values.

Or by going to the tab " Maintenance"It is possible to choose the user from which the default values \u200b\u200bwill be inherited.

Select the necessary parameters, click " OK»To save results.
Will this article help you?
2016-12-01T13: 37: 17 + 00: 00Proper configuration of the list of users and their access rights to the database 1C: Accounting 8.3 (edition 3.0) is necessary for any number of people working with the program. Even if you only work with her!
This setting allows you to continue to answer such questions as "who made certain changes to the database", "how to give access to the database only to view for the checking", "who allowed the assistant to change the settings accounting Policy"And similar to them.
In the third edition, this setting, in my opinion, became easier and intuitively clearer. Today I will tell you how to better set up users and their rights. I will try to consider the most common case.
So, we will customize the following users:
- Administrator : A user who has full rights to the base and has no restrictions. No need to use this user for daily work. The password from the administrator should be given to programmers and administrators who set up or update the database. Since only they will work under this user - we can always be able to separate their changes in the database from the work of other users. This is useful in the case of "parsing flights."
- Chief Accountant : A user who has rights not less than an administrator, but is an independent role with his password. Under this user you will work you yourself.
- Accountant : If you have helpers or other accountants in submission, then this user is suitable for them. What restrictions imposes this role:
- Ban on changing accounting parameters.
- Ban on changing accounting policies.
- Ban on changing account plan.
- Ban on editing a list of users.
- Ban on setting the accounting accounts of the nomenclature.
- Ban on the removal of elements marked for removal.
- The ban on the change date of the data change.
- Cheating : This user will have only the rights to view the database. He will not be able to change anything in it.
1. Go to the "Administration" section and select "User Settings and Right Settings" ():
2. In the opened panel, select "Users":

3. By default, the user "Administrator" must already be in this list. Make a double click on it to open its settings.

4. Make the setting, as in the figure below. Password come up with yourself - it needs to repeat twice. I draw your attention that each of the users should have your own password. It remains to click "Record and Close". Ready!

Chief Accountant


4. In the Right Settings window, specify the daws next to the "Administrator" and "Chief Accountant" items. It remains to click the "Record" button. Ready!

Accountant
1. Return to the user list and click the Create button on the toolbar.
2. A window opens with a new user. Specify the settings as shown below, only password come up with your own.

4. In the Right Settings window, specify the daws next to the Accountant item. It remains to click the "Record" button. Ready!

Cheating
1. Return to the user list and click the Create button on the toolbar.
2. A window opens with a new user. Specify the settings as shown below, only password come up with your own.

As in 1C Accounting 8.3 Create a user with the rights "Administrator"
When starting the newly created clean, empty information base of 1C Accounting 3.0, the initial window has such a look. Program 1C Accounting It is very unequivocally proposed to begin work with filling out the details of our organization.
We will begin the process of working with our 1C Accounting program with the creation of the first user.
To do this, we go to the "Administration" section - "User Settings and Rights" section, go through the Users hyperlink and click the "Create" button.
Specify the name of our user (Glavbuch). We will not make any other changes. If necessary, you can change the password of this user, but now we will do without it. Click the "Write" button.
Program 1C Accounting 8.3 says that the first user will be automatically added to the Administrators group. We agree with this.
Our user is created. If we move on the "Access Rights" button, we will see that the administrator's profile is assigned to the user.
These actions must be performed in order to in the 1C Accounting program 8.3 just this user with administrator rights and appeared.
In principle, you can work without a user's institution. But some regulatory procedures in our program 1C Accounting 8.3 is performed on behalf of the user with full rights. When this user is not in the program, an ambiguous situation is possible, when such regulatory procedures can be performed. Therefore, it is recommended to start working with the 1C Accounting program 8.3 with a user's institution with administrator access rights.


")


