After installing the Internet Explorer browser, you need to implement it initial setup. Thanks to it, you can increase the performance of the program and make it as user-friendly as possible.
General properties
The initial configuration of the Internet Explorer browser is carried out in the section "Tools - Browser Options".
In the first tab "General" you can customize the bookmarks bar, set which page will be the start page. Various information, such as cookies, is also deleted here. According to user preference, can be customized appearance using colors, fonts and design.

Security
The name of this tab speaks for itself. The security level of the Internet connection is set here. Moreover, you can distinguish between this level of dangerous and safe sites. The higher the level of protection, the more additional features can be disabled.

Confidentiality
Access is configured here in accordance with the privacy policy. If sites do not meet these requirements, you can prevent them from sending cookies. It also sets a ban on determining the location and blocking pop-up windows.

Additionally
This tab is responsible for configuring advanced security settings or resetting all settings. There is no need to change anything in this section, the program automatically sets the necessary values. In case of various errors in the browser, its settings are reset to the original ones.

Programs
Here we can assign Internet Explorer browser default and manage add-ons, i.e. additional applications. From the new window, they can be disabled and enabled. Removes add-ons from the standard wizard.

Connections
Here you can connect and configure virtual private networks.

A very handy feature of this section is family safety. Here we can adjust the work on the Internet for a certain account. For example, deny access to certain sites, or vice versa, enter a list of allowed ones.

The list of certificates and publishers is immediately corrected.

If you enable the autocomplete function, the browser will remember the entered lines and fill them in when the initial characters match.

In principle, the settings of the Internet Explorer browser are quite flexible, but if you wish, you can download additional programs, which will extend the standard functions. For example Google Toollbar (to search through Google) and Addblock (to block ads).
According to most users, Internet Explorer is not the best browser, as it loads pages slowly, for the reason that it only displays the page when it is already fully loaded. But nevertheless, this does not prevent it from remaining one of the most popular browsers in the world (but this is rather for the reason that it is built into Windows and some programs can often depend on it).
Installing Internet Explorer 8
Installing the browser is simple, even a beginner can handle it. Although, in fact, we do not install the browser, but update it. If you want to install the Internet Explorer 8 browser, then most likely you have more old version, such as Internet Explorer 6.
I install programs through the Uninstall Tool program and I advise you to do the same, you never know, suddenly you want to delete it later

We choose whether we want to help or not and click the "Next" button.
It is up to you to decide whether to install updates or not, I personally did not check the box, since I can manually download updates from the official site.

After installation, you will need to reboot. If you installed the browser through the Uninstall Tool program, then you must refuse to reboot, otherwise the Uninstall Tool program simply will not be able to save the data, because the reboot will start immediately. And after the Uninstall Tool has saved the data, reboot.
After the reboot, you can already open the browser (via the start menu) and surf the Internet.
Configuring Internet Explorer 8
After installing the browser, when you open it for the first time, there will be a dialog, so to speak, an assistant - you can choose your preferred settings or close the window, since all these parameters can be configured separately.
The item in the control panel is responsible for setting up the Internet Explorer 8 browser, namely, Internet Options.

So, let's go through some Internet Explorer 8 browser settings.
How to change the Internet Explorer home page?
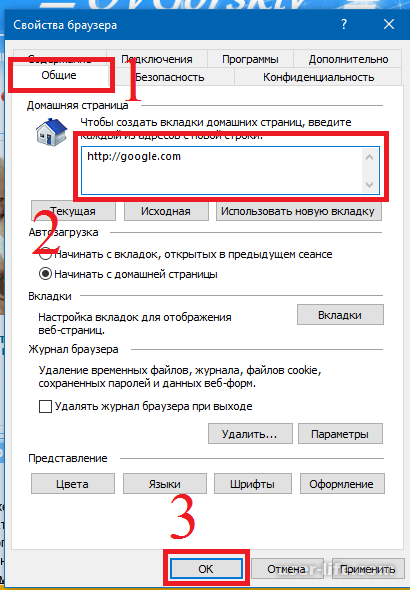
Changing the home page is quite simple, you need to go to the "General" tab (in Internet options), and in the "Home page" field enter the site that you would like to be the home page, but if you want no site to load when you open the browser , then just type about:blank.

In order for the changes to take effect, you must click the "Apply" button.
How to delete Internet Explorer history items?
Sometimes it happens that after viewing Internet sites, you need to delete the history of these sites, that is, so that others do not know which sites you visited (for example, when you chose a gift). This is not so difficult, and can be done in the same tab by clicking on the "Delete" button in the "Delete history" sub-item.
Also, in the window that opens, check the boxes for what needs to be deleted - for example, passwords, temporary files, deleting browsing history.

How to disable pictures in Internet Explorer?
Let's say you have a slow Internet, or for some other reason you need to turn off the pictures so that they are not shown and the Internet is not used up on them (relevant when the traffic is limited or paid).
We go to the tab (in Internet Options) to “Advanced” and a list of many items (checkmarks) opens in front of us, we need to find the “Multimedia” sub-section and uncheck the necessary checkboxes, I personally advise you to uncheck everything if you decide to disable images.

How to change proxy settings in Internet Explorer?
If you need to access the Internet through a proxy, as it happens at work, or if, for example, you want to use a third-party service, such as the Toonel service, then you can specify a proxy server for Internet Explorer through which the browser will work.
To change the browser proxy settings, go to the "Connections" tab in Internet Options and select either the connection you use to connect to the Internet, or click "Network settings" in the sub-item "Settings local network" if you are using the Internet over a local area network.

After that, a window will appear in front of you, in which you need to enter the settings. A proxy usually consists of an ip-address and a port, which must be entered separately.

Using Internet Explorer as the default browser
It happens that for some reason the default browser is not Internet Explorer. In any case, if you want to make the default browser in the system, then you need to go to the "Programs" tab (in the Internet options) and click on the "Set as default" button.

InPrivate mode in Internet Explorer 8
Private mode is convenient when you need to leave no traces when browsing the Internet, this is especially convenient, for example, if you are away from home.
When using the InPrivate mode, there will be no browsing records in the security log, and no form data, cookies, and, accordingly, passwords and logins will be saved.
How to enable InProvate mode? Very simple - you just need to perform a key combination (that is, hold down) Ctrl + Shift + P, after which a private window will open in front of you Internet Explorer.

And all the tabs that you open in this window will also be private, which is quite convenient.
Internet Explorer 8 startup keys
Launching the Browser from the ‘Program Launcher’ Window
It is also possible to launch the IE browser (iexplore.exe process) with keys. To check this, you need to call the 'Start the program' window with the Win + R combination and enter 'iexplore.exe' (without quotes) in the window and if your browser has opened, then you can start Internet Explorer with the keys.
For example, let's start the browser without add-ons, for this we use the -extoff key, that is, we must enter iexplore.exe -extoff.

Launching the browser from the command line (console)
Also, if you wish, you can launch the browser with keys from the command line, however, in this case, you must specify the full path to the browser, an example of launching Internet Explorer from the command line with the "-nohome" key:
"C:\Program Files\Internet Explorer\iexplore.exe" -nohome
This line must be entered in command line, you can call it using the key combination Win + R, then enter cmd in the 'Start the program' window.

Keys for launching the Internet Explorer 8 browser (in Windows XP)
We list the keys that can, if necessary, simplify the work with Internet Explorer.
Iexplore.exe url, in this case the browser will simply be opened with specified address, example iexplore.exe /
- iexplore.exe -extoff will launch the browser without add-ons
- iexplore.exe -new this switch will launch a new IE window in a separate process
- iexplore.exe -nohome with this key, the browser will start without any pages, which is interesting, the launch is faster even when about:blank is specified as the home page
- iexplore.exe -nomerge this key is used to start a new session, for example, to be in two accounts at the same time social network
- iexplore.exe -k will make it possible to run the browser in full screen (kiosk mode)
- iexplore.exe -slf this key is used, as I understand it, to force the opening of the home page
- iexplore.exe -embedding key will launch the IE browser object without rendering the page visually
- iexplore.exe -private launch browser in private mode, pretty handy key
Well, that's all, I hope this material was useful to you
Setting up the Internet Explorer browser. Today we will talk about the web browser, namely the veteran Internet voyage to the well-known Internet Explorer.
And so Microsoft developed Internet Explorer and built it into operating system Windows by default. That is, it is installed along with the installation of Windows itself and is updated automatically if you do not change the settings.
Now a little about him. Like any browser, Internet Explorer has an address bar that can be used not only to access pages, but also as a field for entering search queries. By the way, the default search engine for the address bar can be configured at the request of the user.
Supports Internet Explorer concurrently with big amount tabs, has the ability to create bookmarks and has a large number of advanced settings and features that are often not expected from it as the default browser (browser included).
Let's take a look at some simple settings.
Address bar - used directly for entering site addresses, and for entering search queries. If the addresses are clear, then with search queries a little more difficult. There are many search engines (Google, Bink, Yandex, etc.), to set the default search engine to the one you use, you need to go to the settings (click on the gear in the mountain on the right), then select "configure add-ons". In the window that opens, select "search services", select the one you need and click on the "Set as default" button,

if your list search engine no, follow the link at the bottom of the "Find other search services" window and find the one you need in the list and add it.

When starting the browser, at startup, each user wants to see his or his pages, which he regularly views, and not offered by default. It is very simple to do this, again we go to the settings, select "Internet Options" in the window that opens, the "General" tab, then in the "Home Page" field we prescribe your site or sites via Enter, click apply and ok.
An ordinary user looks through a lot of sites when searching for information, so it often becomes necessary to save a link to a site in order to return later. To do this, the site can be added to favorites; it is very simple to do this, when viewing the site, click on the browser settings and select "add site to the list of applications." Now, if you need to quickly go to this site, just click on the star icon next to the settings icon and a list of saved sites will open in front of you.

If we talk about the icons in the mountain on the right (gear-settings, asterisk-selected sites, house-view). Then by clicking on the house we will get to start page or a group of pages that opens in us when the browser starts. This is convenient when you work a lot with one site, in a split second (in one click) you immediately get to it.

In general, we introduced you to the main features of the Internet Explorer browser that you should configure for convenient operation in him.
Let's take a look at the IE menu - Tools>Internet Options. The Internet Options window contains seven tabs. The most interesting for us are the General and Connection tabs (Fig. 11.5). The main settings are collected on the Connections tab (Fig. 11.5, on the right). The Install button launches the New Connection Wizard. In the Settings area remote access there are three selectors: Never use, Use when not connected to the network, Always use the default connection. The first selector - Never use - is included when connecting only via a local network.
If you are connecting exclusively by modem (and not able to connect to the Internet via LAN), select Use when not connected to the network. This selector is also selected for modem connection if LAN connection fails. The last selector Always use default connection is selected to connect the default modem connection.
Access to the Internet can be optimized using a proxy server. Its use is not always required, but it is recommended. When using a proxy server, the Use proxy server option must be checked. Disabling this option allows you to establish a connection "directly", for example, if the proxy server fails.
The General tab of the Internet Options window is shown in fig. 11.5 (left). To reduce browser loading time, we recommend that you click the From empty button in the Home page area. If there is not enough space on the disk, on the same tab you can use the Delete files button in the Temporary Internet files area or configure the storage settings using the Settings button. The purpose of the standard buttons (Colors, Fonts, Apply or OK) should be clear to you, so we won't dwell on them.
The options on the Programs tab of the Internet Options dialog box should also be easy. By default it has standard applications Windows used for HTML editor, Email, newsgroups, and calls over the Internet. If you want IE to be the default browser, check the Check if IE is the default browser option.
Fine-tuning IE is done on the Advanced tab. Check desired parameters in the Settings list. The list is quite extensive - having studied it, you will configure the browser with maximum (just for you) convenience. There is no risk here, because the Restore Defaults button will always allow you to return to the original values.
To switch to the Internet Explorer settings mode in the Control Panel, select the Network and Internet Connections category, and then select the Internet Options icon. As a result, the Internet Properties window will appear on the screen. This window contains the following tabs: General, Security, Privacy, Content, Connections, Programs and Advanced.
Let's look at how to work with each of them.
On the General tab, configure general settings.
In the Address field, specify the address of the web page that the user has chosen as their home page. A web home page is a page on the Internet that opens by default every time you start your browser. You can return to this page at any time while browsing the Internet by clicking the Home button on the toolbar or by executing the View Go Home page command from the main menu of the Internet Explorer window.
Pressing the From current button allows you to select as your home page the page that is open in this moment. The From Home button restores the page that was set when the browser was installed as the home page. If the home page is not needed, then click the C empty button. In this case, when you start the Internet browser, it will open empty page, and the Address field will take on the value about:blank To delete temporary Internet files, the Delete Cookies and Delete Files buttons are used. Using the Options button, you can switch to the mode of setting and editing the settings for the folder of temporary Internet files.
The Options window will appear on the screen. Use the Check for updated saved pages switch to set the required mode for checking for updated saved pages. The Temporary Internet Files Folder area displays the location of the folder that contains the temporary Internet files. In the Take up on disk no more field, specify the maximum amount of hard disk space allocated for this folder.
You can use the Move button to move the Temporary Internet Files folder to a specified location; this will open the Browse Folder window, in which, according to the usual Windows rules, you must specify the required path. To open a folder with temporary Internet files, use the Browse files button. In the field How many days to store links on the General tab, specify the number of days during which the browser should store links to recently visited pages. Using the Colors button, you can switch to the color selection mode for displaying web pages. Clicking this button will open a window.
Security Options
On the Security tab of the Properties: Internet window, configure the Internet security settings. The upper part of this tab lists the Internet zones accessible from this local computer. The Security level for this zone area displays the security level settings for the zone highlighted at the top of the tab. To change these settings, click the Custom button. Can be restored if necessary standard parameters security for each zone. To do this, click the Default button (you must first select the icon of the required Internet zone).
Confidentiality
The Privacy tab contains options that allow you to set the level of privacy you use while browsing the Internet. The required privacy level is set using the corresponding slider. In this case, to the right of the slider is displayed short description selected privacy level. By pressing the Advanced button, you can switch to the mode for setting additional privacy settings (in particular, in this mode, you can configure the processing of cookies by the browser). Optionally, you can set privacy for individual Web sites.
To do this, use the Change button. Clicking it opens the Privacy for individual Web sites window, in which you perform the necessary actions. The Contents tab contains options for accessing information received from the Internet, options for the auto-complete mode, and some of the user's personal data. Using the Settings button, you can switch to the settings mode for restricting information received from the Internet. This opportunity especially useful for monitoring children's visits to certain websites and their exposure to certain materials. Clicking this button opens the Access Restriction window.
When you first open this window, the system will prompt you to enter an access password, which should be remembered, since the system will request this password on subsequent attempts to enter this mode. Use the Enable (Disable) button to enable/disable established restrictions; it also requires you to enter a passcode. By clicking the Autofill button on the Contents tab, you can enter the autofill settings mode. This will open the corresponding window. In this window, define the objects for which you want to use auto-fill ( possible options- for web addresses, forms, usernames and passwords in forms), and also clears the autofill history (using the Clear Forms and Clear Passwords buttons).
If the Prompt to save password check box is selected, the system will ask whether to save the new password after entering it in the field of the web page. If the answer is yes, the password will be saved, and in the future, when entering a username in the field of the web page, the system will automatically display the password corresponding to this name. To enter some personal information about the user provided by certain Web sites, on the Contents tab, click the Profile button.
Connections
The Connections tab contains information about previously configured Internet connections. To create a new computer connection to the Internet, you must click Install. As a result, the New Connection Wizard window will appear on the screen (the procedure for creating a new connection is described in the section).
To create a new network connection you should use the Add button, to delete an existing one - the Delete button (you must first place the cursor on the object to be deleted). Using the Settings button, you can switch to the mode of viewing and editing the parameters of a network connection selected in the list of connections. To switch to the local network settings mode, click the LAN Settings button.
Programs
The Programs tab defines the programs that will be used automatically when working with the Internet. In field HTML editor from the drop-down list, select the program that the browser will use to edit HTML files: Microsoft Word, Microsoft Excel or Notepad. Depending on the value given field the corresponding command will be displayed in the File submenu of the main menu of the Internet Explorer window. If Microsoft Word is selected in the HTML Editor field, then the Edit in command will appear on the File menu. Microsoft Office Word, if Microsoft Excel is selected - the command will be called Edit in Microsoft Office
Excel, if Notepad - Edit to Notepad is selected.
- In the E-mail field, select an e-mail program from the drop-down list (for example, Outlook Express or The Bat!) that Internet Explorer will use.
- In the Newsgroups field, specify the program for reading Internet newsgroups that Internet Explorer will use.
In the Internet Connection field, specify the dialer that Internet Explorer will use.
- In the Calendar field, specify the Internet calendar program that Internet Explorer will use.
In the Address Book field, select the address book program that Internet Explorer will use. If you check the box
Check if Internet Explorer is the default browser, then each time you start Internet Explorer, the system will check if this browser is the default one. If another Internet browser is used as the default, the system will offer to restore the use of Internet Explorer as such. Checking this box makes sense if there is another browser installed on the computer besides Internet Explorer.
Additionally
On the Advanced tab, configure Extra options some browser modes. In particular, using the appropriate checkboxes, you can enable / disable the display of pictures and their frames, the playback of animations, sounds and videos on web pages, automatic check Internet Explorer updates, etc. Security settings have been moved to a separate section. If necessary, you can restore the default settings offered by the system by clicking the Restore Defaults button.
All parameters of this tab, depending on the functionality, are divided into groups: Microsoft VM, Security, Multimedia, HTTP 1.1 settings, Browse, Print, Search from the address bar, and Special abilities. Let's dwell on each of them. Microsoft VM In the Microsoft VM group, make the following settings.
If the Log Java Language check box is selected, the browser will log all active Java programs.
- If the Use Java Jit Compiler check box is checked, then when you visit a website that uses Java programs, the browser will automatically generate and run those programs. In other words, this flag enables Internet Explorer to use the built-in Java compiler.
It is recommended to set the checkbox Java language scoreboard is enabled if you plan to test Java programs. Settings made using the Use Java Jit Compiler and Java Language Display Enabled checkboxes do not take effect until the computer is restarted.
Security
- In this group, configure additional security settings.
- By checking the boxes SSL 2.0, SSL 3.0 and TLS 1.0 enable the mode in which the browser will send and receive confidential information using the SSL 2.0, SSL 3.0 and TLS 1.0 protocols, respectively. In doing so, the following must be taken into account:
- SSL 2.0 protocol is supported by all secure websites;
SSL 3.0 is more secure than SSL 2.0, but some websites do not support it;
- the TLS 1.0 protocol has a degree of protection comparable to that of the protocol
- SSL 3.0; this protocol some websites do not support.
- By checking the Enable Integrated Windows Authentication checkbox, Integrated Windows Authentication is enabled. This setting does not take effect until the computer is restarted.
If you select the Enable profile check box, the browser will display requests from websites to provide them with data from the user's profile. If you uncheck this box, then the browser will not transmit information about the user and, accordingly, display web site requests.
- By checking the box Do not save encrypted pages to disk, the saving of secret information in the folder with temporary Internet files is prohibited. This mode is recommended to be set if several users have access to the computer.
- If you select the Warn me when switching security mode check box, the browser will notify you when switching between safe and insecure Internet sites.
By checking the Signature verification for downloaded programs checkbox, the downloaded programs authentication mode is enabled. - If you select the Check for revocation of server certificates check box, Internet
- Explorer will check the validity of node certificates on the Internet. - This setting takes effect only after restarting the computer.
- If you select the Delete all files from the Temporary Internet Files folder when the browser is closed check box, the Temporary Internet Files folder will be automatically cleared when you close the Internet Explorer window.
Multimedia
In this group, configure the following parameters.
If you select the Enable automatic image resizing check box, the browser will reduce the size of oversized images on web pages. The Play animation on web pages checkbox enables/disables the animation playback mode on web pages. Some web pages that contain animation load very slowly, and to speed up their loading, it is advisable to check this box.
The Play videos on web pages and Play sounds on web pages checkboxes enable/disable playback modes of video and sounds on web pages, respectively. By deselecting the Show Pictures check box, you can disable the display of graphics to speed up the loading of web pages. If you select the Show picture frames check box, then picture frames will be displayed while loading pictures. This will allow you to get an idea of the location of the elements of the web page before it is fully loaded. Enabling this mode makes sense only when the Show pictures checkbox is checked.
Checking the box Enhanced rendering of color shades turns on the mode
image smoothing. HTTP 1.1 configuration There are two parameters to configure in this group. Selecting the Use HTTP 1.1 checkbox enables the mode of using the HTTP 1.1 protocol when connecting to web sites.
If you select the Use HTTP 1.1 through proxy connections check box, the browser will use the HTTP 1.1 protocol when connecting to Web sites through a proxy server.
Overview
In this group, configure the following parameters. If you select the Automatically check for Internet Explorer updates check box, the browser will periodically check the Internet for a new version of the program. When a new version is found, a corresponding message will appear and the browser will ask you to confirm its download. If you select the Enable display styles for buttons and other controls on web pages check box, the browser will apply the settings to design web pages. Windows screen(see section 3.1).
If you select the Enable personal Favorites menu check box, the Favorites submenu of the main menu of the Internet Explorer window will not display links that have not been used for a long time. To access them, click on the arrow at the bottom of the menu. If you clear the Enable third-party browser extensions check box, the browser will not be able to use tools designed for Internet Explorer that are not developed by Microsoft. This setting takes effect only after restarting the computer. If you select the Enable Install On Demand (Internet Explorer) check box, Internet Explorer will automatically download and install the necessary components to complete a task.
If you select the Show detailed messages about http errors, then if an error occurs when connecting to any server, the browser will display detailed information about the error and advice on how to resolve it. If this checkbox is unchecked, the browser will only display the error code and title.
By checking the box
Use built-in auto-complete enables the mode to auto-complete web addresses in the address bar as you type them. In this case, the browser uses the previously entered addresses that partially or completely match the desired one. If you clear the Use the same window to load shortcuts check box, then web pages opened using links from any document or program other than Internet Explorer will be displayed in a new browser window.
If you select the Use passive FTP protocol (for compatibility with firewalls and DSL modems) check box, the browser will use the passive FTP protocol, which does not require determining the computer's IP address. This mode is considered more secure.
Use the Underline links switcher to select the required link underlining mode:
Always - links are underlined all the time (this mode is set by default); Never - links are not underlined; On hover - links are underlined only when hovering over them with the mouse pointer. If you select the Show button "Go to address bar" checkbox, then the address bar of the browser window will have a Go button.
By setting the Show short links checkbox, the mode of briefly displaying the address of an object (link, picture, etc.) is switched on in the status bar. If this checkbox is cleared, then the address of the object is displayed in the status bar in full format. If you select the Allow folder views for FTP sites check box, the FTP sites will be displayed as a folder (as in Explorer). If this check box is cleared, FTP sites are displayed in HTML format (this is the default setting). If you select the Notify me when download is complete checkbox, a corresponding message will appear on the screen after the download is complete.
Only one setting can be configured in the Print area. If you select the Print Background Colors and Patterns check box, the background image will also be printed when you print the web page. Please note that depending on the printer you are using, print speed and quality may be affected. Search from the address bar. This area contains a checkbox When searching, which can take the following values. Do not search from the address bar - when this value is selected, search from the address bar is disabled.
To search, you will need to use the Search button located in the toolbar of the browser window.
Show results and go to the most similar node - in this case the search bar will display links to web pages with addresses similar to the desired one. In this case, the browser will open the web page closest to the address to the desired web page. Only go to the most similar site - when you select this option, the search results will open the web page whose address is closest to the one you are looking for.
Only show results in the main window - in this case, the results of searches made using the address bar will be displayed in the main window. Accessibility options in this group configure the following settings. If you select the Always expand text for images check box, then when the Show pictures check box is cleared in the Media group, the space allocated for the picture will increase in size to display all the text associated with it. If you select the Move system caret after focus and selection check box, the system caret will move depending on the change in focus or selection. This setting is important when working with programs that use the system caret to determine the desired area of the screen.
The main purpose of a browser is to view Web pages. Even a small program that takes only a few tens of kilobytes can cope with this task. The first browsers were like that. However, during the fierce competition that has flared up between the leading programs Netscape Navigator and Microsoft Internet Explorer, both programs have acquired a host of additional customizable features. In particular, Internet Explorer, emerging from the fray as a winner, has become a huge software package that allows you to adjust the program to the individual requirements of the most biased user. In this article, we will look at most of the settings that are present in the sixth version of Internet Explorer. These settings allow you to change the program interface, add the necessary panels and buttons, change the display settings for the requested pages. The article discusses ways to customize various viewing modes, including how to turn off the display of graphics, change the font size, change the color and encoding of the text of the pages you are viewing. From this article, you will also learn how to set up the necessary privacy and security mode, how to operate with certificates, how to choose the size of the folder for storing temporary Internet files, determine the connection to a particular proxy server, and much more.
Toolbar customization
First of all, let's turn to the point View control menu that provides access to the most commonly used settings.
On the menu View you can add and remove panels as you wish (fig. 1).
To add or remove buttons on standard toolbars, change their size and order, run the command Toolbars à setting, as a result, a panel will appear (Fig. 2), on which you can change the icons.
On the menu View you can also customize different browser panels: Search, Favorites, etc. (Fig. 3).
Typically, Web site developers determine the size and style of the fonts on the page. However, these settings may not be optimal for you. You can set your own text display mode in the browser settings. To do this, the menu View point the mouse cursor at Font size and select the desired size (Fig. 4).
Probably, you have come across a situation where instead of the page text, the browser issues a set of unreadable character sequences. In this case, you should check if your browser has chosen the correct encoding for this page. Cyrillic (KOI8-R) and Cyrillic (Windows) encodings are often confused.
Most Web pages contain information that allows the browser to set the required language encoding.
If the Web page does not contain this information, and Internet Explorer is set to auto-select, then the encoding will be automatically selected.
In order to enable the function of automatic encoding selection, it is necessary in the menu View Internet Explorer browser (Fig. 5) check the box Autoselect.
If auto-selection failed to determine the correct language encoding, but you know which encoding is needed in a particular case, you can select it manually using the command Additionally.
General tab
and tab General(Fig. 6) you can define the so-called " home page”, that is, the page from which you will start browsing Web resources.
Temporary Internet Files
As you know, to speed up the viewing of pages that you have already visited, they are cached on your computer's hard drive and stored in the Temporary Internet Files folder for a certain time. This storage organization speeds up the display of frequently visited Web pages, because the browser can open them from your hard drive rather than requesting a second time from the Internet.
To see what resources are available directly from your computer, open the folder Favorites, run the command File à Work Offline and pay attention to your panel Favorites. Site names that are not available in offline, will turn gray, and those whose information is cached on the hard disk will be highlighted in black (Fig. 7).
Obviously, the more space you provide on your computer for cached pages, the more likely it is that newly requested information will be stored on your disk. In order to increase the Internet cache, go to the tab General to section Temporary Internet Files and select the item Parameters, as a result of which the panel of the same name will appear (Fig. 8), in which you can configure the maximum allowable size of the folder for storing temporary Internet files.
Increasing the amount of space reserved for the folder that stores temporary files can increase the chances of previously viewed Web pages being cached on your computer, but obviously this reduces the amount of free disk space.
In the next screen of the wizard (Fig. 10), you can set the mode in which the subscription will also occur to those pages that will be linked to base pages. And you can set the depth of links.
Next, you will be asked to choose a page synchronization method (Fig. 11). There are two options: by command "synchronize" or using a new schedule.
If you select the "new schedule" mode, the Wizard prompts you to define the synchronization frequency and specify the synchronization time (for example, every day at 23:00).
Privacy tab
Internet Explorer ensures the user's privacy and the security of their personally identifiable information.
Internet Explorer privacy features include:
- security settings that define the processing mode cookies;
- privacy alerts to let you know that the Web site you are opening does not match your privacy settings;
- the ability to view the privacy policy of the P3P Web site (the user's personal data protection format is the Platform for Privacy Preferences Project, P3P.
Due to the support of RZR, servers that collect information about visitors (primarily online stores) and ignore this format may be blocked.
The category of confidential information protected by P3P includes the user's personal data: his real name, e-mail address etc. Protected information is also information about the visited resources of the Network, registered in cookies.
To ensure compatibility with the P3P protocol, a Web resource must describe its privacy policy, that is, determine what information about users it captures, how it stores it, and what cookies it creates. This description is formalized in accordance with the P3P specification and placed in the root directory of the site. Internet Explorer reads given file and get the necessary information.
The main channels for leakage of confidential information are third sites (they are also called third-party sites), that is, sites to which the user is addressed in parallel with the site being viewed. A third-party Web site is any Web site that is not displayed in a browser window. The website you are browsing may contain content from third party websites, which in turn may use cookies.
Internet Explorer 6.0 is set by default to block cookies from third-party sites that:
- incompatible with P3P, that is, they did not declare their privacy policy;
- request personal information without the express consent of the user;
- request personal information without the implicit consent of the user.
To change your privacy settings, on the Confidentiality move the slider up to increase the level of protection and down to set more low level protection (Fig. 14). Description of customizable modes is given in the table.
It should be noted that changing the privacy mode does not affect cookies already stored on the computer.
Clicking on the button Additionally on the panel (fig. 14), you will go to the panel where you can define additional privacy settings: override automatic processing of cookies and determine the mode of accepting first-party and third-party cookies (fig. 15).
Security Tab
Internet Explorer divides the Internet into zones of different levels of security, which allows you to assign the required level of protection to each Web site.
Local Intranet (Local Zone)
Typically, this zone contains all addresses that do not require a proxy server to access. The Local Intranet zone is set to medium security by default. Thus, Internet Explorer will allow cookies from Web sites in this zone to be stored on the computer and read by the Web sites on which they were created.
Internet Explorer's privacy settings allow you to set how cookies are handled on a per-website or per-website basis.
Reliable nodes
The Trusted Sites zone is set to Low by default. Internet Explorer will allow cookies from Web sites in this zone to be stored on your computer and read by the Web sites that created them.
Restricted Nodes
This zone defaults to high level security. Internet Explorer will block all cookies from Web sites in this zone.
Content tab
Access limitation
If you use a computer at home and are afraid that your children can view those pages that you would like to restrict access to, you can resort to the settings located on the tab Content on the panel Internet Options(Fig. 19).
You can restrict access to thematic groups of sites or set a hard ban on access to specific sites.
It is quite difficult to protect a child from visiting all sites of a certain subject, but if you have information about specific sites that you want to block access to, this is naturally much easier to do. For example, in the tab Allowed nodes you can specify a list of sites prohibited from viewing (Fig. 20).
Authentication problem
Authentication is the basis of communication security. Users must be able to prove that they are exactly who they say they are, and at the same time must be sure that their correspondents, in turn, do not impersonate someone else. This is more difficult to do online than in real life, primarily because we usually cannot meet face-to-face with a partner who provides this or that network service. However, even when you see your partner, the problem of identification does not disappear - that is why there are passports, driver's licenses, etc. To authenticate partners on the Network, you must have the appropriate certificates. Before talking about the settings, let's recall the purpose of certificates.
Certificates
A certificate is a document that verifies the identity of the owner or the security of a Web site. It is a set of data that allows you to identify the correspondent. Certificates are used to protect personal identities on the Internet and to protect your computer from insecure software.
An organization with a high trust status can issue certificates that allow the public key to be associated with the identity of its owner. Such an organization is called a Certification Authority (CA), or certification authority.
Internet Explorer uses two types of certificates: personal certificates and Web site certificates.
A personal certificate is used to verify the identity of a user visiting a Web site that requires a certificate. A Web site's certificate certifies its authenticity to those clients who access it for service.
A certificate that certifies the "identity" of a Web site is needed, for example, when sending confidential information over the Internet to a Web site, or when downloading software from a Web site.
Authentication is based on public key encryption. The certificate maps an identifier to a public key. The corresponding private key is known only to the owner of the certificate, who uses it to digitally sign or decrypt data encrypted with the corresponding public key.
The digital signature specified in the certificate is the user's electronic identification that tells the recipient that this information really came from a certain correspondent and was not changed at the stage of delivery. When a user accesses a secure Web site, the latter will automatically send its certificate to the user. As a result, the user will receive a notification that the connection is secure and the data transmitted by the user will not be available to third parties (Fig. 21), and when requesting more detailed information from the IE browser, it will give explanations about the mode of visiting the secure site (Fig. 22) .
To be able to send encrypted or digitally signed messages, the user must obtain a personal certificate and configure Internet Explorer to work with it.
Web site certificate verification when downloading software
There may be several situations when it is important for you to know that the server with which you are going to exchange data belongs to exactly the company to which it considers itself. Let's take a common example - buying or downloading free software from the Internet.
When you buy boxed software from a physical (non-electronic) store, you get a sealed box of the product, so you can trace the package for damage and, in most cases, have no doubt who made the software product. Another thing is when you download a product from the network. In this case, you do not know if the supplier of this software is exactly who it claims to be, and the downloaded software does not contain viruses, is complete, reliable, etc.
Solve this problem allows embedding an authentication code (Authenticode) into the distributed product. This technology enables software developers to use digital signature include information about the developer in distributed programs. When users download software signed with an authentication code and certified by a certificate authority, they can be sure that they are receiving the software from the company that signed it and that the software has not been modified since the signing.
Such a system is the basis for protecting the rights of consumers, for example, in case of viruses in the code. Based on code authentication, users can safely receive signed ActiveX controls, signed Java applets, and other applications.
Software developers are also interested in authenticating a product distributed over the Web, as this makes it more difficult for their software to be counterfeited.
Any company that wants to distribute software or content over the Internet needs such a system.
Client Microsoft programs, such as Internet Explorer, Exchange, Outlook, Outlook Express, come with security systems that already include a system for authenticating program code downloaded over the Web. This is necessary primarily because the above systems are designed for replenishment from the Web. According to the component model, elements such as ActiveX or Java applets can be downloaded to your computer when you browse a Web site. When a user accesses a Web page that needs to play an animation or sound, code is often downloaded to the client machine to implement the required functionality. In this case, the user runs the risk of downloading a virus or other unsafe code. In order to protect the user, there is a system of signed applications.
If a user of the above client applications encounters an unsigned component, the following will happen:
- if the application's security system is set to "High security" mode, the client application will refuse to download the code;
- if the application's security system is set to the "Medium security" mode, the client application will issue a warning (Fig. 23);
- if, on the contrary, the user encounters a signed applet, the client program will issue a different message (Fig. 24).
Having received confirmation of the authenticity of the downloaded software, the user understands that, firstly, the software that he is going to download really belongs to the publisher, and secondly, he knows that authentication is provided by such and such a center, and knows where to get Additional information in order of authentication. In this session, users can trust the further download procedure. Users can also choose to "Always trust downloads from this publisher" to speed up the verification process in the future.
Users can always get additional information about the certificate (Fig. 25).
Installing Publisher Certificates
Certificate issuers create special, so-called root, certificates for themselves, confirming the authenticity of their private keys. Each specific type of certificate has its own root certificate: one for e-mail certificates, another for full personal certificates, and a third for servers. Usually browsers are released with a set of such certificates.
If, while browsing the Internet, you encounter a server with a certificate issued by an unknown issuer, you will be prompted to accept that certificate and, if it contains a root certificate from the same issuer, you will be offered the option to install that certificate and assign actions to servers with certificates issued by this publisher.
The use of digital certificates can ensure the security of your transactions on the Internet, as it allows you to associate the identity of the certificate holder with a pair of keys (public and private).
Obtaining a personal certificate
So far, we have talked about the need for servers to prove their authenticity. However, in some cases, servers require confirmation of the identity of the client. Therefore, now we will talk about personal certificates. There are several categories of reliability of certificates issued by independent certificate authorities.
Personal certificates are used to verify the user's identity as required by some sites that provide a particular service. Certificates are issued by the same certificate issuers, i.e. a third party trusted by both the user and the service operator.
To obtain a certificate, you must register with the certificate issuer of your choice.
Usually, in order to obtain a certificate, you need to provide the issuer of certificates by mail, and sometimes personally, certain documents, and then pay for the certificate.
The procedure for obtaining a certificate is as follows: you access the certificate issuer's Web server, fill in the data required to obtain a specific certificate, and select the length of the private key (preferably at least 1024 bits). Before submitting the form, your browser will generate a public (public) and private (private) key pair and store them in a password-protected database. private key known only to you - it should not be known to anyone else, including the certification center. Instead, the public key is sent, along with other inputs, to the certification authority to be included in the certificate. It is impossible to determine its pair - the private key - from the public key.
After the certificate is issued, the certification authority will usually send you a certificate or provide you with a URL where you can download it from. After downloading the certificate from the certificate issuer, the browser automatically starts the installation procedure.
Installing and removing certificates
Internet Explorer has a certificate manager - Internet Explorer Certificate Manager (Fig. 26).
It allows you to install and remove client certificates and certificates of certification authorities, or, as they are also called, CA (from the English Center Authority). Many CAs already have root certificates preinstalled in Internet Explorer. You can choose any of these preinstalled certificates for code authentication, document time stamping, secure mail, and more. To install or remove certificates, go to the tab Content. Select an item Certificates, and then the corresponding tab. The following tabs are available: Personal, Other Users, Intermediate CAs, Trusted Root CAs, etc.
Category certificates Personal have corresponding private keys. Information signed with personal certificates is identified by the user's private key. By default, Internet Explorer places all certificates that identify a user (using a private key) in the category Personal.
In the tab Trusted Root Certification Authorities usually, root certificates are already pre-installed, which you can view and get all the information about them: by whom they were issued, their validity period, etc. (Fig. 27).
By clicking on one of the certificates, you can get additional information about it, including the composition and certification path (Fig. 28).
Setting up a proxy server in Internet Explorer
As you know, modern browsers, such as Internet Explorer and Netscape Navigator, have internal cache settings that allow you to determine the amount of disk space on your machine that will be used to cache documents you have already viewed. The browser periodically updates the documents in the cache to keep them fresh. However, the amount of cache on a PC is usually small, because PC users rarely allocate more than a gigabyte of disk space for caching, so the amount of stored documents is small. It is difficult to allocate a large amount of memory on a local computer, but this can be done on the provider's proxy server - a computer running a special program that caches data requested by all clients of this provider. Large providers can allocate tens and even hundreds of gigabytes to their customers. Some users are concerned, however, that they will get out-of-date documents by using cached documents from a proxy server, but there is technology to avoid this.
There are a number of criteria by which a decision is made about caching on a proxy server. For example, if an object is marked as confidential, then it will not be cached. Similarly, there are criteria by which a decision is made on the possibility of sending a cached document to a client request. For example, if a document has expired, the server will not send it to the client, but will request a fresh document. This way, fresh documents (with not expired expiration dates) are provided immediately, and if the proxy server has doubts that the document is fresh, it can ask the Web server if the document has changed. It is possible that the expired document is not really out of date because it has not been updated, in which case the Web server will respond to the proxy server that the document is not "corrupted" yet and can be served upon client request. In other words, there is every reason to use a proxy server.
To configure connection through a proxy server, go to the tab Connections on the panel Internet Options(Fig. 32) and instead of paragraph Never use(which you probably had configured if you did not work through a proxy server) select the item Always use the default connection.
Then refer to paragraph Setting, which will lead to the appearance of the panel shown in Fig. 32 .
Check the box Use a proxy server for this connection and enter the proxy server address and port - these addresses should be obtained from your ISP. I use the services of Zenon and in my case it is proxy.aha.ru. Next, go to Additionally(Fig. 33) and indicate One proxy server for all protocols.
It should be noted that work through a proxy server is not always optimal. The most obvious example is if you have faster access to a certain Web server than to a proxy server, then there is no point in accessing through a proxy server. Or, for example, if you are debugging Java applets on some server and you need to constantly check how well your software, then, of course, you will not be satisfied with the download previous version applet. On the panel shown in Fig. 33 Additionally, play video, as a result, pages will load faster.
After you have removed the display of images and loaded the page, it will be displayed in a "truncated" form, as shown in Fig. 37 . Icons will replace images. By right-clicking on such an icon, you can call context menu and view the required image.
ComputerPress 11 "2002
And others malware, a properly configured browser with the installation of the necessary add-ons and plug-ins. One of the best means protection from all kinds spyware - latest version installed browser, such as Internet Explorer 11.
To protect the IE browser, it is advisable to disable unnecessary (or unused) browser settings that may be vulnerable to external attacks. For advanced security settings, follow these steps:
Turn on pop-up blockers on websites you don't know. This security feature allows you to select the desired lock level. When you visit websites, you will receive pop-up blocking messages. You can also create a list of sites in advance where pop-up windows will not be blocked.
Sites on your list will display pop-ups as usual. To enable pop-up blocking, click on the "Tools" button, and select "Internet Options". Next, the "Privacy" tab, the "Pop-up blocker" section, where check the box "Enable pop-up blocker" and agree with the changes with the OK button.

Please note that this feature will not block pop-ups from websites within your local intranet or your trusted sites.
To block absolutely all pop-ups, move the security level slider up. In addition to the default "Medium" mode, there are three more higher degrees of protection.
Protected mode.
Another browser protection option is Protected Mode. This feature will help prevent malware from running in your browser. To enable Protected Mode, again click the "Tools" icon, "Internet Options". On the Security tab, select the Enable Protected Mode check box, and then click OK.

Protected Mode is configured separately for all zones: Internet, Local intranet, trusted sites, and dangerous sites.
Disable ActiveX.
A major security upgrade for Internet Explorer - disabling ActiveX, Active Scripting, and Java. But, in this case, verified sites that also use these functions will not be able to load properly. Add them to the trusted list. To set Internet Explorer to the highest security level, move the slider all the way up and accept the changes with the OK button.
How to enable ActiveX for verified sites.
Click the "Tools" button, go to the "Security" option and check the "ActiveX Filtering" box. Now when you visit a web page with ActiveX controls, Internet Explorer will block them. The ActiveX filtering icon is displayed in the browser's address bar. Clicking on the icon will enable ActiveX for that particular web page.
Disabling Java scripts.
Java scripts create interactive web pages but are also open gates for malware. Only enable Java scripts for trusted websites. To disable them - the "Security" tab. Click on the "Other" button and scroll down to the "Run scripts…Java" heading.


 and geographic information systems (GIS) and can be the result of their work.")


