All site sections Website
All problems S. hard disks (screws) can be divided into two groups: incorrect connection (which is understandable, is not a malfunction) and malfunction of the device itself (refusal of electronics and / or disks themselves).
It often happens that everything works great until you connect the second hard drive. After that, the system "does not see" both disks or "does not see" the second disk.
Or you went to a friend with your hard drive (screw), it all worked perfectly well, and when you came home, they found that your disk does not see the system.
All this is the symptoms of the incorrect hard disk connection. There is nothing complicated in the hard drive connection, so each user should know how hard drives are connected to the computer.
It's like to be able to replace the car's wheel. Do not cause the tow truck if the wheel is broken.
Hard disk interface
For connecting hard disk to computer One of the three interfaces can be used:
IDE (Integrated Device Electronics) - developed in 1986 and is still used;
SCSI (Small Computer Systems Interface) - also designed in 1986 and is also used so far;
Serial ATA (Advanced Technology Attachment) - developed in 2003, confidently gains momentum.
In addition to these interfaces, ST and ESDI interfaces were used to connect hard drives, but they forgot about the first in 1989, and about the second - in 1991.
Initially, IDE was developed only as an interface for connecting hard drives. Later he was modified and received the official name ATA - an extended connection interface for drives.
The difference between the IDE is that the ATA can be connected not only hard drives, but also CD / DVD drives.
The ATA interface was constantly improved, and at the moment there are several of its varieties decorated in the form of standards (Table 4.1).
Table 4.1. ATA standards

Yes, the latest version of ATA was released in 2001. It seems that in the future the interface will not develop, but will live peacefully. The following adopted standard is ATA-8 (2004) - already describes SATAII, and not IDE (ATA).
The SCSI interface is a high-performance interface for connecting various kinds of devices. With this interface, not only drives can be connected to the computer, but peripheral devices.
For example, there are SCSI scanners whose speed is significantly higher than the speed of the scanners connected to the parallel LPT port. But with the advent of the USB bus, the need to produce peripheral devices with the SCSI - USB interface is much more convenient.
Therefore, now the SCSI interface is used mainly on servers - ordinary users, as a rule, do not buy SCSI disks due to their high cost. Yes, and the motherboard with the SCSI controller is quite expensive (compared to ordinary fees).
The SATA interface (Serial ATA, consistent ATA) was developed in 2000, but only in 2003 first appeared in the finished systems. Compared to the usual ATA (it is sometimes called PATA - Parallel ATA - Parallel ATA) it provides greater performance. Much depends on what is the actual hard disk cache.
The ATA interface is described in the ATA-7 standards (in parallel with the usual ATA) and ATA-8. The ATA-7 version interface supports 150 MB / s data transfer rate, and ATA-8 - 200 MB / s. As you can see, even the very first version of SATA is faster than the latest version of PATA. And Sataii is even faster.
While 200 MB / s is the limit for a home / office computer, that is, for the workstation. But the data rate on the modern SCSI interface (FAST-320DT technology) is 640 MB / s.
But these interfaces are used only at high-performance servers - most of the usual users are not affordable, and there is no need for such a speed.
Physical connection of the gesting disk
As we know, gesting discs are two types: ATA (IDE) and SATA (Serial ATA). The first discs are more "ancient", but nevertheless there is on sale the second - more modern, promising and faster.
Definitely - the future for SATA. It seems to me that after a few years, ATA disks will be removed from production. I think so. Wait and see.
Attention! Any change in the physical configuration of hard drives and other disk drives requires a power off of the computer!
ATA-Disk Connection (IDE)
As a rule, on the motherboard there are two controllers for connecting IDEs - primary and secondary. Two IDE devices can be connected to each controller. I specifically not say "two hard drives", because CD / DVD drives can be connected to the IDE controller.
The first device connected to the controller is called a master (MASTER). This is the main device, so you need to choose a faster device on the role of the wizard.
The second device is called subordinate (Slave). So, the system may have four (maximum) IDE devices:
primary Master (Primary Master);
primary slave (Primary Slave);
secondary master (Secondary Master) - the second controller;
secondary subordinate (Secondary Slave) is the second controller.
Open the computer enclosure cover. Typically, the first controller is marked by IDE0, and the second - IDE1 (that is, the numbering begins with zero). If you have already installed an IDE (because you could buy a computer with a SATA disk), it will be connected to the first controller.
How to distinguish the IDE connector from the SATA connector? Very simple: IDE key connector (Fig. 4.3), and SATA is small (Fig. 4.4).

Fig. 4.3. IDE connectors on the motherboard
Pay attention to the IDE-loop color to which the motherboard and hard disk are connected. If he is gray, it is better to replace it on yellow - it is more high-performance loops (your hard disk will work faster if you connect it with a yellow loop).
You can see a visual video allowance - subtlety and nuances by
check hard disk in the HDD SCAN program
The difference is that old (gray) loops have 40 contacts, and new (yellow) - 80. When connecting the drive using an old BIOS cable, it issues a warning that a 40-pin cable is used (40 PIN) instead of 80-pin ( 80 PIN).

Fig. 4.4. SATA connectors
One end of the IDE-loop is connected to the IDE connector on the motherboard (do not worry - you will not get it wrong, because the key will not allow), and the other is a hard disk.
And here it starts the most interesting. You have connected a hard drive to one of the controllers, but now you need to select its mode - Master or Slave.
Next to the connector for connecting the IDE-loop on the hard disk will be a connector of the mode of operation. The mode of operation is selected using jumper - jumpers (Fig. 4.5) to be installed in one of the provisions corresponding to one or another mode of operation.
The hard disk operating modes map is drawn on the hard disk - on the sticker from above. Sometimes the main device (master) is called Device 0 (Fig. 4.6), and the subordinate (Slave) - Device 1. Let it be confused.
Keep in mind: two main or two subordinate devices cannot be connected to one controller. If the device is connected to the controller, you need to disable it and check the operation mode - if Master, then connect the second device as Slave, or vice versa.

Fig. 4.5. Connecting IDE device
It is unwanted to change the mode of operation of already installed devices. Now I will explain why. Suppose, a hard disk is connected to the first controller as a wizard - Windows is downloaded from it.
If you install new hard drive As a master, but the old one will make a subordinate, then the computer will try to download Windows from a new hard disk and he does not work out, nothing!
Usually there is a third IDE mode of the IDE device - on the selection of the cable (Cable SELECT). In this mode, the device will be the main or subordinate depending on how it is connected to the loop - to the middle or by the end of the plume. You do not need to choose this mode, otherwise there may be two wizards or two subordinate devices (if you are incorrectly connected).
So, we have connected the IDE cable, chose the operation mode, it remains to connect the power. With this, everything is simple: many power cables come from the power supply unit, connect one of them to the hard disk. Do not be afraid - you will not connect it wrong. Usually, when the power is connected, the yellow wire is addressed to you.
The general connection diagram of the IDE device (yes, it is the device, since CD / DVD drives are connected similarly) depicted in Fig. 4.5.
Why didn't we talk about the location of the device in the computer case? I remember, a friend came from America and brought his computer, more precisely, one system unit.
It was a system unit of the so-called white assembly. When I opened it, I was pleasantly surprised - the length of all the wires was adjusted to a millimeter. There was an air intake from the fan to the processor, the second fan was directed to the IDE device - for optimal cooling.
Our computers are the so-called yellow assembly. Although they are collected from us, but all components, including the corps, are produced in Taiwan (from here and the name of the assembly is yellow).
And with Taiwanese corps, the situation is such that hard drives have to be placed where you want or need from the point of view of cooling, and where they will fit. I'm not talking about fitting the length of the wires. I'm silent about it ...
Connecting the SATA-Disc Winchester
Now let's talk about SATA disks. Connect the SATA disk is easier than simple. But on board your motherboard, there must be a SATA connector (see Fig. 4.4). On all modern motherboards it is. Do not be afraid, you will not confuse: SATA cable can not be connected to any other portion of the motherboard.
Connect SATA disk easier than IDE:
The SATA cable has two identical connector - at the ends. One end connects to the motherboard, the second to the hard disk. Connect the SATA connector is incorrectly impossible - the key will not allow;
The SATA disk has no jumpers (jumpers), so you do not need to choose the device mode;
Only one disk can be connected to one SATA connector;
Jumpers on available IDE devices do not affect SATA disks;
After connecting the SATA cable, do not forget to connect the power to the SATA disk. Please note: you need a special power cable (3.3 V), which comes with a hard disk.
Sometimes an adapter is supplied, which allows you to connect a conventional power cable to the SATA disk (Fig. 4.7).

Fig. 4.7. SATA power cable with adapter (left) and SATA interface cable (right)
As you can see, the physical connection of the SATA disk is simple. If you want to install Windows on the SATA disk, then it needs to be done boot.
How? When booting a computer when you see an inscription, press DEL to enter the Setup, then among the Setup program settings, find one with the name Boot Sequence or Boot Device Priority.
If you plan to go to her later ... ( Connection order
Hard disk to computer | Connecting Winchester)
Articles in the same category
P Wait with you as I solved the task associated with my iron. He worked, worked ... and there was not enough space. Thought how to install the hard on your computer Acer AX3910? There are not enough connectors for it.
For several years I have been using this computer and honestly for you, he never let me down, it works super reliably, quickly and most importantly, that I like it, this is his noiselessness. Works like a laptop. It is standing on the table and it is not even heard.
Engineers looking for an economical alternative to serial began to use parallel compounds. Over the years, the standard has changed significantly. This is not a controller: it is correctly called the "host adapter". Social networks continue to grow rapidly. Every year we learn new things about what works and that fails.
Your computer has two basic types of memory: memory on hard disk and RAM, and they perform separate functions. Techniques are called a non-volatile hard disk storage, because the data remain when the computer is turned off. Traditional hard drives constantly record data in tiny magnetic fields on rotating metal plates; A newer solid-state drive technology does not have moving parts, instead uses flash memory for storing files.
Installing the second hard disk to the ACER AX3910 computer.
Before this model used the same desktop computers, the same brand, only less powerful and with a smaller hard disk. As they were operating, the need for a faster processor and a more voluminous disk gesture appeared. This model is operating for more than two years and is not going to change yet. Except that there was not enough space on the hard disk.
Random Access Memory is a high-speed temporary storage area in which running programs are stored on your computer, open documents and intermediate results of computing and file processing. This is useful if your programs require a large amount of memory. He also contributed to the book "Nanotechnology: Molecular reflections on global abundance". It also allows you to create redundancy to protect against data loss if your main hard drive does not work. Hard disks are supplied in two versions: external and internal.
Computer Parameters:
For an additional place for storing information, I have been using an external hard disk "WD Elements". The brand is not known to me, produced in Thailand.
This HDD with the USB3 connector, the data transfer rate is very high that I did not even need an increase in the built-in hard disk.
And it would not be worried if at one fine moment he did not work slowly. The time of downloading files to my programs from this external disk has sharply increased. And energy-intensive programs -, Adobe Premier Pro, Adobe Muse. The brake has become concrete.
And anxiety appeared. When checking the Windows disk, it declares a system error on the disk, and it cannot correct it. And on it "my whole life"! Archival photos, work for many, many months. Even thinking became terribly, if suddenly ..., I don't even want to say this word! Very gently appeal to him, dust blows away.
First, determine if there is a computer system for an additional hard disk. Following the instructions in the instruction manual for your computer, open the computer housing and find the hard drive. If there is a place above or below this hard disk for another device of the same size, you probably have a place for the second hard disk.
Then see the cables connected to the existing disk. One will be the power connector, and the other will be the data connector. The power connector is sent to the power source of the computer, and the data connector is to the motherboard. Also check if there is a free space to connect the second disk on one tape cable. If not, you will need to install the second ribbon cable in the second socket of the controller controller on the motherboard, assuming it is available.
How to install the second hard disk
What to do? I decide to urgently install an additional hard disk in 1 TB., Leaving a native disk under the system of the same manufacturer, without reinstalling the system and without changing anything. Bought for 3820 rubles. And knowing that in this compact package there is no, I decide to put it instead of CD / ROMA, and CD / ROM use external, with a connected via USB connector. Not so often he needs now. Yes, and on the motherboard, there are only two SATA connector for disks.
Installing software to an external disk
- Make sure your original disk and your new disk are connected simultaneously.
- The automatic installation will now begin.
- Run all available software updates.
How to determine the thickness of the device
I know two types of optical drives used on laptops that differ thick with each other. "Fat" has a height of 12.7 mm, and "thin" - 9.5 mm. Determine the thickness of the installed device you can not disassemble the laptop. To do this, at first, look at the Device Manager and see the product model.
All you do is searching the location option during the installation process. By this time, it is too late to install them on another hard disk if you do not want to pass and delete and reinstall programs separately. However, you cannot simply drag the program folders to another disk. What you have to do is create a so-called symbolic link. It is a bit similar to shortcuts on programs, folders and websites that clog the desktop, but they are more powerful.
No need to resort to complex teams, although there is a simple and free utility that does everything for you. Select "Custom Setup" and release all additional features. When you install any software, it always asks where you want to save it. It has two halves and divides them in the middle - the icon column.

I have this OPTIARC AD-7580S. Now visit any popular Internet resource selling similar products or Yandex.Market and let's see the characteristics of the device.

As we see the thickness of the device, according to the description, is 13 mm (taking into account the rounding, in reality 12.7 mm).
We need to select source folders and destination. Make sure that they are all marked. Now programs are started from the hard disk. At some point, the hard disk space becomes scarce, and it is time to transmit data to an external hard drive. Or maybe you need an external hard disk to create backup copies?
Connect an external hard disk
Before buying a disc, refer to the computer to connect external media. Please pay attention to which connections have a plate. Depending on the application, you need a plate with a greater or lower transmission rate.
Unpack and prepare a plate
When the disk arrived in your home, unpack it and look at the disk. In most cases, external discs are supplied with a desktop or connected power source and a connective cable for a computer.If you doubt, you can measure yourself using an ordinary line. You can distinguish the drives 12.7 and 9.5 with the naked eye.
Where to buy an adapter for HDD in ODD compartment

It is a plastic box with a small board with connectors and a microcircuit, as well as a USB cord cord and a decorative strap on the front side. For some reason, a mini-CD with drivers, but Windows 7 has seen a device without installing additional software. Moreover, the device is detected from the BIOS, respectively, it can be used as a bootable CD-ROM.
Connect the power supply and connect it. Then plug the hard disk to the computer. If you want to be safe, turn off the computer in advance. If the disk is connected, turn it on and, if necessary, turn on the computer. Now
When assembling a PC, its upgrades and repair, it is sometimes necessary to install a hard disk to a computer. We will consider the basic rules and requirements that need to be taken into account in order to get an excellent result by spending a minimum of time.
The main stages of the hard disk installation
The most common reason that encourages the installation of a new hard disk is a refusal to work the previous one. In this case, the replacement process is surprisingly simple. To begin with, it is natural to open the cover of the system unit, for which it is pre-unscrewed by 2 locking screws on each wall of the rear side of the case (the screws are better to put in sight to not lose them). Next, you need to disconnect the burned hard drive from the power cable and the data bus, release it from the mounting screws and remove it.
Having it as a sample, go to the store. And having bought a new analog, get a hard disk from the packaging, inspect at the moment of lack of serious external damage and scratches. If they were found, then proceed to its installation. Connect everything in the reverse order. Having spent this procedure once, you will know how to install a hard drive on a computer
It is important to note that all the work is made when power off, also disable all cables connected to the PC housing and put it on the table.
Features of the installation of hard drives of different formats
Let's look at how to install a new hard disk if you first took up this case. The joining of the Winchester will not be much harder, but for those who have no appropriate experience and faces this task for the first time, the following information will be useful.

First of all, it is necessary to remember that different generations of hard drives have different connection standards, and, accordingly, different connectors.
Installation rules
If you build in the opinion of most professionals on how to install a hard disk correctly, I advise you to make sure that the motherboard supports the installed Winchester, as well as confirm their compatibility. On some motherboards, two types can be at once: SATA and IDE, but usually DVD drives are connected to IDE loops. Although they are also suitable for hard drives.
Earlier in computers, the emphasis was applied on proven practice IDE format, which confirmed its reliability and compatibility with many well-known models. But since technologies are continuously developing, they gradually refuse themselves, they come to replace new, more modern. With the introduction of a new SATA format, IDE is already in the past, and although the wheels are no longer sold with it, it is still massively used.

Features of formats
The electron-mechanical basis of both formats is identical, differences in the type of interface used. It has a maximum 133 MB / s. Existing standards SATA1, SATA2 and SATA3 provide up to 150, 300 and 600 MB / s, respectively.
The advantages of the IDE include the ability to connect two devices to one loop (while the common is divided between them), and each SATA device is connected by a separate interface cable.
Another minus IDE is the need to manually select and using jumpers to install modes - Master / Slave, as well as deposit in the BIOS settings, which of the hard disks are considered the main thing in the event of a second connection.
Features of installing a new disk to the system unit
Consider the question of how to install a new hard drive. To begin with, you will need to insert our hard drive in the place specifically allocated for it, it usually should be seen closer to the front of the case.
Select its location in the compartment for you need to install where it is best to cool the PC coolers. The optimal position is in the center. Install the new hard drive horizontally and rigidly lock. Attach the screws well so that they are located on both sides.
Reliable fastening will prevent the impact of the vibrations of the Winchesis itself during the work. Vibrations for a hard disk having movable mechanical elements are destructive. In addition, with a dense contact of the disk and wall housing, like a radiator, heat generated heat generated by the hard drive. Next, connect the power and data cables.
How to install a new SATA disk
Unlike an outdated IDE, more perfect is connected much easier. As we already know, this standard connects each of the hard drives with a separate cable.

The SATA hard drive interface is also two connections: narrow and wide. But here the question of how to install a new hard disk is the presence of a different connector through which data is transferred from the motherboard, and through a wide - voltage is supplied.
SATA cable is connected to the data connector. They are different: straight and corner, without latch and with them. But it is impossible to confuse and stick the cable with the wrong side, so there is nothing to be afraid.
Winchester can be connected to the SATA connector arbitrarily. Although there are options for SATA-1, 2 and 3 standards, they differ only in the speed of information transfer and are absolutely compatible both at the physical connection level and logically.
The second end of the cable is connected to the connector on the motherboard. They can also be angular and straight, usually they are painted in bright colors and easily recognizable.
Power connection to disk
After the most time-consuming operations were held, and we found out how to install a new hard drive, now it remains only to connect it to the power.

It both on IDE and SATA-hard drives is supplied directly from the PC power supply. On the IDE disks, it enters through the Molex connectors, and the SATA standard is characteristic of its connector - wider.
Keep in mind that SATA power is not always initially present in the set of connectors on the power supply itself. It may turn out that you have a PC with a block of an old model, and this connector is not there. How to install the hard drive on the computer in this case?
It all depends on the specific model of the power supply. In this case, the IDE-SATA adapter will help you. They are in different design, and sometimes some copies act as splitters for several devices. In principle, it's all that you need to know how to install a hard drive on a computer. And what if one hard drive you cost, but do you want to add the second?
How to install a second hard drive

Sometimes there is a situation when when you download new files, you suddenly discover that there is no free space for this hard disk. Of course, there is a way out - to remove old unnecessary documents and deal with defragmentation, but all these attempts to free a few hundred megabytes (or at best gigabytes) is only temporary success. After some time, it is found that the disc is scored again, and you do not have a place for new films or music.
What to do in this case? There are several ways to solve the problem. You can change your old hard drive to a new one who has a much greater memory. How to install a new hard drive has already been described above. But you need to understand that it entails an abundance of additional problems. It is necessary to reinstall the OS, and, accordingly, all previously injected drivers, applications and programs. Also have to transfer all important information from the old disk to the new one. The mass of time will be spent on this operation.
But there is another way to solve the problem - to purchase the second, extra hard drive. How to install a second hard disk, consider further.
Installing an additional SATA hard drive in practice has proven an increase in the speed of the system. Interacting with severe software packages, you can qualitatively feel the superiority of the new format. Applications and programs are absolutely not inhibited, and the download occurs instantly. In addition, the power consumption and power of SATA disks is minimal, which practically does not lead to possible overheating of the hard drives.
How to connect the second hard drive?
The procedure for connecting a second, additional, hard disk, is no different from how to install a hard disk on the computer for the first time, and corresponds to the previously described process.
When connecting the second hard disk IDE format, there is a small nuance - jumper. It is necessary to establish its status using a special jumper. For the main hard drive, it must be put it in the Master position, and for optional - to the Slave position. In new disks of SATA format, this is no longer necessary.
Each hard drive in the system unit has its own compartment. It is necessary to take care only that the distance between the devices installed is sufficient to ensure good ventilation. Do not place them close to each other, it is better to leave a free span. If there is no possibility to distribute two disks on different shelves, you can install an additional fan to prevent overheating of the carriers that negatively affects the durability of the elements and the safety of your information.
After that, carefully secure each hard disk on the body to avoid the effects of vibrations. If, after switching on the second hard drive, they still appeared, it says about the obvious problem. Vibrations threaten you hard disk errors and the ability to lose information. Therefore, do not neglect fasteners. This will help maximize the possibility of vibration.
What to pay attention to after installation
Recently, the appropriate instruction has been made to the Winchester, which says how to install a hard drive on a computer, so if you should not look back there, there should be no difficulties in the process. After the work done, take care not to simply connect the cables correctly, and it is neatly paving them so that they are not sticking out. If possible, make them away their way intoward, and if necessary, secure with a tape or plastic screeds.
Articles in the same category
P Wait with you as I solved the task associated with my iron. He worked, worked ... and there was not enough space. Thought how to install the hard on your computer Acer AX3910? There are not enough connectors for it.
For several years I have been using this computer and honestly for you, he never let me down, it works super reliably, quickly and most importantly, that I like it, this is his noiselessness. Works like a laptop. It is standing on the table and it is not even heard.
Installing the second hard disk to the ACER AX3910 computer.
Before this model used the same desktop computers, the same brand, only less powerful and with a smaller hard disk. As they were operating, the need for a faster processor and a more voluminous disk gesture appeared. This model is operating for more than two years and is not going to change yet. Except that there was not enough space on the hard disk.
Computer Parameters:
For an additional place for storing information, I have been using an external hard disk "WD Elements". The brand is not known to me, produced in Thailand. 
This HDD with the USB3 connector, the data transfer rate is very high that I did not even need an increase in the built-in hard disk.
And it would not be worried if at one fine moment he did not work slowly. The time of downloading files to my programs from this external disk has sharply increased. And energy-intensive programs -, Adobe Premier Pro, Adobe Muse. The brake has become concrete.
And anxiety appeared. When checking the Windows disk, it declares a system error on the disk, and it cannot correct it. And on it "my whole life"! Archival photos, work for many, many months. Even thinking became terribly, if suddenly ..., I don't even want to say this word! Very gently appeal to him, dust blows away.
How to install the second hard disk
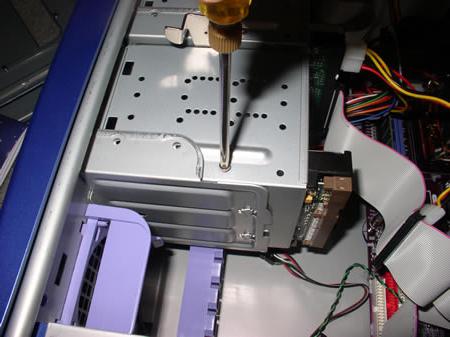
What to do? I decide to urgently install an additional hard disk in 1 TB., Leaving a native disk under the system of the same manufacturer, without reinstalling the system and without changing anything. Bought for 3820 rubles. And knowing that in this compact package there is no free space for him, I decide to put it instead of CD / ROMA, and CD / ROM use external, with a connection via a USB connector. Not so often he needs now. Yes, and on the motherboard, there are only two SATA connector for disks.
Disassemble the case, it is easy

unscrew CD / ROM 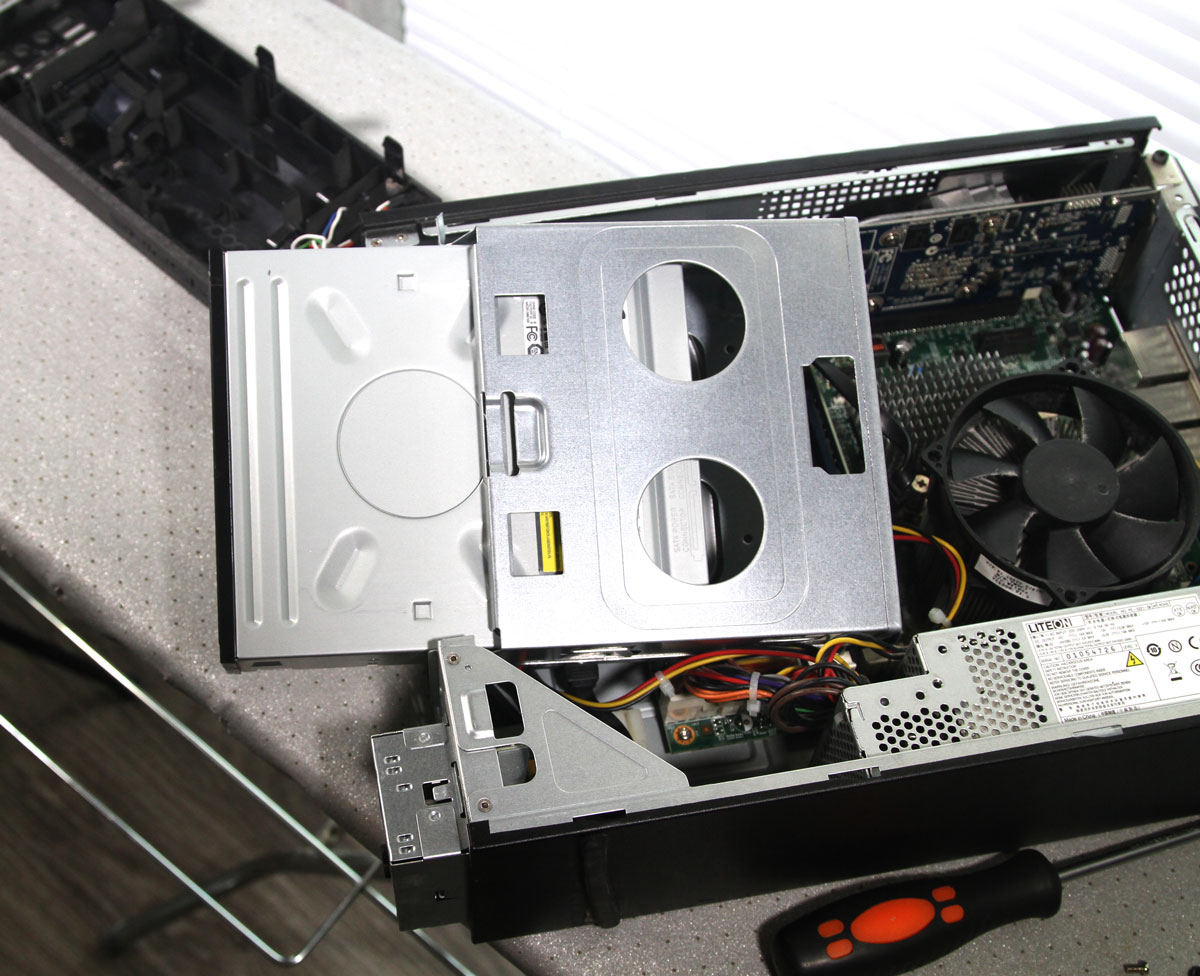

Connect the second hard disk
How to install the second hard disk programmatically. I attach the connectors to it from CD / ROM and collect. Only I change the native HDD and CD / ROM connectors. This is done so that the new HDD does not performed the root disk. If you do not cross the connector, the computer simply does not load the system. Tried B. setup. Start discs, it did not work, so I had to transfer wires. This is done quickly and is not much difficult. 
Next, connect all the wires, turn on and click on the keyboard Del.. It is necessary in order to go out in setup. And just in case, set the priority of loading from our native hard disk. 

 We go out by saving the settings.
Windows will boot, but opening the conductor you will not detect a new disk. To do this, we will do the following opirations:
Out out in Control Panel-Administration Computer Disc Control
.
We bring the mouse to this disk 
and right-click call a pop-up menu in which you create a simple volume.
A simple volume creation wizard window will appear, which will configure this disk. 
In the process of creating a disk designation letter, you can come up with a name name. Format. And the second hard disk appears with our computer. This operation is intended and intuitive. 
Thus, the computer has gained a new storage, in fact, increasing the amount of memory three times. It remains to add RAM to 16 GB. And you can also use the year two.

Computer owners sometimes face such a problem as a shortage of memory on the main disk. In such cases, the installation of another hard drive is required. In this article, we find out how to establish it correctly, what actions must be performed and what tools will be needed for this.
Installing a hard disk
To successfully install the hard drive, it must be correctly fixed in the case, then connect to the motherboard and make sure that the system recognized it. Next remains quickly formatting, after which it will be fully ready for operation.
Step 1: Preparing for the Installation of the Second Disc
At the first stage, it is necessary to select all the elements and tools for connecting the second HDD. We will need:
- 4 bolts for fixing the hard drive to the case;
- SATA cable for data transmission;
- Power cable;
- Cross screwdriver.
Some power supplies there are no power cables with SATA connectors. In this case, the IDE-SATA adapter is needed to connect the hard drive to the power unit:

However, it only applies to old computers, in most of the PC configuration of all modern, so the IDE connection is already irrelevant.
When buying a hard drive cable for data transfer with SATA 2, 3 connectors. As a rule, red (although yellow and black) and may have a straight line on one end, or a M-shaped connector. It is preferable to take the second type, since in this case it will be a more reliable connection with the disk.

Step 2: Installing HDD
Initially, it is necessary to remove the hard drive from the package, if it is new, pre-examine it from all sides, and make sure that there are no damage and scratches. Next, you should de-energize the computer, pulling the plug from the outlet. After that, you can remove the side covers of the case to access the motherboard and the hard drives compartment.
In the photo below, the arrows are the places where hard drives can be connected.

If you plan to install two disks, it is optimal that they are at some distance from each other. In this case, with proper cooling, they will not overheat.
Fix the hard drive to four bolts in one of the body compartments. Previously, it is necessary to choose a cross screwdriver, with which it is easy and effortless to screw the bolts.
The next step is perhaps the most responsible. It is necessary to place the disk in the branch of the case very carefully. It is necessary to do this in such a way that the hard drive is clearly hitting the compartment, and at the same time not to damage the cable that are nearby. It should turn out something like this:

Making sure that the hard drive is installed in the correct position, screw it with its bolts. It needs to be done neat. To easily perform all operations, it is better to pre-disconnect all the wires from the housing and install it as easy to work as possible. After screwing the bolts, we will definitely try the strength of the disk connection. It should not be fused, but be reliably fixed in the same position:

Further action is to connect power cables and data transfer. The connector at the power cable has a larger size. It is connected to the larger connector of the hard drive. Then we insert the SATA cable. Connection diagram for disk is as follows:

After that, insert the second end of the data cable to one of the SATA connectors on the motherboard:

As a rule, Sata-connectors are located close to each other, and there is an appropriate inscription near them. The connector must come tightly so that the connection is reliable. It is necessary to focus on this attention so that there is no problem with the definition of the disk by the system.
Now connect the second cable to the power supply.

Making sure that all connections are reliable and that the hard drive is securely fixed, we collect the case to the previous state. So we connected the second disk to the computer. It remains to make sure that it will be discovered in the BIOS and the system identifies it.
Step 3: Disk recognition by operating system
The connected hard drive will be visible to the BIOS, but Windows is still not able to work with it. In this case, it will be necessary to initialize it, and this can be done as follows.
 At this stage, we can assume that the second hard drive is set to the computer and implemented in the operating system.


