Universal program for removing firmware and BIOS backups from any models of laptops and personal computers.
Dump should always do when we want to make firmware, update, Update or BIOS rollback. Sometimes they are asked to make a copy of the Bios laptop or personal computer board, to repair similar equipment.
And what is BIOS and how this abbreviation is decrypted.
BIOS is cuts from the English words base_input_output_system and translates it as basic_ysystem_vod
Making a dump of bios laptops and computers using this program is very easy and simple.
Brief instructions How to use Universal BIOS Utility Backup Toolkit 2.0 to create a BIOS DAMP, and in Russian backup.
Video instruction manual with this program.
Many antiviruses define this program as a virus, but it is not.
After downloading, you can check this archive on the site www.virustotal.com which will say that half of antiviruses will find various viruses in it, and the second half does not find.
My AVG defines its same as a virus. And on Buke, Casper says that everything is fine.
After checking this file, look, whether your antivirus finds the virus in it. If so, disconnect it during the program.
Then unpack the archive and run the resulting file named Universal BIOS Backup Toolkit 2.0.exe
If your system tells what administrator rights are required. Then click the right mouse button on this file and click the item to start on behalf of the administrator.
After that, the program window opens in which we see information about the type, version, size, manufacturer and the date of your bios.
After that, we click the Read button and wait until the process of reading the bios does not end.
After that, the signboard will appear with the inscription that the reading of the bios is completed successfully.
Click OK. Then click the backup button.

We are offered to choose a place where we will keep the bios dump. Select the desired folder and click the Save button.

We all made a backup copy of the bios, you can upgrade the version, sew a new or old stable version of the bios.
Actually, the original method, snap and microcodes can be found (directly by AMI instructions), and in most cases the use of this method does not bear any problems and does not have underwater stones, but I regularly encountered such a problem with my practice:
Those. There was a banal lack of free space inside the image. When you modify the BIOS for yourself for a specific processor, you can not pay attention to this, because You can always upload only one microcode to your processor, or remove some old microcode to release the place, but when you modify the stream, you need to search for another solution, compromise.
As a compromise, I chose the following solution - we take the latest modes of microcodes for all Core generation processors in all designs (Celeron E, Pentium E, Core 2 Duo, Core 2 Quad, Xeon * 3xxx / * 5xxx) and replacing them all that was before . The set of microcodes turned out the following:

The volume of this set is only 76 kilobytes. This file turned out by combining these files:
cPU00010676_PLAT00000001_VER0000060F_DATE20100929.BIN.
CPU00010676_PLAT00000004_VER0000060F_DATE20100929.BIN.
CPU00010676_PLAT000010_VER0000060F_DATE20100929.BIN.
CPU00010676_PLAT00000040_VER0000060F_DATE20100929.BIN.
CPU00010677_PLAT00000010_VER0000070A_DATE20100929.BIN.
CPU0001067A_PLAT00000011_VER00000A0B_DATE20100928.BIN.
CPU0001067A_PLAT00000044_VER00000A0B_DATE20100928.BIN.
CPU000006F2_PLAT00000001_VER0000005D_DATE20101002.BIN.
CPU000006F6_PLAT00000001_VER000000D0_DATE20100930.BIN.
CPU000006F6_PLAT00000004_VER000000D2_DATE20101001.BIN.
CPU000006F7_PLAT00000010_VER0000006A_DATE20101002.BIN.
CPU000006F7_PLAT00000040_VER0000006B_DATE20101002.BIN.
CPU000006FB_PLAT00000001_VER000000BA_DATE20101003.BIN.
CPU000006FB_PLAT00000004_VER000000BC_DATE20101003.BIN.
CPU000006FB_PLAT00000010_VER000000BA_DATE20101003.BIN.
CPU000006FB_PLAT00000040_VER000000BC_DATE20101003.BIN.
CPU000006FD_PLAT00000001_VER000000A4_DATE20101002.BIN.
The modification procedure itself has also changed a bit and became not easier, then faster:
Step 1 - Open the BIOS image in the MMTOOL program: 

Step 2. - To check, go to the last tab (CPU Patch) and see the number of microcodes. Here are them for example 31 pieces: 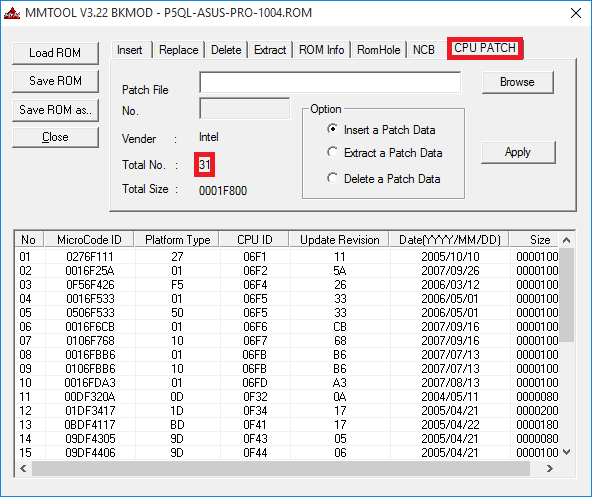
Step 3. - Go to the Replace tab and look for "P6 Micro Code" on it: 
Step 4. - By selecting "P6 Micro Code", click the button of the Ikshchi, select the ncpucode.bin file, described above and replacing it with the Replace button: 


Step 5. - To check, go to the last tab (CPU Patch) and see the number of microcodes. After the microcodes change, 17 remains, the latest version: 
The fundamental difference with the order of modification described on delidded.com is not. In most cases, it is not the same at the output, but the processor receives the desired microcode. From subjective positive moments, I would like to pay attention to only the fact that microcodes are guaranteed to update all current processors, whether "civil" or "server", as well as practically no risk of getting a message about the lack of space. Although, in my practice, there was not enough space for such a set of microcodes a couple of times, it was with BIOS for ECS P4M900T-M and ECS P4M900T-M2 boards, which are generally compatible with Xeon E5450.
By tradition, a public link to the archive with tools - (Zip, 234Kb). Archive contains executable file Mmtol.exe. (version 3.22 BKMOD), File with microcodes for all 45 / 65nm Core / Xeon generation processors ncpucode.bin., as well as two files 45nm.bin. and 65nm.bin. With microcodes only on 45NM processors and only 65nm. Using these files can be useful in cases when it is necessary to release an additional volume in the BIOS, for example, for a new Firmware which is a controller, network, disk, etc.
! Nb.: Nor in the ncpucode.bin file, nor in the files 45nm.bin / 65nm.bin there is no support for Pentium 4 processors, Celeron (without alphabetic indexes), Pentium D, Celeron D and Xeon W (Xeon 5080 for example). These are Netbrust generation processors.
Hello, dear readers of the site site! My name is Roman Zakhattov and I present to your attention the third and final part of the article on the restoration of the damaged BIOS firmware (on the example of the Acer Aspire E1-532 laptop). Before reading this part of the article, it is recommended to get acquainted with and, in which we performed the disassembly of the Acer Aspire E1-532 laptop, removed the motherboard from it, connected to the BIOS microcircuit the CH341A programmer and saved the damaged BIOS firmware into a separate file. We will continue our work preparation of the new BIOS firmware file and then write it to the BIOS chip.
Restoring the damaged BIOS firmware on the laptop by the programmer, in case the laptop is not loaded. Part 3. Removing the BIOS firmware from the EXE file to update the bios. Editing the firmware file in the Hex editor and its entry in the BIOS chip
We turn to the website of Acer to the Acer Aspire E1-532 laptop support page.
And perform downloading all available BIOS firmware.

For example, open the folder with the firmware version 2.10.

In this folder, we see the usual exe file, start it.

After starting the V5WE2210.exe file, we get a window with an error that says that this BIOS firmware is not suitable for this laptop or computer. But the OK button until we click, since we need from the V5WE2210.exe file to extract the BIOS firmware file for our Acer Aspire E1-532 laptop.

Go to section with: on the way
C: \\ Users \\ Username \\ APPDATA \\ LOCAL \\ TEMP (Username can be any depending on how the account is created). In the Temp folder we see a temporary folder 7ZS2C4E.TMP, which appeared after starting the V5We2210.exe file.

Let's open the 7ZS2C4E.TMP folder and see the isflash.bin file in it, which is the BIOS chip firmware file. Copy this file on the USB flash drive.

File isflash.bin copied to the USB flash drive.

The size of this BIOS firmware file is 9.45 MB.

When you try to open this firmware file in the CH341A-USB program, we receive a message that the file size is more than you need, that is, this firmware file is too large to use it to flash the WinBond W25Q64FV chips (namely this microcircuit is installed on the Acer laptop motherboard Aspire E1-532).

Microcircuits can be different volumes, consider this on the example of WinBond chip. As can be seen from the table, the volume of the chip can be 512, 256, 128, 64, 32 MBIT and so on.

The W25Q64FV chip has a volume of 64 MBIT (or 8 MB).

Since our BIOS ISFLASH.BIN BIOS firmware file, extracted above from the EXE file weighs 9.45 MB, and the volume of the BIOS microcircuits on the Acer Aspire E1-532 laptop motherboard is 8 MB, then to successfully restore the BIOS firmware, we need to reduce the file isflash.bin 9.45 MB to 8 Mb. For these purposes, we use the Hex editor, for example HXD. Go to the address
https://mh-nexus.de/en/downloads.php?Product\u003dhxd20.
and download the HXD Installation File HXD

Click on the downloaded file and run the installation.


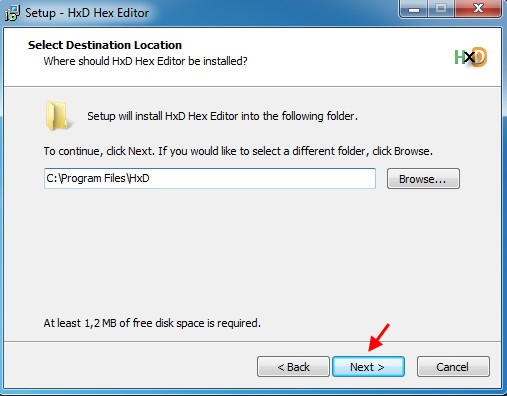

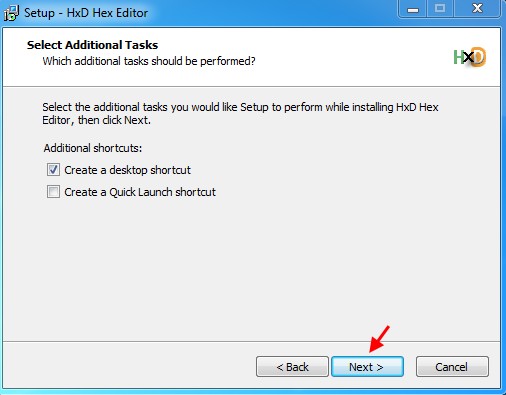
Install.

Installation completed.

Click on the HXD Hex editor label and launch it.

Main window HXD.

Click on File Open.

Select file isflash.bin and click "Open"

We get the following.

In the same way, open the damaged firmware of the BIOS ISFlash01.bin firmware (which we have saved in the second part of the article).

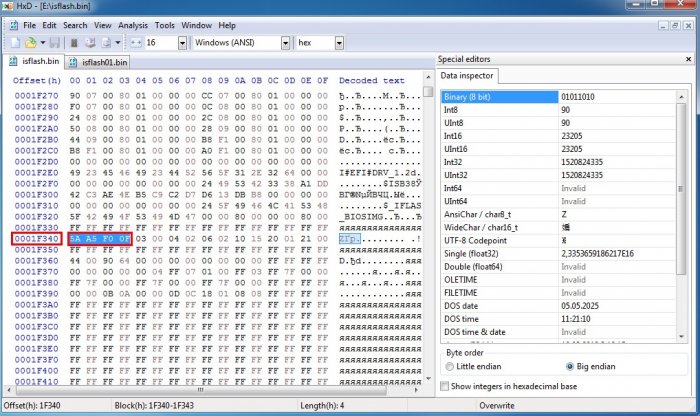
Consider attentively the structure of the file isflash01.bin. As you can see, the file firmware isflash01.bin begins with FF values \u200b\u200b(line 00000000), and in the line 00000010 there are values \u200b\u200b5a A5 F0 0F.

Now consider the structure of the file isflash.bin. We see that this firmware file begins with 4D 5A 00 00 values \u200b\u200b(line 00000000). We need to make it so that the file isflash.bin starts in the same way as the file isflash01.bin, that is, to the beginning of the file isflash.bin there were FF values \u200b\u200b(row 00000000).

In the outdoor file isflash.bin click Search-Find.

And search for the value of 5a A5 F0 0F.

We see that the value of 5A A5 F0 0F in the isflash.bin file is in line 0001F340, also above in line 0001F330 we see the FF values.
We highlight in the file isflash.bin Range of strings 00000000-0001F320. To do this, select Edit-Select Block.

Indicate the initial (00000000) and the final (1F320) row of the allocated range.

Dedicated row range 00000000-1F320.

Delete the selected row range from the isflash.bin file, clicking Delete.

As you can see, after removing the selected strings, the firmware file isflash.bin is now starts in the same way as the file isflash01.bin, namely in the line 00000000 there are values \u200b\u200bof FF, and in the string 00000010 Values \u200b\u200b5a A5 F0 0F.

Let's return to the firmware file isflash01.bin. Scroll through it to the end and see that it ends with a string 007FFFF0.

If ISFLASH.BIN file is scrolling to the end, we see that it ends with a string 009548F0.

Delete from the file isflash.bin all the lines in the range of 00800000-9548F0, that is, we will make it so that the file isflash.bin ends with a string 007FFFF0. Click Edit-Select Block.

Indicate the range of highlighted rows.

Dedicated row range 00800000-9548F0.

Delete the allocated range time 00800000-9548F0, clicking Delete.

As you can see, now the firmware file isflash.bin ends with a string 007FFFF0.

Save the BIOS firmware file under a new name by choosing Save As ...

Specify the name, for example isflash_new and click Save.

New BIOS ISFLASH_NEW.BIN firmware file.

You should pay attention to the fact that the file isflash_new.bin weighs as much as iSflash01.bin file, which we have saved in the second part, namely 8 MB.

Since the W25Q64FV chip, as mentioned above has a volume of 64 MBIT (or 8 MB), and our editable firmware file isflash_new.bin Weighs 8 Mb, then we can proceed to flashing. We connect the CH341A programmer to the BIOS chip in the same way as they did in the second part of the article.

Run the CH341A-USB program. We specify the manufacturer and the model of the chip and remove the old BIOS firmware by pressing "erasing".
About Three of the riddle: worth the hive buzzing. But smoke from the pipe does not go, because it is not a native factory, but the computer on which the BIOS is damaged. And he bursts because only it is now capable. Without bios, he is just a bunch of lifeless iron. Is it worth worrying because of this? Of course not. After all, now you have a great bedside table!
System block as a bedside table? Well, I do not! We know how to make it work. Today we will talk how to restore the BIOS if he flew.
What leads to the BIOS firmware
B iOS and its "descendant" of UEFI, which are stitched with modern motherboards, are special computer programs necessary for the initial configuration and control of PC devices until the operating system starts. They are stored in special flash memory chips on the motherboard, one of which is shown in the picture above. It seems to be a good place of storage, reliable, but sometimes Bios becomes uncomfortable there and he runs away. More precisely, it is damaged and ceases to fulfill its tasks.
The reasons for the damage of the BIOS is not too much, in some cases they are obvious, in others - no. Here is the list of the most common:
- During the power supply of the computer, the power supply was shutdown.
- The firmware program (flash drive) incorrectly interacts with the firmware or flash memory microcircuit.
- The BIOS version is stitched, not suitable for this motherboard. Yes, .
- If the update is carried out from under the operating system - a system failure or program interference, for example, an antivirus blocking.
- Incorrect user actions, such as a reboot of the computer until the update is completed.
- Flash memory microcircuit failures.
- Hidden BIOS firmware errors. Sometimes spontaneous "towers", occurring without visible causes.
- Electrical problems of motherboard.
How do BIOS damage manifest
In most cases, the BIOS firmware is partially damaged, so the symptoms of the failure can be different:- When you press the PC power, only the cooler is turned on, which immediately begins to rotate at maximum speed. Sometimes the LED indicators on the housing and keyboard light up.
- After one or a few seconds after switching on, a cyclic reboot begins. Externally, this is manifested by a cycle of promotion and stops of a cooler, which are repeated while power is supplied.
- When you turn on the power indicator lights up, the cooler does not spin.
- The computer does not submit any signs of life. This happens when damaged BOOT BLOCK - BIOS initial loader. This is the hardest case.
The image on the screen is absent. Even the manufacturer's screensaver does not appear.

There are other forms of BIOS damage, more precisely, its area that stores the configuration of the ME controller (part of the chipset) on boards operating with Intel processors - the so-called ME region. In case of failures in this area, a computer or laptop can:
- It is incorrectly loaded or not included at all.
- Turn off or restart at equal intervals.
- It is incorrect to adjust the speed of rotation of the cooler, for example, to turn it on high revs regardless of the load.
The elimination of such failures is to read the BIOS dump, replacing the ME region to clean and re-firmware using the programmer. Since the repairmen usually do this, and not the owners of computers, we will not stop at this. It is better to deal with what can be done at home without special equipment and risk to finally send your Iron Pet in the kingdom of eternity.
BIOS recovery without a programmer is possible only when the initial bootloader is saved. It is possible to determine whether it has been preserved or not, sometimes it is possible for indirect features: flashing the screen illumination, sound signals from the system speaker, the motherboard reaction to switching on without RAM (sound or flashing indicators), etc. When the initial boot loader is safe, the first time of work Computer pass normally, failure manifests itself a little later.
How to return the performance of the motherboard with the flying BIOS
ASUS.
M Feet Desktop Motherboard Made ASUS Support Technology USB FlashBackwhich is designed to quickly update and restore the BIOS in case of failure. For this, nothing needs to be required, except for a USB flash drive to a capacity of up to 4-16 GB and the BIOS file itself, which you need to download from the manufacturer's site from the section about your Mama model.After downloading, the firmware needs to be renamed. For example, the file "SABERTOOTH X79" (model name) is renamed to "saberx79.rom", the file "SABERTOOTH Z77" - in "z77st.cap". Information should be called the firmware file for your model, most likely there is on the ASUS website, but if you do not find it, check on the forums or in support.
Next, save the renamed BIOS on the flash drive formatted in FAT32, and connect it to the USB port with the mark " FlashBack" or " Rog Connect." The computer before it is desirable to turn off, it will increase the chance of successful recovery.

After connecting the flash drive, turn on the PC and click on the rear panel button " Bios." Hold it down for about 3 seconds until the light indicator flashes on the board. The flashing indicates that the file was successfully considered and stitched into memory. When the firmware process is completed, the indicator goes out.
If your fee from the budget segment is not too new, that is, does not support the USB Flashback, most likely you can restore it with another way. If the computer is equipped with a floppy drive or optical drive, write down the renamed bios file in the root directory of the pure floppy disk or CD, place it in the drive, turn off, and then turn on the PC again. The firmware will be completed when the actuator indicator goes out. If there is no drive, use the USB flash drive.
Gigabyte
Gigabyte cards with Dual (double) Bios fails rarely occur, since in case of damage to the firmware in the main microcircuit ( M.aIN_ Bios.) Dump from the backup is copied to it ( B.ackup_ Bios.). While the main flash memory is good and contains a firmware, even damaged, the fee retains performance.
Problems with the launch of the board with Dual_BIOS are possible in the following cases:
- The main microcircuit is absent or failed.
- Microcode in the main microcircuit completely erased.
- The contents of both microcircuits are damaged.
Some "moms" Gigabyte are able to boot from backup flash memory and use it as the main one. Another group of boards of this manufacturer uses a dedicated area on the hard disk as a BIOS backup. It is a less reliable option, but also better than nothing.
BIOS GIGABYTE recovery from backup is usually automatically executed, but if this does not happen, try turning off the computer from the outlet, wait a bit and turn it on.
MSI and others
Moother Micro Star Motherboards is used by the firmware restoration technology, very similar to Asus'ovskaya - using a flash drive, floppy disk or a CD. Copy the BIOS on a clean media, connect it to the PC, click the off button 4 seconds, clamp a combination on the keyboard leftCtrl +.HOME (or Alt +.Ctrl +.HOME) And, without releasing the keys, turn on the computer. On the beginning of the firmware process, you can judge the flash drive indicator or drive. BIOS on MSI card. Right JSPI1 port for firmware on programmer
 On MSI motherboards and some other brands, which are more than 8-10 years old, the bios flashing is made from the floppy disk. Instructions for Award and Ami Bios differ slightly.
To restore AMI BIOS, do the following:
- Rename the BIOS file downloaded from the manufacturer's website to amiboot.rom.
- Transfer it to the root of a clean floppy disk. Install the floppy disk to the PC turned off.
- Press the left Ctrl + Home keyboard and turn on the computer.
For recovery AWARD BIOS:
- Place the Firmware and BIOS files on the diskette (usually downloaded in one archive).
- Create a text document on a diskette, which indicates the name of the bios file with the BIN extension. Rename the document in AUTOEXEC.BAT.
- Further actions are similar to the above.
By the way, some manufacturers of the motherboard are postponed on their BIOS sites only in EXE format - in the "one bottle" with a firmware program for updating from under Windows. Sometimes such a file can be unpaved as an archive, but users are often unclear that it is from its contents that is firmware. For such problems there is no universal solution. In order not to exacerbate the problem, it is better to consult on profile forums or in the technical support of the manufacturer.

On some boards before the restoration of the BIOS, you also need to extract the real-time clock battery (RTC) or rearrange (remove) the CMOS cleaning jumper. These moments are important to find out before the procedure.
BIOS recovery features on laptops
N and laptops, as well as on Gigabyte boards, BIOS is also often stored in two flash memory chips. But this is not Dual and there is no backup copies. Both chips contain different parts of the firmware or in one is the main BIOS, and in the other - the program of the multi-protroller. So that the device does not turn on, it is enough to damage the microcode at least in one of them.
The method of restoring the flying BIOS on laptops is about the same as on desktops. The firmware file downloaded from the manufacturer and the firmware program (the latter is not always needed) is placed on a clean, formatted in FAT32 / 16 USB flash drive, connect it to a de-energized machine (just turn off the laptop is sometimes not enough, you need to disconnect the power supply and remove the battery), insert the charged The battery in place includes the machine and clamp the key combination. On different laptops, various keyboard combinations are used for this, for example:
- Ctrl (left or both) + Home
- Windows + B (this and other letters are given in Latin layout)
- Windows + F.
- Windows + M.
- Windows + ESC
- Fn + B.
- Fn + F.
- Fn + M.
- Fn + ESC.
The main work consists in unpacking and renaming bios files. One rule here, again, no. In most cases, get the firmware comes from EXE-Shnikov, but! Many manufacturers include a BIOS program for different revisions of one platform or a whole series of platforms, and choose from them the only file you need is very difficult. To not be mistaken, read the instructions for the firmware of your model and revision of the platform on profile forums. And do not hesitate to ask questions.
I intentionally do not at the article by the instructions for restoring the BIOS by firmware on the programmer with feeding and without, closing various contacts, hot replacement of removable flash memory, etc., since all these methods are unsafe and require certain knowledge. However, among readers, you will probably have Those who did something similar on their PC and received good results. It will be great if you describe your actions in the comments in detail. Stories about negative experience are also welcome to other readers thanks to you able to avoid mistakes. In the comments, be sure to give the name of the model and the revision of your motherboard, as well as the BIOS version with which you worked.


