Recently Gulp. gaining great popularity, and it is clear why. It is faster, more beautiful and easier than Grunt.. I had to work with him often, but I always took ready-made solutions and did not fully understand how he did it all. On this weekend, I decided to disassemble and close this small problem. Take this and talk today.
What is Gulp?
Gulp is a FRONT-A assembly tool. It allows you to automate repeating tasks (assembly and minification of CSS and JS files, launch tests, restart browser and others). Thus, Gulp speeds up and optimizes the web development process.
Installing Gulp.
Install Gulp is easy enough. If something does not work, write in the comments or thug your problem. So for installation you need to do 3 steps:
- Install Gulp Global
- Install Gulp as DevDependencies (Dependencies for Development)
- Create a Gulpfile.js file
The first step is to install Gulp globally. Open the terminal and write:
nPM Install --Global Gulp
After that you need to install Gulp as DevDependencies for your project. Make sure you have a package.json file. If it is not, then create it by writing it into the NPM Init console. Now you can install Gulp as DevDependenCies:
nPM Install --Save-Dev Gulp
Finally, you need to create gulpfile.js in the root of your project, which will contain your tasks (Tasks). As an intermediate step, we will install the Gulp-Util plugin. To show how plugins are installed:
nPM Install --Save-Dev Gulp-Util
Now the time has come to write our first task. Open the newly created Gulpfile.js file and write to it as follows:
/ * File: gulpfile.js * / // Collect all our plugins var Gulp \u003d Require ("Gulp"), Gutil \u003d Require ("Gulp-Util"); // Create a task that will be executed by default Gulp. Task ("Default", Function () (Return Gutil. Log ("Gulp is Running!")));
And now we have to launch Gulp in the terminal and we will see something similar to it:
\u003e Gulp [12:32:08] Using Gulpfile ~ / Projects / Gulp-Scotch-Io / Gulpfile.js [12:32:08] Starting "Default" ... [12:32:08] Gulp is Running! [12:32:08] finished "default" after 1 ms
Overview
Gulp itself is very scales on opportunities. But all you have to be put into separate plugins. They together with Gulp are creating miracles.
The Gulp API is very small, and contains only 4 higher-order functions:
- gulp.task.
- gulp.Src.
- gulp.dest.
- gulp.watch
gulp.Task defines our tasks. The arguments are called, dependence (array) and the function (main actions). Dependencies may not be:
gulp. Task ("MyTask", Function () (// do something)); Gulp. Task ("DependentTask", ["MyTask"], Function () ( // do something after "MyTask" will be executed });
gulp.src indicates the files that we want to use. It uses. Pipe access to files through plugins.
gulp.dest points to the folder in which we want to save the modified files.
gulp.src and gulp.dest is used for a simple copy of files:
gulp. Task ("Copyhtml", Function () ( // Copy all HTML files from SOURCE / PUBLIC / Gulp. SRC ("Source / *. HTML"). PIPE (Gulp. Dest ("Public")); ));
In Gulp, a file response response system is built (Gulp.Watch). You can use this task to start the other tasks you need when changing files.
Want to dial more points in Google Page Speed? Do not know what kind of "FRONT-END" assembly? Then you here will be interesting.
What is node.js?
Node.js is customary called "Northern JavaScript". This platform allows you to write programs using JavaScript syntax.
There are implementations for Windows, Mac OS and Linux.
The kit includes a package manager NPM.With which you can install packages.
What is Gulp?
Gulp is a package written on Node.js, which helps webmasters to build projects at the layout layout.
To install Gulp, you must use the command line.
NPM Install Gulp.
At the end of this article there is a file that will help to collect a typical project.
In this example, with Gulp, we will do the following:
- Automatically optimize images for the web;
- Collect one minimal styles from precrossors (Sass, SCSS);
- Collect one minimal file with scripts.
How to collect a front-end using Gulp?
To understand how everything works, we will examine everything in steps.
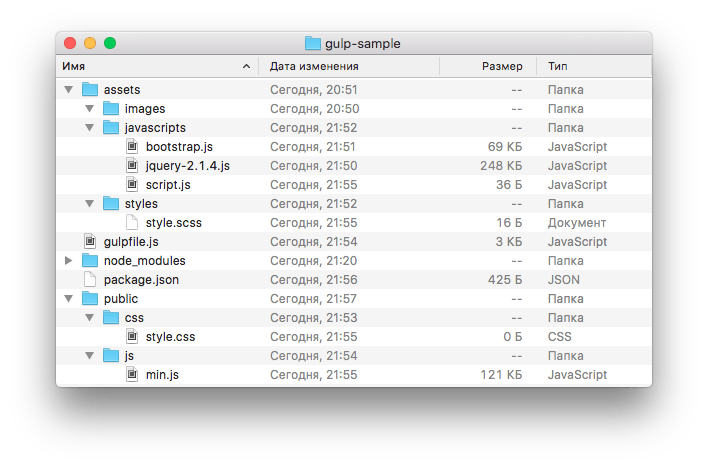
The structure can be viewed in the screenshot.
- ASSETS folder - for image sources, styles and scripts;
- Public folder - the result of the project assembly will be located in it;
- gulpfile.js - a file that describes the logic of the workman's work;
- package.json is a file that contains information about programs and plugins used for the correct operation of Gulp.
package.json.
File contents:
("Name": "Gulp_Project", "Version": "1.0.0", "Description": "Example", "Main": "gulpfile.js", "scripts": ("test": "echo \\" Error: No Test Specified \\ "&& Exit 1"), "Author": "Dmitriy ilichev", "License": "ISC", "DevDependencies": ("Gulp": "^ 3.9.0", "Gulp-CSSO ":" ^ 1.0.0 "," Gulp-Concat ":" ^ 2.6.0 "," Gulp-Uglify ":" ^ 1.2.0 "," Gulp-imagemin ":" ^ 2.3.0 "," Gulp -Sass ":" ^ 2.1.1 "))
This file is clear as follows:
- Project name Gulp_Project, version and description;
- The main file is gulpfile.js;
- The author of the project, the license - all this is not so important and simply these fields can be empty;
- An interesting point is DevDependencies. It describes dependencies.
File can be edited in the usual text editor. It can also be created for the new project by the NPM Int command.
Based on this, Node.js understands that we will need to work:
- Gulp version 3.9.0 and higher for assembly;
- Gulp-CSSO version 1.0.0 and above - plugin to ministerize styles (CSS);
- Gulp-Concat version 2.6.0 and above - plugin for gluing multiple files to one;
- Gulp-Uglify version 1.2.0 and above - plugin to minify JavaScript;
- Gulp-imagemin version 2.3.0 and above - plugin to optimize images;
- Gulp-Sass version 2.1.1 and above - plugin to get CSS from SASS (SCSS).
Excellent! After that, you need to install it all. This is done from the command line. While in the project folder you need to execute the command:
NPM Install
All the necessary information will be taken from Package.json.

After all this magic will appear service folder node_modules.
gulpfile.js.
File contents:
/ * * * Determine the variables * * / var Gulp \u003d Require ("Gulp"), // Reported Gulp JS Uglify \u003d Require ("Gulp-Uglify"), // Minification JS Concat \u003d Require ("Gulp-Concat"), // File gluing ImageMin \u003d Require ("Gulp-Imagemin"), // Minification of CSSO \u003d Require images ("GULP-CSSO"), // Minification CSS Sass \u003d Require ("Gulp-Sass"); // Sass Converting (SCSS) in CSS / * * * Create tasks (Tastes) * * /// SASS task. Launches the Gulp Sass command Gulp.Task ("Sass", Function () (gulp.src ("./ assets / styles / style.scss") // file that processes.pipe (sass (). ON (" Error ", sass.logerror)) // Convert SASS in CSS .pipe (CSSO ()) // Minifixture CSS, obtained at the previous step. PIPE (Gulp.Dest (" ./ public / css / ")); // result we write at the specified address)); // task "js". Launches the Gulp JS command Gulp.Task ("JS", FUNCTION () (Gulp.SRC (["./assets/javascripts/JQuery-2.1.4.min.js", "./assets/javascripts/bootstrap. min.js "," ./assets/javascripts/script.js "]) // Files that proceed.pipe (Concat (" min.js ")) // glue all JS .pipe (Uglify ()) // The resulting "port" minifixture.pipe (gulp.dest ("./ public / js /")) // result we write at the specified address)); // Problem "Images". Launches the "Gulp Images" by Gulp.Task ("Images", function () (gulp.src (". Assets / images / ** / *") // We take any files in the folder and its subfolders. PIPE (Imagemin () ) // We optimize the images for the web. Pipe (gulp.dest ("./ public / images /")) // Result We write at the specified address)); // Task "Watch". It is started by the "Gulp Watch" command // it monitors the changes in files and automatically starts the other Gulp.Task tasks ("Watch", Function () (// when changing * .scss files in the Styles folder and subfolders run the Sass Gulp task. Watch ("./ assets / styles / ** / *. scss", ["sass"]); // When changing the * .js files folder "JavaScripts" and subfolders run the JS Gulp.Watch task ("./ Assets / javascripts / ** / *. js ", [" js "]); // When you change any files in the" Images "folder and subfolders, launch the ImageS Gulp.Watch task (" ./ assets / images / ** / * ", ["Images"]);));
Main chip - in the task watch. After running it once, you can safely work with sources, and the project will automatically be collected every time you save editable files.
At the output, we get ready to publish the template on the Internet.

Tasks can be launched separately. As a result, in the archive at the end of the article you will find the following:
! note To unpacked this archive, first of all, you will need to execute the NPM Install command. This folder contains pretty a large number of Files, and copy / paste them every time - a waste of time.
In custody
There are a huge set of other useful plugins. For example, a wonderful Jade template, which is at times speeding up HTML code, someone may need a LESS and so on.
The presented example is just a platform and a template from which it is possible to start using all these beautiful chips without much knowledge.
Task Ranners and Assembly Systems are highly accelerating the work, automating compilation, testing, and other routine tasks. As in any other area, there are strong competition in this market. Until 2014, TASK Ranner Grunt dominated among them, but later, a small team was separated from the project, which decided to make an alternative tool, Gulp, oriented project assembly.
To help you decide on the selection, within the framework of the article Consider the main Task managers:
- grunt.
and also touch other means and build methods.
Looking a little ahead, let's say that we use Gulp in WaveAccess. Implement the tool turned out to be very easy: at the family of JetBrains products (Idea, Webstorm, Resharper), which we have been using many years have excellent plugins to work with Gulp / Grunt and NPM / NODEJS.
Task Manager VS. Project Assembly System: What is the difference?
Task Manager - Tool to automate tasks. In the configuration of ranners, you can record the names of these tasks; the function that performs them; Plugins to speed up standard actions, but the tasks themselves can be arbitrary. For example:
- Tasks for deployment (zip project, project load on remote server etc)
- Project Assembly Tasks (Minification, Optimization, Verification Code for Validity and TP)
- Tasks for data migration, etc.
Examples of such tools - Grunt and Gulp.
Assembly system - This is a tool that solves only one typical task of the project assembly on the Java Script, which includes:
- concatenation,
- checking code for validity,
- code Minification, and TD.
Similar tools include WebPack, Broccoli, Brunch, Browserify and others.
All similar frontend tasks can be automatically performed using other means: for example, using NPM Run, which we will also talk about in the article.
Example
Consider a Gulp file to assemble the project:
Const Gulp \u003d Require ('Gulp'); Const Coffee \u003d Require ('Gulp-Coffee'); Const Concat \u003d Require ('Gulp-Concat'); const Uglify \u003d Require ('Gulp-Uglify'); const Imagemin \u003d Require ('Gulp-Imagemin'); const Sourcemaps \u003d Require ('Gulp-Sourcemaps'); const del \u003d Require ('Del'); )
But the assembly is a special case of a large typical task. For Gulp, you can write another config - say, for deploy:
Var Gulp \u003d Require ("Gulp"); var zip \u003d require ("Gulp-Zip"); var del \u003d require ("Del"); VAR Install \u003d Require ("Gulp-Install"); var runsequence \u003d require ("run-sequence"); Var Awslambda \u003d Require ("Node-Aws-Lambda"); gulp.task ("CLEAN", FUNCTION (CB) (DEL (["./ DIST", "./dist.zip"], CB);)); gulp.task ("Copy", Function () ("index.js") .pipe (gulp.dest ("Dist /"));)); Gulp.Task ("Node-Mods", function ("./ package.json") .pipe (gulp.dest ("DIST /")) .pipe (Install ((Production: True) ));)); // Clean Up All Aws-SDK Directories from Node_Modules. WE DON "T // Need to Upload Them Since The Lambda Instance Will Already // Have It Available Globally. Gulp.Task (" Clean-Aws-SDK ", Function (Callback) (DEL ([" DIST / NODE_MODULES / ** / AWS-SDK "], callback);)); gulp.task (" zip ", function () (Return Gulp.Src ([" Dist / ** / * ","! Dist / package.json "]) .pipe (zip ("dist.zip")) .pipe (gulp.dest ("./"));)); gulp.task ("Upload", Function (callback) (awslambda.Deploy (". / Dist .zip ", Require (" ./ lambda-config.js "), callback);)); gulp.task (" Deploy ", Function (Callback) (Return Runsequence ([" Clean "], [" Copy "] , ["node-mods"], ["Clean-Aws-SDK"], [zip "], [" upload "], callback);));
A can be described by new tasks as a combination of existing ones:
Gulp.Task ('Deploy', Gulp.Series ('Clean', 'Copy', 'Node-Mods', 'Clean-AWS-SDK', 'Zip', 'Upload'));
This is the difference. Now consider the basic tools.
gulp vs. Grunt.
So, in front of us are two Task Ranner: Gulp and Grunt. Both are used by node.js and NPM, and they put the tasks using JavaScript.
At first glance, they are similar, however, Gulp has something that makes it more convenient to assembling: the skill is parallel to process tasks and a compact config, the laconic API. Let's look closer to their principle of work.
Threading data
We have a grant file that makes the CSS assembly and processing.
It can be seen from it that GRUNT when starting each process:
opens the file;
launches process;
saves changes;
closes the processed file to prevent the following process in it;
records the file to the final folder.
That is, the chain includes creating multiple temporal folders and save intermediate files:
Plugins write different authors. To each plugin can work with files, bypassing, files must be submitted as objects. In Gulp, this task is performed by virtual file system VYNYL-FS. And Gulp immediately sends the file to the following process without creating temporary files and without saving to disk.
The same configuration for Gulp is already more compact:

Its overall work mechanism - streaming files without writing to disk:

Task execution sequence
There is another difference: Gulp by default asynchronously performs stuff. There are advantages in this, and cons. In the same configuration file, we give the command to count the files from the DEV / * SCSS directory and send them to SASS.
The streams send the result of V.Pipe. Method. PIPE allows you to collect the result in the buffer in parts, and when it is full, immediately send information to the stream for reading, without finishing receiving the contents of the directory.
Sequential task execution makes Gulp quick and powerful, but occasionally the need to still perform tasks synchronously as in GRUNT. The problem can be solved through the callback, the return of the stream or promise. The task of Habré is dismantled in more detail. There is an alternative on the site npm.js
If you use GRUT, but you are attracted by streaming data - the same VYNYL-FS module can be used to implement it in GRUNT.
The Gulp Laconic API has only 5 methods:
Task (Name, Fn). Registers a feature named. You can specify dependency on other tasks if you need to execute them first.
Run (Tasks ...). Performs tasks.
Watch (Glob, Fn). Performs a function if the file on the place of the Glob changes.
SRC (Glob). As a parameter takes the file mask and returns the thread representing these files. Then the flow can be transferred to the entrance plugin.
Dest (Folder). Saves files to the specified folder.
I would especially like to note the presence of.watch () in the "native" project API, because tracking the constant changes in files is the most important component of the assembly. The brief of the API makes it possible to focus on its main task to assembling projects.
Alternatives Gulp and Grunt
Despite the popularity of Gulp (more than 130 to downloads per day) and GRUNT (more than 86 to downloads per day according to NPMJS.com), developers see in these systems and their drawbacks: for example, dependence on plug-ins, incomplete documentation, uncomfortable debuging. Alternatively, you can consider project assembly systems (such as Broccoli and WebPack) or NPM scripts.
Project assembly systems
Consider several alternative solutions on the Node.js platform. To assemble the project, they can replace Gulp and Grunt.
This system, like Gulp, arose as a competitor Task-early Grunt, but the developers initially conceived it precisely as an assistant to build with all the advantages and disadvantages. He will not "understand" without settings, that * .js is a file with scripts, * .coffee is coffeescript; Its config is more compact. However, any arbitrary actions at the assembly stage he will not be able to commit.
Here is the config file Brunch. It is written in CoffeeScript (you can also write on js):
Exports.config \u003d files: javascripts: jointo: "javascripts / app.js": / ^ app / "javascripts / vendor.js": / ^ (Bower_Components | Vendor) / StyleSheets: Jointo: "stylesheets / app.css" Order : After: ["Vendor / Styles / Helpers.css"] TEMPLATES: JOINTO: "javascripts / app.js"
Here I want to pay attention to the Jointo and Order operators. At the BRUNCH config level, it seems that you have to collect files in the desired order. As a result, the config takes 20-30 lines.
Broccoli.
Indi-tool, which is under development. His developers wanted to create competition already Gulp.
Compared to Gulp, the Broccoli tool uses other principles:
Acceleration assembly. Each plugin implements an intermediate caching of the assembly results instead of partial rebeling only the necessary files.
Trees instead of files. Gulp is best transforming one file into one final. The default broccolli uses only trees, not files, and they transform them into other trees (degenerate from one vertex).
At the moment, the tool is actively developing, new plugins appear, but for serious projects it is too early: plugins are not enough.
WebPack is a flexible modular assembly system. It has unusual syntax, but herself adopts any module syntaxes.
Understanding that you have to compete with such giants as Gulp, the creators decided to ease our life in the development of large projects. And added to the utility:
The ability to automatically build wood dependencies and resources.
Comfortable tools for the implementation of dynamic loading.
Compatibility with practically any modules (AMD, UMD, ES 2015, Common JS, third-party modules based on them).
Compatibility with preprocessors (Sass, Babel, Coffee Script, Type Script, etc.).
Live Reload (asynchronous boot technology, at which the browser updates not the entire pages, but separate applications).
The ability to share the code and generate a lot of bundle files, avoiding the creation of one heavy bundle.js.
Ability to optimize the code.
Separately, you can note a flexible approach to dependencies. The module can be JS, CSS and HTML file, and even JPEG with PNG. You can use Require ("MyJSFile.js") and Require ("MyCssFile.css"), share and use parts of the artifact again.
Read more about the possibilities, tool configurations, plugins can be found on GitHub, in the presentation with FrontTalks: Deep Immersion in WebPack.
nPM scripts
Assembly tasks can be solved using NPM scripts. Many scare this idea: few capabilities, scripts are not fast enough in comparison with Gulp or WebPack. Nevertheless, these shortcomings are exaggerated.
NPM script capabilities
NPM scripts solve quite a lot of tasks. For example, you can implement trap scripts:
("Name": "NPM-Scripts-Example", "Version": "1.0.0", "Description": "NPM Scripts Example", "scripts": ("Prebuild": "Echo I Run Before Build Script "," Build ":" Cross-env node_env \u003d Production WebPack "" PostBuild ":" Echo I Run After The Build Script "))
Scripts will be loaded in order according to prefixes: PreBuild, for example, starts before Build, because it has prefix Pre. Accordingly, PostBuild will be loaded last. The NPM Run Build team will launch them in the desired order.
You can call one script from the other to decompose complex tasks. For example, here the PREBUILD task calls the Clean task.
("Name": "NPM-Scripts-Example", "Version": "1.0.0", "Description": "NPM Scripts example", "scripts": ("Clean": "Rimraf ./dist && Mkdir Dist "," PreBuild ":" NPM Run Clean "," Build ":" Cross-env node_env \u003d Production WebPack "))
If the task becomes too complicated, you can always call a separate file:
("Name": "NPM-Scripts-Example", "Version": "1.0.0", "Description": "NPM Scripts Example", "scripts": ("Build": "Node Build.js"))
Due to the Gulp Streaming for assembly tasks, it has become much more convenient than GRUNT. But it can be implemented through NPM. In Windows and UNIX, the Streaming is done by default, without saving intermediate files.
For example, in UNIX you can make grep file contents and send it to a new file:
Grep 'My Name' bigfile.txt\u003e linesthathavemyname.txt
Redirect (\u003e) sends the desired strings to the destination file. The task is performed without saving intermediate files.
But there are inconveniences: You can not leave comments in Package.json. The way out can be the creation of short scripts with understandable names aimed at some one small task. In more detail, the question of replacing Task Ranners NPM scripts is well lit in the English-speaking article Why I Left Gulp and Grunt for NPM Scripts.
Outcome
In the market there is a great competition tools for automating routine tasks (for example, Gulp and Grunt), as well as tools for automating the project assembly (WebPack, Broccoli, Medusa, Browserify, etc.).
If you look at the Task Ranners, then Gulp compared to GRUNT is simpler, understood and produce: wins due to savings on disk operations. But Grunt has more plugins (for example, there is a test plugin). Because of this, he remains a lot of fans.
If we talk only about the assembly, then Gulp has all the advantages over Grunt:
The stream architecture for the transfer of files over the chain provided by the Vynyl-FS module.
By default - asynchronous task execution.
The laconic API is only 5 functions.
At the same time, the WebPack build is an equally interesting tool. It provides Live Reload technology that accelerates the renewal of the browser. This is a huge plus: technology saves time to press the update button that developers have to press constantly. Gulp also has Live Reload, but WebPack is difficult to compare with Gulp or Grunt, as it is "sharpened" only under the build and does not "know how to solve arbitrary tasks.
All these decisions are perfectly integrated with the family of products from Jetbrains, however, we in WaveAccess preferred GRUNT for ample opportunities for both footgames, and for frontend specialists.
If you have any questions and you need to develop a web project, write to us on [Email Protected]
- Frontend
- Grunt.
- Gulp.
- Task Runners.
In this article, we will analyze in detail the process of assembling the project of the project, which came across my daily work and very much easier for the routine.
The article does not claim to be the truth in the last instance, since today there are a large number of different assemblers and approaches to the assembly, and everyone chooses to taste. I will only share my thoughts on this topic and show my workflow.
We will use the Gulp collector. Accordingly, the Node JS must be installed in the system. Installing the nodes for a specific platform we will not consider, because It googles in a couple of minutes.
And first will answer the question - why Gulp?
Of the more or less demolition alternatives we have GRUNT and BRUNCH.
When I just started coming to the collectors - there were already grunt and gulp on the market. The first appeared earlier and on this has a larger community and a variety of plugins. According to NPM:
GRUNT - 11171 Package
Gulp - 4371 Package
But Grunt seemed to me through the chur verbal. And after reading several articles, compared - I preferred Gulp for its simplicity and visibility.
Brunch is a relatively young project, with all the advantages of this pluses and minuses. I watch him with interest, but I haven't used it yet.
Let's proceed:
Create a folder for our project, for example "HABR". Open it in the console and execute the command
NPM init
You can simply press ENTER to all the installer questions, because Now it is not fundamentally.
As a result, in the project folder, we are generated by the file package.json, approximately such a content.
("Name": "HABR", "VERSION": "1.0.0", "Description": "", "Main": "index.js", "scripts": ("test": "Echo" error: No Test Specified "&& Exit 1"), "Author": "", "License": "ISC")
Some modifications of it under our needs:
("Name": "HABR", "VERSION": "1.0.0", "Description": "", "Author": "", "License": "ISC", "DevDependencies": ("Gulp": "^ 3.8.1"))
in the DevDependenCies block, we indicated that we need Gulp and immediately we will prescribe all our plugins.
Plugins:
With styles, I do the same as with JS, but only instead of Rigger "A - I use the built-in SCSS import.
Our main.scss will look like this:
/ * * Third Party * / @import "CSS: ../../ Bower_COMPONENTS / Normalize.css / Normalize.css"; / * * Custom * / @import "Partials / App";
In this way it turns out it is easy to control the order of connection of styles.
Check our Task, running
Gulp Style: Build
We collect pictures
Task on pictures will look like this:
Gulp.Task ("Image: Build", Function () (Gulp.Src (Path.src.img) // Select our pictures. PIPE (IMAGEMIN ((// Singing them Progressive: True, Svgoplugins: [(RemoveViewBox: False )], Use:, Interlaced: True))) .pipe (gulp.dest (path.build.img)) // and throw in Build .pipe (Connect.Reload ());));
I use the default Imagemin settings, with the exception of interlaced. Read more about the API of this plugin you can read.
Now, if we put some picture in SRC / IMG and launch the command
Gulp Image: Build
thus, we will see our optimized picture in Build. Also, Gulp will kindly write in the console how much space he saved for users of our site :)
Fonts
With fonts, I usually do not need to carry out any manipulations, but whatever you caress the paradigm "We work in SRC / and collect in Build /" - I simply copy files from SRC / Fonts and insert into Build / Fonts. Here Task
Gulp.Task ("Fonts: Build", Function () (Gulp.Src (Path.Src.fonts) .pipe (gulp.dest (path.build.fonts))));
Now let's define Taq with the name "Build", which will launch everything that we have accounted here
Gulp.Task ("Build", ["HTML: BUILD", "JS: Build", "Style: Build", "Fonts: Build", "Image: Build"]);
File Changes
In order not to climb all the time in the console, let's ask the Gulp every time when you change some file to run the desired task. To do this, write such a TASK:
Gulp.Task (Watch ", Function () (Watch (Function (Event, CB) (Gulp.start (" HTML: Build ");)); Watch (, Function (Event, CB) (Gulp.start ( "Style: Build");)); Watch (, FUNCTION (EVENT, CB) (Gulp.start ("JS: Build");)); Watch (, Function (Event, CB) (Gulp.start ("Image : build ");)); Watch (, FUNCTION (EVENT, CB) (Gulp.start (" Fonts: Build ");));));
We understand there should not be problems. We simply go through our paths defined in the PATH variable, and in the function that is called when changing the file - please start the necessary Task.
Try running in console
Gulp Watch.
and change different files.
Well, not cool?)
Web server.
To enjoy a miracle Livereload - we need to create a local web server. To do this, write the next Task:
Gulp.task ("WebServer", Function () (Connect.Server ((Host: Server.host, Port: Server.port, Livereload: True));));
There is even nothing to comment. We will simply start the server from LiveLoad on the host and port that we have defined in the Server object.
Cleaning
If you add some picture, then run the Image: Build task and then remove the picture - it will remain in the Build folder. So it would be convenient - to periodically clean it. Create for this simple Task
Gulp.Task ("Clean", Function (CB) (Rimraf (Path.Clean, CB);));
Now when starting the command
Gulp Clean.
just deleted the Build folder.
And finally, the little mercy
This Task does not carry critical functionality, but I really like it :)
Gulp.Task ("OpenBrowser", Function () (OPN ("http: //" + server.host + ":" + server.port + "/ build");));
When we need to, we will launch it - and in our browser will automatically open the tab with our project.
Cool :)
Final Accord
The last thing - we will define the default Task, which will launch the entire assembly.
Gulp.task ("Default", ["Build", "WebServer", "Watch", "OpenBrowser"]);
Finally, your gulpfile.js will look something like this.
Now perform in the console
And voila :) The workpiece for your project is ready and waiting for you.
Couple words in conclusion
This article thought as a way to refresh in the memory of the subtlety to build frontend projects, and to ease the transfer of this experience to new developers. You do not need to use this embodiment on your projects. There is yeoman.io where you will find the generators almost for any needs.
I wrote this collector for 2 may reasons.
- I like to use Rigger in my hTML code
- Almost all assemblies that I met - a temporary folder is used (usually.tmp /), to record intermediate results assembly. I do not like this approach and I wanted to get rid of temporary folders.
- And I wanted all this to me from the box :)
My working version of the collector you can download on my github.
I hope the article turned out to be useful for you :)
P.S. All errors, shortcomings and shoals - please write in a personal
Gentleman's Front-End Developer Set
It's no secret that the modern front-end developer must have in its arms one of the project assembly tools such as Gulp. or Grunt.. Until some time Grunt occupied a monopoly in this matter, but the developer group separated from GRUNT decided to create its own lightweight and fast Task-manager Gulp.
In this article, we will prepare the starting package to use it in future projects.
What are we using technology
- Software platform: Node.js.
- CSS Pre-processor: Stylus.
- Task Manager: Gulp.
Why the front manager Task Manager
Until recently, I myself wondered why I need to spend time to configure the Task Manager config, if I cope with layout layout so well until I started using CSS pre-processors.
CSS Pre-processors - really convenient and speed up writing styles, but compiling the code written on a pre-processor into a regular CSS, not quite a trivial task that is solved by one button. Here we are for the rescue and the Task Manager comes. The code conversion occurs not that by pressing the button, everything happens online without your participation (of course, if you configure everything correctly).
Of course, the tasks of the Task Manager go far beyond the processes associated with the transformation code conversion into pure CSS. The project collector is also engaged in a ministry, concatenation, checking the code for errors, assembling the image in sprites, optimizing images under web, etc. You just create in your project a lot of logical-separated files, which are then conveniently collected in one directory already processed and ready to work in the browser. But it is a little later, and now let's start with the preparation.
Installation Node.js.
If you know how to install Node.js to your system and use it, you can safely go to the next header.
I would like to immediately warn that all the actions described are relevant for Mac OS X.but generally applicable for others Unix Systems. Development through Task Manager and Command Line in Windows Somewhat more difficult and here it will not be described. However, if you still use Windows and not ready to refuse it, I can offer an use option virtual machine With installed Ubuntu.I use this option on my home system, which is generally quite convenient.
So, the first thing we have to download and install the Node.js package to your system to work with a node through the console. Go to the official site node.js and download a fresh stable version for your system. After installation, the Node command should be available on your command prompt. To verify that your Node works, enter the command on the command prompt
in response, the version of the Node.js installed is established. If all is well, go on.
Structure of project directories
In our projects, we will use a unified version of the structure:
Develop - Root Development Catalog └─start. - Project Catalog ├─build - Bild Collected Task Manager ├─Resource. - All source files for development (.psd, etc.) ├─Src. - Development catalog │├─css. - Style Development Catalog ││├─images. - All static images ││├─Sprites. - image collected in sprite ││├─partial - custom files styles │││├─mixins.styl - Custom mixins │││└─styles.Styl. - Custom styles ││├─vendor - Others external files styles ││└─styles.Styl. - main style file │├─fonts. - Catalog of fonts │├─img - Catalog dynamic images │├─js. - JavaScript Development Catalog ││ ├ _ *. JS - Side Files JS ││├─_main.js. - Main Custom JS ││└─Main.js. - Main JS file │├─.htaccess - Config for server │├─ * .html - page markup files │├─pages.html. - file with links to all page template │├─index.html - index file markup file │└─include - Catalog of plug-in marking files │ └─ * .html - plug-in marking files (Header.html, etc.) ├─package.json - NPM batch manager config ├─gulpfile.js. - Config Gulp. ├─stylus.template.mustache. - Mask for reading sprites ├─todo. - Todo Sheet └─.Gitignore. - Config for Git
Installation
In the console using the CD command, go to the root directory of development, create a catalog of our MKDir Start project and move on to it.
We will establish our structure for the project through the console:
mKDIR Build Resource SRC SRC / CSS SRC / CSS / Images SRC / CSS / SRC / CSS / PARTIAL SRC / CSS / VENDOR SRC / JS SRC / TEMPLATE SRC / TEMPLATE / INCLUDE SRC / IMG SRC / FONTS
Create the initial files in the project structure:
touch Gulpfile.js stylus.template.mustache .gitignore SRC / .htaccess SRC / Todo SRC / CSS / Styles.styl SRC / CSS / Partial / Styles.styl SRC / CSS / PARTIAL / MIXINS.STYL SRC / JS / Main.js SRC / JS / _Main.js src / template / pages.html src / template / index.html src / template / include / header.html src / template / include / footer.html
Create package.json
all pop-up questions can be tapped through ENTER, Node will set them the default values, or fill out the proposed fields.
.gitignore.
Speaking a gita which catalogs to ignore and not fill in the repository:
/ Node_Modules / / Build / / Resource /
The node_modules directory will appear later after installing plug-ins and will contain all the project's NODE-plugins.
sRC / .htaccess.
Installing an additional GZIP compression and caching for the server:
AddoutPutFilterByType Deflate Text / Html Text / Plain Text / XML Text / CSS Text / JavaScript Application / JavaScript
sRC / CSS / Styles.styl
Connect user style files to the main style file:
@import "PARTIAL / STYLES"
Please note that for connecting.styl files, the extension is not specified, according to the semantics of the Stylus pre-processor code. To connect styles in another extension, for example.css, the indication of the latter is required.
TODO.
This page contains a Todo Development Sheet. You can read more about working with this file on the Plaintasks Plaintasks Plugin page for Sublime Text.
This setting the structure is completed.
Installing plugins through the NPM batch manager
Node.js by default includes a NPM batch manager, in whose repositories a lot of plugins have been collected with which we have to work.
Setting the Gulp plugin
First you need to install Gulp globally (with -G key) on our system
nPM Install Gulp -g
Do it you need onceIn the future, the global installation is not required.
Now you need to install Gulp locally in the project catalog
nPM Install Gulp --Save-Dev
Key --Save-DeV suggests that the information about the plugin (name in the repository and its version) will be added to the Package.json config and remember it for this project. Since we do not store a heavyweight folder with Node_Modules plugins, saved in the config information about installed plugins will allow only one NPM I command to deploy all the necessary plugins in the project.
For each team there are abbreviations, so the command above we can write in a shorter format
In the future, we will also use the abbreviated format of the teams.
Stylus plugin for Gulp
In our projects, we use the stylus pre-processor that works fine and compiled on the node.
Install:
nPM I Gulp-Stylus -D
CSS processing plugins
AvtoPrefikser - automatically substitutes the prefixes -MS-----MOZ--WebKit - in the desired properties:
nPM I Gulp-Autoprefixer -D
CSS Minification - Plugin minifies the output CSS file eliminating it from unnecessary gaps and tabs:
nPM I Gulp-Minify-CSS -D
Image processing plugins
Association of pictures in sprites - You no longer need to spend the hours of precious time to combine all images in sprites, and then calculate their coordinates, all this will automatically make this plugin for you:
nPM i Gulp.Spritesmith -D
Add to the previously created stylus.template.mustache mask for calculating positions in sprites:
((#Items)) $ ((Name)) \u003d ((px.x)) ((px.y)) ((px.offset_x)) ((px.offset_y)) ((px.width)) (( px.Height)) ((px.total_width)) ((px.total_height)) "(((escaped_image)))"; (/ Items))
Add special mixins in Mixins.styl:
SpriteWidth ($ Sprite) Width $ SpriteHeight ($ Sprite) Height $ SpritePosition ($ Sprite) Background-Position $ Sprite $ Spriteimage ($ Sprite) Background-image URL ($ Sprite) Sprite ($ Sprite) if! Match ( "Hover", Selector ()) &&! Match ("Active", Selector ()) Spriteimage ($ Sprite) SpritePosition ($ Sprite) SpriteWidth ($ Sprite) SpriteHeight ($ Sprite)
Connect the mixins and a generated file with coordinates to the main SRC / CSS / STYES.Styl style file:
@import "Partial / Sprite" @import "PARTIAL / MIXINS"
Note that the sprites must connect to the user styles @import "Partial / Styles"
Image optimization for web - The plugin will automatically cut all unnecessary information from your images and soim them up to the optimal size, which will allow in some cases to reduce the scope of images up to 90%:
nPM I Gulp-Imagemin -D
JavaScript processing plugins
Minification JS. - The plugin minifies your JS code reducing its download time:
nPM I Gulp-Uglify -D
JS Tracking - the plugin will check your JS code to identify all inconsistencies and will bring them into the console:
nPM I JShint Gulp-JShint -D
HTML processing plugins
Connected files - The plugin allows you to store static parts of the site, such as Header, Footer, Aside, etc., in separate files and connect them to any part of another file. There is no longer enough, in the case of small changes in the header, change dozens, or even hundreds of HTML pages of the template:
nPM i Gulp-Rigger -D
The plugin is also compatible with JS.
Connect the user JS to the main JS SRC / JS / Main.js software construction:
// \u003d _main.js.
Connect to index.html files Header.html and footer.html
// \u003d Include / Header.html // \u003d include / footer.html
Other plugins
Livereload. - The plugin eliminates you to restart the page in the browser every time to see the changes, now it happens automatically while saving the changed file:
nPM i Gulp-Connect -D
Protect Gulp from departure - Sometimes it happens that Gulp can fly out of the observation mode in the event of critical errors (mainly due to JS). This plugin, if possible, tries to leave Gulp processes workable:
nPM i Gulp-Plumber -D
Rename files - The most common work with file names. The plugin allows you to completely rename files, change the extension, add prefixes and postfix, for example, to bring the style of the style.styl in style.min.css:
nPM i Gulp-Rename -D
Cleener - Sometimes there is a need to complete the Catalog of the BUILD directory, there is a plugin to the rescue:
Sourcemap - In order for after the minification, your files remained readable through the browser debugging, you need to add sourcemap to minifier files:
nPM I Gulp-Sourcemaps -D
Extended Watch Features. - The plugin makes Watch smart, now it does not overwrite all the files in the build when you change the entire file, the specific modified file is overwritten, which saves time and resources:
nPM I Gulp-Watch -D
Check Package.json
After all installed plugins, Check our package.json. He must have about the following type:
("Name": "Start", "Version": "1.0.0", "Description": "Start Pack for Front-End Develop", "Author": "Ivan Ivanov", "License": "Mit", "Dependencies": (), "DevDependencies": ("Gulp": "Latest", "Gulp-AutoPrefixer": "Latest", "Gulp-Connect": "Latest", "Gulp-imagemin": "Latest", "JShint": "Latest", "jshint-stylish": "Latest", "Gulp-jshint": "Latest", "Gulp-minify-CSS": "Latest", "Gulp-Plumber": "Latest", "GULP-RENAME": "LATEST", "GULP-RIGGER": "LATEST", "GULP-SOURCEMAPS": "LATEST", "GULP-STYLUS": "LATEST", "GULP-UGLIFY": "LATEST", "Gulp-Watch": "Latest", "gulp.spritesmith": "Latest", "Rimraf": "Latest"))
Instead of Latest, in your case, specific versions of installed plugins will be spelled. Because We form our starting package that will be used in a variety of projects, it is also recommended to replace the values \u200b\u200bof versions on Latest to always establish current versions of plug-ins in the project.
In the project folder, the Node_Modules directory must also appear in which all the node plug-in files are stored. All the desired plugins are installed, you can go to the GULP config.
Setting up gulpfile.js.
gulpfile.js. - This is the main configuration file of our Task Manager, it is in it that we will store all settings and commands.
All Gulp work comes down to Task ( english a task). The task is a separate independent function named. Each task may be caused separately.
Complimentary mode with modern standards
First of the file, connect the compatibility mode only by modern standards:
"Use Strict";
Read more about this directive.
Initialize plugin
Plugins are initialized by the following design:
var initplugin \u003d require ("plugin-name");
In accordance with this design, you initialize all our plugins:
VAR GULP \u003d REQUIRE ("GULP"), // Main plug Gulp Stylus \u003d Require ("Gulp-Stylus"), // Preprocessor Stylus Prefixer \u003d Require ("Gulp-Autoprefixer"), // Admission of CSSMIN \u003d Require (" Gulp-minify-CSS "), // Minification CSS Uglify \u003d Require (" Gulp-Uglify "), // Minification JS JSHINT \u003d Require (" Gulp-JShint "), // Tracking errors in JS Rigger \u003d Require (" Gulp -Rigger "), // Work with Inclusions in HTML and JS Imagemin \u003d Require (" Gulp-Imagemin "), // Minimizing images Spritesmith \u003d Require (" Gulp.Spritesmith "), // Conjoin pictures in Rimraf \u003d Require sprites ( "Rimraf"), // Cleaning SourceMaps \u003d Require ("GULP-SOURCEMAPS"), // Sourcemaps Rename \u003d Require ("Gulp-Rename"), // Rename the Plumber \u003d Require files ("Gulp-Plumber"), // Fuse for stopping Galp Watch \u003d Require ("Gulp-Watch"), // Expanding the capabilities of Watch Connect \u003d Require ("Gulp-Connect"); // Livereload.
Constants of paths
For convenience, we immediately define all the ways and masks:
Var Path \u003d (Build: (// Here we point where to fold ready after assembly files HTML: "Build /", JS: "Build / JS /", CSS: "build / css /", img: "build / css / images / ", fonts:" build / fonts / ", htaccess:" build / ", contentimg:" build / img / ", sprites:" src / css / images / ", spritescss:" src / css / partial / " ), SRC: (// Ways Where to take source HTML: "src / template / *. HTML", // syntax SRC / template / *. HTML says Gulp What we want to take all files with extension.html js: "src / JS / [^ _] *. js ", // In styles and scripts We will need only Main files JShint:" SRC / JS / *. JS ", CSS:" src / css / styles.styl ", cssvendor:" src /CSS/vendor \u003e* ", // If we want library files to separately store that Rassenger IMG:" SRC / CSS / IMAGES /**/*** ", // Syntax IMG /**/2*. means - take all the files of all extensions from the folder and from the Fonts nested catalogs: "SRC / Fonts / mounted", Contentimg: "SRC / IMG /**/2*", Sprites: "SRC / CSS / Sprites / *. PNG ", htaccess:" src / .htaccess "), watch: (// We will point out, for changing ka Kih files We want to watch HTML: "SRC / TEMPLATE / ** / *. HTML", JS: "SRC / JS / ** / *. JS", CSS: "SRC / CSS /**/2**", IMG: "SRC / CSS / IMAGES /**/7/27, Contentimg:" SRC / IMG /**/*, Fonts: "SRC / Fonts /**/2*", htaccess: " SRC / .htaccess ", Sprites:" SRC / CSS / SPRITES / *. PNG "), Clean:" ./build ", // directory that can be cleaned outputdir:" ./build "// Source Root Directory to run the minister );
Please note that we can use name masks:
- * .js. - All files with JS extension
- [^ _] *. JS - All files with the extension JS, excluding those starting from the lower underscore
- *.* - Any files with any extension within the current speaker
- /**/* .html. - All files with extension.html within the current directory and all subsidiary directories
Task (tasks)
Now that all constants are spelled out, you can start writing Taskov. All tasks have the following design:
Gulp.task ("TaskName", Function () (// Some Functions));
Mini-server and LiveReload
First of all, we will configure the operation of the local server and LiveRELOAD:
// Local server For the development of Gulp.Task ("Connect", Function () (Connect.Server ((// Mix the root server configs:, // root directory of the port: 9999 server, // What port will use LiveReload: True // Initialize the work LiverelOad));));
Most likely you will often have to work at once in several projects. The server allows you to simultaneously run multiple servers, enough for different projects to register your port.
Bild HTML.
// Task for Building HTML Gulp.Task ("HTML: BUILD", FUNCTION () (Gulp.Src (Path.Src.html) // Select files on the desired path. PIPE (Rigger ()) // Ringing via Rigger. Pipe (gulp.dest) // Unload them to the Build .pipe folder (Connect.Reload ()) // and reboot our server to updates));Build JS.
// Check JS on errors and pin them into the Gulp.Task console ("JSHINT: Build", Function () (Return Gulp.Src (Path.SRC.JSHINT) // Select files on the desired path. PIPE (JSHINT ()) // run via jshint .pipe (jshint.Reporter ("jshint-stylish")); // Stylish an output of errors in the console)); // Bilding Yavascript Gulp.Task ("JS: BUILD", FUNCTION () (Gulp.Src (Path.src.js) // Find our Main file.pipe (Rigger ()) // Ringing via Rigger .pipe (Sourcemaps .init ()) // Initialize SourceMap .pipe (Uglify ()) // Singing our JS .pipe (sourcemaps.write ()) // Propying cards. PIPE (RENAME (SUFFIX: ".min"))) / Add suffix.min to the output file.pipe (gulp.dest (path.build.js)) // Unload ready File in Build .pipe (Connect.Reload ()) // and reboot the server));Build Sprite
All images for combining into sprites add up to the SRC / CSS / SPRITES directory and after the run via Gulp become a single spriting image. In sprites, you should not add logos and boards without clear sizes.
// Bilda sprites gulp.task ("Sprites: Build", function () (var spritedata \u003d gulp.src (path.src.sprites) // Select from where to take images to unite in sprites (spriteesmith ((imgname: " Sprite.png ", // The name of the spray image CSSName:" Sprite.styl ", // Style name where you store image positions in ImGPath:" Images / Sprite.png ", // Way Wheels Sprite CSSFormat:" Stylus " // Format in which I process the CSStemplate position: "stylus.template.mustache", // file mask Cssvarmap: Function (Sprite.name \u003d "S-" + Sprite.name // The name of each sprite will consist of a file name and the design "S-" at the beginning of the name)))); spritedata.img.pipe (gulp.dest (path.build.sprites)); // Path, where we save the picture spritedata.css.pipe (gulp.dest (Path .build.spritescss)); // The path where we save styles));
For the output of the sprite, it is enough to use the mixture. For example, for the Lorem.PNG file, the sample from the sprite will look like this:
Lorem Sprite ($ s-Lorem)
Now the object with the class.Lorem will take the size of the image and the image itself as a background.
Bild static images
Static images are images used in the layout template.
// Buildim Static images Gulp.Task ("Image: Build", Function () (Gulp.Src (Path.SRC.IMG) // Select our pictures. PIPE (IMAGEMIN ((// Sing them Progressive: True, // Compression.jpg Svgoplugins: [(RemoveViewBox: false)], //Svg Interlaced: True, //Svg.gif Optimizationlevel: 3 // compression ratio from 0 to 7))) .pipe (gulp.dest (PATH. build.img)) // unload in Build .pipe (Connect.Reload ()) // Reboot the server));
Bild dynamic images
Dynamic images are content images that will change on the site and at the template level are connected only to the demonstration. For example, it can be images for news, etc.
// Buildim Dynamic images Gulp.Task ("ImageSContent: Build", Function () (Gulp.Src (Path.Src.conentimg) .pipe (Imagemin ((// Sing them Progressive: True, //Spage.jpg svgoplugins: [(RemoveViewBox: false)], //Svg Interlaced: True, //spotion.gif OptimizationLevel: 3 // Compression ratio from 0 to 7))) .pipe (gulp.dest (path.build.conentimg)) // unload in Build .pipe (Connect.Reload ()) // reboot the server));
Bildim CSS
// Building Custom CSS Gulp.Task ("Cssown: Build", Function () (Gulp.Src (Path.src.css) // Select our main style file. PIPE (sourcemaps.init ()) // Initialize Soucemap. Pipe (Stylus ((Compress: TRUE, "INCLUDE CSS": TRUE))) // compile Stylus .pipe (Prefixer (Browser: ["Last 3 Version", "\u003e 1%", "IE 8", "IE 7 "]))) // Add vendor prefixes.pipe (CSSMIN ()) // Surminem.pipe (Sourcemaps.Write ()) // Propyash Sourcemap .pipe (Rename (Suffix:" .min "))) / / Add suffix.min to the output file name.pipe (gulp.dest (path.build.css)) // Drink in Build .pipe (connect.reload ()) // Reboot the server));Separate Task for external styles:
// Building Vendon CSS Gulp.Task ("Cssvendor: Build", Function () (Gulp.Src (Path.Src.cssvendor) // We take the VENDOR .PIPE folder (Sourcemaps.init ()) // Initialize Soucemap .pipe ( cssmin ()) // Surrem.pipe (sourcemaps.write ()) // Propyash SourceMap .pipe (Gulp.Dest (Path.Build.css)) // Unloaded in Build.pipe (Connect.Reload ()) // reboot the server));
Also add Task for Bild General CSS:
// Bildim CSS whole Gulp.Task ("CSS: Build", ["Cssown: Build", // "Cssvendor: Build"]);
In case you need to process external styles separately from home and unload them. separate files You need to rassate the line "CSSvendor: Build"
Build fonts
// Bildim Gulp.Task fonts ("Fonts: Build", Function () (Gulp.Src (Path.Src.fonts) .pipe (gulp.dest (path.build.fonts)) // Unload in Build));Build.htaccess.
// Bildim HTAccess Gulp.Task ("HTACCESS: BUILD", FUNCTION () (Gulp.Src (Path.Src.htaccess) .pipe (Gulp.Dest (Path.Build.htaccess)) // Unload in Build));Common Build
In order for us to be bought every part separately, Propyat Task for General Build:
// Bildim All Gulp.Task ("Build", ["HTML: BUILD", "JSHINT: Build", "JS: Build", "Sprites: Build", "CSS: Build", "Fonts: Build", " HTACCESS: Build, "Image: Build", "ImagesContent: Build"]);
Cleaning Bilda
Sometimes it is required to fully clear the Build directory. Here the next Task will come to the rescue:
// Clean the Bild folder Gulp.Task ("Clean", Function (CB) (Rimraf (Path.Clean, CB);));
Watch or Tracking Changes in Real Time
One of the most important and useful features Gulp is the Watch function that allows you to track in real time all changes with the files produced and, depending on this, perform specific steps:
// Watch Gulp.Task ("Watch", Function () (// Bildim HTML In case of changing Watch (, FUNCTION (EVENT, CB) (Gulp.start ("HTML: Build");)); // Buildim Sprites In case of changing Watch (, Function (Event, CB) (Gulp.start ("Sprites: Build");)); // Buildim contextual sampling in case of changing Watch (, FUNCTION (EVENT, CB) (Gulp.start (" ImagesContent: Build ");)); // Bildim CSS In case of changing Watch (, Function (Event, CB) (Gulp.start (" CSS: Build ");)); // Check the JS in case of changing Watch (, ["jshint"]); // Bildim JS In case of changing Watch (, FUNCTION (EVENT, CB) (Gulp.start ("JS: Build");)); // Bildim Static images in case of changing Watch (Function ("Image: Build");)); // Bildim fonts If you change Watch (, FUNCTION (EVENT, CB) (Gulp.start ("Fonts: Build");)) ; // Bildim HTCCESS in case of changing Watch (, FUNCTION (EVENT, CB) (Gulp.start ("HTACCESS: Build");));));
Default actions
Default actions - which tasks will perform the Task Manager when entering the Gulp command in the console:
// Default actions Gulp.Task ("Default", ["Build", "Watch", "Connect"]);
In our case, in defense, we will be brought to our project, we will turn on the Watch mode and start the server.
Command Line Commands
All Galpa Commands for the command line consist of two parts it is directly team Gulp. And through the gap the name Taska. Here is a list of commands applicable to our config:
- gulp - the main command, launches Task Default
- gulp Build - Bildim All
- gulp Watch - Start Watch
- gulp Clean - Cleaning the BUILD catalog
- gulp Connect - Start Server
- gulp HTML: Build - HTML Bild
- gulp JShint: Build - Check JS for errors
- gulp JS: Build - Build JS
- gulp Sprites: Build - Build Sprite
- gulp Image: Build - Bild Static Images
- gulp ImageContent: Build - Bild Dynamic Images
- gulp Cssown: Build - CSS Custom Bild
- gulp CSSvendor: Build - Bild External CSS
- gulp CSS: Build - Common CSS Bild
- gulp Fonts: Build - Bild Fonts
- gulp HTACCESS: Build - Build.htaccess
At this stage, the Gulpfile.js is completed.
Copy the starting package in the project
To begin, go through the console in the folder where we are developing, such as CD Develop / Example and copy everything from the starting packet directory to our project CP -A ~ / Develop / START /. ~ / Develop / Example /
This copy method is most convenient, because It will accurately copy everything, including hidden files .Gitignore, etc.
Conclusion
Using this guide We have prepared a starting package to use Gulp in your projects for Front-End Development.
Also this package is available on GitHub
POST Scriptum
This article is not a final and will be updated depending on changes and improvements.


