The problem at which hDD Not determined by the computer is quite common. This can happen with a new or already used, external and built-in HDD. Before trying to eliminate the problem, you need to figure out what has become its reason. Usually users and themselves can correct the difficulties associated with hard disk - For this, it is enough to follow the instructions and act neatly.
There are several common situations, due to which the hard disk refuses to perform its function. This concerns not only the disk connected to the computer for the first time - once the main HDD can stop working, which is why the operating system boot will be impossible. These causes can be:
- The first connection of the new disk;
- Problems with loop or wires;
- Incorrect settings / BIOS failure;
- Weak power supply or cooling system;
- Physical breakage of the hard drive.
In certain cases, it is possible to encounter the fact that the BIOS sees a hard disk, and the system is not. Accordingly, a very experienced user may have difficulty diagnosing and eliminating the problem. Next, we will analyze the manifestation and solution of each of them.
Cause 1: First Disk Connection
When the user first connects an external or internal hard disk, then the system may not see it. It will not be displayed among other local disks, but it is physically fully working. It is easy to fix, and this is necessary as follows:

Even if the utility "Disk management" Does not see equipment, take advantage of alternative programs from third-party developers. In another article, the reference is described below how to format special applications designed for advanced work with HDD. Use method 1 in which work with different software is considered.
Cause 2: Invalid Format
Sometimes the disk has no item "Change the letter of the disk or the path to the disk ...". For example, due to inconsistencies in the file system. To work normally in Windows, it must be in NTFS format.
In this case, it needs to be reformatted so that it becomes available. This method is suitable only if HDD does not contain information, or the data on it does not provide importance, because all the data will be deleted.

Cause 3: Uninitialized HDD
The new and unused hard drive may not work immediately when connected. Alone, the hard disk is not initialized, and this process should be done manually.

The disk will be initialized and ready to work.
Cause 4: Damaged connectors, contacts or loops
When connecting an external and internal hard drive, you need to take care. Outdoor HDD may not function because of the damaged USB wire. Therefore, if visible reasons, Because of which it does not work, no, then you should take a similar wire with the same connectors and connect the disk to the computer. The inner hard drive can also have this problem - cables failed and need to be replaced to work.
Still often helps a simple reconnection of the SATA cable to another connector motherboard. Since they are usually sufficient, you will need to connect the SATA cable to another free port.
Due to inattention or insufficient experience, the user can incorrectly connect the hard drive inside system Block. Check the connection and make sure that the contacts do not depart.
Cause 5: Invalid BIOS Settings
The computer does not see the system disk


Perhaps the BIOS is not set up the IDE compatible mode.

BIOS does not see hard drive
Usually, even the BIOS does not define the hard disk, then the wrong settings or a failure of them. Incorrect settings appear as a result of the user's actions, and failure can occur for various reasons, ranging from nutrition interruptions and ending with viruses in the system. This may indicate the system date - if it is not accurate, then this is a direct failure indicator. To eliminate it is required full reset Settings and return to factory settings.
Outdated BIOS.
When you try to connect a new drive to a too old computer with the same BIOS periodically fails to avoid problems. This is explained by software incompatibility and irrelevant control files. You can try to update bIOS firmware manually, and then check the visibility of HDD.
Attention! This method is intended exclusively for experienced users. The whole process you will perform at your own risk, because in case of incorrect actions, you can lose the performance of the PC and spend a lot of time to restore its functioning.
Cause 6: Not enough nutrition or cooling
Listen to the sounds that are distributed from the system unit. If the buzzing sounds of the change of cycles are heard, then it is likely to be a weak power supply. Act in circumstances: Replace the power supply to a more powerful one or disconnect the device's secondary importance.
If the cooling system is not well running well, then due to overheating, the disc can be periodically permissible to determine the system. Most often this happens when a laptop is used, which is usually weak coolers that do not cope with their task properly. The solution to the problem is obvious - the acquisition of more powerful cooling.
Reason 7: Physical breakage
Due to various causes hard The disc can fail: shake, fall, hit, etc. If the above methods did not help, then you should try to connect an HDD to another computer. If it is not determined by them, then most likely, on the program level it is not to fix it, and have to find service center For repair.
We looked at the main reasons for which the hard disk does not start. In fact, they may be greater because it all depends on the specific situation and configuration. If your problem has not been solved, then ask questions in the comment, we will try to help you.
In bios. Solving some problems for only specialists with appropriate knowledge, however, with more part of them, the usual user will be able to cope independently. The recommendations below are universal, that is, suitable for any manufacturer of computers, netbooks and laptops, whether ASUS, Acer, MSI and others.
Check for service
The drive may come into disrepair due to the following damage:
- after hitting or falling a laptop
- wearing mechanism
Any device or components over time exhausted its resource and breaks. To check the service, you should connect it to another PC. If it does not work - you need to buy a new one.
Always remember that when working with a laptop, it cannot be installed on an uneven or soft surface. The ventilation holes must be open to the unimpeded air intake into the cooling system.
Proper connection
The next thing to do if the computer does not see the hard drive - check the correctness of the connection. Make sure that:
Motherboard
In some cases this problem Related to malfunctions in the motherboard. There is a chance that the southern or northern fault failed, intersected the contacts designed to connect with a hard disk. What to do? In such a situation, it will require its partial repair or full replacement to normalize the computer.
Jumper
If you are the owner of an old computer with a hard disk on the IDE interface, then pay attention to the jumpers. On the housing there is an optional connector to configure the priority of HDD. One of the four pairs of contacts located in it is fixed using a special jumper.
 It should be checked for the presence and correct location. If you want the connected device to be the main - set it to the " Master" If you connect the second drive - you should install in " Slave.».
Also be sure to check their condition in other similar devices. Most often, exactly the smallest details provoke malfunctions in the system, because of which, in turn, BIOS does not recognize components.
Additional loop
Do not use one data loop to connect multiple devices, even taking into account the availability of additional connectors. Best of all, each disk is connected separately. Perhaps your hard in BIOS is for this reason.
Non-food
This problem occurs more often after a complete upgrade of the computer or replacing the component, and in case you have a weak power supply, it can simply "pull" all installed on the PC device.

BIOS settings
Have a new generation of laptops and netbooks with SATA interface In Bios Hard is recognized as " Drive.»Device, but sometimes can have another name.
- It is necessary and to find a section that is responsible for hard drives, Usually it has in its name "IDE Controller" or "SATA Controller". Make sure that the settings of your drive indicates the " Enabled." or " ON.».

2. Also select in the column " First Boot Device.»Your drive.

Physical malfunction or factory marriage
With different damage, the performance of conventional magnetic disks (HDD) is quickly broken, and how it is correct to be recognized. Typically, the reason for this is a shake, a drop or a blow. At the same time, the inner mechanics partially fails (magnetic heads stick, the engine bearing clins or the magnetic plates themselves are damaged). In this case, it is subject to only professional repair. HDD, he does not submit any signs of life, most likely you got marriage. Better decision It will pass it back to the store while the warranty is valid. Since in the case of independent repairs, you can not accept it back.
If you could not solve the problem with our advice on your own, we recommend that you contact qualified specialists to quickly troubleshoot.
Video solution
ISO disk images are used in a variety of situations. IN ISO Imagex Approach operating systems, applications, games and more. Therefore, many users are interested in how to open the program. file iso..
In this article we will tell you what program to open the ISO file. But, before we proceed directly to the programs it should be noted that you can in two ways. You can simply open an ISO file and see what files from it inside, or open the ISO file by mounting it as a virtual disk, in this case you can use the ISO file as a real CD.
7-zip.

Daemon Tools Lite is a free version of the Daemon Tools Pro, as well as one of the most popular disk mount programs. This program allows you to mount disk images in such formats as MDX, MDS / MDF, B5T, B6T, BWT, CCD, CDI, BIN / CUE, APE / CUE, FLAC / CUE, NRG, ISZ, as well as ISO. With Daemon Tools Lite, you can quickly mount the ISO file into a virtual drive and work with a disk image as a real disc disc in your drive. You can download Daemon Tools Lite from the official site.

- This is a professional program to work with ISO images. This program allows not only to open ISO files, but also to mount them in virtual driveAnd also to edit them, adding or deleting files. Moreover, with using ultraiso You can write the contents of the ISO file to the USB flash drive to install the operating system. If you work a lot with ISO files, you definitely need to choose Ultraiso. The only lack of this program is not free. At the time of writing this article, Ultraiso stands a little less than $ 30. Download trial version or buy this program can be on the official website
Hello expensive readers, today we will talk to you about virtual images of optical disks. Many inexperienced computer users often arise a question: how to open an ISO format. I remind you that the ISO image is a certain virtual image optical diskhaving file System In accordance with the ISO 9660 standard.
Such ISO images are created for subsequent recording on the physical disk (CD, DVD, etc.), but often there are situations when you need to view or copy some files that are already in the ISO image. To read such virtual images of physical disks, the following programs are widely used: Poweriso, Daemon Tools, Alcohol, Ultraiso, Nero, Winiso, and many others.
As you see ISO images can be opened by many software products. True, they still need to be installed on the computer and figure out how they work, we are also interested in a quick, express method of viewing such an image without using additional programs.
WinRar
To start working with this utility, you need to do the following steps "Start" - "All Programs" - "WinRAR" - "WinRAR".
 Next, you need to specify the path to the file that is planned to open, for this you need to perform the following steps: "File" - "Open Archive" where and specify the path to the ISO image. Having selecting the ISO file you need, click on the "Open" button.
  You can also click a double-click on the file and wait for it to open it to view or copy information.
7-
Zip.
When working with this program, using the right mouse button, click on the ISO image and select "7-ZIP" in the context menu - "Open Archive".
 To make the above operations described faster, right-click on the image and select "Open with ...". After that, a menu will open in which you want to select the archiver: WinRAR or 7-Zip.
 If you have a situation of frequent use of files located in ISO image, you can do the following: To do not open it every time, using the presented utilities, you can copy the desired files from the image to a separate folder.
Open ISO using programs
So we figured out how to open an ISO file using archivers. Of course, this method is very easy and does not require almost no skills. In practice, it becomes necessary to store the downloaded data in the form of ISO images and, if necessary, "connect" them or write. It looks like you insert the disk into the drive. Only for our purpose a real drive is absolutely not needed.
There are programs creating a so-called virtual disk. As soon as the disk is "inserted", you can see it in the "My Computer" section just as if it were real, and access any data on it. To do this, it is enough to sort out one of the programs, which will be discussed below and you can connect your ISO images by pressing one button.
Daemon Tools.
One of the most simple programs To connect images is Daemon Tools.. Its main advantage is not only simplicity, but also the availability of a free version that will be enough to learn not only than to open an ISO format, but also using the case, I will show how to connect a virtual disk.
Therefore, we will go straight to the manufacturer's website and download the program from there :.

Click on the "Download" button. We launch our Daemon Tools Lite and in the window that opens, click "Next", then "I accept", and now I choose " Free license", After which we click" Next "and then again" Next "and" establish ". The program is installed, click "Close", after removing all the checkboxes.

Now clicking the right mouse button on the ISO file, when you select "Open with", and then "Daemon Tools Lite", the disk with the image data will be available in the "My Computer" section, as if it was inserted into your computer's drive.

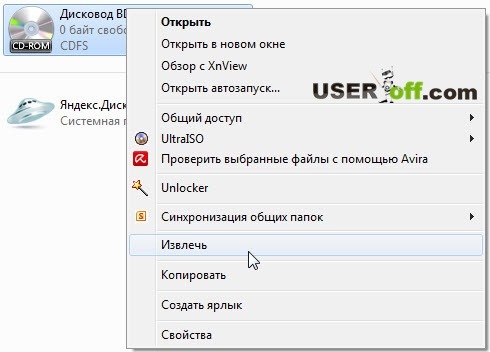
If you no longer need data on the disk, you can right-click on the disk icon in the "My Computer" section and select "Extract" in the drop-down menu.
Ultraiso.
Now let's figure it out how to open an ISO file using a simple Ultraiso program. Download ultraiso program from . Choose your country from the list and click on any of the two green arrows next to it.

We launch the downloaded file, thoughtfully press "Next", agree with the conditions of developers, press "Next" four times and once "set", remove the checkboxes and close the window, as in the previous case.
Now click on the right ISO file with the right mouse button and select "Open with" and then "Ultraiso". A new window will open in which you can view files or copy them using "dragging" by simply by clicking on the desired file. And dragging to the area where you want to store it. By the way, we will use the unregistered program, so before opening, click on the "Test Period ..." button.
Cdburnerxp
The last thing worth paying attention is how to open the ISO file using the CDBurnerXP program. A small note: This method for those who want to immediately write data from ISO to the disk, if it is certainly required. To do this, you will need a real drive and a clean drive. The size of the disk depends on how large iso file is. Usually, this is a DVD disk. In any case, the size of the ISO file must be less than the size of the disk.
Download last version From the official website:

Installation program by selecting "Next" 4 times and 1 time "Set", refuse to install third-party program And click "Next". Now the program shortcut appears on the desktop, start it and in the window that opens, select the inconspicuous "Open" button below.

In the window that opens find the desired ISO file and choose it by clicking "open". Now click "Write a Disk" and, if everything is in order, the program will start recording.

After the record is completed, all data from the ISO file will be on the disk and will be available at any time. This method is convenient for saving data that does not happen, will be safe and they will not need to be moved or open. Now you, perhaps, know how to open the file. ISO better me;).
ISO image is often used to create a copy. installation programs For example, Windowds.
The ISO file is an optical image of a CD or DVD, which contains the ISO 9660 file system.
The image is a simple file. With the help of specialized programs, it can be used instead of a standard CD.
Such a file has less information than the disc from which it was written off. The disk may have information that can protect it from copying.
Only programs that have such information can save such information.
You can view the ISO file information using archiving software capable of supporting such a format.
Often, such a file is used to "pack" as many files and folders in one archive as possible.
This format involves the storage and distribution of boot and other large files with a greater speed than via removable or other physical media.
Now the ISO format is used more and more.
The main difficulty with such files is that Windows Vista and XP initially cannot recognize their format, due to which some inexperienced PC users have difficulty.
When trying to open without pre-installed, third-party, softwareOld operating systems do not know what to do with this file.
How to open an ISO file?
See also: 5 simple ways How to create an image of Windows 10

Fig. 2. Creating a disk image
Such format is most often used to transmit information from a CD or DVD through the Internet or media.
The archive stores all the necessary data that is then transferred and unpacking on another computer.
Recently, such a format began to use often, so how to open it should be known to each PC user, because not every computer can immediately choose the appropriate program.
This format is used to archive games and data of operating systems.
This is done so that you can run the launch, without having a physical disk, and if there is only its image. In this case, you can do without unpacking.
You can simply run the file with a double mouse. But if you need to extract information from a virtual disk, then a special program will be required.
On the this moment, there are somewhat more famous free softwarethat are easy to use and are available to any user. So, what to open an ISO file?
1 alcohol
4 winrar.
5 7-ZIP
5 windows 8-10 (system conductor)
See also: Top 15 Computer cleaning programs from garbage

Daemon Tools - a program for creating CD / DVD disks.
The drive is created by the programmatically, after which it is perceived by the computer, as if there is a disc. This allows you to use images, as physically existing discs located in the CD-ROM.
It is possible to create images in various formats for subsequent use in this and other similar programs.
The virtual drive is created to increase the rate of transmission of information and reduce the wear of media.
One of the most popular utilities to create images and their unpacking.

Fig. 3. Utility load page
On the official website of the developer can be found free versionBut after the update it will have to buy. Go to the developer's website and click the Download button.
In order to open the files you need, it will be enough Lite version. This version is suitable if you do not need to perform any complex manipulations. It is in second place, on the developer's website.
After loading the program, install it and run. To create an image, click on the button shown in Fig.4.

Fig. 4. Creating an image in Daemon Tools
After clicking on this button, select the file you want to convert.
But it will start not in the program, however, it will be possible to find it in "My Computer", as a disk located in the drive.
You can also open it through "My Computer", but before that it needs to be launched in the program. To do this, press the corresponding button shown in Fig.5.

Fig.5 Running the image to work.
After starting the image, it will be seen in "My Computer", where it can already be opened.

Fig.6 Added disk image.
Through Daemon Tools, the work is quite simple.
Considering the fact that recent ISO files have become quite popular and distributed, this program You need to have on your PC.
System requirements She has small, the amount of memory takes the minimum. Additionally, it can be noted that this utility It is often installed with the game as a mandatory application if it happens from the disk through the drive.
From reviews:
"Excellent program for the virtualization of optical disks, and besides, free"
"One of best programs When working with disk images "
"Excellent and qualitatively creates a virtual disk and keeps data on them"
Alcohol
See also: Error "Windows cannot complete Formatting": Causes of error and 5 ways to eliminate it

A paid application for creating disk images.
With it, you can create up to 31 drives, as well as write information to the CD.
There is an alcohol version of 52%, which is notable for recording information on media, as well as absolutely free and is intended for non-commercial use.
You can download this program on the official developer website.

But free it is provided only for 30 days. Next, the utility asks to buy a license.
The full version can be, of course, download on pirate sites, but it is not recommended to do this, since you can download the viral software, thereby harming your PC.
Going to the developer's website, you will fall on main page. You need to click "Download trial".
After that, you will automatically go to the download page on which you want to click the "download" button, after which the downloading file will start.
When you finish downloading, install the program and run it. The main window will open in which you select the "File" submenu, then click "Open".

Fig.9. The main window of the utility.
Further work with a finished way is no different from work in Daemon Tools - We launch "My Computer", we find disc And launch it.
From reviews:
"This program is much better Daemon Tools, much! Images are made very easily, and it is easily removed (in contrast, again from Daemon Tools) ";
"Cool program for images";
"Mandatory program for any comp. The comments do not need. ";
"The cool program is very necessary for gamers !!!";
"Damn, the program is generally a bomb, and even if you know how to use, download in mandatory !!!".
See also: Create a bootable USB flash drive for Windows yourself

The program is designed for Windows OS, the main functions of which are the creation, editing and converting CD / DVD images.
It has the ability to emulate and create a CD record.
There is a paid and free versions. The difference is that it is impossible to work with images, whose size is more than 300 MB. Multilingual interface. Can use own ISZ format.
Ultraiso is not only popular, but also easy to use. Its simplicity and due to popularity. You can download the program for free on any site on which it is available. One of the best - SoftPortal. How to download the program:
1 Go to the above site and we are looking for in the Ultraiso search string. Click on the "Download" button.

Fig.12. Downloading the utility.
Automatically, the site will redirect you to another page, which will need to select the download source - the site of the developer or an alternative to it.

Fig.14. Open file for installation.
When the installation is completed, open the program. After starting the application, proceed to the opening of the disk image, to the help button "Open", as shown in Fig. 15.

Fig.15. Opening a file to create an image.
In the window that opens, select the desired ISO file to create an image. The content will open, as shown in Fig.16.
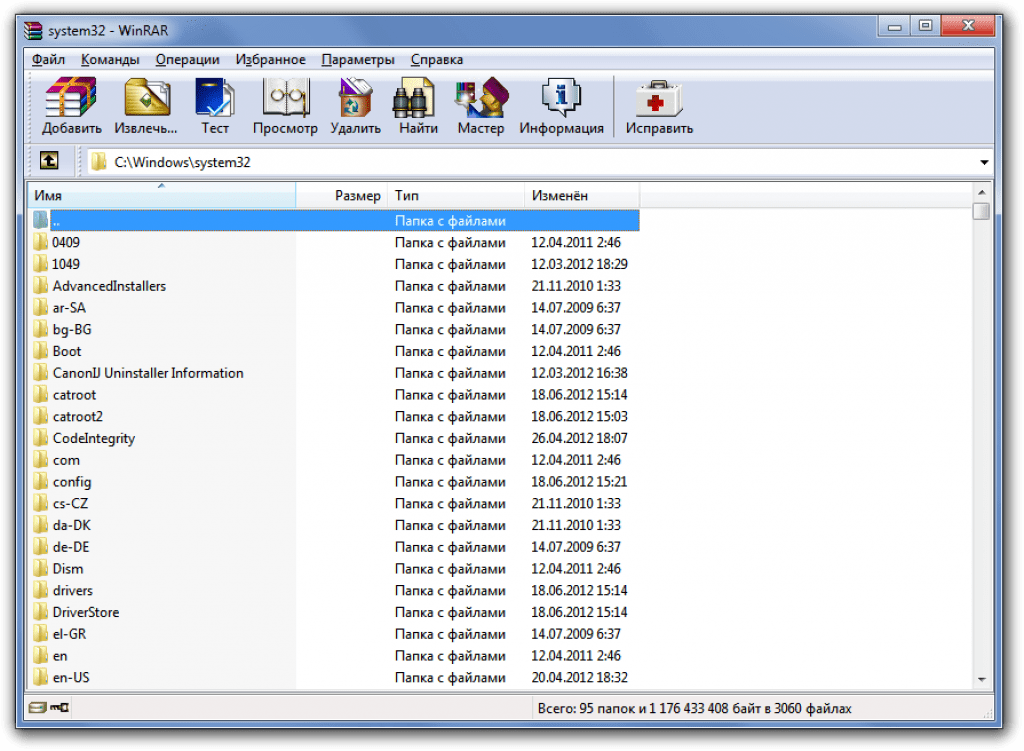
Fig.16. Content image.
All that is in the image is displayed in this window. Here you can already choose what you need and work with the file.
The program is easy to use, so even the most inexperienced beginner can cope with it.
From reviews:
"The program is just super, I advise everyone";
"The program can be useful in a variety of cases, from creating an image from a physical disk before converting formats. There is a function of recording the disk image. Working with the program is quite easy, it is Russified, which contributes to the rapid development of all functions. The internal file browser allows you to conveniently view folders and select files for new projects. I recommend for use! ";
Designed in 1999, it still has the popularity among users and an open source code, which, on a license, is freely distributed.
The main platform is Windows. Versions are available graphical interface And for the command line.
Amazing the fact that the ISO file can open the usual 7-zip archiver.
You can download the full free version on the developer's website. On the download page, you will need to select the version of the system.
If your PC is the operating windows system 7, most likely 64-bit suitable. Choosing a version, click the "Download" button, after which the installation file will start.

Fig.10. Utility download page.
The installation of features does not have and happens in the same way as any other program.
After the installation is completed, run the program. If in the window that opens, click on the Plus button (Add), then another window will open in which you already need to select an ISO file for unpacking.
The contents of the file will be open, as in ordinary folder. To extract the necessary, just drag from the utility the selected file to the desktop using the mouse.

Fig.11. Adding a file for unpacking.
From reviews:
"It is pleasant to work in the program, everything is smooth and troubled. The archives can be unpacking both in the current folder, and in the folder with the title, as the name of the archive itself (which is much more convenient). You can pack the folder (add to archive) and send it to e-mail. You can simply open the archive and see its contents ";
"Very simple, very useful and functional, very recommended";
"The program is excellent, I use more than a year. Works well, developers are great. And most importantly - free !!! Put, you will not regret. "


 in Photoshop How to make a grid in photoshop CS6")


