The factory settings on a laptop may be required in a wide variety. For example, your computer is very clogged with various programs, or often errors occur, the computer slows down and helps anything. Also, with a reset, you can get rid of the problem of blocked Windows.
All these problems can be solved by resetting the laptop to the factory settings. Let's proceed.
By the way, I want to say that there are cases when it is impossible to come to the factory settings. The fact is that some users who bought a laptop immediately, or after a while, reinstall Windows, which went bundled with a laptop. A hidden section is often deleted, allowing you to recover on the hard disk.
It happens that by calling the wizard on computers, it reinstalls Windows, then, most often, the same thing happens - the recovery section is removed. So, it is better to do it yourself.
If this happened, most likely, you will have to look for a data recovery disk, you can try to download the image on the network. The best option Of course it will reinstall the system.
We move on to the cases when bringing a laptop to the factory state is possible.
But this will remove all data from the C disk, Windows will be reinstalled and the key to enter will not be required. After reinstalling and starting the system, the installation of drivers and other components will begin.
- First you need to disable the built-in function fast download Boot Booster.which speeds up loading a laptop. It is done in. To do this, turn on the device, when you start the download, click F2.After hitting the BIOS, we find where this function is turned off. Go to the tab Boot.and there is looking for item Boot Booster., Press Enter on it and choose Disabled.. On the latest tab Choose Save Changes and Exit. The laptop will save the settings and will reboot. After downloading, turn off the laptop again.
- Turn on your device and then press the F9 key. The download screen appears.
- The program of the factory settings will prepare data for recovery, after a message appears about whether you really want to restore the data. Do not forget that everything from the disk will be deleted!
- Next, do not touch anything, the recovery process is automatic. During the recovery, the computer will reboot several times.
So, to carry out this operation on the HP laptop, you need:

To do it on acer laptop, you need to do the following:
- Turn on the laptop and holding the ALT, press the F10 several times, the system must request a password.
- If you have not previously restored anything, then the standard password is six zeros (000000).
- In the window that appears, select Factory Reset. (Reset to factory settings).
By the way, the return to the factory settings can be done in the operating room itself windows system. To do this, you need to find the EreCovery Management utility there we go to the Recovery tab and reset the settings.
In order to restore this laptop to the factory state, you need to use the Recovery Solution utility that is located in Windows. If this utility is not, then restart the computer and press F4, start the recovery utility.
- Select Restore (Restore).
- Next, COMPLETE Restore (full recovery)
- Select the recovery point Computer Initial Status.
- A message about reboot will appear, click "Yes"
- Follow the instructions of the system.

After completing the work, you will need to restart the laptop once again to activate the recovery made by the program.
To restore the laptop, you will have to carry out how manipulations are:
- Click on the key 0 on the keyboard and keep.
- Turn on the laptop.
- Let's release the 0 key when the computer starts to pic.
Second entry option this laptopIf the first did not come out:
- Turn off the laptop, then press F12.
- Not releasing your finger from the F12 key, turn on the laptop.
- We are waiting for the corresponding window.
Run the recovery utility, just follow its instructions, is not so difficult there.

I hope this article helped you in solving your problems, in case of issues, ask and in the comments.
In this instruction, we will tell you how to reset the Android-based smartphone to factory settings, as well as focus on how to properly prepare the gadget and save all the necessary information before it is accidental deletion.
What is the reset of Android settings and why do it?
Many of us have come across the problem of constant depending on the device, the occurrence of firmware glitches, loss of communication, etc. To get rid of such difficulties, a reset of the factory settings of the gadget for Android comes to the aid. What does this mean? The resetting of the device settings allows you to restore the factory characteristics of the firmware, which further has a positive effect on the speed of the device and the absence of additional "glitches".
What files and data should be pre-saved before resetting the settings?
There is a huge number of ways to reset the settings for Android to the factory, but the only thing that combines them is a total deletion of all files and data from the device's memory. Therefore, it is necessary to take care of the media files important for you in advance and contact information, notes and other documents you would like to save. How to do it right, read further.
Right backup of contacts and notebook on Android
Let's start with the preservation and transfer of contacts, "where to further" from our gadget. The easiest way is to copy the contacts to the sim card. Make it easily, following our instructions. Go to the contact menu and select "Import / Export". In the window that appears, export contacts to any carrier convenient for you: SIM card or SD storage device.

The most reliable way is to rewrite your contacts into a notebook, but we have "in the yard", era of technologies and gadgets, this option is not suitable for everyone. We advise you to use the efficient and effective method on the backup of contacts on Android - synchronize data with Google account or its cloud storage. In addition to contacts, the cloud storage service, offers you to synchronize SMS messages, notes and records of the calendar from any Android devices.
To begin with, you should register with the Google service, simply create new account Or log in in the old one. Let us not tell about it in detail, since such simplest actions do not need comments. Tell you about the correct synchronization of the necessary information with Google servers.
Go to the phone settings, the "Accounts" section. Select "Google" accounts. The window that opens will be several points
Security and input;
Confidentiality;
Account setting;
In the upper corner of the device screen, your account will appear (Google Account), tadam on it.
After the actions have done, a window will appear with a synchronization options. We put the ticks opposite the items we need. If you wish to hold a manual data backup to the Google server, click on the circular black arrows, as shown in the screenshot.

Congratulations! Required information and data were downloaded on google Server and synchronized with your account. After resetting the device settings, you will not be difficult to restore the notebook or notes of the smartphone.


We make a quick photo backup, video, music and documents on android.
Easy way - connect the device via USB cord to computer and transfer the necessary information to it. There is a small nuance - not all phones are synchronized with PCs in Flashki mode. At the time of connecting the gadget to the computer, select the "Use as a USB-drive" mode.


The second method of the backup of the necessary files is to transfer them from the device's memory to the flash card. Open the File Manager.

In the Manager window, select photos that are in the phone's memory. SD card is displayed elsewhere (SDCard1).


Check the photos that need to be transferred to the USB flash drive (clamp your finger on the desired fileuntil the checkbox appears).

The "Menu" button is located in the upper right corner. If you need to select multiple files, click "Select All" so as not to spend time on the selection of each photo. In the next step, tap on "Move" and specify an SD card as the end point of your files. In order not to get confused, you can create an additional folder by pressing (+) and save the data into it.


Make the same with video, music and documents, if these files are important for you.
The third way to save data on Andorid before resetting its settings - use cloud storage. The algorithm of actions is no different from the previous point, all you need to do is download additional applications from the playmark: Google Disc, Yandex disk, etc. We advise you to use Gogle Drive, because It is automatically synchronized with your account data, after resetting the settings on the gadget.


Go to B. Google Drive., Press "+" and choose "Download".


We celebrate the images and folder to download in cloud storage. Do the described actions with the rest of the media data.


detailed instructions to reset android settings to factory
The first and easiest way to reset the settings is to use the standard phone menu, because The device itself will suggest that you should do. To begin with, you should go to the smartphone menu and find the "Settings" section. As a rule, it is a gear.
Tip! Experienced users can say that on each android device, a step-by-step reset of settings is characterized by an algorithm and a sequence of actions. In fact, it is not. "Stock" or " Standard Android»Do not distinguish the settings and data reset strategy.
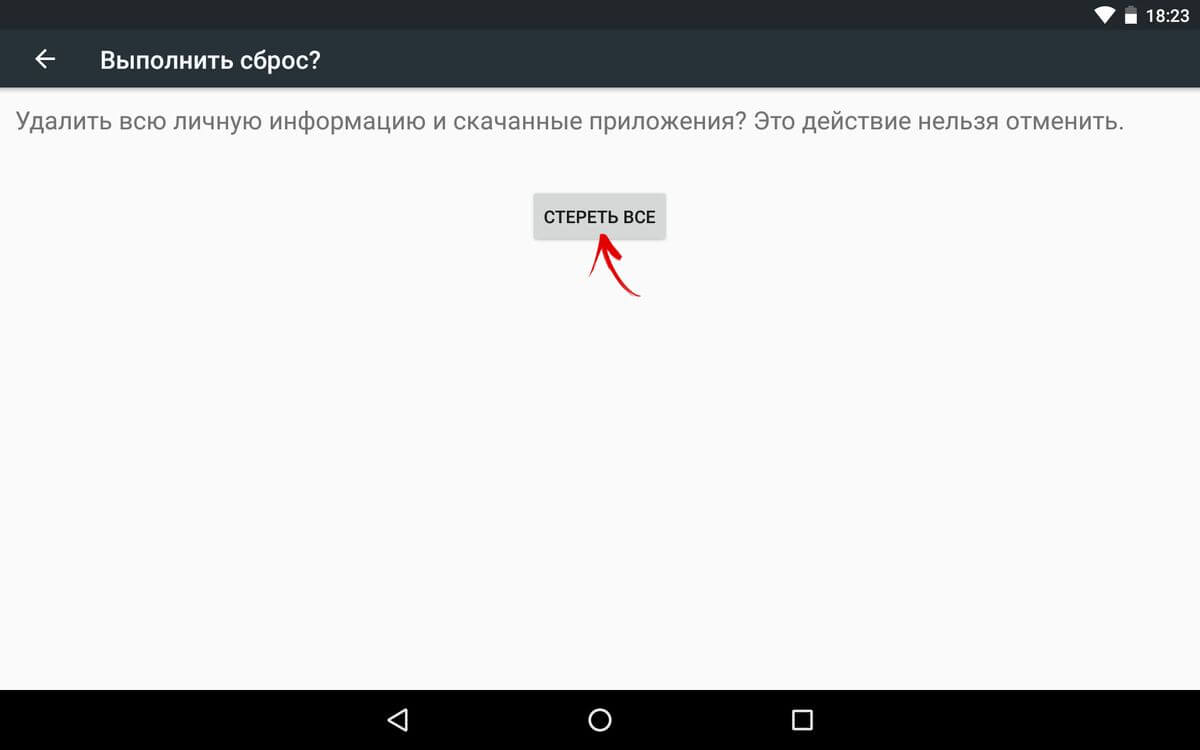
Find in "Settings", item "Restoration and Reset". Select "Reset the phone settings" - "erase everything."

For example, if you have Samsung smartphone, Instead of the menu item "Restore", present "Archiving and Reset".


In another case, with Xiaomi, Meizu and Huawei smartphones, the algorithm is no different, but the name of the buttons has undergone changes. Go to "Settings" - "Extended" - "Reset Settings"


After a successful relief of the discharge, the performance of the gadget will be on the height, and you will forgive about glitches and processor engineering.
The second way to reset the settings is the use of secret codes that are mainly used by wizards for the repair of smartphones. But, even the most simply user can use any of them without any problems. To do this, we need to press the "Wash" button and when the onscreen numbers appear, you should dial "secret code".

* 2767 * 3855 #-Done code completely reinstalls the firmware, making your phone new. After the manipulation of the manipulation (1-3%) of users can say that the android smartphone does not turn on. Yes, the risk of such an explicit event is present, but you should not lower your hands. In this case, you should update the device firmware.
* # * # 7780 # * # * - The settings will take place with this code. Applications will be deleted, the remaining data will remain.

Hard Reset. Or hard reset Android settings.
The third way is the most interesting. It is created for users who have the main hobby - updating firmware on android device. This is a reset of settings via Recovery. The so-called "hard method" or "Factory Reset". There are nuances and subtleties that we will tell you more about and try to answer all questions in the comments to the article.
This method of "zeroing", as a rule, occurs when the device screen is turned off, using a specific key combination.
For reference! Be sure to charge the device at least 80%.
Let's proceed. Drop the device.

Each manufacturer Android smartphone The combination of the key to enter the device to the "Recovery" mode is distinguished. We advise you to get acquainted in advance with possible optionswhich we will tell you now. As a rule, there is a basic combination: the volume button down (-) and the button on / off the device. Hold them until the recovery appears (as an image in the photo below).

If you have a smartphone from Samsung without a home button (button "Home"), then climb the volume key (+) and on / off the device.

In another case, if "Home" is present, the key combination will be as follows: simultaneously press and hold "+", "Home" and "On / Off". As soon as Samsung appears, release the pressed buttons.


Some LG models should click (-) and the "ON / OFF" button), but after the logo appears, the power button should be released and click again.
On the phones sony A specific type, you should click simultaneously (-), (+) and the "ON / OFF" button.

After our actions, the "Recovery" menu will look as follows as shown in the photo below.

Next, you should move along the recovery menu using the volume buttons and select "Wipe Data / Factory Reset" or "Clear EMMC", "Clear Flash". Selects it is made using On / Off. Select the desired item and click "Yes" or " YES - Delete All User Data. "After the phone has completed the hard reset, select the" Reboot System Now "item. This is the process" Hard Reset "can be considered completed.

We allocated a situation in which the owners of Samsung devices can get into. It happens that the gadget does not enter the "Recovery" mode. In this case, the adapter "Jing" will help you. It is inserted into the charging socket connector and in 3 seconds it enters the smartphone to Recovery mode.

Also developed a program for resetting settings on android using a computer - Android Debug Bridge (ADB). It should be installed on your computer, and on the phone to activate the ADB mode. Include the phone to the computer (preferably through the original cable).
To reset the AnrDoida settings from the PC, click "Start" - "Run" and enter "CMD". After running the command line, open the program by typing ADB Reboot Recovery on the command prompt. After entering the smartphone to the recovery mode, follow the instructions described above.


We restore the contacts and the necessary files after full reset settings.
It is not difficult to restore a copy of your device. To do this, go to the "Restore and Reset" menu item - "Copying Data" and "Auto-Restoration". Preferably the presence of a stable and speed Internet connection.

conclusions
In this instruction, we reviewed the most popular ways to reset the settings on android smartphones. Before you delete information or make a "gesting reset", try to prepare a data backup or synchronize the device with Google Account.
If you have any questions, ask them in the comments to this article.
The need to reset the settings on Android may occur in completely different situations: the device began to hang, or you just can't unlock it. And if no action helped solve the problem, Hard Reset is a real opportunity to restore the device's performance. From the article you will learn what to do.
(!) If forgotten graphic key, PIN or password, first read these instructions: and.
Well, if after these manuals, you still need help with removing blocking or you have other problems with the device carefully read this article. It is worth noting that after Hard Reset from the phone or tablet, data is deleted only from internal memory. SD files, photos, music, video, etc. Will be untouched.
Method 1. How to reset the Android settings via Recovery
The first way is relevant for those who do not turn on at all, it works faulty or you need to return access to the smartphone system:
1. Turn off the device.
2. Now it is necessary to get into Recovery mode. To do this, clamp and hold a specific keyboard shortcut until the screen is lit. Depending on the manufacturer of the device, the combination may differ:
- Reduce volume + power button
- Volume Increase + Enable Button
- Increase / lower volume + power button + Home button
- Volume Increase + Rewinding Volume + Enable Button
How to go to Recovery Mode on the phones of various brands is written in.

Using the zoom buttons, the volume decreases can be moved up and down, respectively, and confirm your choice - the on / lock button. In newer devices menu Recovery. May be sensory.
3. Select "WIPE DATA / FACTORY RESET".

So you consent to clean the internal memory of the smartphone / tablet.

5. And at the end of the "Reboot System Now".

The whole process will take no more than a minute. After all android actions The phone or tablet will reboot - the factory parameters will be restored. You will get the device as it was when you first start.
MEIZU recovery mode
Meizu made their recovery mode instead of classic recovery. To get to it, use the "On" + Volume "UP" combination. Note only the Clear Data item and click Start.

We perform Wipe from the recovery on Xiaomi
The Xiaomi engineering menu is loaded when the power key and VOLUME "+" is pushed. It is available in several languages \u200b\u200b- to switch from Chinese to English, press:

1. Select "Recovery"

2. Click OK if you are going to go to recovery mode.

3. Press "WIPE DATA". Here the sensor does not work, use the power and volume keys to select and move.


5. Confirm by clicking "Confirm".

6. The device will inform the successful implementation of Wipe. Open the main menu.

7. To restart the smartphone, select "Reboot".

8. Then "Reboot to System".

Method 2. How to make Hard Reset through settings
1. Go to Android settings.
2. Open the "Restore and Reset" item. Do not forget to execute.

3. Select "Reset Settings".

4. Then click "Reset phone settings (Tablet PC)".

5. If a graphic key is installed or a password, you need to enter it.

6. At the end, click "Erase All".
After that, all data will be reset from the internal memory of the device.
On Android 8.0 Oreo and above
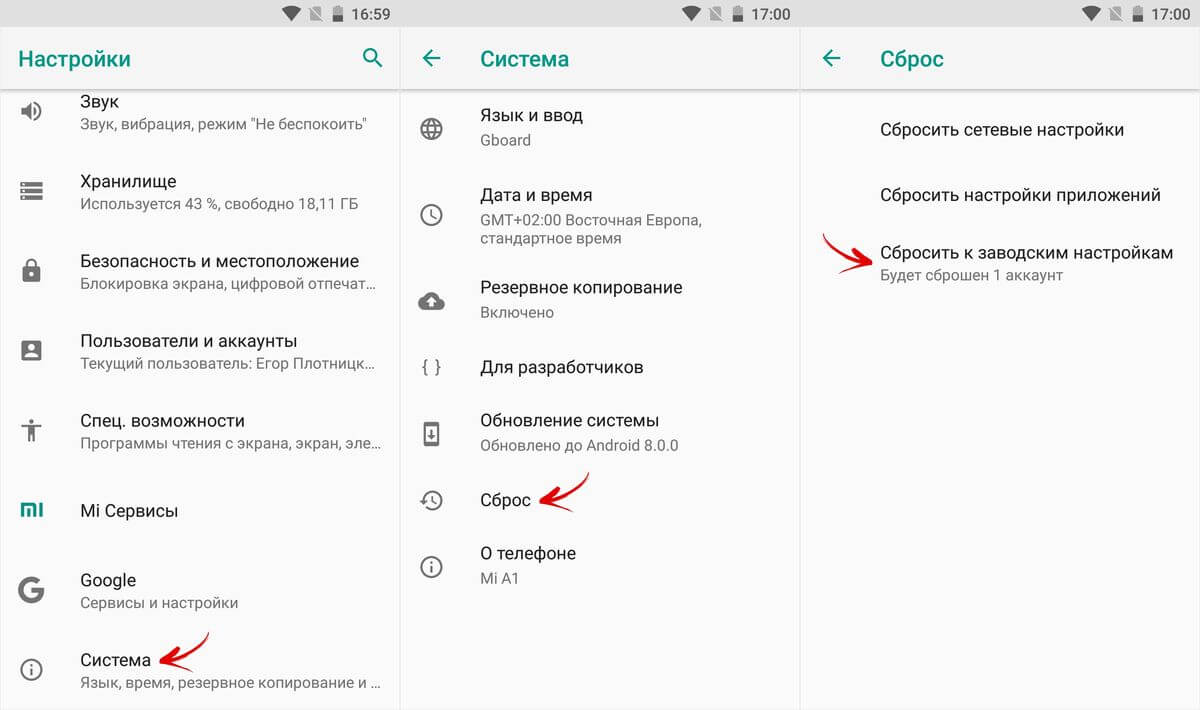
The "Settings" menu in Android 8.0 has undergone strong changes. Now the "Reset to the factory settings" function is in the "System" section → "Reset".
On Meizu.
In Flyme OS, the path to the function is different from the stock of Android: go "Settings" → "On the phone" → "Memory" → "Reset settings".

Mark the "Delete Data" item and click Restore.
On Xiaomi.
In miui feature Factory Reset. Developers hid in " Additional settings»- Watch the video instruction:
On the smartphones Xiaomi. A USB drive is also cleared, so take care of the creation of a backup if you want to save photos, audio and other files.
Method 3. Resetting the settings for Android
This method is even easier than previous. In the dialer, type one of the following. Perhaps none of them will work, everything depends on the manufacturer here:
- *2767*3855#
- *#*#7780#*#*
- *#*#7378423#*#*
Also try entering these codes in the "Emergency Call".
4. We carry out Hard Reset from FastBoot Mode
Clear internal memory Android devices can be using the FastBoot utility for the PC when the machine is loaded in the same mode (if any on the smartphone). About installing and starting the program, as well as ADB and USB drivers, told in. On such devices as Nexus, Pixel, Huawei, HTC, Sony, Motorola, the last LG must first unlock the bootloader:
- On Nexus - team FastBoot OEM Unlock
- On Nexus 5X, 6P and PIXEL - Activate the OEM Unlock option in the "For Developer" settings, apply the FastBoot Flashing Unlock command
- For the rest, you will additionally get an individual code on the manufacturer's website.
(!) Unlocking bootloader is carried out via FastBoot and immediately makes Wipe. In the future, to reset the phone, it is enough to perform actions from the instruction.
Translate the device to FastBoot mode. There are 2 ways:
First.Turn off your smartphone. Then clamp and hold the "On" buttons + lowering the volume before the appearance FastBoot Mode.. This shortcut of the keys may differ depending on the manufacturer.

Second. Carefully read how to work with ADB and FastBoot, the link to the article is above. Connect the phone to the computer by activating the USB debugging (see). Then enter the ADB command through command line (or PowerShell in Windows 10) running on the name of the administrator and press "ENTER":
To Windows PowerShell Performed this command, add at the beginning:
It turns out like this:

The device is loaded in firmware mode. To erase the data, it is enough to execute one of the commands (do not forget to add. \\ When using PowerShell):

To restart the device, use:

5. How to delete data from the phone through the service "Find Device"
Google has developed a special service "Find the device" With which you can not only track the phone, but also reset its settings. To do this, the device must be connected to the Internet.

2. Google will find devices attached to this account. Click "Erase Data".


4. Confirm the selection by clicking "Clear".

As a result, internal memory will be cleaned on the smartphone or tablet.
6. If installed TWRP Recovery
Unlike the standard recovery mode, custom allows you to reset specific sections, and not all settings immediately.
To do this, in the main menu, open "WIPE".

If you just want to make Factory Reset, pull the slider to the right.

If you want to format specific partitions, select ADVANCED WIPE.

Mark the sections you want to clean and make swipe to the right.

To restart Android, click "Reboot System".

That's all. In fact, no difficulties with resetting the settings on Android should not arise, the whole process will take no more than 5 minutes.
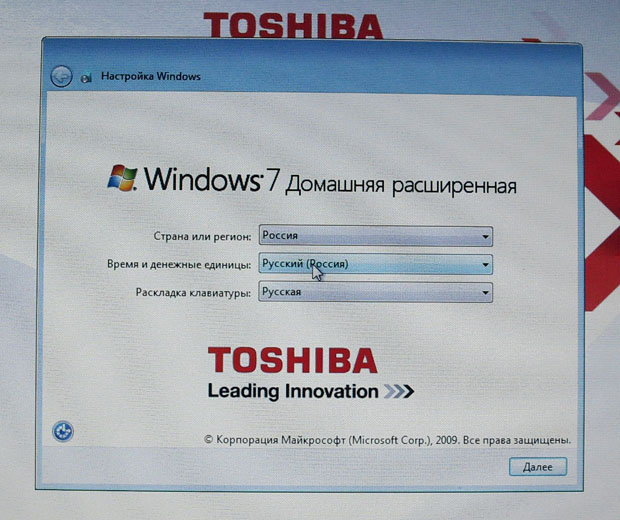
If the manufacturer of your computer saved on it installed windows data 7, you must act as follows: Open the control panel and go to the "System and Security" category.
In the "Archiving and Recovery" section, find the "Restore system parameters or Computer" item. Then click on "Advanced Recovery Methods", select the "Computer Return to initial settings"And follow the instructions.
 However, if you come across the "Reinstall Windows (required installation disk Windows) "You need to reset Windows 7 using recovery methods.
 After starting the computer, during the boot process, pay attention to the indication at the bottom of the screen that by pressing the function key you can go to the recovery mode. In most cases, these buttons are or otherwise you should try other function keys.
On some laptops to appeal to function keys You must press the key in the lower left corner of the keyboard. If you did not have time to click on the desired key, you need to repeat the boot process.
After your computer boot in recovery mode, use the arrow keys to select the Restore Point. Since you have already saved the data, you can go to the next step by clicking "Next".
Now Windows will prompt you to disable all input devices, such as the keyboard and mouse. After confirmation with the "Next" button, disconnect peripherals. The reset process begins, which may take a few minutes.
Photo: Company-producer
- Good day, I wanted to ask you how to restore the laptop to the original factory settings? I know that these settings are in a hidden section. hard diskBut this section I carelessly deleted and now when I try to roll back to factory settings, I have an error. DVD recovery discs did not create and in general, never once restored a laptop to factory settings. What is the way out of my situation?
- Hi Admin, please explain how to be. Toshiba laptop, on it there is a hidden partition, another disk C: and disk D:. Hidden partition I did not touch, but on the disk D: I deleted everything, and now I can't roll back to the factory settings, say, Toshiba laptops are used to restore the factory settings, the hidden section and some other HDD Recovery folder, which is just on the disk D:. What should I do now?
- Bought a Toshiba laptop, in the instructions for the laptop it is written, if you wish to roll back to the factory settings, press the F8 key, the recovery program will start. Pressed but run Additional options Downloads and everything ... And then what to do? And another question, when you first start, a message came out - we recommend that you create a resuscator media on a USB flash drive or DVDs using the Recovery program, it will help you to restore the contents of the computer to the original factory state, even in case of serious damage to the computer. Explain how to apply this resuscator in case of problems?
- Hello, tell me how to restore the factory settings of the Hewlett-Packard laptop (HP) if the beech is not loading at all. When booting, Windows goes out with an error.
- Admin, answer such a question. All manufacturers of laptops are equipped with them special program Recovery located in a hidden section, using this program you can roll back to the laptop to the factory settings in case of serious problems with the operating system. Question - Is there any alternative to this program?
How to recover factory laptop settings
When will the idea come to the head to restore our laptop to factory settings? That's right, when we no longer understand what is happening to him, and most importantly, the laptop does not understand what is happening to him, because of the dozens of unnecessary sections created on it, thousands of various programs and three antiviruses.
- Note: Before kickbacking to the factory settings, you can copy all data from the C: and the desktop disk using.
Many users may notice that in such a situation you can reinstall "Windows" with all programs, drivers and everything. But I, in turn, I note restore factory laptop settings, inexperienced user, is much easier. I do not need to suffer from searching and installing drivers for all devices, you just need to reinstall required programs and that's it. The only thing that many confuses in this situation is that many have never launched this most restoration of the laptop to the factory settings. To introduce you to this restoration and purpose of our article, I hope after reading it, you will be better to represent how it can be done.
To restore the factory settings on various laptops, I have to have quite often and I want to say that the restoration mechanism itself on all laptops is almost the same, but of course there are always a nuance that is better to know in advance.
The first rule. During the recovery of factory settings, network adapter Nutrition should be constantly connected to a laptop.
You reboot a laptop and boot up defined key On the keyboard, the factory recovery program is launched, here you need to be attentive. The factory recovery program can offer you to restore only a C drive: or restore the whole hDD. If you select a C:, then only it will be restored to the factory settings, and the remaining sections with your data will remain intact. If you select Restore to factory settings, the entire hard disk, then all the sections you have created, with all your files will be deleted and your laptop will be in such a state as at the time of purchase.
Where is the laptop factory settings program?
Usually in the hidden section of the laptop, which is called the "Recovery section", the volume of up to 20 with an excess gigabyte. You can see it, if you enter the computer management-\u003e Disk management. This section is desirable not to delete, otherwise you will not be able to restore the laptop to the factory settings.
Owners laptop Toshiba. You need to know that besides the hidden section Recovery, they still have a HDD Recovery folder located on a D: it cannot be deleted too.
Note: Friends if hidden sections on your laptop are not deleted, but the recovery program of the factory settings does not work, read our article -.
Why create a laptop recovery DVDs?
As soon as we bought a laptop and turned on it, on the screen, immediately after the appearance of the worker wooden tablesA service window of the laptop manufacturer appears with a proposal to create-DVDs a laptop recovery discs. That is, we will create the same hidden section with factory settings, but on DVDs. This is done in case the hidden section of the laptop, for some reason (more often by the user's fault) is damaged or will be removed at all.
To create a recovery DVD, you usually need 3 clean CDs. With serious problems with a laptop, for example, you can not download at all operating system, And the hidden section is deleted, we can restore the factory status of the laptop using the previously created DVDs of the recovery.
Hot keys to restore the factory settings of laptops
ASUS - ASUS screensavers appear on the screen screensaver Press F9
Acer - Alt + F10
HP Pavilion - When you turn on the laptop, press the ESC key. Enter the start menu, then press the F11 key.
SAMSUNG - F4.
Sony Vaio - F10. On new laptops Sony Vaio. Used special button Assist.Try pressing it when loading. Boot Vaio Care., In the menu, select Start troubleshooting (recovery) -\u003eSelect keyboard layout Russian -\u003e Diagnostics -\u003e VAIO recovery tools -\u003e Windows 8 -\u003e Run the recovery wizard(Restoring the system in step by step mode).

Toshiba - F8 or on the last models 0 or even it is necessary to click Fn + 0.
Packard Bell - F10
Dell Inspiron - When the Dell screensaver appears on the screen, press Ctrl + F11
Fujitsu Siemens - F8
LG - F11
Lenovo - F11
So, the first to restore the Toshiba laptop to the factory settings, click when downloading F8, (if you have one of the most last models TOSHIBA laptop, then immediately when you turn on the laptop, press and hold 0), a window appears Additional download options. Choose Troubleshooting computer And click Enter.

Select language settings.


Select the Toshiba HDD Recovery recovery tool or it may be called Toshiba Recovery Wizard.

In the next window, we are warned that it will be restored to the original state of the C:, that is, everything will be removed from it and it will be deleted at the time of purchase of a laptop, drive D: will be untouched.


It is impossible to interrupt the operation, so make sure that the power adapter is connected to the laptop. Press and launch the recovery process of the laptop to the initial factory state.

There is a rollback process to factory settings

Installing software and drivers.

Select the username, password for your account. Install the date, time, they are usually correct by default. If you want, you can register your laptop to extend the warranty.

First running Windows. That's all
How to restore factory settings for Sony laptop
Click when loading the F10 key and enter the dispatcher windows downloads, choose using the keyboard Running the recovery center VAIO.


A window appears before us, we can familiarize yourself with the possibilities of recovery.
For example, choose Restore disk C: And in the next window, we read information about what will be restored.


The C drive is restored: to the factory state, reinstalls everything softwareBut not on the computer installed after purchasing a computer, it will have to be installed again. This program Deletes all files on a C:, but does not affect the files available on other sections.

If we choose Completely restore the system, everything will be removed on the disk C: and in all other sections. After recovery, all disk space will occupy a C drive:


How to recover to factory settings HP laptop
If the laptop is not loaded at all because system errors And you want to restore its original settings, then in order not to lose your data, you can download it from any Live CD, then transfer important files to a portable hard disk, further restore the factory settings, since when restoring the factory settings, all your data from the laptop is removed .
Click when you turn on the laptop key E SC..

We enter the boot menu, as you can see, the F11 key is responsible for restoring the factory settings. System Recovery.. Press the F11 key.
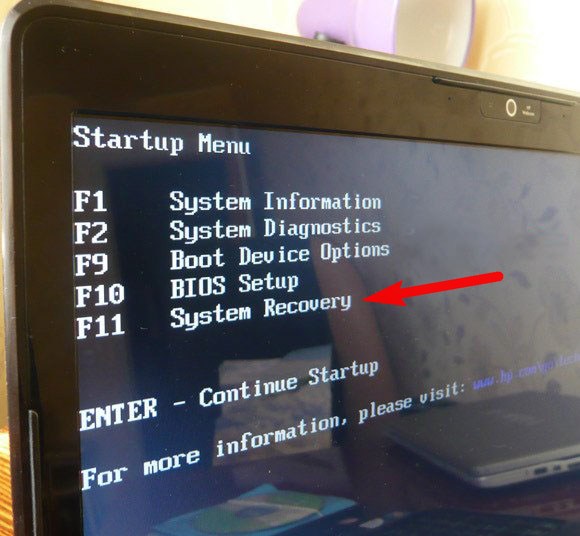
A window appears HP Recovery Manager.. Here we need item " Restoration of the system to the initial state when delivered from the manufacturer».

Click on " Restore without creating backup Files "and click Next.

Now you need to disable all external devices: the printer, scanner, mouse, click further and the process of restoring the factory settings of the HP laptop will begin.
Is there an alternative to the recovery program to the factory settings built into the laptop? Yes there is programs and I. they have much more opportunities.


 in Photoshop How to make a grid in photoshop CS6")


