Will be created when the gadget is activated. However, configuring smartphone for the first time, users often miss this stage for one reason - the device requires a plastic card data.. Russian users who are accustomed to all suspect fraud, pull with the creation Apple IDtrying to find a way to do without a card.
Options, how to register the "account" of the iPhone, there are several - among them there are such at which it is not necessary to enter data "credit cards".
Without Apple ID The user will not be able to:
About full using iPhone without Apple ID Can not go and speech. The legendary multifunctionality of this smartphone is due to a huge amount of heterogeneous software available in the AppStore. iPhone. without applications - just a stylish and high-quality gadget, but by no means not multitulcapable of cope with any task.
How to create a new account via iTunes?
If you do not have iTunes., start standing from download latest version This program from Apple's official website. As soon as you download and install Mediacombine, act as follows:
Step 1. Open Aytyuns. and click on the tab " Account»In the horizontal menu from above.
Step 2.. Select " To come in…".

Step 3.. In the window that appears, click " Create new Apple. Id».

Step 4.. You will find yourself on a welcome page. iTunes Store. - Here you need to click on the blue button " Proceed».

Step 5.. At this stage you need to read the document called " "And put a tick opposite" I got acquainted ... ".

If you do not confirm the fact of familiarization, the registration will fail to be completed.
In the absence of the opportunity to read the position of Apple immediately You should use the link "Print version". The browser will appear an HTML document that should be printed to familiarize himself with it as soon as free time appears.

Confirming that you have read the conditions, click " To accept».
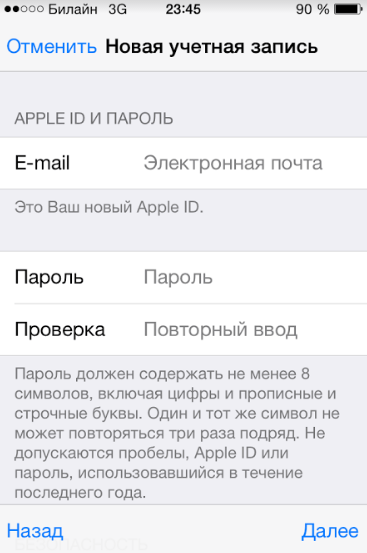
Step 6.. Fill out the questionnaire - you need to enter such data:
- E-mail address. It is important that the address is valid, and also that you have access to it. If you wish, you can also specify an additional postal address.
- Date of Birth. By date you should have more than 21 years - otherwise you will not get the content and software in the AppStore and iTunes Store.
- Invented password. Password Requirements apple records Very severe: it must contain numbers, lowercase and uppercase letters. Plus, one character can not repeat three times in a row.

Also, the user will have to answer three questions - for example, what was the name of a better friend of childhood.This measure is necessary to ensure the security of the account.
Step 7.Discard the mailing, if you do not want to receive information about the products of the "apple" company and the releases of films and music on mailbox. To do this, remove the checkboxes opposite the fields. Recommendations and information ...».

Then click " Proceed».
Step 8.. Select the method of paying purchases and enter the necessary details. note that specification of credit card details in iTunes in no way begins to your welfare. Money spikes only in the case of the acquisition of content or software and only with your consent.

If as a payment method you have chosen a plastic card, you will have to enter its number, validity period, and CVC2 - security code from a back side. If you preferred the option " Mobile phone ", Enough to specify cell number And confirm it through SMS.
Step 9.. Fill in the fields of the block " Setting the account" You need to specify:
- Familia and name.
- Code and city name.
- Street of living and index.
- Contact phone number.
- Form of circulation (" mr." or " ms.»).

As soon as fill in the required fields, click " Create Apple ID" You will see a window that sends you to the mail.

Step 10.. In the mailbox you will find such a letter:

You should click " Confirm address", After which you can assume that Apple ID Successfully formed.
How to create an Apple ID without a PC?
Caissure account Apple will be possible without a computer, but in this case it is necessary that the device is connected to 3G or Wi-Fi. Provided access to the Internet, act like this:
Step 1. IN " Settings»IPhone Lay the section" iTunes Store App Store. "And go to it.

Step 2.. Click on the "button" Create a new apple id».

Step 3.. On the next screen, you will see a list of countries - Russia is chosen by default. Without changing anything, click " Further».

Step 4.. You should familiarize yourself with the document entitled " Provisions and Conditions of Apple Multimedia Services" Document is quite capacious - 29 pages are obtained on iPhone small font; That is why most users neglecting him reading.

Anyway, confirm that you have read " Regulations"And agree with the conditions will have. To do this, click " To accept"In the lower right corner and then click on the same button in the appearing window.

If you want to read the conditions, but not from the phone screen, and from the paper media, use the link "Send by e-mail". You can print the document from email.
Step 5.. Fill in the form. Introduce the same data as when registering an account in iTunes. - E-mail, password, date of birth, questions and answers required to ensure safety.
If you do not want to subscribe to Apple services, applications and content, switch the sliders below, in an inactive position.

Step 6.. Choose payment method and enter payment details. The same data is needed as when registering through iTunes..

After you specify the required information, click on " Further».
Step 7.. Go to the email, which indicated when registering Apple ID, and press " Confirm address».
Creating an account Apple IDin the "settings" of the device and registration through iTunes. - Similar procedures: In both cases, the same information is required.
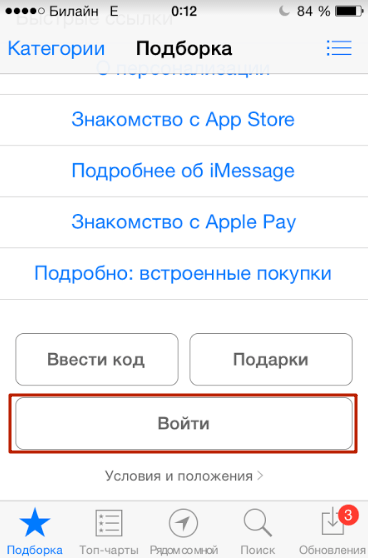
You can get into the Apple account creation service via the App Store. Go to the application store and scroll through the main page to the end. Click on " To come in».
Then click " Create Apple ID».

How to create an account on an iPhone without a credit card?
At least one way to create Apple ID Without a "credit card". If you do not want to share with Apple payment details, act like this:
Step 1. Go to iTunes. and in the drop-down menu select " Programs».

Step 2.. Find free Appendix (any) on main page And click on his icon.
Step 3.. After the application description opens, click " Download».
Step 4.. In the window that appears, tap on the button " Create a new apple id"So you run the account formation procedure.

Continue registration as usual until the moment when you need to decide on the payment method.
Step 7.. On the page " Specify the method of payment"Instead bank card Select the option " Not».

With this choice, you will be delivered from the need to introduce payment details. However, the numerous fields of the block " Setting the account»Fill it all the same.
Conclusion
Create Apple ID You can both with PCs and without it. However, if you use the computer and iTunes., time will be spent less - it will have to print abound, and on the PC keyboard it is more convenient.
In addition, when registering from a computer, it will be possible to do without specifying the details of the selected payment method. This is important because many domestic users apple technology Suspicious refer to the requirement to leave data cards.
My name is Sergey and today I will show you how you can create an Apple ID on the iPhone and on the computer. That is, individually consider, first the option with an iPhone, and then with the computer.
There is nothing complicated here, but again the topic is relevant. Watched statistics and every month several thousand people Looking for information about how to create an Apple ID, in particular without a credit card.
So let's go!
How to create an Apple ID on the iPhone?
First of all, consider it all on the iPhone. Therefore, we take your smartphone and repeat for me. Find standard application App Store and launch it.

Here at the very beginning important moment. You need to select a free app and go to the download page. Next I will tell why we do it.

I chose such a toy. Click download and install after a second.


We are told, they say you need to log in, or "Create Apple ID". Naturally click the second point.

The registration process begins. First of all, you need to choose a country. I will choose Ukraine. If you admire you need Russia, then it will most likely substitute automatic, and if not, then scroll through the list and find the right country. After the selection, click Next.

We accept the terms of the agreement. Click to accept and accept once again.


Next, you need to enter your current postal address. I advise you to use mail from Gmail. We come up with a password. Here, note that the password must contain both letters and numbers and the numbers should be at least one capital, that is, a big letter. For example, I created a password TestPass1234.

I go down below and here to ensure security you need to choose three different questions and answer them. This data will be needed if you suddenly lose access to your Apple ID, that is, if there, for example, a password forget or something like that.

Filled answers to questions and go down even lower. Here you can enter additional email, but it is not necessary.

Even below Introduce your birth date. Pay attention if you are less than 18 years old, then the registration you will not miss you. Therefore, point out the year so that you were 18 years old.


The next registration stage is adding a credit card for Apple ID. Remember at the beginning we tried to download a free app. We did it so that it was possible to not specify your card here. There is no item here. Choosing it!

We chose it down and introduce our data. Name, surname, street, house room, city and index.

And we are then asked to enter the mobile phone number. I will try to introduce not the real, I hope to ride. So, it seems nothing else here is not necessary. Click further.

We are told that a verification letter was sent to our mail. You need to follow the link.

I immediately dropped a message at the post office, there you need to find a link to confirm. Click, "Confirm address."

We enter the password that was used during registration.


And the recorded record is confirmed. Rates us back to the App Store and again ask you to enter a password, do not be surprised, there is always a password. I sometimes wonder how much you can enter the password every time.

Now we try to install and download this toy again.

No, well, they rock, again you need to enter a password. Okay.

So, you can remember the password for 15 minutes. Ltd. ... For a whole 15 minutes, I will not ask me a password. Really. Okay.


Well, everything is ready, go to the last screen and here is our downloaded and installed game.

By the way, if we return to the App Store on the first page of the selection and fall at the bottom, we can make sure that the entrance to the Apple ID is now fulfilled.

How to create an Apple ID from a computer?
If you have any errors when creating an Apple ID on iPhone, or you just do not conveniently enter all the data on the phone, you can create an Apple ID from the computer. It seems to me it is still easier!
Go to Apple site https://appleid.apple.com and find the New Apple ID link. Press it.
As in the case of creating an Apple ID on the iPhone, we need to fill a bunch of fields here. Mail, password, answers to 3 control questions and security code. Fill and click to continue.

To confirm the address you need to enter the code that I was thrown on the mail.

I found the code and this is 619221.

Returning and introducing it into the form.

Well, the campaign is all. Us in this case They did not even ask to specify the data of their card, name, address. Although there is this data added.

Well, let's go back to the iPhone and see if we miss us with this login and password.
Run the App Store again and go down to the bottom. Click login and fill.


We are told that this Apple ID has not yet been used in the iTunes Store and you need to click.

Still, you will have to choose the country, take the terms of the agreement and enter your data. So, because without missing them. You need to specify the country at least to enter a name, address and city.
After filling out all the fields, we are told that now the account for iTunes Store is created.

Now you can try something download with this Apple ID.

Well, here, as you can see, you can register both on the iPhone and on the computer.
Register in the iTunes Store in iTunes
There is another way to register. If you need to create an Apple ID so that then on the phone you do not need to enter the rest of the data, then for this we need to register on the computer through program iTunes. . I remembered the first time I was registered to download applications, I did it through the iTunes program.
There, too, you can choose a free app and try it to download, we will be offered either to log in, or create a new account. We choose naturally creating an account and fill the fields already familiar to us.


What kind of friends, with this question we figured out and again I remind you that in order for you at the registration stage did not request your card data, and there is no item, you need not to forget at the beginning of choosing a free application.
That's all create an Apple ID on an iPhone or computer is very simple. See you in new lessons and articles. Until!
Today there is just an incredible variety of phones, but the leading place in demand, and also among sales is the iPhone. Such phones are very comfortable, high-quality and provide a huge number of opportunities, and the registration of your iPhone will give even more interesting services as well as functions. But how it is properly and profitable to register such a smartphone knows far from every owner, although it is not at all difficult. There are several options for the implementation of the mentioned process, but a method will be considered here that does not require the use of a card (credit card). He is the fastest, easy, convenient, and also affordable to every person, because a lot of people fear to introduce any data from their bank cards. In addition, the most part of the iPhone owners is quite solely free applications.
Preparation for registration
Each subscriber with an iPhone can register an Apple ID at any time, both during the first power on the device and a long time after successful activation. In each case, the scheme is almost completely identical. Below will be considered the second option, that is, the formation of an account on the iPhone, which has already been operational.
Subscriber must prepare:
- An iPhone, which has already passed activation.
- Connecting to world web on Wi-Fi or an inserted SIM-card with an Internet (without access to Global Network Do nothing can not).
Registration actions
To successfully register your gadget, it is clear, carefully, and also consistently perform the following actions:

Important points and notes
You need to pay special attention to some nuances:
- Be sure to introduce your true email.
- The password should be more than eight characters: numbers, English letters, and at least one capital letter should be in stock. Password needs to be remembered, but better to write down.
- Pointing age cannot be put less than 18 years old, if you are younger, you can exaggerate a little.
- It is incredibly important to realize the fact that the introduced emailAlso, the password will later become your Apple ID. These data should be accurately recorded and keep well, not showing anyone without telling them.
- It is required to remember that this information is your account, as well as the only confirmation that the owner of this mobile apparatus is directly you.
- If you do not plan to apply a credit card, then in the "Payment Information" item must be selected. Otherwise you need to specify payment System, after which make all the required data. You need to fill all the information with the exception of the point called ... ".
- On the mail that you indicated some time earlier will receive a message that you want to open and go to the link contained in it.
That's all, registration in Apple ID (by the way, absolutely free) is successfully completed. From now on, you can completely safely use the store called the App Store, download to your iPhone for the gift provided (or making money - paid) games, as well as various applications.
Hello everyone! We have already become acquainted with the identifier in the system of the apple company (). And at the end of the article, came to the conclusion that Apple ID registration is needed to create your own, unique account. And if you need, we will do! Especially, if you consider this instruction in accuracy, the whole process will not take you a lot of time, and efforts will be minimal at all.
By the way, the article will consider registering an Apple ID without any card (credit card). Why without it? In fact, the reasons can be thought of a lot. I will not deepen and list just some of them.
And here they are:
- The simplest thing is not all this the most credit card.
- Many fear to enter their card data (although it is completely safe).
- Some enough only free applications in the App Store.
If all these three items are not related to you, then at a certain stage (on what? All the details are below the text), it will be necessary to make data "plastic".
In general, register an Apple IDs can be absolutely at any time, both when the device is first turned on and after it. The scheme is almost the same everywhere. Here we will consider the second option, namely the creation of an account on an iPhone or Aipad, which has already been used for some time.
That is, we need:
- Activated iPhone, iPod, iPad - here the instruction is universal, regardless of the gadget.
- Connection via Wi-Fi or inserted SIM card (nothing will happen without the Internet).
All is ready? Begin!
We take your device, unlock it and find the App Store icon in the menu, click.
Choose any free game Or the application is to install. Attention! It is required that the free application is required.

Then we need the Create Apple ID menu item.

A new account creation window will appear. We see the choice of a country or region, we leave Russia.

"Provisions and conditions ..." - just accept. It is difficult for me to imagine a person who will read it - 60 pages after all :) Although, perhaps, I have not enough rich fantasy :)


The data entry window opens.

Several important clarifications:
- Be sure to enter a really existing email.
- The password must come up with a minimum of 8 characters: numbers, English alphabet letters, and necessarily at least one capital letter. Write down or remember the password!
- Age - you need to specify that you are not less than 18 years old. If you have not yet reached the age of majority - you are brazenly.
Very important! The specified e-mail and password will be your Apple ID!Save, write on a piece of paper, nobody and never show them.
Remember, this data is the only proof that the device belongs to you. To understand all the severity of the situation, I advise you to read (especially pay attention to the last paragraph). Did you do everything? Go ahead…
Payment information - Select No (if there is no intention to use a credit card). Or (if you wish to use the App Store store on a complete "coil"), indicate the payment system, after we enter all the necessary information. Item "ITunes Gift Cards ..." is not obligatory. Fill out the remaining data.


An email sent to the mailbox was sent to the letter - open it, well, of course, go on the link to complete the process.


Congratulations, registration in Apple ID (and completely free) completed! And now you can use the App Store store, establishing freely distributed (well, or by paying - paid) applications and games.
In my opinion, the instruction turned out to be sufficiently detailed, but if you are tormented and the various questions do not give you, then I always wait for them in the comments. Boldly tell about your problem - I will help, as they say, what can :)
Updated! There is an article that summarizes all errors that can interfere with the creation of an Apple ID. Therefore, if something does not work ,.
P.S. By the way, for a full and correct apple registration ID need to click on the buttons social networks And put a "like" article - try it really works!


