If you download ISO image with the Windows distribution and even write it correctly to DVD disc or create bootable USB drive with the help of the same UltraISO, practically no one has any difficulty. Then with the second stages, directly installing the operating system from a disk or flash drive on a PC, many have difficulties.
I know of three ways to start installing Windows.
1) the simplest and most unreliable is to open the image with Windows already running through virtual drive and start the installation, but there are many factors that can interfere and give an error at some stage of such an installation.
2) Insert the USB flash drive we created into a USB connector or a DVD disc with Windows into your drive, no matter what version, windows 7 roofing felts, windows 10 roofing felts, even win95. It works for everyone. Then, when you turn on the PC, call the BOOT menu, this is a list with the media from which you need to boot, select the media we need and press ENTER. More details on how to install Windows through the BOOT menu can be found here.
3) It differs from method 2 only in that we indicate what we want to boot from not through the boot menu, but in the BIOS of our device.
In this article, we will talk in detail about how to install Windows from a USB flash drive via BIOS or boot Windows 7 from a BIOS flash drive.
Booting Windows 7 from a BIOS flash drive
Installing Windows from a USB flash drive via BIOS starts with a call BIOS menu or it is also called Setup, this is most often done with the Delete button immediately after turning on the laptop or computer, continuously press until you see blue screen with some kind of text, but it happens that you need to press another button, it's F2 or F10 or Esc. You can try all the options until you see the desired result, or you can read it in the welcome window motherboard firmware text like "Press DEL to run Setup" he tells us to get into the BIOS, you need to press DEL.
And so, after we got into BIOS SETUP UTILITY, we look for the Boot tab and use the arrows to go there. We need the line Boot device Priority
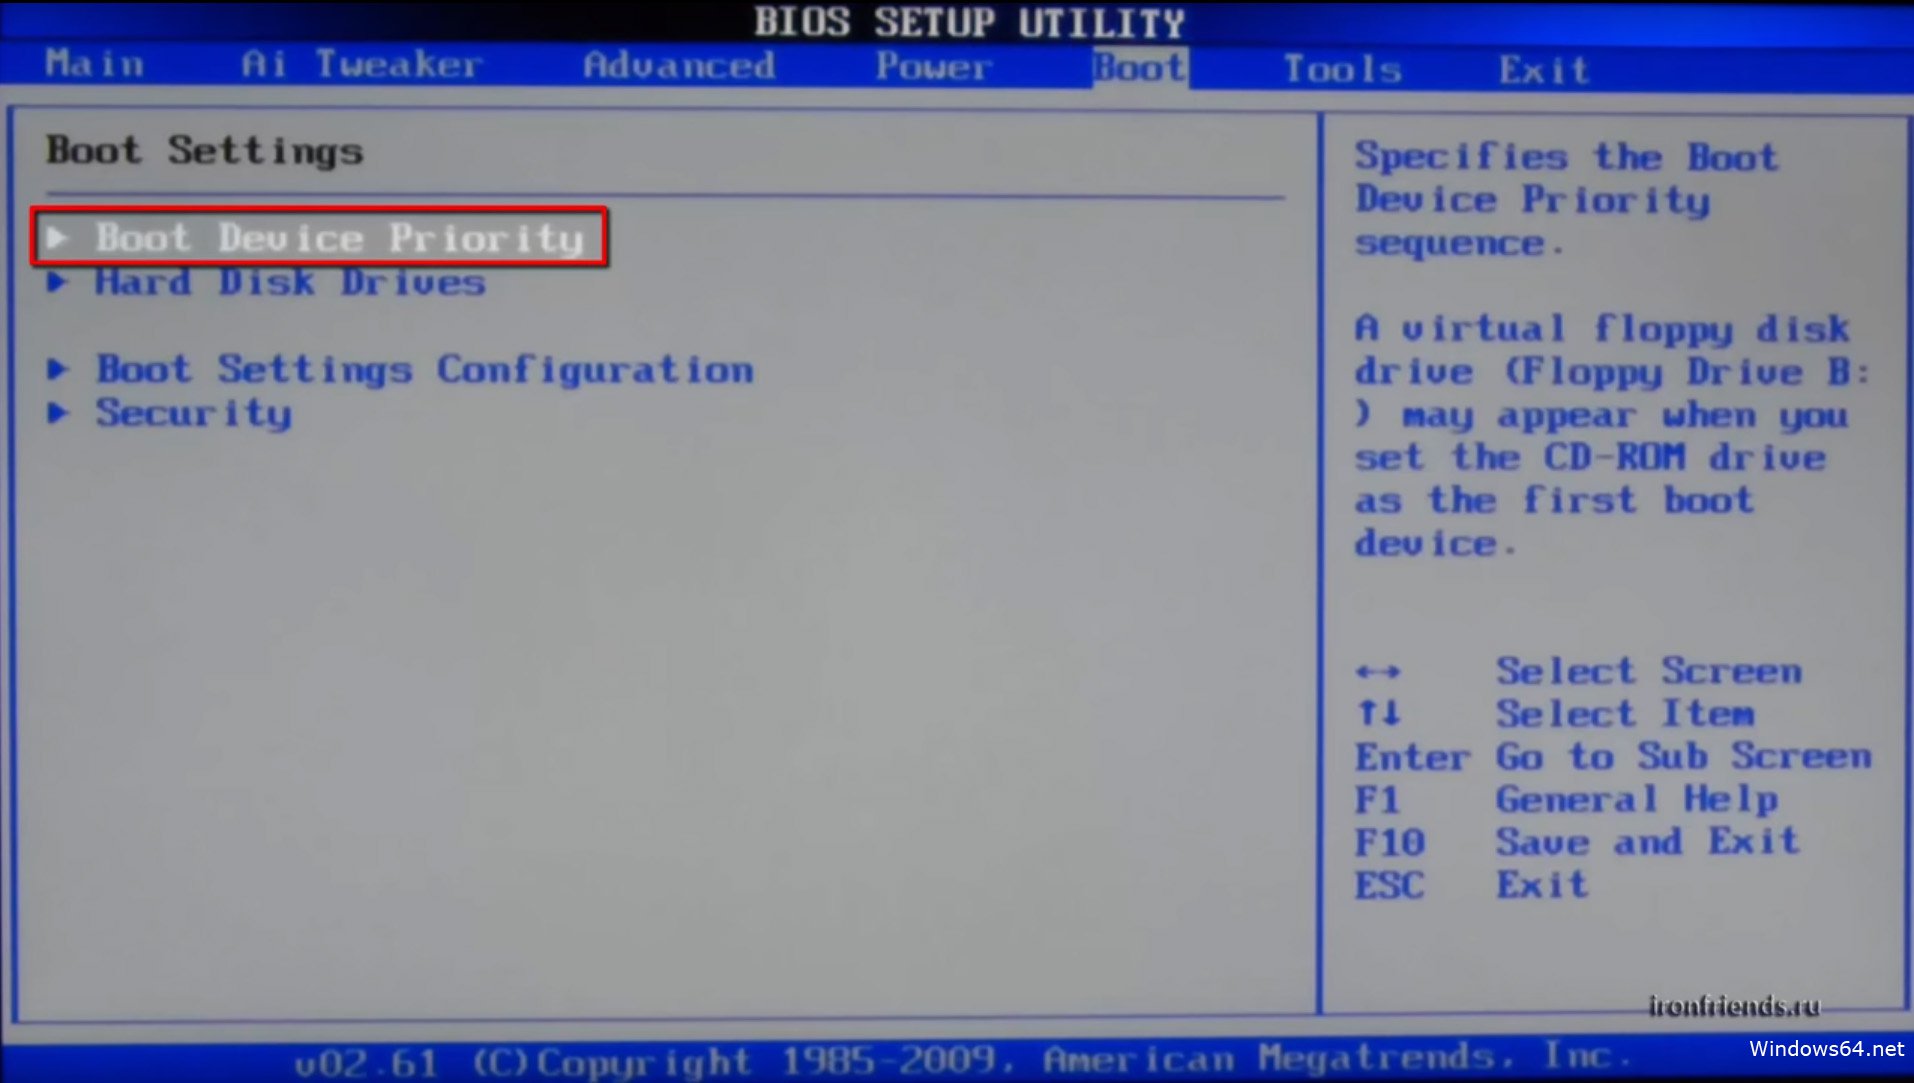
The logic here is simple, the higher the device in the list, the higher the priority in the download queue. That is, the top one in the list is loaded first, and so on in turn until the system boots.

And so we select the first drive in the list using the arrows and press ENTER, we see a list of all possible devices from which the computer can boot.

If we want to choose to boot the BIOS through a USB flash drive, then we select the USB interface, this is Removable Dev or something with the inclusion of the text "USB" or if the flash drive is already inserted, then the name of the manufacturer of the flash drive will be written. If you need to select a DVD drive, then as a rule this line begins with the words CDROM: or DVDROM: or it can also be written by the manufacturer of the DVD drive.
If you decide on the choice, then press ENTER and in the same way select the second device in turn, the second in the list should be your hard drive on which Windows will be installed. If the BIOS does not see the USB flash drive, then try inserting the USB flash drive into another USB connector and do everything over again.
So that all changes are saved in BIOS Setup, you need to go to the Exit tab before leaving and select the Exit & Save Changes line and press ENTER.

After that, we can install Windows BIOS via a USB flash drive or dvd drive... bios with a blue screen can no longer be found in everyone. In 2017, more and more often you can see the new generation BIOS, it is more graphically thought out, there are icon pictures for an understandable association, if not strong in English so as not to be mistaken. But in fact, all settings are similar.
Attention!- after our changes in the BIOS, now the computer will always boot first from the USB flash drive, then from hard disk, therefore, it is important when installing Windows after the first stage of installation, when the laptop or PC reboots, USB connector, or remove the disc from the DVD-roma. Otherwise, the first stage of the installation will be repeated endlessly.
Now we know how to set up a BIOS to install windows from a USB flash drive. And having with us a bootable USB flash drive with the image of WINDOWS 7 or 10, we can easily install or reinstall the OS on any device.
There are many types of BIOS: Ami, Award, Phoenix Award, UEFI. Let's figure out which buttons to press when booting a computer or laptop in order to go to BIOS and put a boot from a USB flash drive to install windows. I want to note that the traditional key delete, F2 to enter the BIOS. Below are the combinations of buttons on how to enter BIOS to install a boot from a USB flash drive.
Buttons for entering bios from laptop and computer manufacturers.

Buttons from BIOS manufacturers

How to put a boot from a USB flash drive in BIOS for installing Windows
To begin with, you don't always need to go into BIOS to swap the bootloader for installing windows. For this there is the so-called launch menu... To go there, you need to turn on the computer, sometimes a key is written. V this case F12. Press the key that is written in the word Boot Menu .


How will we start the computer: USB flash drive or other devices. The next step is to install the windows system.

How to install a boot from a USB flash drive in Ami Bios
- Push Device Priority.

In line 1st devise we set the priority from the flash drive. This is usually all, but many have come across why I did everything right, and the computer does not start from a USB flash drive. It is just necessary to specify sometimes, in addition to priority, forced loading in the line Hard Disk Drives.

- V Hard Disk Drives we set a forced start from a flash drive.
- V 1st drive select the media.
- Press F10 to save.
It turned out that in the 1st Devise and Hard Disk Drives settings there is a bootloader with USB Flash i.e. we put the priority option, tried it and it didn’t work. Then we set a forced launch and everything worked out for us. And so in all BIOS versions, if the priority loading did not work.


How to install a boot from a USB stick in Award Bios
- Go to Advanced Features.


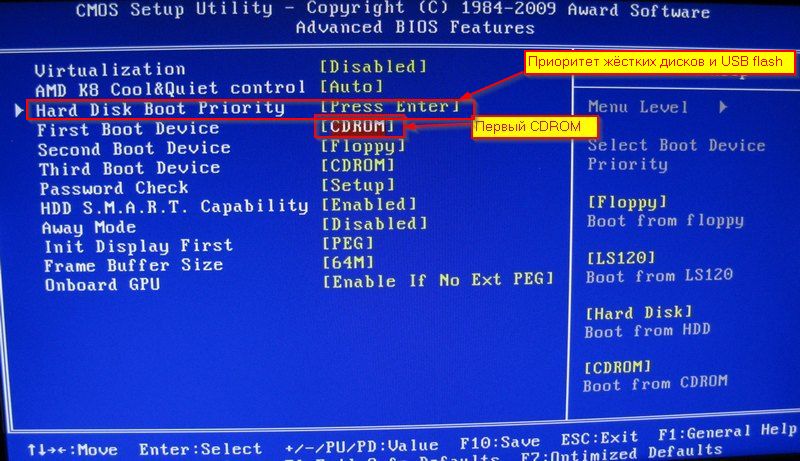
- We press First Device, v context menu we put from which bootloader we will start the computer. We have chosen the primary device to launch.

- Hard Disk Priority put the flash drive in 1st place. (If in First Device choose to start from a drive, then you need to put a USB flash drive in Hard Disk Priority).
- Award is ready, press F10 to save.

How to install a boot from a USB flash drive in Phoenix Award Bios
- Customization Advanced, in line First Boot Device we put a USB flash drive or other device.
- Push F10 to save.

New UEFI BIOS in which you can control the mouse.
- Line Boot Priority, swap by dragging with the mouse. Can be done through advanced settings> Exit / Advanced mode and choose Advanced mode.


- Presses Boot and choose in Boot Option #1 loader.


It turned out to be very simple to go to BIOS and install a boot from a USB flash drive to install Windows, you just need to change just the type of boot. And remember the preemptive and force bootloader.
How convenient a USB Flash drive is to use, you can talk endlessly. However, it is not the purpose of this article to enumerate the advantages and benefits of this removable storage medium.
It will be about how to set up a boot from a USB flash drive in BIOS. Indeed, often the user is faced with the problem of inability to install the operating system or cannot use by software bootable shell Live USB using the mentioned gadget.
Let's figure out what causes the electronic immunity and what settings need to be applied in order for the Flash storage device to be "noticed and identified" by the BIOS microsystem as a full-fledged bootloader.
Bios is different
To date, manufacturers computing technology Three main types of BIOS microsystems are widely used:
- Award
- AMI (American Megatrends, Inc.)
- Phoenix (Phoenix Technologies, Ltd.)
Meanwhile, each of them is individually subdivided into many versions and can be used on computers. different types and modifications.

Despite the generally accepted asceticism of the BIOS interface and standardization in management (with the exception, perhaps, of the UEFI BIOS, which will be discussed separately), the names of the sections and their location in the working area of the microsystem are often, as they say, regulated by the manufacturer, and therefore are distinctive interpretation.
At the same time, one should not forget about such a factor as the built-in level of functionality in relation to a specific basic system, which, in general, can be compensated by an increase or, on the contrary, a decrease current version BIOS. By the way, about the process BIOS updates on laptops, you can learn more from the article posted .
Changing Boot Device Priorities - Practical Examples

So, in order to put a boot from a USB flash drive in BIOS, you need to perform a few simple manipulations in the basic microsystem. However, in view of the differences described above, sometimes this process, frankly, is very difficult. So it makes sense to deal with each a separate case, that is, by an example, see how the boot from a flash drive is set for each specific BIOS system.
Assigning the USB mass storage device as the master bootloader in the AMI BIOS
Before you enter the microsystem interface, the USB flash drive must be connected to the corresponding connector. Use only primary ports.
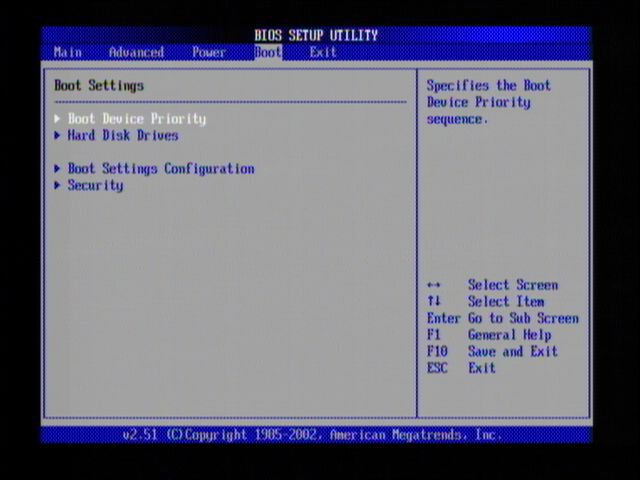
- Use the left / right keys to navigate to the Boot tab - press the Enter key.

- Go to the item "Hard Disk Drives" (down) - again "Enter" and when you activate the item "1st Drive", which means "First drive", select the name of the installed flash drive from the drop-down list.

- When finished - press "ESC".
- Now use the item "Boot device priority" - "1st Drive" - "Enter" and specify the USB flash drive again.

- Press “ESC” twice and go to the “Exit” tab, where you need to activate the “Exit saving changes” item.
- We agree to the save request - "Yes".
The changes you make will take effect after the computer restarts.
Booting from a USB stick to AWARD and Phoenix BIOS
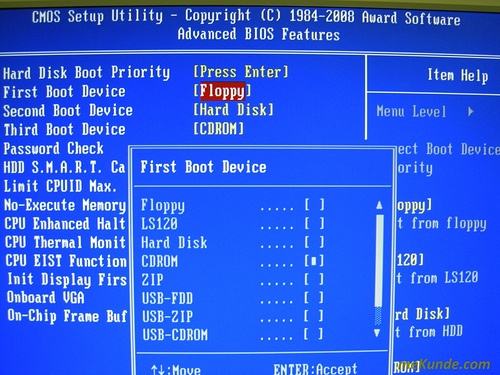
- Go to the second item "Advanced BIOS Features".

- Using the "Enter" key, activate the "First Boot Device".
- In the drop-down menu, you must specify "USB Flash" or "USB-HDD".

- After you have specified the boot device - press "ESC".

- By using hotkey"F10" save your changes.
How to configure BIOS InsideH20 to boot from a USB flash drive
In some laptop models, you may also come across this BIOS option.
- Go to the "Boot" tab.
- Set the “External Device Boot” item to “Enabled”.

- Now in the "Boot Priority" block, use the "F5" and "F6" keys to set the "External Device Boot" parameter to the first position in the list.
- Next, go to the "Exit" tab and select "Save and Exit Setup".
After, the laptop will boot from the USB flash drive.
Manipulating UEFI Settings: Changing Boot Order
As a rule, when entering the advanced BIOS microsystem, all active drives are displayed on the main screen (at its bottom). Using the mouse, drag the USB stick to the first position.
In some versions of the UEFI BIOS, this feature is not available. However, your attention should be drawn to the "Bios Features" or "Boot" section, where you need to set your USB flash drive as a priority bootloader.
Boot menu is the fastest way to boot from a USB stick
Literally in all BIOS versions, there is such an opportunity as - to boot from a specific device without executing a script for entering the microsystem management interface.
Depending on the type of computer, the version of the operating system and even, design features computing device, the process of calling the Boot menu service can be radically different.
The main keys with which you can enter the fastboot menu

In some laptops, the manufacturer provides special button"Nano Button" or "One Key Recovery" (some details can be found ), through which you can also get to the fastboot menu.
In conclusion: on "button omissions"
In some cases, after turning on the computer, the process of loading the operating system takes place very quickly, which in turn can become a kind of obstacle to entering the BIOS and calling the "Boot menu". In most cases, this "inconvenience" is observed in computers with preinstalled Windows 8 or, the latest, 10th version.

If you are faced with such a difficulty, the solution is ... You can also try to disable the " Fast loading". Enter "button" in the search field of the start menu and select "Configure the functions of the power buttons" - perform the necessary actions. As you can see, there are plenty of options for booting from a USB flash drive. Choose the one that suits you best.
In this article we will talk about how how to boot from USB disk, and some of the problems associated with it.
Attention! For settings Computer BIOS to boot from a USB flash drive, the USB flash drive must be connected to the computer. Connect the USB flash drive to the USB port, restart the computer, and only then enter the BIOS or call the Boot menu.
When you need it
In most cases, booting from USB is required for:
- operating system installation;
- diagnosing problems;
- hardware testing;
- remove viruses on the computer.
In order to boot from a USB flash drive, you do not need to go to BIOS settings, change the parameters and save them. It is often enough to bring up the Boot menu while the POST screen is displayed and select Boot from USB.
One-time boot from a USB stick
Depending on the manufacturer of the laptop or motherboard stationary computer, different keys may be responsible for calling the boot menu. Most often it is F8, F10, F11, F12 or Esc... Look for a prompt on the screen when booting up your computer. It usually sounds like Boot Menu or Press .. to select boot device:
V Boot Menu, select USB-HDD:

If you cannot boot from a USB flash drive, enter the BIOS settings and set the following parameter values:
USB-HDD: Enabled
USB-Floppy: Enabled
Legacy support: Enabled
External device Boot: Enabled
Secure Boot: Disabled
In different bios, different manufacturers have different parameters. Do not think that all these parameters will necessarily be found on the same computer. We have just listed the names of all the possible parameters that can affect booting from USB flash.
Configuring boot from a USB flash drive in BIOS settings
This method is useful if:
- you frequently boot from USB or constantly work in an OS booted from USB:
- you don't want to bring up the Boot menu every time you need to boot from USB.
1. When the computer boots up, press the key to enter BIOS setup. Most often it is Del, F2 or F10... If you cannot enter the BIOS using these keys, read the manual for your computer or your motherboard and find out which key allows you to enter the settings.
2. If you have AMI BIOS, go to the section Boot => Boot Device Priority and select the USB flash drive as the first boot device.
If you have AWARD BIOS, enter the section Advanced BIOS Features and in setting First Boot Device choose USB-HDD.
Save the settings.
Have you already recorded a bootable USB stick, but don't know how to boot from a USB stick? There is nothing complicated here. Booting Windows from a flash drive it is very simple, and for this you just need to go into the BIOS and change one setting.
If you have not yet recorded a licensed digital copy of Windows, I recommend reading -?
How to set up booting from a USB flash drive?
If you just plug the USB stick into your PC or laptop and restart it, installing Windows will not start. After all, for this you need to enable boot from a USB flash drive in BIOS.
This is easy to do. But there is one caveat here. The fact is that download windows from a USB flash drive to PCs and laptops is carried out in different ways. First, it depends on the BIOS manufacturers. And, secondly, from the laptop brand (Asus, Acer, Samsung, Lenovo, HP, etc.).
Yes, the BIOS menu will always be different, and this can cause difficulties. But below we will consider several examples so that you understand and can independently navigate the BIOS menu (in case you have another option).
So, let's begin. To enter the BIOS, you must immediately press a certain button on the keyboard when you turn on your computer or laptop. Which one? You can find out when loading on the screen.
You can find out that you have entered the BIOS by seeing the corresponding menu in front of you. The following options are usually found:


If the BIOS did not load, then wait until the PC or laptop is turned on, restart it and try again by pressing another key.

In this case, the "Boot" item was selected, and then "Boot Device Priority" (ie, the priority of device startup). As a result, a menu like this will open:


As you can see, they are different, but in each case there are lines we need - First (1st), Second (2nd) and Third (3rd) Boot Device. Here it is indicated which device is booted first, which is the second and the third in turn. As a rule, the first is always HDD(HDD), and then a floppy drive (CR-ROM).
When you connect the USB flash drive, the USB-HDD item will also appear. It is necessary in the First Boot Device item to select the option - USB-HDD. Example:

Next, you must definitely save the changes, otherwise you will have to repeat everything from the beginning. Which button to save? This information is written at the bottom of the screen. For example, in the screenshot above: F10 - "Save", ESC - "Exit". We save the changes and exit the BIOS. Congratulations, the BIOS setup for booting from a USB flash drive is complete.
The computer (or laptop) will automatically reboot, after which the following line will appear:

Press any button - and it will begin Windows installation.
If you have a UEFI BIOS then everything is as simple as shelling pears
Go to BIOS and you will see something like this menu:

To configure the boot of a USB flash drive into UEFI, we are interested in the "Boot Priority" item. Drag the USB device icon to the top of the list (to be the first) and exit (the exit button in the right upper corner). When you exit, the system will ask you if you want to save the changes. Agree, after which the PC or laptop will reboot.
By the way: it doesn't matter at all what kind of image you have on your USB flash drive - Windows 7, 8, 10 or XP. It doesn't affect anything. Booting the OS from a flash drive will start in any case (of course, provided that it is correctly recorded).
And finally, one more very important point... When unpacking Windows files will complete - the computer will restart.

After that, you need to go to BIOS again and return the previous device startup priority. That is, put the hard disk drive (HDD) first, and the USB stick - last. This shouldn't be a problem.
Basically, you don't have to. In this case, when a black screen appears, NOTHING do not press.
Otherwise, the Windows installation will boot again and you will install operating system again.
But when Windows is installed, you still need to go to BIOS and return the previous device startup priority. Otherwise, the computer (or laptop) will first of all always download data from the USB flash drive (provided that it is connected).


 Pc radio does not display channel list")
