TOPIC 8. CREATING WEB PAGES WITH WORD
Microsoft Office applications - Word, Excel, PowerPoint, etc. can be used as editors that simplify the creation of Web sites. In this case, the user may not know the HTML language and have a familiar environment for document formatting - WYSIWYG (what I see is what I get). A huge number of people who use Word in their daily work are potential HTML document developers.
There are two ways to create a Web page in Word: using a wizard or template, or by converting an existing one. Word document to HTML format. However, Word itself generates HTML tags, although not in an optimal way.
The first way creating HTML documents is quite simple - you need to start creating a document "from scratch" and only follow the advice of the Wizard and use the tools that are available in the program menu.
Second way- convert existing Word document to HTML tags on save Word file in HTML format. The transformation naturally leads to the fact that some elements of the document's design will be lost or changed.
One of the distinctive features of HTML documents is that the document itself contains only text, and all other objects are embedded in the document at the time it is displayed by the Browser using special tags and stored separately. When you save an HTML file to the location of the document, Word creates a folder on disk, into which it places its accompanying graphic design elements. For example, when saving a file with pictures frieds. htm Word creates a folder frieds. files, in which he will place all the pictures.
Accordingly, when creating a site — a group of interconnected Web pages — it is recommended that you place the site in a separate folder and, when moving or publishing a site, strictly preserve the entire internal folder structure.
When preparing a publication on the Internet of materials created in Word, it is useful to know the specifics of converting to HTML format. Some of them are given below (Table 8.1).
Table 8.1
Converting design elements to HTML
Document Element Word | Convert Word ® HTML |
Font sizes | Word displays fonts from 9 to 36 points. Dimensions (edit) HTML fonts range from 1 to 7 and serve as an indication of the font size to the Browser |
Text Effects: | Text effects are not saved, but the text itself remains |
Outlines: | Typefaces remain, but some underlines are converted to a solid line |
Animating text | The animation is not saved, but the text remains. You can use the creeping line to animate the text (Web Components panel) |
Images are converted to GIF or JPEG format if they have not been previously saved in such formats. Lines are converted to horizontal lines |
|
Graphics: Autoshapes, Curly Text, Decals, and Shadows | Objects are converted to GIF files. In the editing environment of the Web page, you can insert the graphical tools "Insert" - "Picture" |
Tables are converted, but options not supported by HTML are not preserved (for example, colored borders and variable width borders) |
|
Page numbering and headers and footers | Since an HTML document is considered a single Web page, there is no concept of headers and footers and pagination is not preserved. |
Page margins and multi-column text | |
User-defined styles are converted to direct formatting if supported by HTML |
If you need to insert your own tags into the HTML page, Word provides direct editing of HTML code... This can be done by calling the editor window via the "View" - "HTML Source" menu. Before switching to this mode, you should save the file. After finishing editing before closing the window, the file must also be saved.
Another possibility of switching to the HTML editing mode is to open the document in the Browser and call the menu "View" - "As HTML". By default, editing is done in Notepad.
Although Word displays the document in much the same form as it will later appear in the Browser, you can preview a Web document without leaving Word.
In the "View" menu, the ways of displaying the Word document are set (Fig. 8.1). When you select "Web Document", the file is displayed as it would appear in the Browser installed on your computer. Through the "View" menu, you can return to normal regime work with the document.
https://pandia.ru/text/78/284/images/image002_81.gif "width =" 32 "height =" 32 src = "> Autobiography" href = "/ text / category / avtobiografiya /" rel = "bookmark "> autobiography).
My hobbies
My friends
4. Create a Word document dedicated to your hobbies. Save document as hobby. doc in your folder. The document must be formatted, have a footer and, in addition to text, contain pictures.
5. Create Excel workbook with the table as shown below, save under the name friends. xls
https://pandia.ru/text/78/284/images/image004_38.jpg "width =" 464 "height =" 164 src = ">
To calculate the average values should be used formulas.
5.1. Build charts illustrating information about your friends. Arrange the graphs, adjust the size of the table and graphs under the table.
5.2. Prepare a sheet for printing: configure the parameters of the "Page ..." tab in the Preview, create headers and footers.
6. Establish links between documents using hyperlinks.
6.1. Open main document main. doc and sequentially highlighting the section headings, attach hyperlinks to them ("Menu - Insert") to the corresponding documents.
8. Create hyperlinks at the end of each supporting document to return to the main document.
8.1. Prepare a drawing to ensure the return from supporting documents to the main one. For example, a picture Buffer "href =" / text / category / bufer / "rel =" bookmark "> buffer (Alt + PrintScreen) and further editing the picture in the Paint editor.
8.2. Insert a picture at the end of each document and attach a hyperlink to the main document behind it. doc. In file hobby. doc the hyperlink should provide a transition to the "Hobby" tab.
10. Create a group of related Web pages using the rendered document transformation method.
10.1. Prepare a folder for Web documents named My_Web.
10.2. Sequentially opening previously prepared documents, save them in a folder My_Web by indicating:
File type: Web page (* .htm; * .html)
10.3. Close all documents, analyze changes in the folder structure.
11. View Web documents starting with main. htm... Analyze which elements of documents have changed or disappeared altogether. Try to follow a hyperlink. Make sure the links between web pages need editing.
12. Edit Web-documents, change hyperlinks, perform additional design.
Attention! To switch from the Browser to the editing mode, use the menu "File" - "Edit in Microsoft Word for Windows "or the button on the toolbar.
II. Create New Web Documents Using MS Office Applications
1. Get acquainted with the structure and composition of a multi-page hypertext document uniting four pages (see Appendix 8.1).
2. Create a folder named Presentation, and in it - a folder for your drawings Gallery.
3. Prepare figures for inclusion in the appropriate pages. Save them in a folder Gallery as separate files in bmp, gif or any other format used on the Internet. Pay attention to the size of the pictures and the size of the files. Files should not exceed 3–10 kB in size.
4. Create separate file for each page using the word processor Word (Pages 1, 2, 4). For Page 3 use a ready-made file friends. htm... Save files in htm or html format in a folder Presentation.
4.1. Launch the word processor and use it to create the main page, save the file in html format under the name index. htm
4.1.1. It is recommended to use a table when creating a structured document. After placing the objects, remove the border of the table.
4.1.2. Execute the execution of the document. For the main heading, use the WordArt object, for others - the Heading style.
4.1.3. To decorate the background, use one of the texture fill methods (menu " Format" – "Background" – "Fill methods") or thematic design (menu" Format" – "Topic").
4.1.4. View in the Browser the changes in the folder structure that occurred when the Web page was saved. Open the created page, edit it if necessary.
4.2. Create the second page of the site using the editor Word.
4.2.1. To create a document use the menu item " File"-"Create", in the opened dialog box" Document creation"select tab" Web pages"and pictograph" New Web Page". Save a blank web page in the folder Presentation by giving the page a name in English childhood. htm
4.2.2. For the title "My childhood" use Scrolling line by first displaying the Web Components panel. Get acquainted with the crawl line parameters, configure it so that it appears no more than 2 times.
4.2.3. Make the markup for placing objects using a table. Insert picture from folder Gallery.
4.2.4. Design the background of the page using a two-color gradient fill. Choose colors that are close to the color of the texture or theme of the main page.
4.3. Create a third page based on the file created in Part I friends. htm
4.3.1. Copy the file and its accompanying folder to a folder Presentation.
4.3.2. Open the file in the Browser, make sure the document is displayed correctly. Edit if necessary.
4.4. Create the fourth page of the site using the editor Word.
4.4.1. Prepare a drawing - a view of the SPbSUT building. Save the picture in a folder Gallery.
4.4.2. Create a file in the Presentation folder named university. htm
4.4.3. Insert a picture into the file - a view of the SPbSUT building, previously saved in the folder Gallery... Copy or enter email address university. Write a few phrases about your faculty and insert a hyperlink to the faculty website.
5. Establish links between site documents.
5.1. Open in Word document index. htm and, sequentially highlighting the "Contents" items, insert hyperlinks to the corresponding documents.
6..gif "width =" 32 "height =" 32 src = "> MsoNormalTable">
Greetings
Representation -
short summary
Drawing or
the photo
E-mail me
(email address)
Page 2 (My childhood)
Page 3 (My friends).Use a previously created Web document friends. htm, created with Excel.
Page 4 (My Universities). Provide the full name of the University, the address of the SPbSUT website, a picture with a photograph of the main building of the SPbSUT. Write a few words about your faculty, give a link to the website of your faculty.
Control questions
What are the ways you can create a Web page in Word? How does Word change the folder structure on disk when you save a new Web page? What new techniques for document design appear when working with Web pages? Which ones become unavailable? How do I insert a hyperlink to another document? How do I insert a picture? How to view, edit tags of an HTML document created in Word?
Introduction
In the course of computational practice:
· Developed a pedagogical scenario on the topic of an individual assignment;
· Developed a Web-page that implements the developed pedagogical script;
Set up and test the developed Web-page using the program Internet Explorer;
· Prepare a report on computational practice;
Using Word to Create Web Pages
During the internship, we learned:
· Save Word documents as web pages;
· View web pages in Web markup mode;
· Save web pages in the Web folder;
· Create web pages using the Web Page Wizard.
and the World Wide Web
The World Wide Web is a system of documents related to each other hyperlinks. Hyperlinks allow you to navigate from one document to another. Documents can include text, pictures, audio and video files. To format documents in HTML format (basic format World files Wide Web) there are some restrictions. For example, in these documents, without special tweaks, you usually cannot place text in multiple columns, and also cannot align it to both sides of the page.
Each web page is a regular text file with command-specific formatting options for text, graphics, and hyperlinks. This file is called HTML source because the commands are written in Hypertext Markup Language (HTML) format. The browser (a program that allows you to read information in documents on the World Wide Web) recognizes a web page and displays it on the screen in the same way that Word does in web page mode.
We will see that in the mode Web browsing The text is easy to read, as it is displayed in large letters and the lines are automatically wrapped to adapt to the width of the page. In this view, the text can be edited and formatted.
Saving a Word Document as a Web Page
In Word 2000, the Internet file format (HTML) is used as one of the Word formats. This means that you may not need to specifically convert Word documents to Web format... If you open an already prepared web page, then Word will automatically save it in the same format. If you are starting to work with a document in Word, then to convert it to a format suitable for the web, you will need special team conservation. Now we will create a document, make some changes to it and save it as a web page.
1. Open the Book Review.doc file that we created in one of the previous lessons.
2. Select View> Page Layout.
You will see a document formatted in several columns (Fig. 1)
The Saving Document dialog box will appear on the screen, as shown in Fig. 2. In it, you can select a computer, disk or folder to save the document.
Fig. 1.

Rice. 2
In addition, you can specify the file name and format. To set the titles of web pages, use the Change Title button. Let's save the web page in our working folder.
The title is the name of the document under which it will be published on the Internet. Various search engines use the content of such headings for high-priority searches. If you want your documents to be easily found in the vast amount of materials published on the Internet, try to give them meaningful titles.
4. Click the My Documents button. The contents of this folder will be displayed on the screen.
5. Double-click the Work icon.
6. Highlight the file name in the File name field.
7. Enter the name My Web Document.
Word converts the document to HTML format for it. could be viewed on the Internet (Fig. 3).

Rice. 3.
Note that the document is now displayed on the screen without columns. They can be displayed in page layout mode, but they will not be displayed when viewed in a browser window (Figure 4).

Rice. 4
When you save documents in HTML format, Word saves graphics and other objects from that document in separate files.
Not everyone realizes how powerful tools for working with text Microsoft Word offers us. Thanks to this editor, we will create our first functional website on the Internet for free. At the same time, you do not need to possess any specific knowledge. It is enough to have minimal skills to work with this well-known text editor.
The first steps to create a website in Word
We create our website in Word (hereinafter we mean Microsoft Word), as they say, from scratch. You can start with the already classic phrase "Hello world", which in Russian translation: "Hello world." Although I would write on my first page on the Internet like this “This is my first page on the Internet. Hooray!". We write this (or any other) phrase in the Word on the newly created page, select the "File" menu (in Word 2003), or after clicking on the "Office" button (top left in Word 2007), the "Save As" command and save document as "Web Page (* .htm; * .html)". Think of the name yourself, but it should be in Latin, for example "stranitsa", I recommend calling it "index" - then it will be very useful for us when placing a site on the Internet. Web pages are also called html pages (from the name of the html language - the hypertext markup language on the basis of which all sites on the Internet are based).
This way you have created your first page: index.htm. Click on the file (two times of course), and you will see your web page in the web browser or browser (from the English "browser" - browser) installed on your computer by default.
There are several popular browsers today. These are Internet Explorer, Firefox, Opera, Chrome and others. Which browser to use depends only on your preferences.
It doesn't matter which version of the Word you will be working in. The web pages will be saved in accordance with the standards accepted on the Internet today and will be equally well viewed in any browser.
A small digression. You can write any text in the Word on your new page and in exactly the same form any visitors to your site will see it (we will post our page on the Internet in the second part of a series of articles on creating a site in Word). In fact, not everything is so cloudless, since not all browsers are 100% compatible with each other (the same situation with the support of Internet standards for displaying pages) and it happens that the display of the page in the browser and in the Word does not completely coincide. There is, fortunately, a very simple and universal way solutions to this problem - after saving our page, we will view it in a pair of browsers from different manufacturers, for example, Internet Explorer (installed by default) and Firefox. Fortunately, all browsers are free. Thus, we will be sure that any user on the Internet will see the same as we do. We will immediately correct any inconsistencies in the browser and in the Word document (for example, alignment), usually this is done by changing the properties of the Word page element (lines, words, tables). After saving the document, we make sure that everything is fine with us and continue to work further.
It is important that Word can check our text for spelling and grammatical errors, which is a big plus. It is bad form to have errors on your site.
Now start experimenting with the most basic elements of the Word. Draw a table of any complexity, insert any pictures, clips, shapes (available in the "Insert" menu), change the page background and colors individual elements(for example, the color of each cell may be different). Do what your heart desires. Word provides a lot of ready-made solutions for the design of your document (web page in our case).
Working with tables in Word is much faster and more convenient than in any modern web editor.
The thing is that one of the most popular ways to create web pages on the Internet is to place a complex table on the page, and the arrangement of various elements (pictures, menus, any text) occurs in the table cells. We will follow the same path and make sure of the extreme simplicity of working with tables in Word.
Please do the following. Draw a table of 6 × 6 cells in the Word in any way convenient for you. Paint the cells in a checkerboard pattern with red. For simplicity, you can specify red in the cell properties and press "F4" (copy format) on each cell to be colored. An example of a table in the figure below.
You can use for practice already ready-made files with examples in a Word. Download the zip archive with this and other examples. Select the table by left-clicking on the square with a cross in the left upper corner the table and right-click on the mouse to select "Borders and Fill". In the "Border" tab that opens, set "Type": None.
Your table will have an invisible border and other lines. Next, save your document as a web page and view it in a browser. This example showed the basic principle of working with pages using tables, i.e. we fill in the cells with the necessary information and then make all the lines of the table invisible.
When we start working with the main material on the page, I strongly recommend that you save the Word file as a web page IN A SEPARATE FILE !!!, the same index.htm, for example. Those. you will have 2 working files. One Word, with the .doc extension (or .docx, depending on the version of Word) is the main file that you will edit, and the other is the web page file with the .htm extension. We will open the web page in a browser and compare its design with the original design in Word in case of possible inconsistencies.
Why is it better to do this? Because when Word saves a document to a web page, some of the objects can be converted into a picture that can no longer be edited.
Advanced Word Tools for Web Page Decorating
The most interesting effects for designing a web page, and without it, you can't go anywhere, are available in the "Drawing" toolbar. If this panel is not active for you, then right-click anywhere in the area where the toolbars are located and put a check mark next to the word "Drawing".
You can choose any of the many AutoShapes available in the AutoShapes menu of the Draw toolbar.
Any tools included in the Drawing toolbar can be found different ways... The first method is already known to you, and the second method is to select "Insert" in the main menu and go to the "Picture" submenu (for Word 2003). In the Word next versions(Word 2007 onwards) the interface is more intelligent and it is already much easier and faster to work there, here when you select the "Insert" menu on top panel all tool icons are already present.
Let's show a small example of the intellectuality of a Word, starting with the 2007 version and older. For example, we draw any autoshape in Word 2007 and the additional tab Drawing Tools \ Format immediately opens, where it is possible to apply any available effect to the shape. Moreover, the results of applying the effect can be seen instantly, unlike Word 2003. But, nevertheless, the end result will be the same. Experiment yourself.
Here is just a small example with various autoshapes in Word, which can be useful when working on a website.
You can insert text into any AutoShape and edit it like in a regular document. Using a specific figure as an example, the figure below shows an example of changing various parameters of a figure.
You can change dozens of parameters - the color of the shape, its edging, the thickness of the boundary lines, any text parameter. You can apply the Shadow and Volume tools to almost any object. Such tools are often used by webmasters on the Internet to create beautiful buttons, but in Word it will take a few seconds. Perhaps the most interesting tool is the WordArt object. With its help, you can do, literally, anything, with any inscription. Examples of WordArt objects are below.
We make a full-fledged website
Having dealt with some of the possibilities of Word, we proceed to create a full-fledged website, which will already be suitable for part-time work as an Internet agent of a bank. Applying all the previous developments, we get the first (main) page of our site.
You can download and edit this example by adding your text. For convenience, pictures of the current product line of Moscomprivatbank (Privatbank in Russia) have already been added to the page. Later you can replace them with others (search to help you).
What's new in this sample site for us:
1) There are 3 hyperlinks in the first line of the agentbankanew.doc file table.
The map image and the text "More about the map ..." link to the existing page kreditka.htm. And the "order" button is already a selling link that redirects an interested visitor to the bank's website. This link includes your id, which is assigned to you after registration by a bank agent. It's easy to insert a hyperlink. Select any text or object and, by clicking on the right mouse button, select "Hyperlink". You can also find the Hyperlink button on the always-visible Standard toolbar (Word 2003) or on the Insert top menu (Word 2007). In the upper right corner, click "Hint" and enter a text that will be displayed as a hint when you hover the mouse pointer over the link. See for yourself.
So, when we link to an existing file in our working directory, we simply point to that file. And you take the link for the "Order" button from the agent's site after registration by the agent and paste it into the "Address" field at the bottom of the "Add a hyperlink" window.
In the selling link http://agent.privatbank.ru/branches/product/21/XXXX/, the latest XXXX is replaced with your identification number (ID). How to get an identification number is described in detail in an article from the series of articles "Guide to earning additional income in Moscomprivatbank in three steps».
To add a new link, you select a text or object with the left mouse button, then by pressing the right mouse button, select "Hyperlink". To change or view the address of an existing hyperlink, you move the mouse pointer over it without pressing the left button, and IMMEDIATELY PRESS THE RIGHT MOUSE BUTTON and select "Change hyperlink ...".
2) At the top of the page, we create a menu where we link to all banking products on the page. This is done to simplify navigation on the page and additional convenience for the visitor of your page. For ease of navigation, the Word editor (inside the page, as well as between different documents or web pages) provides a navigation bar "Web site", where you can use the arrows to quickly navigate, as in a browser when working on the Internet.
To refer to a place within a document, we make a bookmark by highlighting any place in the document (word, line, picture, etc.).
3) We are adding additional pages with more detailed product descriptions, because A short description on the home page is clearly not enough, and it is bad form to write a long description text for all products at once. The design of the detailed pages can be left similar to the home page - all at your discretion. You can use a ready-made page from an article in the series of articles "Guidelines for generating additional income in Moscomprivatbank in three steps" with a description of Privatbank's flagship product - only in in this case it is necessary to rename the web page with the credit card description (from index.htm to kreditka.htm), because we refer to the detailed description of the credit card with the file name kreditka.htm. Detailed Descriptions you will make the rest of the products yourself, since there is enough information on them.
4) It is necessary to pay attention to the content of the page (content). Here it is worth adhering to generally accepted standards, and if it is simpler, then the rules of good form. Let this be the greeting at the beginning of the page, short description organizations (in our case, a bank). By the way, you can create a separate page for information about the bank. At the bottom of the page, there should be your contact information, because visitors will surely have questions. And they will be able to ask them to the specified by you email, ICQ or telephone. Perhaps you will add interesting links or something else to the information at the end of the page - at your discretion (the entire Internet is in front of you as an example). Very important point: It is considered a good practice to have a link to the site from where you got (or partially got) the materials for your site. And of course, unique material is important for any site, which will have a positive effect on the indexing of your site by search engines, but this is a separate extensive topic not for this article.
Final saving of the document as a web page
After the final touches in the creation of the site are done, it is necessary to competently transform our document into a web page. There are several nuances here that it is highly desirable not to forget - ensuring full visual correspondence of the original document in the Word with the saved web page and the compliance of the web page with generally accepted guidelines for the content of the site when placed on the Internet. When saving a file as a web page, we select the file type: "Web page with a filter" - this is done to reduce the size of the file (unnecessary information is removed from it, which is only necessary for editing in the Word and does not matter for the browser). Next, be sure to come up with the correct title for the web page. This is not the name of the file, but the name of the web page that will appear in the title bar of the browser.
After finally saving the document as a web page, take another close look at the resulting web page in multiple browsers. If you see inconsistencies (most often alignment problems), then correct the Word document. You already have a ready-made web page that can be posted on the Internet, but there is one caveat. Word does not insert one specific element into the web page (the so-called,). At first glance, this is not critical, but nevertheless, browsers may have problems interpreting our web page (problems may arise with search engines - without of this element the search engine may consider your page unsafe, tested on my own experience). Read an excerpt from the handbook:
Elementis intended to indicate the type of the current document - DTD (document type definition, document type description). This is necessary for the browser to understand how to interpret current web page since HTML exists in several versions, there is also XHTML (EXtensible HyperText Markup Language), which is similar to HTML, but differs in syntax. So that the browser does not "get confused" and understands according to what standard to display the web page and it is necessary to set in the first line of code.
Thus, based on this information, we insert the missing line at the very top of our web page (html document) in any text editor... The line is as follows:... The figure shows its location (at the very top). In the same figure, you can see the basic elements of any web page using an empty html document as an example.
We will not analyze the meaning of all the elements, if you have a great desire to understand this, then ask any search engine. The main thing is that with this line we won't have problems with browsers and search engines. Do not forget to insert this line at the beginning of every web page. That's all!
Let's sum up
After completing work on the site (creating and filling in additional and main pages with material), we receive a full-fledged site for free - a description of your activities on the Internet, without which there can be no question of any normal part-time work. A few simple steps, described in part 2 of the series of articles on creating a website, will allow you to see your site not only on your own computer, but also for all visitors to your site (potential customers). Read on to the website and expect the first online sales!
Slide 2
We will take a look at simple tools and techniques for developing web pages. Let's take an example of how to create a fragment of a site containing a cinema repertoire. First of all, you need to: develop a website project; understand its structure and intended content. Those. build information model site. Site structure. Cinema "October" offers Dramas Comedies Detectives DRAMAS COMEDIES DETECTIVES PHOTOS First (main) web page Second web page Third web page Fourth web page
Slide 3
On the first ( upper level) is the first (main) page. It hosts general information about the cinema and hyperlinks to open pages of the second level. The second (lower) level contains pages dedicated to certain genres of films. Film genre Plot photo Title, country Director Actors: Summary Sessions: Ticket price: Second level pages.
Slide 4
Of course, the structure of the site can be further complicated by adding pages of subsequent levels. For example, pages dedicated to directors, actors, etc. All pages of the same level are often styled with the same style. However, their design may differ. The main elements of web pages are: text blocks graphic objects Text blocks include: Graphic objects include: main text, headings, lists, text hyperlinks, etc. images (drawings, photos, animation), "wallpaper" - background pictures, images-hyperlinks, dividing lines.
Slide 5
Tables are often used to place items at specific locations on a page. The style of the text and the style of the graphic elements determine the style of the web page. Text style refers to the font type, size, style, indents, alignment, intercharacter and line spacing etc. The style of graphic elements is set by the shape, size, color, texture of the material, as well as various effects. For stylistically competent paperwork, it is convenient to use ready-made templates - Themes. A theme is a set of design elements and color schemes for a document specially developed by a computer designer. The theme sets the style for each page and the entire site: the style of the main text, headers, hyperlinks, etc.
Slide 6
Themes are offered in all office programs. Website creation begins with a choice finished Themes or developing your own design template. After that, separate pages are created. Then the hyperlinks are formed that define the navigation on the site. The files for all pages on the website are placed in a separate folder. This makes it easier to host the site on a web server. It is customary to name the main web page file index or main with the extension htm or html. "Bombing" theme "Highway" theme
Slide 7
Run the WORD program. Execute the command File New. In the task pane, select Web Page. Let's choose the Theme of the design: Format Theme. For example: "Blend". To place photos and text areas on the page, we will use a table with 6 rows and 2 columns. Desired cells unite. We will post the necessary information. Save the web page created in this way on disk under the name DRAMA.HTML. Let's start building a website by designing second-level pages. When you save a WORD document as a web page, all images used in the document will be placed in a separate folder with the name of the web page and the extension .files.
Slide 8
Result of steps 1 - 4.
Slide 9
The result of completing the rest of the steps and viewing the created web page in a browser.
Slide 10
An important stage web page development - creating hyperlinks. To do this, you need to: 1. select the text that will become a text hyperlink; 2. Insert command Hyperlink or icon 3. Link to file, web page 4. Select desired file, the content of which should open by hyperlink and confirm the selection. At the end of the work, you need to view the created pages in the browser and check the links work.
Slide 11
You can enhance the attractiveness of a web page by placing dynamic and interactive elements on it. Let's "revive" our main page of the site by placing a creeping line on it. The order of the task execution: View of the Toolbar Web Components Open the "Creeping line" window. Type the text "Suggests", make the necessary settings and confirm the selection.
Slide 12
WORD editor allows you to connect video and sound files to a web page. To do this, open a dialog box by clicking the Sound or Film icon, click the Browse button, find the required video or sound file, set playback parameters.
View all slides
TOPIC 8
CREATION
WEB-PAGES WITH HELP
WORD
As editors to make it easy to create Web -sites, you can use applications Microsoft Office - Word, Excel, PowerPoint other. In this case, the user may not know the language Html and have a familiar environment for document formatting - WYSIWYG (what I see is what I get). A huge number of people using Word become potential developers in their daily work HTML documents.
Create a Web page in Word can two ways: using a wizard or template, or converting an existing document Word to HTML format. In this case, Word generates tags itself Html , although not in an optimal way.
The first way HTML creation -documents are quite simple - you need to start creating a document "from scratch" and only follow the advice of the Wizard and use the tools that are available in the program menu.
Second way- converting an existing document Word to HTML tags when saving a file Word in HTML format ... The transformation naturally leads to the fact that some elements of the document's design will be lost or changed.
One of the distinguishing features Html -documents is that the document itself contains only text, and all other objects are embedded in the document at the time it is displayed by the Browser using special tags and are stored separately. When saving Html -file at the location of the document Word creates a folder on the disk, into which it places the accompanying graphic design elements. For example, when saving a file with pictures - frieds. htm, Word creates a frieds folder .files , in which he will place all the pictures.
Therefore, when creating a site - a group of interconnected Web -pages, it is recommended to place the site in a separate folder, and when moving or publishing a site, strictly preserve the entire internal folder structure.
When preparing the publication on the Internet of materials created in Word , it is useful to know the features of converting to the format Html ... Some of them are given below (Table 8.1).
Table 8.1
| Document element Word | TransformationWord® Html |
| Font sizes | In Word depicts fonts from 9 to 36 points. Font sizes Html range from 1 to 7 and serve as an indication of the font size to the Browser |
| Text Effects: | Text effects are not saved, but the text itself remains |
| Outlines: | Remain, but some underlines are converted to a solid line |
| Animating text | The animation is not saved, but the text remains. To give the text an animation effect, you can use a creeping line (the panel “ Web Components ") |
| Graphics | Images are converted to format GIF or JPEG , if they have not been saved before in such formats. Lines are converted to horizontal lines. |
| Graphics: Autoshapes, Curly Text, Decals, and Shadows | Objects are converted to files of the format GIF ... In the editing environment Web -pages can be inserted graphical tools "Insert" - "Picture" |
| Tables | Tables are converted, however options not supported Html are not saved. For example, colored borders and variable width borders |
| Page numbering and headers and footers | Since the document Html considered one Web -page, then the concept of headers and footers is absent and the numbering is not saved |
| Page margins and multi-column text | |
| Styles | User-defined styles are converted to direct formatting if supported Html |
If necessary, insert on Html -page own tags, in Word foreseen direct editing Html-code... This can be done by calling the editor window through the menu "View" - "Source Html ". Before switching to this mode, you should save the file. After finishing editing before closing the window, the file must also be saved.
Another possibility is to open a document in the Browser and call the menu "View" - "In the form Html ". By default, editing is done in Notepad.
Although Word displays the document in almost the same form as it will later look in the Browser, preview Web -document can be executed without leaving Word.
BASIC TERMS
ASCII ( American Standard Code for information Interchange- American Standard Code for Information Interchange) - a seven-bit code for representing text information.
GIF ( Graphics Interchange Format- graphics exchange format) - used for low-color sharp images, supports transparent areas and animation.
Html ( Hyper Text Markup Language) - hypertext markup language.
Jpeg ( Joint Photography Experts Group- Joint Expert Group on Photo Processing Machine) Is a common raster graphics format ideal for scanned photographs.
Web- page ( Web-page)- an electronic document intended for placement (posted) on the Internet.
Web- site ( Web-site)- Web collection -pages related to each other by topic, hyperlinks and proximity to the Internet.
Web server (Web -server) - the server intended to host Web - sites on the Internet, and providing services at the request of customers.
WYSIWYG ( What You See Is What You Get- what I see is what I have) - the type of editors in which the document is displayed as it will be printed or presented on the Internet.
TASK number 8
Topic: Creation
Web
-site based software applications
MS
Office
(
Word
and
Excel
)
Part 1. Creation of a group
Web-pages by conversion method
documents
MSOffice
1. Prepare a folder on the working disk for placing your documents.
2. Create a Word document with the following content.
A main heading, such as WordArt:
![]()
Then place the text:
And create a table of contents, for example, of 2 items.
My hobbies
My friends
3. Execute the document and save it in your folder on your hard drive under the name main.doc.
4. Create a Word document dedicated to your hobbies. Save document as hobby .doc in your folder. The document must be formatted, have a footer and, in addition to text, contain pictures.
5.
Create an Excel workbook with a table according to the given sample (Fig. 8.2), save it under the name friends .xls.
To calculate the average values should be used formulas.
| My friends |
|||
| Name | Age | Growth | Weight |
| Vasya | |||
| Zina | |||
| Kolya | |||
| Lena | |||
| Mean | 27,5 | 176 | 71,75 |
Rice. 8.2. Sample table for file friends .xls
5.1. Build charts illustrating information about your friends. Place the graphs under the table, adjust the size of the table and graphs.
5.2. Prepare the sheet for printing:
5.2.1. Configure the parameters of the "Page ..." tab in the modePreview, create headers and footers.
6. Establish links between documents using hyperlinks.
6.1. Open the main document main.doc and sequentially highlight the section headings, attach hyperlinks to them ("Menu - Insert") to the corresponding documents.
7. Bookmark the title in the main document My hobbies ... Give it the name "Hobby". Save the document.
8. Create hyperlinks at the end of each supporting document to return to the main document.
8.1. Prepare a drawing to ensure the return from supporting documents to the main one. For example, a picture can be obtained by creating a graphical copy of the active window in the buffer (Alt + PrintScreen) and further editing the picture in the Paint editor.
8.2. Insert a picture at the end of each document and attach a hyperlink to the main.doc document behind it. In file hobby .doc the hyperlink should provide a transition to the "Hobby" tab.
10. Create a group of related Web-pages, by converting prepared documents .
10.1. Prepare a folder for Web -documents named My _ Web.
10.2.
Sequentially opening previously prepared documents, save them in a folder My _ Web by specifying
File type: Web page (*. Htm; *. Html)
10.3. Close all documents, analyze changes in the folder structure.
11. View Web -documents starting with main. htm ... Analyze which elements of documents have changed or disappeared altogether. Make an attempt to follow the hyperlink. Make sure that the connections between Web -pages need editing.
12. Edit Web -documents, change hyperlinks, complete additional design.
Attention:To switch from the Browser to the editing mode, you need to use the menu "File" - "Edit in Microsoft Word for Windows "or the button on the toolbar.
13. Save and close all documents, copy folder My _ Web to drive A: ... Submit work Web -pages to the teacher.
Part 2. Creation of new
Web-documents using
applications
MSOffice
1. Get acquainted with the structure and composition of a multi-page hypertext document uniting four pages (see appendix).
2. Create folder namedPresentation, and in it a folder for your drawings -Gallery.
3. Prepare figures for inclusion on the appropriate pages. Save them in a folderGalleryas separate files of the format bmp, gif or any other format used on the Internet. Pay attention to the size of the pictures and the size of the files. The file size should not exceed 3 - 10 KB.
4. Create a separate file for each page using a word process Word (p. 1,2,4). For Page 3 use a ready-made file friends. htm. Save files as htm or html in folder Presentation.
4.1. Launch word processor Word and use it to create the main page, save the file in the format html under the name index. htm.
4.1.1. It is recommended to use a table when creating a structured document. After placing the objects, remove the border of the table.
4.1.2. Execute the execution of the document. For main headers, use the object WordArt , for others - Heading style
4.1.3. To decorate the background, use one of the texture fill methods (menu “Format "-" Background "-" Fill Methods ") or thematic design (menu"Format" - "Subject").
4.1.4. View in a browser the changes in the folder structure that occurred when saving Web -pages. Open the created page, edit it if necessary.
4.2. Create the second page of the site using the editor Word.
4.2.1. To create a document use the menu item"File" - "New", in the opened dialog box"Document creation"select tab"WEB-pages" and the icon "New WEB-page" ... Save clean WEB -page in folderPresentationby giving the page a name on English language childhood. htm
4.2.2. For the title "My childhood" use Scrolling line by displaying the panel in advance Web -components. Get acquainted with the crawl line parameters, configure it so that it appears no more than 2 times.
4.2.3.
Make the markup for placing objects using a table.
Insert picture from folderGallery.
4.2.4. Design the background of the page using a two-color gradient fill. Choose colors that are close to the color of the texture or theme of the main page.
4.3. Create a third page based on the file created in Part 1 friends. htm.
4.3.1. Copy the file and its accompanying folder to a folderPresentation.
4.3.2. Open the file in the Browser, make sure the document is displayed correctly. Edit if necessary.
4.4. Create the fourth page of the site using the editor Word.
4.4.1. Prepare a drawing - a view of the GUT building from the Moika side (find the old GUT site). Save the picture in a folderGallery.
4.4.2. Create file in folderPresentation, With name university. htm.
4.4.3. Insert a picture into the file - a view of the GUT building, previously saved in the folder Gallery... Copy or enter the university email address. Write a few phrases about your faculty and insert a hyperlink to the faculty website.
5. Establish links between site documents.
5.1. Open in Word document index. htm, and sequentially highlighting the "Contents" items, insert hyperlinks to the relevant documents.
6. Insert a picture at the end of each document (). Create hyperlinks that provide a return to the main document by pinning from the drawing.
Attention! The picture for going to the main page must also be in the folderGallery.
8. View the contents of each of the newly created files in the format HTML.
8.1. Find tags that provide insertion of hyperlinks, pictures.
9. Copy folderPresentation with all its contents on disk A: or on disk C: to the Temp folder ... Test the site by launching a view from a new location.
10. Present your site to the teacher, start viewing it from the main page.
Appendix
Site structure
|
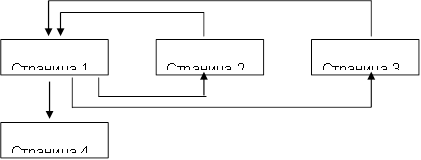
Page 1 (home page)
| Greetings |
||
| My childhood My hobbies My Universities | Introduction - short summary | Text (comments on the photo) |
| Text (several lines on a given topic) |
||
Page3 (My friends) - use the previously created Web-document friends. htm created with Excel.
Page 4 (My Universities)
The full name of the University, the address of the GUT website, a picture with a photograph of the main building of the GUT


 What is transcoding")


")


")


 How to find out the number of processors")


