Normalization of sound in Sound Forge Pro 10
Raise level sound signal without risk losing quality, allows a function "Normalize". The algorithm of its work is as follows: the program deducts the level of the highest signal from the level of the maximum possible signal, raising the overall volume of the file volume to the resulting difference. To take advantage function "Normalize" Open the same name dialog box located in the Process menu item. The main parameter is "Normalize To"indicating the maximum possible level of the signal that will be taken into account when normalization of sound in Sound Forge.
It is possible to normalize multiple files, which is useful when recording a CD. To do this by clicking the button SCAN LEVELS, scroll through the audio file, on the volume of which will be peeling the rest. Then open the following audio file and in the "Normalize" dialog box near the switch «USE CURRENT SCAN LEVEL (DO NOT SCAN SELECTION)». Click the "OK" button in the dialog box "Normalize To". The program works normalization volume in the audio file.
Function "Normalize" can also perform more complex treatment by calculating the average "Perceived volume". Sometimes there is a situation when any sound in the audio file, being on the same volume with the rest, sounds louder. The reason for this is the properties of human hearing. Sound Forge has the ability to measure the file data from the point of view of human perception. To do this, in the "Normalize To" dialog box, you need to activate the switch . At the same time, several more parameters will be available: "Ignore Below" - The value of this parameter determines the threshold of the allowable sound level. All values \u200b\u200bbelow the specified threshold, when scanning a "average perceived volume", will be ignored. In most cases, the value of this parameter is approximately "-45 DB".
Parameter "Attack Time" Specifies the program how quickly the digital signal gateway should be opened to take into account the permissible sound levels when scanning data. Therefore, if the audio file contains frequently replacing each other sounds, such as drumsticks, you should set this value as low as possible, otherwise frequent sounds will not be taken into account. In most cases, a value equal to 200 milliseconds is fully coping with the declared task.
Parameter "Release Time" Specifies the program how quickly the digital gateway should close. If you want to scan the data to be taken into account as much material, you should set a higher value of this parameter.
Due to some limited human hearing, very high and very low frequencies It is harder to hear than the average. This position can be fixed by setting the check box. "Use Equal Loudness Contour". This feature Strengthens the non-hearing spectra in frequencies, so in most cases it is advisable to install it.
After installing all the characteristics, click the button SCAN LEVELSto launch the scanning process "Perceived volume".
When working with a function "AVERAGE RMS LEVEL (Loudness)You should be careful, setting up the "Normalize To" parameter, since the selection of a very high value can lead to deformation of the sound or cut-off data. If you do not exceed the value "-6 DB", distortions are excluded.
For best protection You can choose from clipping data "APPLY DYNAMIC COMPRESSION"bookmark IF Clipping Occurs.
Press the "OK" button. The program normalizes the volume of audio data, given the values \u200b\u200bof current parameters.
(0)| Acquaintance with Sound Forge Pro 10 | |||||
|---|---|---|---|---|---|
| 1. | Interface | 3:13 | 4 | 25906 | |
| 2. | NAVIGATION IN SOUND FORGE PRO 10 | 2:00 | 0 | 8937 | |
| 3. | Markers | 1:50 | 0 | 6369 | |
| 4. | Region | 4:23 | 0 | 5093 | |
| 5. | Search | 4:01 | 0 | 4476 | |
| Basics of editing in Sound Forge Pro 10 | |||||
| 6. | Magnify tool | 1:21 | 0 | 7006 | |
| 7. | Selection | 1:41 | 0 | 4729 | |
| 8. | Copy and insert functions. Part 1. | 3:20 | 0 | 7352 | |
| 9. | Copy and insert functions. Part 2. | 3:20 | 2 | 44121 | |
| 10. | Cancel action | 2:45 | 0 | 2863 | |
| 11. | Tool "Pencil" | 3:16 | 0 | 5686 | |
| Processing functions | |||||
| 12. | Amplitude axis displacement | 2:16 | 0 | 5631 | |
| 13. | Change bit | 2:17 | 0 | 4908 | |
| 14. | Changing the frequency of sampling | 9:33 | 0 | 5605 | |
| 15. | Removal of silence fragments | 4:41 | 0 | 4850 | |
| 16. | Inserting silence | 1:05 | 0 | 3643 | |
| 17. | Change the sound volume. Part 1. | 1:09 | 0 | 8053 | |
| 18. | Change the sound volume. Part 2. | 1:09 | 0 | 9455 | |
| 19. | Normalization of sound | 2:37 | 0 | 27550 | |
| 20. | Changing channels | 4:31 | 0 | 4636 | |
| 21. | Pan | 3:26 | 0 | 3538 | |
| 22. | Equality, part 1. | 2:12 | 0 | 5807 | |
| 23. | Equality, part 2. | 2:12 | 0 | 5087 | |
| 24. | Equality, part 3. | 2:12 | 3 | 3056 | |
| 25. | Reverse | 3:20 | 0 | 4656 | |
| 26. | Changing speed | 1:57 | 0 | 18614 | |
| Effects in the Sound Forge Pro 10 program | |||||
| 27. | Effects Ech | 2:21 | 0 | 5897 | |
| 28. | Multi-Tap Delay | 3:51 | 0 | 3021 | |
| 29. | Chorus (Chorus) | 2:09 | 0 | 3275 | |
| 30. | Flanger (Flange) | 2:25 | 0 | 2491 | |
| 31. | Pitch bend. | 2:42 | 0 | 3149 | |
| 32. | PITCH SHIFT. | 3:08 | 0 | 12197 | |
| 33. | Vibrato. | 2:47 | 0 | 2171 | |
Most recently, I recreed to the wonderful resource of the independent sound engineer des Mckinney. It's just a storehouse of useful articles on modern sound recording and note! And here is one of them (free translation by):
The normalization process is often confused by newcomers in digital recording. Frankly, "Normalization" has different meanings that, naturally, confuses. However, newcomers and specialists can be confused by myths and disinformation, which are enough for this topic.
I will talk about 10 common misconceptions and what really happens.
Peak normalization
For a start, some explanations: since "Normalization" may mean a few things (see below), the myths below are primarily referred to as peak normalization.
Peak Normalization is an automated process that changes the level of each sample in the digital recording signal with an equal number, so that the loud sample reaches the specified level. Usually, the process is used in order for the signal to reach a maximum of 0DB - the most loud level allowed in digital sound.
The normalization process is similar to moving the volume knob or fader: the entire signal changes the same "fixed" amount, up or down. When normalized, the system finds the most loud peak and it already builds the overall level.
Some of the myths below reflect nothing but the misunderstanding of this process, as it happens with common misconceptions, but nevertheless, some of the myths come from more fundamental misunderstanding - in this case in sound, mixing and digital recording.
Myths and disinformation.
Myth # 1: After the normalization of several tracks, they sound with the same volume.
Normalization of several tracks to the general level is guaranteed only on the condition that the tracks are identical. However, our volume perception depends on many factors, including sound intensity, duration and frequency. The peak signal level is important, but it does not have a direct relation to the full volume of the track.
Myth # 2: Normalization makes the track so loud as possible.
Listen to these two MP3 files, each is normalized to -3db:
When the track level is so low that you can no longer use Hein's regulators (Gain) and volume to make the track quite loud. This indicates a recording problem, ideally you can rewrite the track with the necessary level ... But when it is not possible, normalization can save an unsuccessful double.
When you need to install the peak level of the track without changing its perceived volume. For example, working with a test signal, white noise and other non-communication content. Of course, you can install the peak level manually - listening to the track and marking peaks ... But this work may make the function of normalization.
Myth # 9: Normalization ensures that the track will not be overloaded (Clipping).
A single track, normalized to 0DB, will not be overloaded. However, if the track is processed or filtered with an increase in volume (for example, with the equation) distortion will appear. And if the track is part of a mix that includes other tracks normalized to 0db, there is a guarantee that the sum of all tracks will exceed the loudest peak of any of the single. In other words, normalization protects you from overload only in the simplest case.
Myth # 10: Normalization requires an additional dystering operation (DITHER).
This last myth is slightly esoteric, but it occasionally appears in network discussions. Usually, in the form of a statement: "It is good to normalize 24 bits, but not in 16 bits, because ...", accompanied by an explanation, which transmits an incorrect understanding of digital recording.
Just say: dystering is used when changing the bit. (for example, transformation from 24 bits to 16 bits). Normalization, works independently of the bit depth, changing only the level of each sample. Because, no change in the bit occurs, dystering is not required.
Other definitions.
Normalization can mean several other things. In the context of mastering album, engineers often normalize album tracks to one level. This refers to the perceived volume and is not related to the peak level of each track.
Some systems (for example, SoundForge) offer "normalization by RMS", the action of which is based on calculating the rms volume level. It approximately corresponds to the perceived volume and also does not depend on the peak level. However, as with peak normalization, its use also requires a meaningful approach.
32044L Music Anniversary, we believed more than once it was necessary to deal with the situation when one compositions of one collection sound too loudly, while others, on the contrary, too quiet. It happens when users download music from different sources, and more songs with different sound volume are often found in mixes where songs of different performers are collected. Well, this is understandable, only as in such cases, do not adjust the same volume every time, as soon as the song sounds louder or quieter?
No, of course, because the volume can be aligned, and it is very simple. To do this you need a little free utility . This program allows you to process audio files of popular formats in batch mode according to specified parameter Volume.

So, we go to the developer's page and download the last complete (!) version . By default, the program is installed in English and, if it does not confuse it, install it in as usual modeTo immediately get an interface in Russian, in the second installation installation you need to install a tick "RUSSIAN" on the menu "Language Files".

In the menu, click the button "Add files" and load the utility window audio files , over the volume of which you need to work. Next click "Trek Analysis" And we are waiting for the program to complete the analysis of files in order to identify their volume. This procedure may take a few minutes, it all depends on the overall size of the analyzed files. On the processing of assembly, 1 GB leaves about 10 minutes.

After you need to set the desired volume (Default is 89 DB) And click the button "Type of track". As a result of processing, the volume of all audio files will be shown to a single specified value. Changing the volume level takes less time than the analysis. It is also worth noting that all files in the processing and saving process will be overwritten.
And finally, a few words about what the parameters are opposite each file.
- Level - Current volume.
- Clipping - installed opposite the bird Y. Indicates that at the current volume on the track there are noise (Will you hear them or not, depends on the sharpness of your hearing).
- Track - shows the difference in decibels between the current and user-defined volume parameter.
- Availability in column "Clip (T)" Indicates that background noise will remain and after processing.
So that these noise can be as small as possible, it is not recommended to set the volume too high or too low. Optimal meaning For parameter "Volume Number" is approximately 85-95 decibel.
Hello everyone! The normalization of sound is not a problem for the one who knows how to use Audacity even at the most important level.
Let's start with the definition.
Normalize the sound is, in simplely speaking, so to process it in the audio partner so that it was nice to listen, namely:
- remove background noise,
- align the volume of speech throughout the sound track,
- remove sharp emissions / volumes of volume,
- remove unwanted sounds (cough, for example),
- make the volume of recording such that it can be comfortable to listen to all types of computers and mobile devices, exposing the volume of the device to the middle level.
How important is it? Very important! Good video S. bad sound - Money for the wind. Video "Rulit" in Internet marketing. Do you sell through your online store, do your services via the network, whether the corporate site build, strive to dig up your channel in YouTube - everywhere you need to be able to make a decent video. But video is a video, and if you have sound support, there will be a quiet, deaf, with noise, other defects, then consider that all the work is a stepmark. None of such a video further 10 seconds will not continue to watch.
Immediately I will say that if you trust on your superior expensive professional camcorder, then it is in vain. She will write noises even better than a smartphone. So, 100% "pull out" the sound of the first-class "hardware" will not work.
Professionals use sound editors for this. Take a separate audio track and rule it. In this post, I will teach you how to use Audacity to normalize sound.
Why exactly Audacity? Because it:
- Specialized program - audio file audio file.
- Pretty powerful in order to make anything with the sound.
- Free.
- Quite simple in mastering. Especially when it comes to standard non-sophisticated sound operations.
Well, let's start.
From this article you will learn:
In order for everything to be as close as possible to real life And it is clear, take a video taken on the most ordinary smartphone - hTC One. v. Video it removes HD resolution. Today, this is no longer extended, but the standard. The sound captures as a smartphone - if close, it is good, if at a distance, then already mediocre.
So, our very first task:
How to extract sound from video to a separate audio file
Methods - weight. In order not to clutter the post of secondary details, briefly tell you everything about three. Choose convenient for yourself.
- Through. demon paid program Freemake Video Converter.
- Through a paid program Total Video Converter
- Through you have a video editor. And you should have it. Especially if all or part of your business is on the Internet. Especially if you regularly shoot and post video on your site. Of course if you want to upload good videoso that many people look at him.
The first two points should not explain in detail. There everything is completely simple, but if there are problems - write, I will explain.
Here on the video editor I will stop in more detail. In the sense of how to remove the sound from the video with it. Video edits are also a lot. I use one of the most popular - Sony Vegas.
Copy the captured video from the smartphone to the computer.
Open the video editor.
Through the File menu - open open a video file.
 and choose the format of the stored MP3 file. Click on Custom ...
 and select the save parameters. I recommend choosing mono, bitrate 128 Kbps and frequency 44 100 Hz.
 Select the save folder and the desired name of the saved MP3 file.
All the audio tracks are separately saved and now let's start normalize sound. I will write everything step by step.
Step 1. Primary application of the Hard Limiter plugin
On the recorded sound may be peaks-emissions on volume. If you do not reduce them, they are great annoying or can even stun. It may be a cough, and suddenly a loud challenged chair, a signal near the passing machine and so on. Therefore:
Click on the field of control of the track properties with the left mouse button and thereby highlight the entire track
 Then go to the Effects menu-Hard Limiter ... and put these parameters

Click OK. Ready.
Step 2. Sound Normalization
Usually, recording from microphones, smartphones, dictaphones is quiet in order to put it right here in this form in the form of a video on the Utyube. So we need to raise the volume of the sound. But it is advisable to do it so that the sound has risen, but not higher than the specified limit. To do this, it is applied plugin normalization of the signal. It increases the volume, but so that the maximum amplitude is fixed. To do this, we go to the effects-normalization menu ... put in the -3.0 DB window.

Click OK. We look the result.
Step 3. Processing Audio File Playing Compressor ...
Continue enjoy Audacity. for normalization of sound And on this step, I will master the plugin compressor ... I draw your attention that you need to process the track specifically in such a procedure step by step, not muddy and not jumping. What is the compressor need ...? The compressor averaries, reduces the difference between the quietest and loudest sections. It happens, a person speaks into a microphone louder, then quieter and with too much difference to listen to such an entry uncomfortable. After the compressor processing, the volume of the voice becomes more smooth, without jumps.
So we go to the effects-compressor ... we put the same parameters
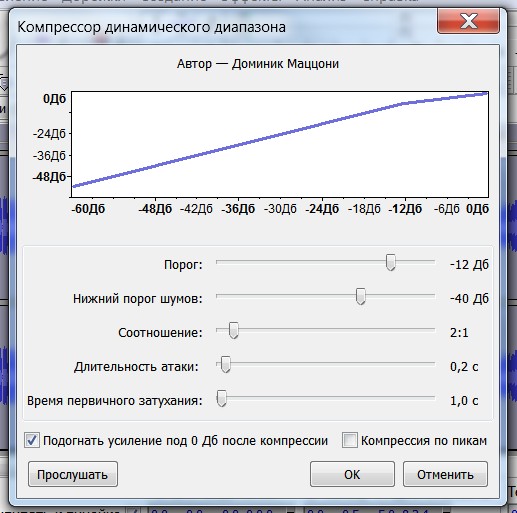
and click OK. Rejoice in the result.
Step 4. Finish treatment with Hard Limiter plugin ...
No matter how well I handled the sound compressor, its algorithm also has shortcomings and under certain conditions it again highlights peaks. To avoid this, over again, handle the Hard Limiter Plugin track ..., just put the level not -10, as for the first time, and -2.0 DB.
Here is in general and that's it. In most cases, these 4 steps are sufficient. Now consider more complex cases, namely:
- if the previous plugins are normalization of the signal ... and the compressor ... - did not quite well cope with the normalization of the volume along the entire length of the audio track
- and if the record went to high level The background noise - the refrigerator worked nearby, the fan was noisy, some buzz and the like.
Manual alignment of the volume of individual regions of the audio track
To do this, we will apply a simple plugin signal amplification. It acts as a volume knob. At this stage, it is justified using it, since the sound is already prohibited through the normalization of the signal ... and the compressor ... and in general is an aligned diagram. Only, as you can see globally different in large areas. With such a "layout", previous plugins do not always cope well and therefore now correct it with your hands. I note that this situation is infrequent.
So, we allocate that part of the audio track, where the signal level is explicitly lower. We go to the effects-enhancement of the signal ... and the selection of the level of amplification of achieving alignment of the volume of audio tracks across the volume. Look at the video as it happens.
How to remove noise from recording
Please note that now I will explain how to fight precisely with continuous background noise. If suddenly, during the records of the record, someone coughed, sneezed, something fell - it's all not a background noise and if there is a desire to remove it, then do it in other ways. And now we will remove the background noise. So, to remove the noise from the audio, you need to find a plot of silence on the audio track, to highlight it and carefully listen. It is desirable that it contains only smooth background noise, without clicks and other "drop-down" or distinguished pieces. The better we will pick up such a fragment, the better the program will cope with the stripping of the entire audio track.
To do this, we visually choose a plot on the diagram with zero or so amplitude and highlight it with the mouse. Click on the Play button in the Audacity buttons panel and listen carefully. If there are other single sounds on the background noise, we try to find and highlight a fragment without them.
Having found the best fragment, allocate it. We go to the effects-removal of noise-create noise model.
Then we highlight the entire track. We go to the effects-removal effects menu. Leave these parameters here.

The only parameter with which you can experiment is noise suppression. The most first field. I advise you to stay within 12-24 DB. If you do below 12, the noise can decrease completely slightly. If you do above 24, distortions may appear on the remaining areas with sound.
We look at the video where I do it all:
That's all. The audio track is normalized, it remains to save it as a file.
Saving a processed Audacity track in a separate audio file
This is done through the File-export menu ... I draw your attention that through the File-Save Project menu ... You save the audio recording specifically in Audacity format and only. In order to save in MP3 or WAV format you need to use it precisely to export ... Next, everything is simple. Choose the desired file type. If necessary - click parameters ... and set the necessary parameters. For example, if you do export to mp3, then you can choose through the sound quality options. I recommend not to make it below 80 kbps and above 128 kbps. This is to voice, of course. If you wrote music and you need the maximum sound quality, you can even put 320 kbps. We only have in mind that the higher the bitrade (this is the sound quality), bigger size A final file will be received.
So, from this post you found out how enjoy Audacity. In terms of sound normalization.
Supplemented in December 2018 - This article is written in 2014. Over the past 5 years, by the end of 2018, experience has accumulated, subtleties and techniques have revealed, which:
- simplify the procedure
- reduce the time for the processing of sound and
- noticeably improve the quality of the final sound


