Usually, maximum resolution Modern monitors exceed the 1920x1080 standard, if such are the owners of a large screen diagonal (from 25 "and greater). Monitors with a small or medium-sized screen diagonal of the older generation can support standards 1600x1024, 1140x900, 1366x768, 1280x1024. Limits of the capabilities of their monitor or laptop displays in It is necessary to know its permissive ability to avoid problems with the installation of the value unsupported by them. The maximum possible screen resolution is indicated in the instructions of monitors and laptops. Usually after installing the video driver, the desired screen resolution is configured automatically and in the system settings. windows screen This is recommended.
But not always the video driver automatically selects the optimal screen resolution. In such cases, without manual intervention, to install the desired permission in the system settings or using the video driver manager, as a rule, either Catalyst Control Center, or "NVIDIA Control Panel" - can not do.
1. Right and incorrect ways to configure screen resolution
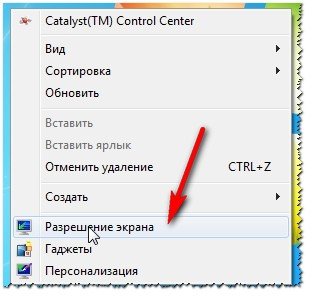
Screen resolution tools operating system You can configure by calling the context menu on the desktop and selecting the "Screen Resolution" item in the case of Windows 7 and 8.1.

In the case of Windows 10, in the context menu, you need to select "Screen Settings", then - " Extra options Screen.


Here, in the context menu on the desktop, as a rule, the command of the video driver manager is also present. In its window, you must search for a configuration tab to set the screen resolution.

It is desirable to change the screen to change only in the system settings or inside the video driver manager. And not with the help of various third-party programs providing such an opportunity. Whereas the Windows screen settings are also protected from applying a screen resolution monitor (a new resolution is previously being tested for a few seconds with a preset return option to source value),

third-party programs And the game new permission can be applied immediately, without prior testing. And sometimes even without user demand. And if the resolution unsupported by the monitor or the laptop display is too high or, on the contrary, it is too low, as a result we obtain a dark screen with the inscription "Out of range", Out of Range, Input Not Supported or with a different message, but that same essence. Experimenting with screen resolution in windows settings Or a video driver manager, such trouble can be avoided: if an unsupported resolution is erroneously installed, and the screen will turn off, after a few seconds it, returning to the same screen resolution, turns on again.

Installation of unsupported permission can also be a consequence of virus penetration.
So how to solve the problem if the screen resolution is applied by the monitor?
2. Participation of the Second Display
Solve the problem in the simplest way possible only if the computer is connected to at least two monitors or monitor and the TV. The same applies to the periodically connected (respectively, previously configured in the system) monitor or television to a laptop. The problem is very simply solved even if it is established unsupported resolution of the main, not an additional display. And even though the image on the second screen is not duplicated, and extended. What should be done? On an empty desktop of the second screen, we call the context menu and select the "Screen Settings" item for Windows 10 and "Screen Resolution" for versions of the system 7 and 8.1.

Most likely window system settings The screen will open on the main monitor with impenetrable darkness. In this case, blind click the + shift key + arrow to the right / left to transfer the window to another screen. And install a supported resolution for the main monitor.
If only one monitor is connected to the system unit, but the room has a different monitor or TV, which may be supporting the installed screen resolution, solve the problem can be tried using the latter. All you need to do is connect another time display instead of the current monitor. And with it, you already set the desired screen resolution. It may very well be that a modern TV will be able to cope with the resolution, which for the main monitor turned out to be excessively high. And, on the contrary, there is a chance that the kinescopic televisions connected using the S-Video cable (for old video cards) or through a special adapter for the VGA cable (naturally, if there is any), you can display a low-resolution image of 640x480 or 800x600.
If there is no other displays, the Savior or Such also does not support the problematic screen resolution to cope with the task, alas, you will have to resort to "tambourine dances". Especially in the case of Windows 8.1 and 10 installed on the computer.
3. Deleting a video driver in the safe mode of Windows
To return the screen resolution supported by the monitor, you must download Windows in safe modewhere the system works with the basic screen resolution, without starting the video driver. In safe mode, the video card driver will have to be deleted. Then, running already in the usual mode of operation of the system, the video driver will need to be installed again.
3.1. Safe mode for windows 7
In the case of Windows 7, this process will be easier due to ease of entry into safe mode. Need to restart hardware using the button Hard Reset. And when you start the computer, press the F8 key. Once in the menu additional options Downloads, you need to select the "Safe Mode" option.

3.2. Safe mode for Windows 8.1 and 10 with the participation of their installation media
For Windows 8.1 and 10, the F8 key does not work, as in most cases its analog does not work - the combination of SHIFT + F8 is due to the reduced system startup. Get into the safe mode in these versions of the system, without seeing anything in front of it, you can use the installation media by any of these versions - at least Windows 8.1, at least Windows 10. Restart the system using the Hard Reset button, go to the BIOS and install the loading priority with DVD -Disc or flash drives. At the first stage windows installations Click the Shift + F10 keys to run the command line. In its window we enter:
bCDEDIT / SET (DEFAULT) SafeBoot Minimal
Click Enter. And wait for the notification of the successful performance of the operation.

Command line closed window. In the Windows Installation Start window, click Next.

Click "Restoration System".

Then choose "Continue".

After restarting windows Computer Uploaded already in safe mode.
3.3. Safe mode for Windows 8.1 and 10 with recovery disk
If the disk was previously created windows restorationIt can be used in the same way as a disk or flash drive. When booting from the recovery disk and selecting the keyboard layout,

you need to select "Troubleshooting" (this menu option may also be called "Diagnostics"),

then - "Advanced Parameters",

and then run command line.

In its window, enter the above command and press ENTER.


3.4. Safe mode for Windows 8.1 and 10 blind
If there is no installation media with Windows 8.1 or 10, no recovery disk, if there is no second computer, with which any of them could be organized, or just with it all laziness to mess around, in a safe mode from a working but invisible system, you can try to enter blindly. But in this case, it is necessary to carefully enter the values, to know exactly what language the keyboard layout before the experiment with the screen resolution, and also to stay in the Windows environment, and not within the 3D application (not all games can be rolled when you press the + D keystroke ). So, what actions do you need to do blind?
Step 1: If the layout was not in English, switched to it with keys + space.
Step 2: Run the command line on behalf of the administrator by serial pressing the + Q, Cmd, Ctrl + Shift + Enter keys.
Step 3: If columns work, you will hear the usual sound Sound Uac; Click the arrow left, then ENTER.
Step 4: We enter the command line mentioned above
The situation is the system unit without a Windows 7 monitor and higher, with a modern video card, such as AMD Radeon RX480, when connecting to a computer via TeamViewer, we obtain the screen resolution of 640x480 pixels.
Low resolution is not very convenient, since any windows and panels with the use buttons and cancel are not covered in the screen and do something on the computer practically not possible.
The most interesting thing is that on the cards of the past generation, for example, the Radeon R9 380, there is no such situation and permission can be installed, what is needed. Perhaps the case lies in the drivers. We will look for a solution.
At first, various programs came to my mind to manage system resolution, such as Qres, PowerStrip. But they did not help, the operating system, categorically did not want to change permission.
After that, I thought, and what if you score the necessary permits into the Windows registry. I found where 640x480 was written, changed, rebooted and nothing .. Resolution left again at 640x480. I even tried to prohibit the system to change the registry branches, but also a stupid. Maybe I did not give this topic and it was possible to get even deeper, but I was painted the following thought.
Fake Monitor, Virtual Monitor Windows 7. I started searching for software that allows you to create a virtual monitor and moves to it, and systemic leave low resolution. But it somehow did not give me the result. I tried Zonescreen and some other programs.
I did not spend a lot of time on digging in each of these methods, as I knew three other options for solving this problem and this did not give me rest.
1. Just connect the monitor, reboots and everything will be fine.
2. Instead of a monitor, connect the plug made of 3 resistors by 75 ohms, but this is suitable only if you have a VGA output, and there is no such exit on RX 470 and 480, there is DVI and HDMI.
In the case of DVI-A and DVI-I, you can plug the resistors or use the DVI-VGA adapter cable and inhibit resistors in it, but again in the maps of type RX 470 and 480 from DVI only DVI-D, and with it is not so It turns out. In the case of DVI-D, you need to apply a chip.
There is an option to buy a HDMI plug.

Such a plug in China costs from $ 5
3. A more versatile option and cheaper is the use of an HDMI-VGA adapter.

HDMI-VGA adapter can be bought in China from $ 3. The adapter is good because you can connect the old monitor with the usual VGA input.
In general, the result is simple - 3 bucks and all things, you can not torment the system and video card drivers.
Phrases: monitor resolution DVI plug, VGA plug, 640 × 480 Resolution without monitor, monitor emulator
P.S. still a solution, you can connect a fee from the old monitor, but it is for guys
Good day! Many users under permission understand whatever, therefore, before starting talking about it, I want to write a couple of words of entry ...
Screen resolution - Roughly speaking, this is the number of pictures of the image on a specific area. The more points - the clearer and better image. So, each monitor has its optimal resolution, in most cases, which needs to be specified for high-quality pictures on the screen.
This article will consider the issue of changing permission, and typical problems and their solution in this action. So …
What permission to exhibit
Perhaps this is one of the most popular questions when changing permission. I will give one advice, when exposing this parameter, first of all, focusing on the convenience of work.
As a rule, this convenience is achieved when setting optimal permit for a specific monitor (each it has its own). Usually, the optimal resolution is indicated in the documentation for the monitor (I will not stop at this :)).
How to find out the optimal resolution?
2. Next, right-click on the desktop anywhere, and select the screen settings (screen resolution) in the context menu. Actually, in the screen settings, you will see the ability to select the resolution, one of which will be labeled as recommended (screenshot below).

You can also use a variety of instructions for the selection of optimal permit (and tables of them). Here, for example, clipping from one such instruction:
- - For 15-inch: 1024x768;
- - for 17-inch: 1280 × 768;
- - for 21-inch: 1600x1200;
- - for 24-inch: 1920x1200;
- laptops 15.6 inches: 1366x768.
Important! By the way, for older electrons monitors, it is important to choose not only the right permission, but also spell frequency (Roughly speaking, how many times the monitor is blinking in a second). This parameter is measured in Hz, most often monitors maintain modes in: 60, 75, 85, 100 Hz. In order not to be tired of the eyes - put at least at least 85 Hz!
Change permission
1) in video drivers (on the example of NVIDIA, ATI Radeon, IntelHD)
One of the most simple ways Change the screen resolution (and in general, set up brightness, contrast, picture quality and other parameters) - this is used by the video driver settings. In principle, they are configured all the same way (I will show several examples below).
Intelhd.
Extremely popular video cards, especially recently. Almost half of the budget laptops can be found such a map.
After installing the drivers for it, simply click the tray icon (next to the clock) to open the IntelHD settings (see Screenshot below).

Actually, in this section you can set permission (see screen below).

AMD (ATI Radeon)
You can use the same icon in the tray (but it is far from each version of the driver), or simply right-click anywhere in the desktop. Next, in the pop-up context menu, open the "Catalyst Control Center" string (Note: See the photo below. By the way, the name of the setting center may vary somewhat, depending on the software version).


NVIDIA
1. First click on the right mouse button anywhere on the desktop.
2. In the pop-up context menu, choose " Control panel NVIDIA"(Scrong below).


2) in Windows 8, 10
It happens that the video driver icon is not. This may occur for several reasons:
- reinstalled Windows, and you have installed a universal driver (which is set along with OS). Those. There is no driver from the manufacturer ...;
- there are some versions of video drivers that do not "endure" automatically icon in the tray. In this case, you can find a link to the driver settings in the Windows control panel.
Well, and to change the permission, you can also use control panel. In the search bar, type "Screen" (without quotes) and select the cherished link (screen below).


3) in Windows 7
Right-click on the desktop and select " Screen resolution"(Also, this item can be found in the control panel).
Next, you will see a menu in which all possible modes available for your monitor will be displayed. By the way, the native permission will be marked as recommended (as already wrote, in most cases it provides the best picture).
For example, for a 19-inch screen, the native is a resolution of 1280 x 1024 pixels, for 20-inch: 1600 x 1200 pixels, for 22 inch: 1680 x 1050 pixels.
Old ELT-based monitors make it possible to put permission much higher than they are recommended for them. True, they have a very important value - the frequency measured in Hertz. If it is below 85 Hz - you begin to rip in eyes, especially on light colors.

After changing the resolution, click "OK". You are given 10-15 seconds. time to confirm changes in settings. If during this time you do not confirm - it is to recover for the same value. This is done in order to be distorted if you have a picture so that you cannot recognize anything - the computer returned to the working configuration.
4) in Windows XP
Almost no different from the setting in Windows 7. Click right anywhere on the desktop and choose the item "Properties".


Here you can choose the screen resolution, the quality of color reproduction (16/32 bits).
By the way, the quality of color reproduction is characteristic of old monitors based on CRT. In modern, the default is 16 bits. In general, this parameter is responsible for the number of colors displayed on the monitor screen. Only here the person is not capable, practically, to distinguish the difference between 32 bit color and 16 (perhaps experienced editors or gambling, which are many and often work with graphics). Whether the business is butterfly ...
PS.
For additions on the topic of the article - thank you in advance. On the sim I have everything, the topic is completely disclosed (I think :)). Good luck!
Very often, users face the situation when the monitor gives the message "Save Mode", "out of range" or "unsupported resolution" or «
»
.
This means that the video card settings are set permission that the monitor does not support.
In many forums and sites, you can meet this advice:
"To change the screen resolution you need download windows Press F8 and set any minimum resolution, after will restart in normal mode and enjoy life. "
But, as practice shows, it does not always work.
I want to share 100% way to reset the screen resolution on the computer.
In order to reset the screen resolution really need to download the computer in a safe mode, but let's point.
- When booting windows, press F8;
- Select the "Loading Computer in Safe Mode" item;
- Press the Windows + Pause key combination (I fall into the properties of my computer), go to the EQUIPMENT tab, press the device manager button;
- Reveal the list of video adapters;
- Choose your video adapter, call the context menu and select Disable (Windows may ask "Do I need to delete drivers?" You can answer "no", but sometimes you need);
- Reboot your computer in normal mode;
- And now you do not need to do anything, we see a miracle, Windows will detect a video adapter and reset the resolution of the monitor screen.
This method has survived a lot.
There is still a way to reset the screen resolution - to return the old monitor back or reinstall Windows :) And why do you laugh, on many forums I met tips about reinstalling Windows! You just imagine a 5-minute problem solved in a few hours.
How to download Windows 10 in Safe Mode to reset the video card settings
The comments asked a question (stated): " in Windows 10, it is impossible to boot in safe mode without turning on this option in the OS itself , And since it is impossible to enable this option without a working monitor, then your advice for Win 10 users is not relevant. Have other thoughts that are suitable for Win 10?
PS: There is no other monitor at hand, the built-in video adapter too. "
This is not entirely so ... yes, it is possible to enable the download menu only from the "working" Windows 10. But the download menu, where it will be "Download in Safe Mode" (Safe Mode) You can call a reset button several times with the RESET button system block . Windows 10 will understand that for some reason he will not be able to boot and offered various options for recovery. By booting in safe mode, you can perform all the necessary steps to reset the screen resolution in Windows 10, which are described above.
FAQ.
Q: how to reset the screen resolution through bios
A:the information on the screen resolution settings is stored in the operating system configs, via the BIOS to reset the screen resolution cannot be


