The name HDMI (High Definition Multimedia Interface) literally translates as High Definition Multimedia Interface. A standard HDMI cable has 19 wires. Knowing the pinout diagram of the cable, you can connect an HDMI outlet to it or fix a broken wire, replace a damaged connector. The individual contacts of the socket are numbered from right to left, with odd-numbered contacts in the top row, and even-numbered ones in the bottom row.
HDMI is used as an interface for transmitting high quality uncompressed digital video and audio signals. HDMI interface supports transmission to maximum resolution video and audio signals such as DTS, LPCM, DVD-Audio, Dolby Digital, Super Audio CD, etc. HDMI can have a maximum data transfer rate of up to 10.2 Gbps (340 MHz). The interface uses the TMDS protocol.

HDMI connectors (mini, micro) and their pinout
- Type "A" - 19 pins, specification 1.0
- Type "B" - 29 contacts, specification 1.0
- Type "C" - 19 pins (mini), specification 1.3
- Type "D" - 19 pins (micro), specification 1.4
- Type "E" - 19 pins, specification 1.4

HDMI Type A (19pin) pinout

HDMI Type B (29pin) pinout

HDMI Type C mini (19pin) pinout

HDMI Type D micro (19pin) pinout
| Contact | Descriptionsignal | |||
| HDMI Type A (standard) |
HDMI Type B |
HDMI Type C (mini) |
HDMI Type D (micro) |
|
| 1 | 1 | 2 | 3 | TMDS Data2 + (Video signal, pair 2) |
| 2 | 2 | 1 | 4 | TMDS Data2 Shield |
| 3 | 3 | 3 | 5 | TMDS Data2- (Video signal, pair 2) |
| 4 | 4 | 5 | 6 | TMDS Data1 + (Video signal, pair 1) |
| 5 | 5 | 4 | 7 | TMDS Data1 Shield |
| 6 | 6 | 6 | 8 | TMDS Data1- (Video signal, pair 1) |
| 7 | 7 | 8 | 9 | TMDS Data0 + (Video signal, pair 0) |
| 8 | 8 | 7 | 10 | TMDS Data0 Shield |
| 9 | 9 | 9 | 11 | TMDS Data0- (Video signal, pair 0) |
| 10 | 10 | 11 | 12 | TMDS Clock + |
| 11 | 11 | 10 | 13 | TMDS Clock Shield |
| 12 | 12 | 12 | 14 | TMDS Clock- (Video clock frequency) |
| — | 13 | — | — | TMDS Data5 + (Video signal, pair 5) |
| — | 14 | — | — | TMDS Data5 Shield |
| — | 15 | — | — | TMDS Data5- (Video signal, pair 5) |
| — | 16 | — | — | TMDS Data4 + (Video signal, pair 4) |
| — | 17 | — | — | TMDS Data4 Shield |
| — | 18 | — | — | TMDS Data4- (Video signal, pair 4) |
| — | 19 | — | — | TMDS Data3 + (Video signal, pair 3) |
| — | 20 | — | — | TMDS Data3 Shield |
| — | 21 | — | — | TMDS Data3- (Video signal, pair 3) |
| 13 | 22 | 14 | 15 | CEC (Signal) |
| 14 | 23 | 17 | 2 | Reserved (HDMI 1.0-1.3c) HEC Data- (HDMI 1.4+ with Eternet) |
| — | 24 | — | — | Reserved (Reserved in the cable, but not connected) |
| 15 | 25 | 15 | 17 | SCL (I2C Serial Clock for DDC) |
| 16 | 26 | 16 | 18 | SDA (I2C Serial Data for DDC) |
| 17 | 27 | 13 | 16 | DDC / CEC / HEC Ground |
| 18 | 28 | 18 | 19 | + 5V Power (max 50 mA) |
| 19 | 29 | 19 | 1 | Hot Plug Detect (All versions) HEC Data + (HDMI 1.4+ with Ethernet) |

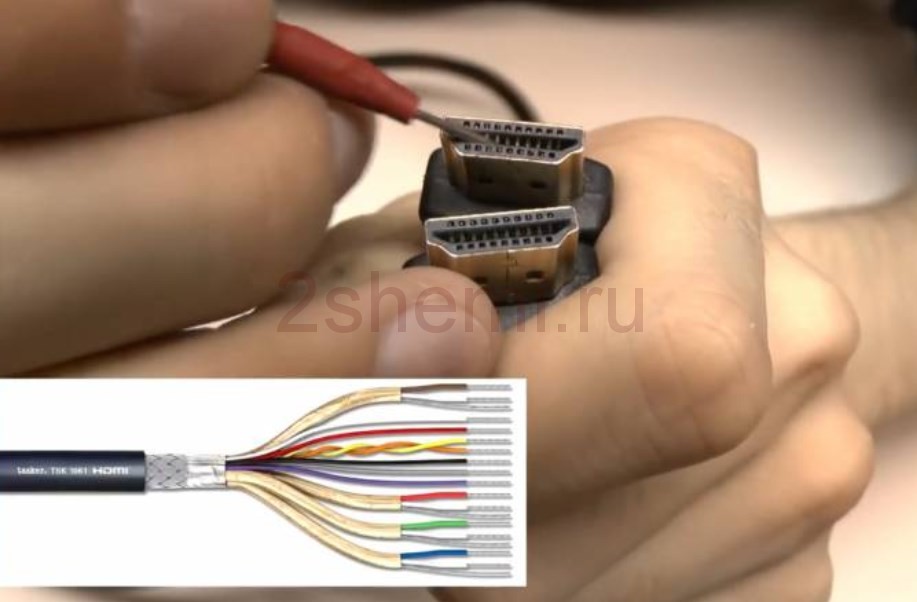
HDMI cable pinout by color
HDMI cable is divided into 5 groups of 3 cores. And 4 more veins go separately. The connector provides switching of four groups of shielded balanced circuits for transmission of digital video signals (aluminum foil shield), separate wires for service data and power.

| Contact number | Appointment | Wire color | Note |
| 1 | Video signal 2+ | White | Red group |
| 2 | Video signal 2 screen | Screen | |
| 3 | Video signal 2- | Red | |
| 4 | Video signal 1+ | White | Green group |
| 5 | Video signal 1 screen | Screen | |
| 6 | Video signal 1- | Green | |
| 7 | Video signal 0+ | White | Blue group |
| 8 | Video signal 0 screen | Screen | |
| 9 | Video signal 0- | Blue | |
| 10 | Tact + | White | |
| 11 | Clock screen | Screen | |
| 12 | Tact - | Brown | |
| 13 | Service signal CEC | White | |
| 14 | Utility | White | Yellow group |
| 15 | Asymmetrical bus SCL signal | Orange | |
| 16 | SDA signal asymmetric bus | Yellow | |
| 17 | Earth | Screen | Yellow group |
| 18 | +5 V power supply | Red | |
| 19 | Connection detector | Yellow | Yellow group |
There is no single color marking of conductors and each cable manufacturer may have its own marking. This is exactly what was used in the test sample of the HDMI cable.

HDMI cable pinout for sound
Sound in modern TVs or set-top boxes sometimes only comes out through HDMI (without the usual audio outputs or like headphones, that is, there is no old audio output). Therefore, you have to think how to "extract" sound signal from the herchdimiai nest. To do this, you can buy a special audio adapter on Ali (600 rubles) in the form of a small box, which extracts sound from the signal going through HDMI and outputs it in analog form to two RCA tulip connectors or in digital to optical SPDIF.
HDMI-DVI pinout

Pinout of HDMI connector for RCA tulip
Usually, an HDMI-RCA adapter is used when it is necessary to reproduce or transfer data in video and audio format. This interconnect cable has a built-in chip that converts HDMI digital signals to composite video or audio. This signal is then fed through the cinch connector to the TV screen.

To convert a purely digital HDMI signal to analog (S-Video, component or composite), you need not just an adapter, but a whole device consisting of a digital signal receiver, several DACs, a TV signal shaper, and a bunch of small details. Too hard to call it just an adapter.
The design of the adapter is made in the form of a miniature hardware module with a wire. On one end, which has an HDMI connector, and on the other, three multi-colored tulip connectors.
HDMI-VGA adapter pinout

An HDMI-VGA adapter consists of more than just wires and connectors. An HDMI-VGA cable is a whole circuit on a microcircuit, which is very difficult to solder yourself - just buy a ready-made adapter (as is the case with sound extraction from such a cable). Its price on Ali is about 700 rubles.


HDMI-HDMImini adapter

DIY HDMI cable making
Manufacturing HDMI cable at home, not a problem - just take a piece of wire of the required length and the necessary connectors. Strip a couple of centimeters from the braid, strip the insulation from the wires and carefully tin.

Depending on which connectors you need to use at the ends of the cable, we select the pinout scheme and solder it. For example, if you need to have hdmi plugs on both sides, the scheme will be as follows:

Here is the option for both standard size and mini or micro hdmi.
- an adapter that allows you to connect the video output of a computer with a regular color TV. Below we will consider several options for such an adapter, describe the pros and cons of each design, and give tips for making a VGA SCART adapter with your own hands.
Before getting started, one important clarification: all tips and instructions in this manual are presented “as is” and everyone uses them at their own risk.
VGA-SCART pin assignments
To understand the operation of the VGA SCART adapter circuits below, consider Various types signals to be transmitted from the computer to the TV.
RGB signal
The main signal that is transmitted through the cable from the computer to the TV is an RGB signal with a breakdown into three components (R-red, G-green, B-blue) Fortunately, in this case standard and SCART connectors are fully compatible (outputs: 0.7V amplitude, 75 ohm impedance). Therefore, you can directly connect the corresponding contacts without resorting to the use of special circuits or devices (we will consider this option later).
Common wire
In VGA and SCART connectors, several pins are connected to a common wire (ground), which are often connected to each other inside the cable. Their common connection allows you to negate various noise (especially in relation to the three RGB lines). The same applies for shielded cable.
Note: in fact, there is only one common wire, so it is normal that all the contacts with the designation of mass are connected together.
720p / 60Hz, 1080p / 60Hz ...
Audio and video converter


Audio signal
In order to output sound to the TV, you need to take a cable with a standard 3.5 mm jack for a PC and connect it straight to the SCART connector. You can output both mono and stereo sound without resorting to the use of special devices and circuits. Just be careful not to confuse the audio-out with the audio-in, as the SCART have them side by side.
Commutation signals
As mentioned earlier, the SCART input can accept various types of signals. In order for the TV to understand what type of signal is input, there is a special contact "RGB Blanking" (pin 16). If a voltage of 0 ... 0.4V is applied to this contact, then the TV will wait for "Composite signal", if 1 ... 3V, then the signal is "RGB". The use of this type of signal is extremely important for the functioning of the VGA-SCART adapter, and as we will see below, there are different ways get it.
Another conclusion that may interest us is "Swtch" (conclusion 8). This pin is for switching TV / AV mode. Also on some TVs this output allows you to set the "aspect" of the picture:
- TV Mode - 0 to 2 V.
- AV mode with a ratio of 16: 9 - 5 to 8V.
- AV mode with 4: 3 ratio - from 9.5 to 12V.
If you do not give a signal to this conclusion, then the TV will remain in its default state (TV mode), and then we will need to use the remote control to switch to AV mode.
Synchronization signals
This is where the most difficult part of building a VGA-SCART adapter begins. The timing of signals from a computer's video card is very different from the timing system used in a regular TV, so you need to resort to some tricks to make them compatible. The difference between most VGA-SCART adapter circuits is based on how to solve this problem.
In a computer, standard VGA uses two different signals for synchronization, one vertical (60 Hz) and one horizontal (31 kHz). Both signals operate according to TTL logic and therefore have a peak value of 5V. Finally, signals can be either positive or negative depending on the video mode used.
However, the TV only needs one composite sync signal with a peak value of about 1 ... 3V. Also, the horizontal frequency is much lower, about 15 kHz (vertical, and almost the same 50 ... 60 Hz). Finally, the signal must always be negative.

The main problem we are facing is horizontal synchronization. Assembling the circuit for this transformation is quite a difficult task. In this case, as a rule, changes are made to the signal source itself (video card) using a special software or even a modified VGA (like the famous ArcadeVGA) to get 15 kHz directly from the VGA output. We will consider this issue further.
Getting 15kHz clock signal by software
As mentioned in the previous section, the solution to the main problem when building a VGA SCART adapter is to obtain a horizontal sync signal at 15 kHz. Typically, a solution is achieved through a change, mainly in the area of software, video card settings personal computer... In addition, the synchronization signals must be negative, i.e. with a constant level up to + 5V, which tends to zero during the pulse itself.
Soft-15kHz program
This interesting software for Winows XP / Vista, created by a German programmer, allows very in a simple way obtain a 15 kHz sync signal of the negative type. It is compatible with most video cards and is very easy to use.

Its only drawback is that during startup operating system the signal from the video card remains at 31khz, so you cannot see anything until the end Windows boot... Using the Soft15khz program is quite simple: after downloading, just unpack the rar-archive with the program and run it (no installation is required), then click on "Install 15kHz" and restart your computer.
(1.4 MiB, downloaded: 2,464)

This is a powerful software for editing all parameters of a video card, including obtaining a sync signal at 15 kHz. The program is not free, although it can be successfully used in the shareware version (the only drawback in this case is the presence of a splash screen, which lasts about six seconds at startup). You can download the PowerStrip program from the official website.
Acquiring 15kHz clock signal by hardware
Let us now turn to the study different schemes VGA SCART adapters ranging from the simplest to the most complex. Let's start with the pinout of the VGA and SCART connectors:

Basic circuit with composite sync (only for ATI RADEON video cards)
- pros: Easy to implement, no special components required.
- Minuses: Requires external 5V and 12V power supply, only works with certain ATI Radeon graphics cards.

Basically, three RGB lines (VGA pins 1, 2, 3) are used, connected to the corresponding SCART pins (pins 15, 11, 7). It is also necessary to connect the common wires of each channel (of course, one common wire is enough, but for high-quality shielding it is better to use all of them). To do this, the pins from VGA (6,7,8) must be connected to 13, 9, 5 SCART.
Note: These connections are always the same in all adapter circuits. Dotted brown wire that connects VGA pins 10 and SCART 17 to the sync common wire. The black wire connects the shielded cable jackets of both connectors. Finally, the brown wire that runs from pin 13 of VGA to pin 20 of SCART carries the composite clock signal.
ATTENTION: In order for this VGA SCART adapter circuit to work, it is very important that the video card supports the clock mode on pin 13, which is usually absent in most video cards and only some video cards belonging to the ATI RADEON family can support this mode of operation.
Synchronization signal acquisition using diodes and resistors
- pros: Works with any video card, the presence of the function of switching on by an external signal.
- Minuses: Required external power supply 12V.

Consider the first adapter circuit. In this case, the connection of lines R, G, B and mass is the same as in the previous diagram. The circuit allows you to use a regular video card (not generating a composite video signal). The sync signals from VGA pins 13 and 14 are mixed in a diode and 330 ohm resistor circuit, and then transferred to a regular 20-pin scart.
Using a bipolar transistor to mix the two clock signals provides good quality Images.
Instead of using external source power supply, voltage 5V is taken from pin 9 VGA. True, not all video cards are capable of providing this voltage, especially the older generation cards. Anyway, everyone latest models compatible with VESA 2.0 should do the trick. In this circuit, not 12V is connected to pin 8 (to turn on the AV mode), but 5V. When the TV supports aspect ratio switching at 5V, the ratio will be 16: 9 instead of 4: 3.
Adapter on the 74HC86 chip
- Pros: Excellent quality and compatibility (works with any graphics card)
- Minuses: By far one of the more complex schemes.

The VGA SCART adapter circuit is based on a 74HC86 integrated circuit (four logical elements"Exclusive OR"). An external 5V power supply is also required. The signals are mixed using exclusive-OR elements, the output of which is a composite signal of excellent quality. The adapter works with any TV, provides a negative signal at a frequency of 15 kHz.
The VGA-RCA adapter cable is used to connect audio and video devices. So, for example, using it, you can connect a DVD-player, satellite tuner, which has an analog component video output, to a multimedia projector with a component video input. Quite often, home appliance users are faced with a choice: buy a VGA-RCA adapter (or an extension cable) or make it yourself. This is due to the fact that the cost of long original cables from leading manufacturers is quite high. And the monetary and labor costs for making such a device with your own hands are very small. In this article, we will look at what a VGA-RCA adapter is, as well as its pinout. With this information, you will be able to make the mentioned cable yourself.
Description and pinout
For the manufacture of the subject of our conversation, it is recommended to use (as a conductor) a computer cable of the "twisted pair" type CAT5 (it is better to use a shielded cable), since it is able to transmit a video signal without loss of quality over a distance of 50 meters. The VGA-RCA adapter contains three RCA connectors (male or female, depending on the purpose) and a D-Sub connector (15-pin).

Pinout of the D-Sub connector for this adapter:
- the first is signal red;
- the second is signal green;
- the third is signal blue;
- the sixth is the land of red;
- the seventh is the land of green;
- the eighth is the land of blue;
- 4, 5, 9, 10, 11, 12, 13, 14, 15 pins are not used.
Thus, only six pins are required for the VGA-3 RCA adapter. If you are using a twisted pair cable, then use colored wire pairs to solder each tulip. For greater rigidity, the ends on which the RCA connectors are soldered are recommended to be crimped with a heat shrink sleeve. Here, in fact, is the whole description. The resulting RCA-VGA adapter supplies the component video signal to the VGA-input.
Application
Very often, a VGA-RCA adapter is used to supply a component video signal to a computer monitor. However, this cannot be done, the adapter will not work. This is because the computer monitor does not accept the color-difference component signals from the DVD player, but the RGB component. To ensure the operability of such a connection, the use of a special transcoder is required.

Conclusion
The described method of making an adapter can also be used for other similar products: 3 x RCA - 3 x RCA, VGA to VGA extenders, etc. For example, you can make an adapter for an S-Video or Scart cable, the most important thing is to use the correct pinout these connectors. The use of twisted pair cables makes such adapters and extension cords very cheap to manufacture. If you need a short adapter, you can use an unshielded cable to further reduce your costs. And if you need an extension cord of 10 meters or more, then it is better to take twisted pair with a copper shield. This will ensure the high quality of the transmitted component video signal. It is better not to save on this element, because no one will like watching a movie, while “snow” or stripes will appear on the screen, distorting the picture. It is better to do it once well than to redo and fix flaws.
Hello. For a very long time I had an old seventeen-inch monitor on the roof, which was covered with dust. It was lying around for a long time, exactly until the moment when I accidentally came across an article about a signal converter from RCA (popularly "tulip") to VGA. There, the author of the article connected the monitor to satellite tuner, and instead of speakers used computer speakers.
I also decided to do this trick with my old monitor, so to speak, give it a second life as a TV in the kitchen. After ordering, namely after 18 days, I received the parcel in the mail.
The device itself was packed very well, namely, it was wrapped in a bunch of layers of pimpled film.
Having reached the contents, we have the following configuration:
- Converter
- Power Supply
- VGA to VGA cable
- RCA to RCA cable
- S-video to S-video cable
- The instruction is in English.

Converter complete set
As you can see, the bundle is not small, all the necessary cords are already included in the kit.


I was very surprised by the very coating of the converter housing. It is covered with a soft-touch that feels a bit like a rubber coating. It is thanks to him that the body is much less susceptible to all mechanical damage and so pleasant to the touch.
After the purchase, I was in for an unpleasant surprise from my old monitor. After lying on the roof, he refused to turn on, so for the demonstration he connected the converter to another, already Led monitor.
Everything is connected very easily. Monitor cable, plug into the connector VGAOUT, the cable from the tuner or DVD is connected to the connector VideoIN... The power supply into the socket, and its output into the socket 5 vPower... After that, everything starts working.


Example of work
On my monitor, immediately appeared perfect picture, even considering that the signal goes through an analog RCA cable. The converter has a menu that allows you to adjust some parameters, such as brightness, image offset, but I did not touch anything there. We only used the mode button, which is responsible for switching the screen extension, choosing the right extension for my monitor.
If you decide to make yourself the same TV set from a monitor, I recommend this particular adapter, since its quality of work is at the highest level.
Bought here... The seller is very good, he sent the goods on the second day.
Thank you all for watching.
PS. The old monitor was repaired, there was a crack on the TDKS.
The question of how to make a vga tulip adapter is more famous today than ever. Many people like the idea of connecting a TV to a computer. And a lot of speculation is being made on this.
You will need
- Internet, hefty dilapidated video card with tv-out over d-sub, d-sub m jack, rca jack, 75 ohm coaxial cable, soldering supplies
Instructions
1. On the internet you will find a more readily available tulip vga connector, but unfortunately, even if you get one, it won't work. To transfer a composite signal from a computer to a TV, you need the video card to support given view signal standard. Until 2000, they produced video cards using tv-out over d-sub. That is, you could truly connect a TV to such a video card through a vga tulip adapter. However, later in 2000, the standard for signal transmission was changed, and video cards stopped transmitting the composite signal. Thus, if you make a vga tulip adapter or buy a ready-made one and try to use it on a current video card, then the adapter will not work under any circumstances.
2. If you still need to output the signal from the vga output of the current video card through the composite input to the TV (yellow tulip video), then the exclusive method to do this is to buy a special converter device. It performs signal transcoding between different standards. The cost of this converter varies from $ 10 to $ 20. This is a rather difficult device, therefore, only a specialist can assemble it independently.

3. If you are the joyful owner of an old video card (pre-2000 release) that supports tv-out over d-sub, say by Matrox, you can try making a tulip vga adapter yourself. To do this, you need a wiring diagram for the rca and d-sub connectors, or "pinout".

4. Prepare vga connectors and cinch for soldering. Open the defensive housing, apply flux to the required pads according to the pinout. Take a piece of cable of the required length, strip the ends, tin them.
5. Slide the connector housings securely onto the cable before soldering to the connectors. Solder the inner core of the cable to the center pad of the cinch connector and pin number 3 of the vga connector. Solder the shield conductor of the cable (braid) to the other pin of the cinch connector and to pin 8 of the vga connector on the other side of the cable.
6. Gather the connectors on both ends of the cable. The adapter is ready. You can try connecting your TV to your computer.
Related Videos
Note!
Pay special attention to setting the signal format, resolution, and decoding. Start with the lowest values. The TV may not recognize the video signal for most combinations of these settings, so try different options.
Useful advice
The most primitive method of connecting a TV to a computer is a video card with a separate tv-out, tulip or s-video. You can also use a converter. Another method of connecting a computer to a TV is acceptable for you, for example: - connecting with a vga vga cable, if on a TV there is a vga input. Some modern TV models are equipped with a special adapter for connecting vga; - connection via a vga s-video adapter. This connection is allowed on some models. ATI video cards Radeon, say, 3000 series and special graphics card driver settings. Also, the TV must have an s-video input; - connection via a vga YPbPr adapter. The same as in the previous paragraph, but the TV must have a YPbPr component input (three tulips are not yellow); - connection via a vga SCART adapter. The same as in the previous paragraph, but the TV must have a SCART input (comb).


