In 2016, consumers spent $ 61.8 billion on apps for mobile devices, and in 2017 this figure reached $ 75.7 billion. This market is constantly growing, but not all applications are successful, justifying the money spent on them.
To highlight your application among a large number competitors, it is important to make it technically high-quality and such that it really helps solve the problems of your consumers.
To create a quality app, you need to have a good development team. How many days the work will take, how the application is created and how much it costs, you will find out in this article.
Factors that affect the cost of creating an application
Two criteria are important here: the performer (the price depends on the country in which the developer is located) and the functional complexity of the application.
Naturally, the price depends on the amount of work that needs to be done by the team. It directly depends on the number of screens, controls, device type, screen orientation modes, security, the number of languages supported in the application, and much more. The more functionality the customer wants, the more time and money will be required for development. Although there is a way to spend less time and money on for your website.
The process of developing an application is really quite difficult. Sometimes a team of at least 6-7 specialists may be required.
The development plan looks something like this:
- First, you need to think over for whom and for what purpose the application is being created, how the user can enter it, what problems will he face? All of this is described in the User Story.
- Then the design stage and design development begins, the navigation is thought out, a layout is made and a guideline is drawn up - this is an instruction for developers: how design elements should look for different mobile devices.
- Next, graphics are sliced so as not to overload the application by weight, but at the same time leave everything you need. Please note that when developing not an ordinary web application, but the weight of the application will be no more than 200 KB.
- Further, all these materials are transferred to development. Often in the process of work, new ideas appear that make adjustments to the initial plan.
- After that comes the testing phase. The tester checks the operation of the application on different devices, and also uses special services to test the application on different operating systems Oh.
- After testing, the application is uploaded to the App Store and the monitoring phase begins. To track download statistics and reviews, you can use the Distimo or Flurry services. Google Analytics is also used for this purpose.
- After the release of the application, you need to work hard to attract users, collect all the metrics and analyze user behavior. If you use push-mailing technology, it is easier to “learn” the habits and requests of customers with the service. Having made the necessary conclusions, improve the application.
Before ordering development, make sure that the team will work on prototyping the application. This is very important, as it will help you avoid mistakes and oversights, as well as clearly understand what the end result awaits you.
Many teams are engaged in the creation of mobile games to order, this is the category of applications that users spend the most on. The development process and the cost of the application are very different in this case.
How to calculate the cost of developing a mobile application
Usually, developers make a preliminary estimate of the cost of the order. You can get it in a couple of days, usually for free.
If the cost suits the customer, he signs a contract, which calculates the exact price of the application development, the deadline for the completion of the work, and a description of the final result. Sometimes the price can change if during the development process it was decided to add additional functionality... But this is agreed with the customer.
The average cost of developing a mobile application depends on the complexity of the application:
- A simple application costs about $ 3,000 (the term of work is 1-2 months);
- Medium application - $ 4000-5000 (3-4 months);
- Hard - $ 6,000 (over 4 months).
How much does it cost to develop a mobile app for a freelancer
In Russia and Ukraine, many freelance developers “write” applications with sufficient quality. Their prices are 2-3 times lower than, for example, freelance developers in the United States. Therefore, many customers from other countries turn to Ukrainian and Russian specialists.
Application development price in different countries
A high price does not always indicate a high quality of performance, it only indicates that the salaries of programmers in different countries very different.
It takes about 2 months of work to create a simple application, that is, 300 hours. It turns out that the minimum cost of an application from Indian developers will cost $ 3000, from Eastern European - about $ 7500.
How long does it take to create a mobile application?
The process of creating an application for the operating systems Android, iOS, Windows Phone consists of several stages.
- Free cost estimate (takes about 2 days);
- Study of the problem, market and competition (about 5 days);
- Writing a technical assignment depending on the complexity of the application (10-15 days);
- Design development (from 5 to 15 days);
- Programming takes from 20 days to 4 months;
- Testing and monitoring of the application is carried out within 5 - 10 days.
If the application being developed is very complex, then parallel programming is carried out to speed up the delivery of work.
How to create a mobile app for free
To create a simple application on the Internet, there are many services and programs for creating mobile applications for iPhone, Android and even WP. Each service provides step by step instructions, how to do it.
App builders make it possible to develop one app for Android, iPhone and tablets. Services software allows you to create applications in minutes.
Of course, the quality of such an application is very inferior to that created by professionals, both in design and in functionality. The likelihood that you will be able to make money on such an application is minimal.
How to develop a mobile application for adequate money?
- For your app to be popular and generate income for you, you need to meet the needs of your audience. If the app doesn't solve any of the user problems, it is doomed to fail.
- Before deciding on one of the development teams, make a price comparison, as well as study the portfolios of the companies you have selected. A high price is not always a sign of high quality.
- Before ordering, be sure to ask for a rough estimate of the project.
- Discuss all the details of the project with the team, and also insist on creating a prototype of the application. Decide on the design and functionality of the application. You must be clear about what you need and what you don’t need. Then the cost of the work can be significantly reduced if you understand that you will calculate it as superfluous.
- And only after discussing all the issues, you can sign the contract.
Mobile application development is a difficult and time-consuming process, which is a full-fledged software development. To make it easier for you to understand how we create mobile applications, we will briefly tell you about each stage of our work.
People come to our company to realize their idea of a mobile application, web resource or to automate business processes. We conduct a free business examination, advise the client and refine the conceptual component of the project, taking into account the needs of users.
Interviewing. The purpose and value of the application? The target audience? The main functionality? Platforms? Requirements for the application development process? Criteria for choosing an executor? Review of similar solutions: functionality, number of users, ratings, reviews, monetization. User analysis.
Additional questions. Connection of technical specialists. Statement of requirements for the implementation of the application.
The project is evaluated by the development team. After that, the client receives a preliminary commercial offer for the application development: stages of application development; terms and cost; specialists; guarantees.
We conclude a contract in which we describe in detail the stages of work and our obligations. You will be legally protected. Each stage of the work is absolutely transparent, all the main points are discussed with you in as much detail as possible.
Understanding what users expect from the application, we proceed to the prototyping process. A well-built interface is a guarantee that the user will quickly find out how the application will help solve his problem. You get the opportunity to see the functionality of the future application without the software part.
We draw the design of all screens and element states. We use the recommendations of Google and Apple for the design of the application. We make sure that graphic solutions are clear and convenient. You get a design that sets you apart from the competition.
Terms of Reference - a document developed on the basis of an approved interactive prototype and product design required by developers, test engineers to develop and test a project.
Programming of a web resource or a mobile application is carried out according to the SCRUM methodology - step-by-step task scheduling and breakdown of their execution into sprints.
Demonstration of the results to the customer in 2 weeks. The team analyzes the risks and problems, completes the sprint, and optimizes the further application development process.
The difference between our work is that we not only develop applications, but also take them for promotion. Our clients get a company that is responsible for all stages of work: from the first button to downloading the application and grateful feedback from users.
Interview
We conduct interviews in person or via Skype. An interview can take several hours. This stage of application development is important. How accurately and fully the client answers the questions depends on how the product will be released.
The main questions we ask are: project objectives, existing business process, target audience, competitors. At this stage, future functionality is discussed.

MindMap
We create MindMap - a smart map that allows you to structure all the information received from the client. This is a visual project diagram, thanks to which all the data about the application is in one place.

Analysis


Hand sketching
We study competitors' applications. We analyze where users may be uncomfortable or where they stumble while performing their tasks. We do this to determine how the new application will differ from the existing analogues.

Development of a prototype
Based on the sketches, we create wireframes - a structural diagram of the application pages. This is the skeleton of the design, where every detail of the future product is depicted.
A UX specialist works on page layouts. The process of creating wireframes is discussed with the art director.


After its approval, a clickable prototype is made, which is sent for approval to the technical department.

User interviews
We test the finished prototype on users - employees of our office or groups of volunteers. We show a prototype and ask questions: "What do you think this button is?", "How would you add a product to the cart?" etc.
This helps to detect incomprehensible moments for users and correct errors at this stage of the development of a mobile application.

Presentation of the prototype to the client
We make a presentation: show the prototype to the client, explain what will work and how. If necessary, we make changes, finalize. We agree on all the details and approve.

Development of the design concept
At this stage of developing mobile applications, we are making several options for design concepts. The concept chosen by the customer will form the basis for the design of the entire application.

Design of all screens and states
At this stage, all screens and element states are drawn. On average, 120-150 screens are obtained. This helps to take into account all the scenarios and not increase the programming time.


TK and client-server architecture
When we have the design ready, we proceed to the development of the Terms of Reference. It describes all scenarios, screen transitions and screen states. At this stage, the specialist works out the hi-level architecture of the project and the data storage model.

This is important stage... It determines how the software part will be built, the speed of the application, the configuration of "client-server" requests. Where do we get the data, where do we write it, how do we write it, etc. The TK includes all systems with which it is necessary to synchronize.

Programming and Testing
The work goes into the hands of programmers. The development process is based on the Scrum agile development methodology. A complete list of tasks is formed (the so-called "back-log") and divided into small sections (called "sprints").

We program it step by step and demonstrate the result after each sprint. When the software part is ready, we send the application for testing. Test technicians check the product for possible errors. If necessary, the application is returned to the programmers for revision.

Publishing an application
The main stages of mobile application development have passed, it remains to prepare the application for publication. To do this, we make product descriptions and graphics that comply with the rules of Google Play and AppStore stores. If you do not follow them, the application will not pass moderation.


In stores, the user sees the app icon first, so it is important to make it attractive.

When creating graphics for app descriptions, we check whether the authors have permission to use certain images, whether there are celebrity faces in the photo, as well as compliance with other store requirements.


Product technical support
After delivery, projects go to the stage of technical support.
I started to study graphic design when I was 13 years old. I learned how to design websites from online courses and played with Photoshop and Affinity Designer all day. This experience taught me to think like a designer.
I've been designing and developing apps for almost a year now. I took part in the MIT program where I worked on the Universeaty application development team. Two months ago, I started working on a new Crypto Price Tracker app that came out recently on January 28th.
In this article, I will share the step-by-step design process that I follow when working on applications. This should help those looking to learn or improve their digital design skills. Design is not only about how to use design software, and this article will not teach you how to use it. There are hundreds of quality tutorials on the Internet. Design is also about understanding the essence of your product, its functionality, and design, without forgetting about the end users. This is what this article will teach you.
Design process:
- Create a user flow for each screen.
- Create / draw prototypes.
- Choose design templates and color palettes.
- Create a design.
- Create an animated prototype of your app and ask people to test it and provide feedback.
- Make final touch-ups on the layouts so that all final screens are ready for development.
Let's start!
Userflow
The first step is to figure out what features you want to see in your application. Once you have ideas, create a user flow. This is a flowchart of how your application works.
Typically, a user flow consists of three types of shapes.
- Rectangles are used to represent screens.
- Diamonds are used for conditions (for example, pressing the login button, swiping left, zooming in).
- Arrows connect screens and conditions together.
Userflows are very useful because they give a good logical idea of how the application will function.
Here's a user flow diagram I drew when I started designing my app.
Userflow for the main interface.
Prototypes
After you have finished creating user flow for each screen, you will start working with prototypes of all screens. Prototypes are essentially low-detail sketches of your application. Basically, a sketch or diagram of where the images, labels, buttons, and more will be located. A rough sketch of how your application will perform.
I am using printable templates from UI Stencils to draw wireframes. This saves time and provides a good workspace for drawing and taking notes.
Here's an example of a prototype.
 Mobile app interface prototype
 After prototyping, you can use an app called Pop and take a snapshot of all your drawings with the app and get a clickable prototype by linking all screens with buttons.
Design sketches and color palettes
This is my favorite part. It is like window shopping. Lots of design patterns and color palettes to choose from. I will choose the ones that I like and will experiment with them.
The best platforms for finding patterns are Mobile Patterns and Pttrns. And for good color palettes check out the Color Hunt website.
Design
Finally, you move on to using your design software. It looks like you logged into your app in the future and took some screenshots. It should look realistic and pretty much like the real thing.
There are development software and design tools. I am using Affinity Designer. The most commonly used iOS design tool is Sketch.
Here's an example of some of the early designs of my application.
 Transferring the picture to pixels!
 I experimented more with different color palettes.

I shared the initial layouts with friends to get their feedback. A lot of people seem to like the gold and black gradient.
Get ready to get feedback and experiment with new suggestions! You will get amazing feedback from your users when you talk to them, not when you frantically browse Dribbble or Behance.
So I redesigned the layout and removed the background graphics because generating them was technically time-consuming and impairing readability. What happened in the end:
 The golden gradient to black looks surprisingly good!
 I was happy with the color scheme, tab bar icons, and overall layout. I went ahead and designed the rest of the screens following the same design principles. It was a long but insanely fun process!
When all my screens were ready, I put together a prototype in Adobe XD and asked a few friends to experiment and give feedback.
After the final touches, this is what the final version of my design looks like.
 Final version of the design
 After all the screens were complete, I imported them into Xcode and started developing the application.
That's all! I hope this article helps you get started on your app design or helps you become the best designer... And if you like my application, you can download it.
I end this article with one of my favorite design quotes.
“Design is not only about how an object looks and feels. Design is how it works "
- Steve Jobs
How is the Android development process going? Let's highlight a few basics:
- IN Java files you describe the logic of the program - what you want your application to do.
- In XML files, you design layouts - appearance.
- Once the application is written, you need to use the build tool to compile all the files and package them together into an .apk file that can be run on Android devices and / or publish to Google Play.
- All utilities and files that are used to create an Android application are combined into an integrated development environment (IDE). An IDE is a program that you open to edit your code files and compile and run.
- Eclipse used to be the standard IDE for Android development, but now it has been replaced by a more functional one. Android Studio Is a Google product.
You will, of course, find deeper processes going on behind the scenes of the above steps. For example, advanced users will want to know the role virtual machine Dalvik. The end of the article will list links to useful resources that every Android developer should be familiar with. The first one is the official documentation from Google.
- Download and install Android Studio.
- We will learn about launching and testing applications on Android devices and emulators.
- Let's create a simple Android application that displays the "Hello World" text on the screen of a mobile device.
At the end of the article, you can find useful recommendations for novice developers from the company.
Installing Android Studio Development Environment
It's really tempting to start reading the documentation and writing code to find out what the platform is capable of. And we will do it soon! However, to get started with the Android platform, you need to set up a development environment.
It is especially important for beginners in programming for Android to take their time and methodically follow each step. Even if you follow the steps correctly, you may need to troubleshoot a small environment setup issue depending on your system configuration or product version. To do this, use search services... The StackOverflow resource is especially worth highlighting.
It is important not to allow any underwater rocks obstructed your ultimate goal of learning Android programming. It is known that even professionals sometimes have certain problems with setting up a working environment. In such cases, knowledge is important command line... If you'd like to become more familiar with this tool, there is a link to a good introduction below.
Along with practicing the syntax, it is important to educate yourself for a successful programmer mindset that will not accept file X error messages not found final judgment. This kind of thinking is easily practiced by you in cases where you do not give up and are looking for a solution to the problem.
Go to Android page Studio developer.android.com/studio/index.html and find the download button latest version for your platform.
Click on the download button and you will be asked to read the terms and conditions of use of the software product. After reading carefully (as you always do) and accepting, the download begins. It will probably take a few minutes. After that, you can install Android Studio just like any other program. On the home page The download contains installation instructions for Mac and Windows.

Now that you've installed Android Studio, let's get it running! Start Android Studio. The program will ask if you want to import your settings. Since you are starting from scratch, just select the second item and continue.

You should see a nice Material Design loading screen.

When the download is complete, you will be taken to the welcome screen.

Even if you just downloaded Android Studio, you may not have the latest version. To avoid problems with versions in the future, click the "Check for updates now" button and, if necessary, follow all instructions to get the latest version. Sometimes Studio will automatically inform you that there is an update using a screen like this:

In this case, always select Update and Restart. Excellent! We've successfully completed the development environment setup.
Creating your first Android project
It's time to create your first project. Let's start simple. It is customary for programmers to call the first program "Hello World". Let's follow this tradition and then make a few small changes so that the application uses your name for the greeting. In the end, you can download it to your device and show it to your friends. Android Studio has a small step-by-step tool to help you create your project. Click "New Project" on the start screen:

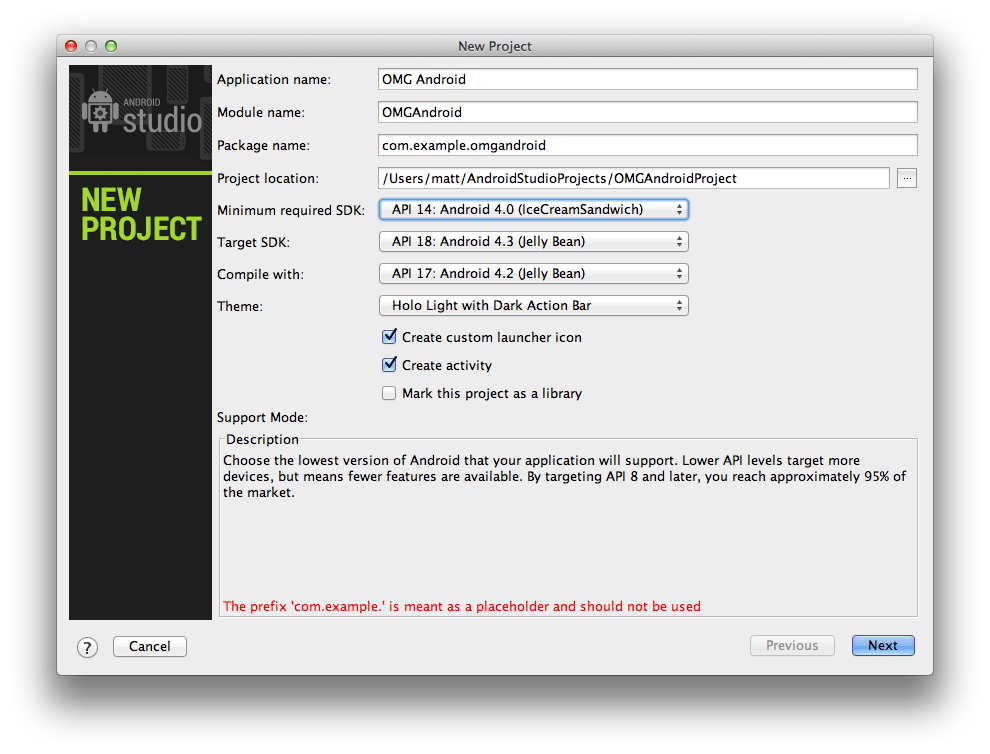
Fill it in like this. Feel free to replace "example" in the package name with something else to remove the warning at the bottom of the screen. You can also set the project location by specifying any folder on your hard drive
For drop-down SDK versions note the Description section at the bottom of the dialog box. It explains what each setting is for.
Install the minimum required SDK as shown in the screenshot. This sets the minimum Android version required to run the application. Choosing this value for your own projects is a matter of balancing the SDK capabilities you want and the devices that will be supported.
To receive additional information about API versions and their use, there is a dedicated Dashboards page on the Android developer site https://developer.android.com/about/dashboards/index.html.

After selecting the version, the screen for selecting the starting template opens. You can create an app that already interacts with the google maps api and displays the map. In our test case, select Empty Activity and click the Next button.

And now you are at the last step of the application creation process. Before clicking Finish, there are a few things to note. This is where you first come across references to the main architectural components of any application.
- - this is the first but not the last mention of the word Activity. In the context of Android, an Activity is usually seen as a "screen" in your application. This item is very flexible. When Android Studio creates the MainActivity class, it inherits from the Activity class from the package Android SDK... Those familiar with object-oriented programming understand this concept, but for beginners, this basically means that your MainActivity will be a custom version of an Activity.

- Layout Name- the layout of what will be shown to the user is defined in a special form of Android XML. You will soon learn how to read and edit these files.
Click Finish. It will take some time to create and load the project. After a while, Android Studio will complete the build of your project. Of course, the project is still empty, but it has everything you need to run on an Android device or emulator.

After loading the project, you view the XML layout file. Before moving on to Android programming, let's talk about how we can get this application running. It's time to say "Hello world!"

Running the application on the emulator
Now it's time to say a few words about the emulator. Android Studio comes with software capable of emulating an Android device for running applications, browsing websites, debugging, and more.
This feature is provided by Android Virtual Device (AVD) Manager. Optionally, you can configure multiple emulators, set the screen size and platform version for each new emulator. This functionality is very useful as it eliminates the need for developers to buy multiple devices to test programs.
Click on the Run button in the form of a green arrow.

You will have to wait a while for the emulator to load and as soon as it is ready, you will see something like this:

Congratulations! You've made your first Android app!
And so ... Why and how did it work?
To start making changes and adding interesting features you need to get a working knowledge of what goes on behind the scenes. Take a look at the files and folders section of the Android Studio project on the left side of the screen. You may need to click the small tab on the edge (see below) if on this moment the project explorer is not displayed.

Review the folder structure for a few minutes and double-click on the files to see their contents in the main window. If this all looks mysterious, don't worry!
Android project structure: Team
Every good team is made up of people who fulfill their assigned roles. Do you want to get the job done right? You need the right team. There are several key elements in Android projects, and each of them must play a specific role:
Java: Professional
This is the part of your code that is responsible for the application logic. Your code will be in the src \ main \ java directory in the main project folder. For learning Java, consider Bruce Eckel's book Philosophy of Java;
Resources: Artist
It's not enough just to make an Android app, it also needs to be stylish. Your app will never stand out if it doesn't have clear icons and images, well-designed layouts, and maybe even fluid animations.
When initialized, the folder contains the following folders:
- drawable, which stores icons. Now there is only standard icon applications.
- layout with XML files that represent screen designs.
- menu with XML files of lists of elements that will be displayed in the action panel.
- values with XML files containing sizes, colors, string constants, and styles.
AndroidManifest.xml: Boss
This XML file informs your system about the hardware and software requirements of the application and contains its version name and icon. The manifest also contains information about all Activities in the application. Do you need work done by your application? Talk to your boss first.
Alteration
Go to res / values / strings.xml and double click the file. When you open the file, you will see two string resources in XML.
These resources are used in different places, but it is very convenient to have all the text used in your application in one file. If you need to translate it, or if your marketing colleague asks you to remove any redundant links, it's easy to make all the changes here.
Change the hello_world line that the application displays on the screen. Change its content to something more personal, such as using your own name. You will end up with something like:
Click Run. The application should restart and you will see a personal message:

We congratulate you - you have completed your first project and learned how to edit source code. The first step in Android programming made. We wish you good luck on this challenging but incredibly interesting journey! If you need professional development of an Android application, contact Infoshell specialists.
Zhdanova Ksenia Denisovna
Faculty of Mathematical Economics, Statistics and Informatics, PRUE G.V. Plekhanov Moscow, Russia
Annotation: “Have you ever faced such a problem: do your parents use Viber, friends of WhatsApp and Telegramm, and colleagues at work exclusively use Facebook? If your answer is yes, then our & WVTF app is especially for you! " The value of this idea lies in the fact that a person who uses several software products such as Viber, WhatsApp, Telegramm and Facebook, will be able to communicate with all contacts from one application, without having to switch between several programs.
Keywords: Business plan, A. Osterwalder's business model, mobile application, Investment, innovation model
Developing a business plan of mobile applications & WVTF
Zhdanova Ksenia Denisovna
Faculty of Mathematical Economics, Statistics and Informatics Plekhanov Russian University of Economics Moscow, Russia
Abstract: The purpose of the project - to create a unique mobile application to aggregate messages from different messengers. "Have you ever faced such a problem: your parents use Viber, WhatsApp and friends Telegramm, and colleagues are extremely Facebook? If your answer is" yes ", then our application" & WVTF "especially for you!" The value of this idea is that a person using multiple software products, such as Viber, WhatsApp, Telegramm and Facebook, will be able to chat with all your contacts from a single application, without the need to switch between multiple programs.
Keywords: The business plan, business model of A. Ostervalder, mobile application, investment, innovation model
1. SUMMARY OF THE PROJECT
The business idea is to create an application that aggregates the most popular instant messengers.
Our company will be engaged in the production, implementation and maintenance of the & WVTF mobile application, which will aggregate several popular instant messengers at once, such as:
1) WHATSAPP,
2) VIBER,
3) Facebook,
4) TELEGRAM
The goal of this project is to create a unique mobile application for aggregating messages from different messengers.
Our customers will be people who use several messengers at once, because the interlocutors use different programs (due to the peculiarities of the phone's operating system and preferences). Thus, people will be able to communicate without having to switch between different programs and windows. The buyers will be both IOS and Android users. The age segment of buyers is from 7 to 99 years old.
We will deliver information to customers via the Internet, namely through the AppStore and GooglePlay applications. Advertising using the Vkontakte group and Yandex.Direct
Our competitors are Nimbuzz and Snowball apps. The main difference is the messengers included in our application. These are the most popular messengers.
The long term prospects are:
- Increase in the number of clients
- Adding the most popular and demanded messengers to our application, i.e. development of a mobile application.
Start-up funding requirements and income after project implementation:
Starting capital = 300,000 rubles
For the first MONTH of work, it is planned to sell 5000 paid versions of the application at a price of $ 1 / version. Thus, the sales income for the first month will be 300,000 rubles.
When selling free versions, in which pop-up ads appear, an income for the first month is planned in the amount of 100,000 rubles.
Suppose that starting from the 2nd month from the start of sales, it is planned to sell 2,500 applications per month, the income will be 150,000 rubles + sales income of 100,000 rubles = 250,000 rubles per month. TOTAL = 400,000 + 11 * 250,000 = 400,000 + 2,750,000 = 3,150,000 rubles
Organizational and legal form of the enterprise - Individual entrepreneur
To implement the project, it is planned to attract 5 employees:
1. Chief programmer,
2. Programmer,
3. Technical support specialist (2 employees),
4. Manager.
2. DESCRIPTION OF THE PROJECT
The type of our investment project is the creation of a project "from scratch", because the project is innovative and previous versions does not have.
At the moment, the project is at the stage of "Assembling the team" and "Creating a concept"
At the time of launch, it is planned to implement the project throughout the territory of the Russian Federation, and after a successful launch, we plan to expand the area of action and allow using our application all over the world.
The goal of this project is to create a unique mobile application for aggregating messages from different messengers.
How our business idea was born: “Have you ever faced such a problem: your parents use Viber, friends of WhatsApp and Telegramm, and colleagues at work exclusively use Facebook? If your answer is “yes”, then our application “& WVTF" especially for you!"
The value of this idea lies in the fact that a person using several software products at once, such as Viber, WhatsApp, Telegramm and Facebook, will be able to communicate with all contacts from one application, without having to switch between several programs.
To achieve the goal of our project, it is necessary to sign contracts for the provision of servers from Viber, WhatsApp, Telegramm and Facebook. This will be done through the API (Application Programming Interface). The API defines the functionality that the program (module, library) provides, while the API allows you to abstract from how exactly this functionality is implemented.
The term for achieving the goal of the project - from the beginning of creating an application to publishing applications in the AppStore and GooglePlay - will not exceed 2 months.
3. INFORMATION ABOUT THE MAIN PROJECT PARTICIPANTS
History:
There is no story about the borrower, because this is the first startup.
The main participants in the project:
- Chief programmer
- Programmer
The order of interaction in the project- the founder of the business (he is also a manager) concludes a contract with the above specialists, specifying their job responsibilities.
The manager is obliged to write the TK in accordance with GOST No. 34 and transfer it to the chief programmer, as well as conclude contracts for access to the WhatsApp, Viber, Telegram, FaceBook servers. In turn, the chief programmer brings the programmer up to date to start building the application. After the allotted time, the programmers are obliged to show the preliminary version to the manager for approval and further work.
Organizational plan:
A start-up capital of 300,000 rubles is required, which will be financed by the founder of the business.
The first 2 months will be spent start-up capital, then the startup starts to make a profit.
Table 1. Calculation of the required investments
|
Staff costs |
||
|
Position |
Amount of wages per month, rub |
|
|
Chief programmer | ||
|
Programmer | ||
|
Technical support specialist (2 people) | ||
|
Sales / Contracting Manager | ||
|
Total staff costs | ||
|
Equipment costs (not included) |
||
|
Rental expenses (not included) |
||
|
Contracting costs (server access) |
||
|
| ||
|
Telegram |
||
|
|
||
|
Expenses TOTAL | ||
4. PRODUCT DESCRIPTION
Product program:
We offer you a new messenger & WVTF:
1) Convenient intuitive clear interface
2) Possibility to purchase free version
3) Save battery power and memory in your smartphone by using one messenger instead of 4!
4) Our app is available for Android and IOS smartphones
5) Ability to use one application instead of 4 without losing the functionality of all programs
We will provide 2 view of our application:
a. Website iphones.ru is free(under testing)
b. Website appleinsider.ru/obzory-prilozhenij - paid
c. Website appstudio.org/ios-apps - paid (7000 rubles)
2) For Android users:
a. Website androidinsider.ru - paid
b. Website ferra.ru/ru/apps/ - paid
c. Website android4all.ru/soft - is free
1. Gathering the team
2. Payment for the services of a programmer
3. Writing applications for IOS and Android operating systems
4. Obtaining a patent for the application
6. Implementation of applications in Google Play and AppStore
7. Development of a marketing strategy to attract new customers
8. Technical support users
9. FINANCIAL PLAN (FORECAST STATEMENTS, INDICATORS)
Project performance indicators:
1) DPBP (DISCOUNTED PAYBACK PERIOD). This is the time for which the current (discounted) net cash flow of the project will exceed the initial investment. This indicator reflects the period after which all the money invested in the project is returned, provided that the discount rate is correctly selected. The indicator should not exceed the duration of the project, otherwise the project will be considered unprofitable.
2) NPV (NET REPORTED INCOME). One of the key indicators of the project, which is the current (discounted) amount of net cash flows from the project (the difference between all cash inflows and outflows), calculated taking into account the expected change in the value of money. Shows the absolute amount of money (income) that the bank or investor will receive from investing money in your project. Allows you to compare projects of equal duration and takes into account their scale. For a project to be considered profitable, this indicator must be at least greater than zero.
3) IRR (INTERNAL RATE OF PROFITABILITY). Along with NPV, it is one of the key indicators of the project and characterizes the degree of profitability of the invested money, taking into account the time factor and subject to full coverage of all project costs from income. It is calculated as a barrier rate - the discount rate at which the NPV of the project is 0. IRR allows you to compare the efficiency of investments in the project with alternative options financial investments (for example, in other, more profitable projects) and shows the relative profitability of the project per unit of invested funds. This figure should be higher than the discount rate.
4) PI (PROJECT PROFITABILITY INDEX). It is also one of the key indicators of the project and is calculated as the ratio of NPV to initial investment. Shows the relative profitability of a project compared to other projects with a comparable initial investment. If the index value is equal to one or less, it loses to other projects and investments and actually makes the project of little interest to the bank or investor.
Investment size:


 new brushes in Photoshop?")


