Often, faced with the same type of work, we would like to save our time and do everything “in one fell swoop”. Batch processing is an indispensable assistant in this matter.
Graphic files undergo many transformations: from elementary ones, performed even by novice users (changes in size, format, etc.) to more complex ones, performed by specialist designers, programmers (adding filters, applying effects). Simple conversions can be done in standard image viewers, as many of them have built-in features to do so. More complex processing is done in converters - programs for processing graphic images.
Below, in ascending order, batch processing methods are described from simple to more complex, professional. The research results are summarized in comparative table 1. Test results in Diagram 1.
Image Tuner
The most simple, not complicated settings and filters, program for basic processing images. The list of its capabilities is limited to changing shades, sizes, image orientation, adding a watermark. The program works in the "single window" mode: the files being processed are loaded into the left half. The right side shows the conversion options.
Pros of this program:
ease of use;
supports such popular formats as JPEG, BMP, PNG, GIF, TIFF, RAW, NEF and others;
There is a preview feature. Fires when an image is clicked.
Minuses:
excessive simplicity of filters. Filters are so simple that I have no settings. Located in the "Resize" menu section;
not a large number of formats for saving finished sketches: 5 in total;
flaws in the design of the program: some of the settings are in English, the rest is translated into Russian.
Thus, this program is intended for elementary basic image processing.
The main function of this program is to view images.
Pros:
availability. The program is free to download;
functionality. Performs viewing and converting functions. How the converter works through the “Batch Conversion/Rename…” menu. Supports three mode options: batch rename, transform and mixed mode;
compactness (small size);
an impressive number of formats (about 20);
test mode available for batch renaming files.
Minuses:
not all options are available for the full list of formats;
some transformations occur only when activating Use advanced options ..., by pressing the "Advanced" button. Otherwise, only transformations standard for the viewer are available: resizing, cropping, horizontal/vertical reflection, watermark.
preview is assumed only for the original image. If, for example, we can specify the dimensions pixel by pixel, then changing the color parameters, brightness, balance is a problem, since they change by entering numbers. And we will be able to see the results of the conversions only after the end of the conversions and exit from "Advanced".
Thus, if you are satisfied with the basic transformations that do not require a preview, this program will satisfy your requirements. But it cannot be included in the list of the most convenient converters.
AVS Image Converter
AVS Image Converter is a converter program. It is one of the AVS4You suite of programs for working with images. A feature of this program are the auxiliary utilities Software Navigator and Update Manager. By the way, this explains the large size of the program: 27 MB.
Pros:
ease of use. Very simple interface, with simplified functions or presets, which makes it easy to work with the program even for inexperienced users;
number of supported formats: 8 for writing, more than 20 for reading;
connection to the Internet: you can process photos imported from Flickr or Facebook accounts, and the program itself has presets for photos intended for publication on the Internet;
separate tab "Watermark". Used to overlay text or image on a photo.
Minuses:
few conversion settings. Basically, settings aimed at color prevail: brightness, contrast, color temperature. There is a blur / sharpen effect, adding text. You can get acquainted with the entire list of effects in the “Correction” tab.
FastStone Photo Resizer
In terms of functionality, this program resembles IrfanView, but, unlike the latter, it provides the user with a more convenient and expanded choice of options.
Pros:
image management. By specifying the output image format (“Output Format”) and the save folder (“Output Folder”), you can save time on performing these functions for each image separately;
"Search and Replace" function. With its help, the name of the files is corrected without a complete change of the name.
Minuses:
basic set of transformations. The list of available transformations: adjusting the size, texture, perspective, adding a water image, selecting frames;
no preview mode (window);
irrational use of the interface area. Most of the workspace is an area for selecting files.
XnConvert Program
The XnConvert program is one of the components of the XnView image viewer known to many users. Created on the same basis, the programs perform almost identical actions, but still have a number of differences, which will be discussed below.
XnConvert is an image converter only and does not include a viewer function. On the one hand, this is a plus of the program, since it strictly performs its functions. On the other hand, you need to use another viewer program to work.
The basic principles of the program are as simple as possible. Images to be processed are added by drag and drop or using buttons. Next, the conversion options are selected from the list. The lists are at the top and are displayed as thumbnails, which presents some inconvenience to users. The fact is that this kind of sorting does not allow viewing information about source files, as it could be when sorting in the form of a table. Therefore, sorting is more conditional than functional.
Now in more detail about the conversion functions. The list of transformations is located on the main tab "Actions" and is divided into 4 groups:
image: work aimed at transforming a file, or related to file properties;
correction: processing of colors and levels;
filters: image blur, sharpness adjustment, focus change;
Miscellaneous: other functions.
Output tab. In this tab, you work with files that have been converted: specify the parameters for saving (name, save path, format). There is Extra options for saving, they are applied to formats such as GIF, PNG, JPG, etc.
Download script button. Used to export images intended for use with the Internet. Packing or sending via FTP or e-mail, uploading images processed to a Picasa or Flickr account - these functions are located above the indicated button.
And in conclusion, it should be noted that the program supports more than 500 formats for reading. True, some of them are more specific and require additional resources. In this case, you need to install GhostScript or a CAD plugin.
A simplified version of XnConver. The simplicity of work lies in the fact that only two tabs are provided in this program. The first is for the format and save options. The second contains a list of transformations. To select and apply a transformation, add half of the box on the right to the list. There is a "Save Script" feature. The settings window is located in the "Tools - Batch Processing ..." menu.
Photo converter program
The program was created in several editions: home (minimum), standard, professional. Professional edition allows you to use Adobe features Photoshop, supports over 400 graphic formats, functions from command line. The standard version is simple and convenient step by step settings, supports only the most popular image formats (JPEG, TIFF, GIF, PNG, BMP).
The program interface is divided into two parts, so the first step of the conversion is to add an image to right side window. The second step is the conversion itself, which occurs through the “add action” button. In the minimum version, in addition to standard functions, a blur / sharpen effect, red-eye removal is provided. The standard version allows adding a watermark. And the third and final step is conservation. At this stage, the saving format is selected, in addition there is an option "Rename file by mask". Completion and saving is pressing the "Start" button.
I would like to note in this program a more logical placement of the transformation functions than in the ones discussed above. But, nevertheless, there are certain shortcomings: for example, the level correction functions and cropping are related to editing, and in the program they are in the “Automatic” settings group. However, over time, with frequent use of the program, this does not cause any difficulties.
One of the disadvantages of the program is help on English language, but you can see the answers to your questions on the site.
This program is one of the most popular among converters. Almost everything is included in this program. necessary tools for batch image conversion. On the this moment the current version is CS6, for now we are considering the CS5 version. Files are processed using actions, the Batch operation, or the Image Processor script.
The first image processing method
To process graphic images, you need to create a Set. To do this, it is better to take a test sample. In the future, this set will be applied to all selected files. A set is created through the Actions palette by writing down the required actions. At this stage, only Photoshop tools are available. In the future, the list can be adjusted by adding or removing certain actions. Through the "File - Automate - Batch ..." menu, go to the "Play" settings group, select the desired action, specify the source and folder for saving the processed files. This action results in a mass application of the set.
Second Image Processing Method
The second processing method is more acceptable, since it does not require the creation of an action. The method is based on using the Image Processor script. Changing the format or size of the image occurs through the menu "File - Scripts - Image Processor ...". The rest of the settings can be done in the first way.
The processed images are saved in JPEG formats, PSD and TIFF.
Work Adobe software Lightroom is based on bulk conversion of exported images or using the "Library" module. To work with images, the following settings are used, marked in the "File - Export ..." menu:
Export To – selection of image export. As options: HDD, e-mail or burning CD or DVD. The Library module also allows you to export images to the Internet: Facebook, Flickr, Adobe Revel and SmugMug;
Export Location - folder for saving images;
File naming - selection of file names by mask. The program has a large list of variables. Variables can also be taken from the image's metadata;
File Settings - here you select the format for saving images. You can leave the output format or choose one of the following: JPEG, PSD, TIFF, DNG
Image Sizing - specifies the size and resolution of the saved image;
Output Sharpening - definition of image sharpness;
Metadata – request to save file metadata;
Watermarking - option to overlay a watermark.
If you are not satisfied with the standard presets provided in the left sidebar ("Preset"), you have the opportunity to add your own.
04/07/16 4.9KIn this article, you will learn how batch photo processing and how to apply it to multiple images.
What will we create
We'll create a Photoshop Action that changes the length of our images to 1000 pixels, and then we'll apply this action to multiple images at the same time. Photoshop automation features such as actions and batch processing have been available for a long time, so you can complete the tutorial in Photoshop CS3 and newer versions:
Resources
Images for processing « Distressed Paint Overlays for Your Graphics»
Step 1
First let's create new document size 2000 by 1500 pixels. This will give us a workspace to create an operation for batch processing photos in Photoshop:
Step 2
Go to the menu Window> Operations (Window> Actions) to open the action panel. Click on the folder icon Create a new set» (Create New Set ) at the bottom of the Actions Pane and name the set « Resizing Actions". You can move sets and operations on the panel by clicking and dragging them:
Step 3
Click on the created set to select it. We will be creating our operation within this set to save it for later use. You can't save actions outside of Photoshop and open them on another computer unless they're in a preset.
Click on the button " Create a new operation» ( Create New Action) and name the operation "1000PX Wide" (" Width 1000px»):
Step 4
Press "Record" ( record) to start recording your operation in this batch photo editor. Everything you do now will be recorded step-by-step for later use in batch processing. Go to menu Image > Image Size and set the width to 1000px. Make sure the checkboxes next to the " Scale Styles» ( Scale Styles), « Keep proportions» ( Constrain Proportion), "Interpolation" ( Resample Image).
Set the resampling drop-down menu to " Bicubic automatic» ( Bicubic Automatic). Click OK. Don't worry about the document size settings, as the operation only writes the values for the labeled fields, the width value we changed, and the resampling settings in the dropdown menu:
Step 5
Now we need to save our image to the operation we are recording. Otherwise, we would not write down the Save As command ( Save As) in operation, but batch processing requires it to export the correct file type. Go to menu File > Save As and save the blank document as a jpeg. Check the box " Embed color profile» ( Embed Color Profile). Click Save ( Save).
It doesn't matter where you save the image during the recording of the operation, because we will define the destination folder where the image package will be saved later, but you must definitely click the "Save" button to determine the file type in the operation for photoshop batch processing photoshop:
Step 6
Go back to the action panel and click on the "Stop" icon ( stop). Our operation is ready! See the image resizing and saving steps we followed? It's simple:
Step 7
Go to File > Automation > Batch Processing to open the batch processing window. Select " Resizing Actions” from the drop-down menu “Set” ( set) and " 1000PX Wide from the Operation menu ( Actions):
Step 8
Press Select ( Choose) under "Source: folder" ( Source: Folder) and select the Distressed Paint Overlays folder where you saved it. We will be resizing these images:
Step 9
Leave the field " Ignore "Open" commands» ( Override Action “Open” Commands) unchecked because we didn't open any files during the recording of our operation. Field " Include all subfolders» ( Include All Subfolders) also leave it unchecked as the stock package we are using does not have any subfolders.
Fields " Suppress file open options dialogs» ( Suppress File Open Options Dialogs) and " Disable color management messages» ( Suppress Color Profile Warnings) must be checked so as not to confirm parameter changes for each image in the batch.
Most JPEG images will have an embedded sRGB color profile, which is Photoshop's default working RGB, so there shouldn't be any color management system warnings anyway. If the image doesn't have an embedded profile, Photoshop can set the working profile to sRGB . It is important that there are no pop-ups during batch processing of photos. dialog boxes, otherwise all automation targets will fail:
Step 10
Create new folder on the desktop. Name it Batch Process Images Resized . Go back and in Photoshop's batch processing window, set it as the destination folder. Make sure the field " Ignore "Save As" commands» ( Override Action Save As Commands) is marked.
Today we will look at a way to process a large number of images, spending a little more time on it than processing one.
How often do we face the fact that we need to process a large number of images for one template? Much more often than we think: post images the same size on a website, set up copyright, equalize white balance in photos with the same lighting, and so on. Doing all this manually is a rather lengthy and tedious process. Batch processing of images will allow you to save several hours of time that you could spend at the screens of your monitors, repeating the same actions.
Step 1
It is better to create two folders on the computer. name one "Originals" (from personal experience I advise you to make a copy of it - just in case), the second - "Results" . In the "Originals" folder we place all our photos that need to be processed. If you need to insert a photo into a frame or put a copyright, and it is important what orientation the photo is (horizontal or vertical), then we again divide it into two folders: we put vertical photos in one, and horizontal ones in the other. Plus - first of all, we set the same resolution for all images (in the case of a frame, equal to its resolution).
Step 2
Open in Photoshop any image from the folder "Originals" and write Action for it. To do this, in the window "Operations"/"Action" (the icon is located next to "History" , or you can go from the tab "Story" ) first create a new folder for "Action" (click on the folder icon)

Designation: Blue - create a new operation/create new action. Green - play actions for an open image. Red - indicator, when pressed, recording starts, and it lights up red. Black - stop recording.
Immediately after creation action starts recording all the actions you perform with open image, while the recording indicator lights red. To stop recording, click on the icon "Stop" (highlighted with a black circle).
Step 3
We process the image depending on the needs (changing the resolution, color correction, applying filters). After all the necessary processing, save it to a folder "Results" with a button "Save as" and click on "Stop" to stop recording action . After that, it's better to delete the image from the folder "Results" so as not to get confused.
Attention! In no case should you select any separate parts of the image and process them! In this case, on all images, the selected area will be processed as you did with the first image.

This is how you should end up with it. In which case, you can delete any action by simply dragging it to the trash.
Step 4
Now you need to use action for all photos in the folder "Originals" . To do this, go to the menu File - Automation - Batch Processing (File - Automate - Batch). Choose desired folders and settings suitable for you, click "OK" and wait for Photoshop to process all the images for you.

P.S. Do not forget that the possibilities of a computer are not unlimited, and if you have to process a larger number of photos, then it is better to split them into two parts (according to our observations, this will turn out faster), and since a large load falls on RAM your computer, then to speed up the acceleration process (sorry for the pun) it is worth closing all programs, except, actually, Photoshop.
P.P.S. I hope that this tutorial will save you a lot of time, all the best and good shots!
In one of the previous articles, I wrote about what actions are in Photoshop and how to work with them.
In this article, I will talk about a simple and very convenient way to process a large number of photos for publication on the Internet. With the help of actions in Photoshop, we will create an action that will automatically resize, sharpen and save previews of your photos for the web.
A photo preview is a very important thing, because it is on the preview that the viewers will evaluate the quality of your work. Many photographers do not attach much importance to the preview, they say, "you have to look at full size to appreciate the quality of the photo." They are certainly right. But in practice, 99% of people will only see previews of your photos - in a blog, photo gallery or on a Vkontakte page.
That is why the preview of your photos should look as high quality as possible. And above all it concerns the sharpness of the image. When resizing a photo, the sharpness inevitably deteriorates, and it is necessary to increase the sharpness on the preview. If you don't do this, the viewer will be sure that your photo has a sharpness problem. And a good, “ringing” sharpness in the preview immediately makes the frame more attractive.
Just compare these two photos, the sharpened preview looks much better.

But processing each photo manually is extremely tedious. If you need to prepare 3-5 photos, it will certainly not take much time. And if we are talking about 20-30 frames or 300-500? In an article about shooting a reportage, I wrote how important it is to provide the customer with full-size and previews of all photos. And there is no way to do without action games.
One of the biggest advantages of working with actions is that you have to spend a little time and write the action once, and then you can save a lot of time using it in processing.
It is this action that we will write today. It is versatile and you can use it with any of your photos.
Our task is to make an action that will resize the photos to the desired size, increase the sharpness and save the photos in the quality we need.
Writing such an action is impossible without one very handy feature in Photoshop - Fit Image.

Fit Image allows you to adjust the image given size. Usually used to resize a photo. Image Size, but it has one serious drawback. V Image Size you can't just specify the value of the long side of the image, you can only set the value of the height and width of the image. Because of this, there is a problem with vertically and horizontally oriented photos.
Let's say we set the width of the image to 700px. Horizontal frames will be fine, but vertical frames will be significantly larger than horizontal ones. Because they have a long side that is vertical (i.e. height) and a size of 700 px is set for the width of the image.
Partially this problem is solved by percentage resizing of the image, for example, make the preview size 20% of the original size. But if the original photos differ in size, then their previews will be different. This method is not suitable for batch processing of photos.
We need a universal action that will work with all photos in the same way. That is why you need to use the function Fit Image.
You just need to set the height and width to the same number, and Photoshop will determine the long side of the image and resize it.

Create a new action and start recording:
1. We open any photo in Photoshop and we will carry out manipulations on it, which will be recorded in the action.

2. Now convert to sRGB - Edit=>Convert To Profile, just in case you're working with Adobe RGB or ProPhoto RGB. The fact is that sRGB is a standard color profile that all Internet browsers understand correctly. Adobe RGB and ProRGB are not supported by most common browsers. If you are working only with sRGB, this action can be omitted from the action.

3. Apply Fit Image with a value of 700 px. In my opinion, 700 px is optimal size photo preview. Although you can set any other value there, of course.
4. Let's start with sharpening. We open Filter=>Sharpen=>Smart Sharpen. Depending on your personal preferences, set the sharpness settings. I usually do things like this:

5. Our preview is ready, it remains only to save the photo - File=>Save As.
In this window, it is important to pay attention to the line Embed Color Profile. By checking the box next to this item, you attach a profile to the ICC file.

Then the settings window will open - for publishing quality on the Internet 9-10 will be more than enough.

6. Close the photo - this action should also be recorded in the action.
That's all, click stop and our action is ready.

You can read about how to apply an action on a large number of photos at once in our article on the basics of working with actions in Photoshop.
But there is one thing that makes photo editing for the web even easier and more convenient. This Droplets in Photoshop.
Create a Droplet

Droplet is a very handy feature for working with actions.
The essence of its work is that you can create a file that launches the action you need.
After creating a Droplet, you just need to drag and drop photos onto its icon, and Photoshop will automatically start, and the selected photos will be processed by the action.

It's very easy to make a Droplet from an action:
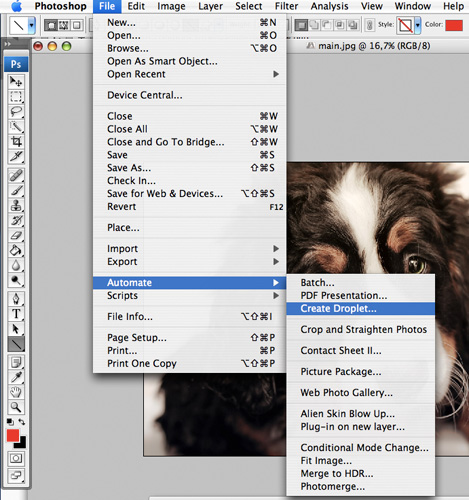
1. Go to File=>Automate=>Create Droplet
2. Configuring Droplet's settings

- Choose where to save the droplet file
- What set and action to use
- Where to save the resulting photos
All other settings are almost the same as the Batch window settings when working with actions.
Now you have an action droplet file, and you can simply drag and drop the photos you want to process for the web into it.
We often have to work with large quantity photos. Processing 300-500 photos at a time is very difficult and time consuming. Thanks to a little Photoshop tutorial on batch processing photos, you will learn how to do several actions on images at a time, which will significantly reduce the time for work.
Consider the lesson on the example of such a concept as preview. It is extremely important for any photographer. You may now say that only by enlarging the image you can realize its quality and shooting skill, but as practice shows, even the most nice photos are rarely placed in their original size. Most likely, as part of the preview, they will remain. Then it is extremely important that, despite the small size, the user feels the quality of the photo.
The main thing in processing small photos is sharpness, especially if you have greatly reduced the original size of the image. In addition to resizing, when creating a preview, sharpening is required.
If you are to process hundreds of photos (batch processing), then the most appropriate option would be to resort to help. In this case, you only need to record the course of actions once, and that's it, then the program will do everything for you.
Our action can be applied to photos of any size and subject. The main actions that we need from the action are to resize the photo, increase the sharpness and then save it in the desired format. To do this, we first need to study the command , it's in the tab File - Automation.
As opposed to just a team "Resize", which changes the size of the image, regardless of whether the photo was originally horizontal or vertical, recognizes the type of photo and accordingly brings it to the desired view.
In order to visualize what the work of the team is, I will give an example. Let's imagine that through "Resize" we set the parameters to 400px, as a result, all horizontal photos will be processed correctly, but the vertical ones will become much larger, since they should not have a width of 400px, but a length.
Through we simply put the two necessary numbers and the program itself will recognize which number refers to the length and which to the width.

Now let's move on to the instructions for batch processing a photo.
Step 1
To begin with follows. We will carry out a series of operations on it, which we will write into an action.
Step 2
Let's start recording the action. To do this, open palette Operations, create or select a folder where it will be stored, click the small button at the bottom of the palette Create a new operation, give it a name. You can find out more information about . The recording has begun!

Attention! All of the following actions are already recorded in the action.
Step 3
It is necessary to convert the photo to sRGB format (only this standard is correctly displayed by all browsers, on any devices). To record an action, press Edit - Edit Profile. If all sources are already saved in the required format, then this step can be omitted.
Step 4
V the Change Dimension option set the value to 700px. Of course, you can put any number, but as practice shows, this is the ideal size for a preview.
Step 5
Now the main thing is sharpness. To optimally increase the sharpness, it is best to use a filter. So let's go to the section. Filters - Sharpness - Smart Sharpen. Set the optimal parameters.
Step 6
The last step is to save the image. The next step is to specify the quality of the photo. For Internet sites, the optimal parameter would be 9-10.
Step 7
Finally, close the photo if you don't want to end up with 300 open tabs.
Step 8
We press Stop. Everything! Our universal action is ready.
There is one thing that makes editing photos for the web even easier and more convenient. This . Thanks to this, you can create a file that will run the entire action.
How to create
It is created from an already recorded action.
Step 1
We go to File - Automation - Create Droplet

Step 2
You need to set the parameters:
- Select the folder where the photos are stored;
- Select an already recorded action;
- Select the folder where you want to save the received photos.

After clicking on the OK button, a droplet will appear in the folder you specified. in the form of a blue arrow. You just need to transfer your photos to this arrow, and all the preset settings will be applied to them immediately.
Save your time and use batch photo processing!
Noticed an error in the text - select it and press Ctrl + Enter . Thanks!


 How many cores are on my windows 10 computer")


 Samsung s8 irises do not work")
")
