Today I will tell you how to enable booting from a USB flash drive in BIOS different manufacturers... It doesn't matter what version you have, the order of body movements will be as follows:
1. We insert our bootable USB flash drive into the usb connector of our computer. I recommend inserting it into a port located directly on motherboard, i.e. from the back of the system unit.
2. Turn on the computer and press the key Delete(or F2) to get into the BIOS. Depending on the manufacturer and BIOS version, other keys (Esc, F1, Tab) can also be used, so you need to carefully read the prompts on the screen.
In BIOS, we can move through the tabs only using the keyboard.
Below I will describe in detail this process by the example of the most used BIOS versions.
Attention! Remember that if you install the operating system from a USB flash drive or CD and select the boot device in the BIOS, and not in the boot menu, then after the first automatic restart of Windows, you must enter the BIOS again and return to boot from hard disk... If this is not done, the autoload from the USB flash drive or CD will work again, and Windows will start the first stage of the procedure again. installation.
Setting up Award Bios to boot from a USB flash drive
Award Bios:
First, let's check if the USB controller is turned on. Go to “Integrated Peripherals”. We go down with the arrow on the keyboard to the point “USB Controller”. Press the “Enter” key and select “Enable” in the window that appears (also using “Enter”). Opposite “USB Controller 2.0” should also be “Enable”.
 We leave this tab by pressing "Esc".
Then we go to “Advanced BIOS Features” - “Hard Disk Boot Priority”.Now in my example, the hard drive is in the first place, and the flash drive should be.
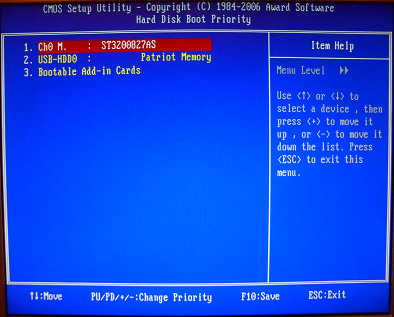 We stand on the line with the name of our flash drive (Patriot Memory) and raise it to the very top using the “+” key on the keyboard.
 We leave from here by pressing "Esc".
Customization AMI Bios to boot from a USB stick
If, upon entering Bios, you see such a screen, then you have AMI Bios:
 First, let's check if the USB controller is turned on. Go to the “Advanced” - “USB Configuration” tab.
 Opposite the items “USB Function” and “USB 2.0 Controller” should be “Enabled”.
 If this is not the case, we stand on this line and press the “Enter” key. From the list that appears, select “Enabled” (also using “Enter”).
Then we exit this tab by pressing “Esc”.
Go to the tab “Boot” - “Hard Disk Drives”.
 Now my hard drive is in the first place, but I need to put a USB flash drive here. We stand on the first line, press “Enter” and in the window that appears, select our Patriot Memory flash drive.
 It should be like this:
 We leave from here through "Esc".
Choose “Boot Device Priority”. Here, the first boot device must be a USB flash drive.
 Press Esc.
Then we exit Bios, saving all the settings made. To do this, go to “Exit” - “Exit & Save Changes” - “OK”.

Configuring Phoenix-Award Bios to Boot from a USB Flash Drive
If, upon entering Bios, you see such a screen, then you have Phoenix-Award BIOS :
 First, let's check if the USB controller is turned on. We go to the “Peripherals” tab - opposite the “USB Controller” and “USB 2.0 Controller” items there should be “Enabled”.
 Then go to the “Advanced” tab and set “USB-HDD” opposite the “First Boot Device”.
 After that, we exit Bios, saving the changes. To do this, go to “Exit” - “Save & Exit Setup” - press the key “Y” - “Enter”
 This is practically everything you need to know in order to boot from a USB flash drive. In my article, I described the process of configuring BIOS for the most popular versions: Award and AMI... The third example presents Phoenix-Award Bios, which is much less common.
In different BIOS versions the described procedure may differ slightly. But the main thing is that you understand the very principle of setting.
By the way, I would also like to add: in order to choose which device your computer will boot from, it is not necessary to change the settings in the BIOS. You can immediately call up a special menu after turning on the computer to select boot devices (this can be done with the F8, F10, F11, F12 or Esc key). In order not to guess with the keys - we look carefully at the monitor immediately after switching on. We need to have time to see an inscription like this: “Press Esc to selest boot device”. In my case, it was necessary to press "Esc".
Even the most advanced user at some point, you may encounter an unpleasant moment when an attempt to start the system from a bootable USB flash drive (for reinstall Windows, for example) ends with nothing, since the BIOS simply does not see the USB flash drive. There is a logical explanation for this phenomenon. In this tutorial, you will find a couple of tips to help you solve the problem.
What to do if the BIOS does not see the bootable USB flash drive
First, make sure your USB port is working. Try connecting to a port on the motherboard itself. If you try to solve this problem by rewriting bootable media, but inserting it into a non-working port in the BIOS or in principle, there will be little sense from your efforts, to put it mildly. If the port is working, go to the following way solutions.
Most often, bootable USB drives are not displayed in the BIOS or Boot Menu due to the fact that the image recorded on it does not support booting in the mode installed on the motherboard (by the user or by the manufacturer). For example, an image for UEFI is written to a USB flash drive, and the motherboard operates in Legacy mode or vice versa. Many motherboards support hybrid mode, which allows booting from both UEFI and Legacy drives. You need to go to BIOS (UEFI) and find the desired item.
For example, on my motherboard from Gigabyte it is called BootModeSelection and allows you to select two modes at once. It is because of the hybrid mode, when entering the Boot Menu, one drive is displayed twice - one Legacy and one UEFI (if an image is recorded for both systems at once), which allows you to select your preferred boot mode without overwriting the image or changing BIOS settings. On other motherboards, the choice of the boot mode may be called differently. For example, Legacy Support or Compatibility Support Mode(it can be signed with the abbreviation CSM). V individual cases it is also called by the name operating system like Windows 10/8 for UEFI, and Legacy Windows 7 or Other OS.
If your motherboard supports only one of the boot types, you will need to either switch the BIOS to Legacy / UEFI, or again. An error with the image most often occurs among users who have not figured out how to correctly write Windows to a USB flash drive. Many people simply copy the contents of the image to a removable drive, and then try to boot from it. This method will work on a UEFI system, but will not work on a Legacy. And yes, you need to copy content image, not the image itself a separate file... Copying the image itself will not work even on UEFI. In the case when the BIOS does not see the USB flash drive, we recommend overwriting the drive, because when you try to install Windows from a Legacy drive to a UEFI system, you may also need to disable Secure Boot.

It is also worth considering that on some motherboards, the USB flash drive must be inserted into the USB port before the computer starts booting. In other words, it will not appear in the boot menu list if you insert the USB flash drive into the port after entering that Boot Menu. Insert the drive into the port, restart your computer, go to the Boot Menu and boot from the USB flash drive.
If nothing helps at all, try to write Windows to another USB flash drive and boot from it. Alternatively, plug the drive into a USB 2.0 port rather than USB 3.0.
On older BIOSes, USB sticks are not displayed as a separate boot menu item at all (USB-HDD does not work). In this case, you need to go into the BIOS and find the priority settings hard drives... Your USB flash drive with the recorded system should be displayed in the list of connected drives. Set it to the first place, save, reboot, and then from the boot menu select start from HDD. The BIOS will select the USB flash drive first and start booting from it, which in turn will allow you to install the system.
If all attempts are in vain, you will have to burn Windows to a different type of media. If the computer you are trying to install Windows on has a DVD drive, try burning the system to a DVD and booting from it. Many will scoff at this advice, but if nothing helps at all (this primarily concerns old computers), booting from a DVD should help solve the situation. You can burn the image to disc in the same Media Creation Tool, only select the DVD instead of USB as the target drive.
For the computer to start not from a hard drive, but from a USB drive, it is necessary. This flash drive is used for system recovery, password reset and other "rescue" missions. But how to choose a carrier if it is not displayed in the BIOS settings? You can solve the problem yourself. Provided that the drive is in good working order and data is read from it.
How to fix the problem: BIOS does not "see" the USB stick?
Check if USB device support is enabled. How to do this depends on your motherboard model. After turning on the computer, the message “Press [key] to enter Setup” appears at the bottom of the screen. Click it to enter BIOS. And look for a menu that has "USB" in its name.
New versions of BIOS
You can work with new versions of BIOS using the keyboard and mouse. Also "comes across" support for the Russian language. You will quickly figure out the parameters. But even if it is not there, you will be able to customize the boot order and run through a USB flash drive.

Award-BIOS
After starting BIOS, do you see two lists on a blue background? Then you have the Award version. You won't be able to navigate the menu by clicking the mouse. It can only be configured using the keyboard. At the bottom or on the side there will be instructions on which buttons to press for this.


Now let's get down to load priority.

When you are finished using the drive, return to the previous BIOS settings.
AMI-BIOS
The BIOS AMI has a gray screen, a blue font and a row of tabs at the top. The information block is on the right. Mouse control is also not available.

Now you can change the bootloader parameters:

Phoenix-Award BIOS
The Phoenix-Award BIOS also has a gray screen. Information about which keys should be pressed is located below and highlighted in green. If the computer does not boot through the drive:

UEFI
Have you turned on USB support, but for some reason there is no flash drive in the BIOS? The problem could appear due to UEFI - a mode that "protects" the bootloader from malware and extraneous code. This module will start the operating system even if you have configured the BIOS correctly. What to do? Disable UEFI.
The settings depend on the motherboard manufacturer. First way:

Second way:

After working with the media, re-enable Boot Protection.
Need a "correct" flash drive
Perhaps it's the flash drive itself. More precisely, in the way it is written. If you copy the information to it directly, nothing will work. But why is it necessary to create a "bootable" drive? To run it, you need a "program script". Without it, the system will not understand what, in general, to do with the carrier.
To create a bootable USB flash drive from the LiveUSB utility:
- Insert the drive into the slot.
- Run the installer.
- Select your Flash media from the list.
- Confirm the installation.
- Now, through this drive, you can "reanimate" the system.
To install a third-party OS, you need a ready-made ISO image and a burning program. For example, UltraISO or Rufus. Consider the second one:
- Insert the drive into a USB port.
- Run the program.
- Check the "Create bootable disk" checkbox.
- Click on the button in the form of a disk.
- Specify the path to the image.
- Click on "Start".

A bootable USB drive can be created using Windows.

If the BIOS does not "see" the bootable USB flash drive, perhaps the problem is not in it, but in the settings. Don't throw it away ahead of time. Try changing the BIOS configuration first.
It happens that the BIOS does not see the bootable USB flash drive. This can happen on any personal computer with absolutely any operating system, be it Windows XP, "seven" or "eight". What to do if BIOS This is a very popular question among all users. In addition, any owner has encountered such a problem at least once in his life. personal computer or laptop. Some in a similar situation immediately contact service centers. And some even go to the store where they bought the flash drive, with indignation and complaints that it does not work.
Of course, it may be that it really is all about a faulty device. But sometimes BOIS does not see the USB flash drive for a number of other reasons. And even if everything was normal before, the problems that have arisen now can be caused by various malfunctions that simply "accumulated" in the system. Or the flash drive may lack the power of your system unit. Or ... Below will be given the most popular reasons due to which there are problems with the identification of flash drives and other USB-devices, as well as ways to eliminate these problems.
Why doesn't BIOS recognize removable media?
When you connect or a device via the USB port, it is automatically detected, and the "Device Manager" reports that a new media is connected. In some cases, he asks to install drivers or updates as well. But sometimes the BIOS does not see the bootable USB flash drive or cannot synchronize its work. What to do in this case? There are several most likely reasons for the occurrence and solutions to this trouble.

USB controller: setup
The BIOS is the part of the operating system that is responsible for the problems with the flash drive in most cases. Where exactly is the problem? The most obvious reason why the BIOS is the USB controller is not working correctly or is simply disabled. How to deal with the problem? Turn it on! To do this, in the Award BIOS section, find the Integrated Peripherals subsection, and then go to the second menu item - Advinced (where the advanced BIOS settings will be). Then we find the USB Configuration category, go into it, press Enter and pay attention to the inscription that appears opposite the USB parameters. Disabled and Enabled may light up there. If the controller is in the off state, then you need to turn it on using the arrow buttons. To save the changed parameters, be sure to press F10.

If the controller is connected, but the BIOS does not see the USB flash drive, you can try it on a different port of the system unit. Perhaps this one is faulty or incorrectly configured, which interferes with its functioning.
Sometimes none of the ports can identify the USB stick. In this case, the USB controller itself makes sense. Especially often, such a problem occurs after reinstalling or rolling back the operating system, when some of the necessary data may be lost or the parameters are reset to "default". So reloading all latest versions drivers can solve the problem with the USB flash drive.
Compatibility issues
The vast majority of modern peripheral devices only supports USB version 2.0., which, of course, will not be recognized on computers whose interface is configured for 1.1. V this case to solve the problem, you just need to install the auxiliary software, which, as a rule, always comes with the device - on the same disk with the drivers or separately. Sometimes required applications can be downloaded from the official websites of USB drive manufacturers.

The INFCACHE.1 system file is the root of all evil
If you have tried all of the above methods, but the problem has not disappeared anywhere, then you can try another, but already cardinal method. Just remove from your computer system file INFCACHE.1. You can find it in the WINDOWS root directory, on hard drive C, or on the location where your operating system is installed. The full path to this file looks like this: WINDOWS: system32DriveStore. You can also find it by searching or using. If, after deleting this file, the problem disappeared, then all the problems were related to cache corruption. The next time you turn on the computer, the INFCACHE.1 file will recover by itself.
Still, it's the BIOS?
Instructions for configuring this part of the system software will help to cope with problems with a flash drive in some cases. For example, if, as mentioned above, the problem is in a disconnected USB controller. Correct setting BIOS is simple, but important. Almost any user can cope with this, even with little experience of working at a personal computer.

So, in order to get into the parameters, you need to press the F2 key (in some cases DELETE) at the moment when it loads BIOS system... Next, you need to go to the Advanced tab, where you can manage advanced features, select the Integrated Peripherals section and press Enter. After completing these simple manipulations, you can see if the controller is working, as well as other tools that affect the functioning of the ports and the automatic detection of connected USB devices.
BIOS does not see other devices connected via the port
If the computer fails to detect not only the USB flash drive, but also other external media and devices connected via USB (for example, a printer, speakers, camera or phone), then this case requires special and radical measures.

Remove the cover (protective side plates) from the computer. As a rule, they are either bolted to the case, or fastened to the "latches", then we connect the USB flash drive or other device directly to the USB port on the motherboard. In most cases, this may be enough for the BIOS to see the device. But if this did not happen, then you can try to install the appropriate driver package for correct operation and to eliminate incompatibility problems. If this does not help, there is still a way out!
Other reasons why the BIOS does not see a flash drive and other USB devices
It often happens that many different devices are connected to a computer that require a large number energy. For example, a scanner or a powerful sound system... And already these two connected devices may be enough to cause a power shortage when connecting even such an economical medium as a USB flash drive. What can we say about trying to connect a camera to the computer in order to reset or view photos on big screen... In this case, the BIOS does not see the USB flash drive (or other device) due to too much low level electricity that can be spent on this port. In other words, the device may need more energy than the USB connector can provide. As a result, it simply lacks the power to turn on and function.
In order to eliminate such a problem, you need to find out the USB controller of your personal computer. You can clarify this in the "Device Manager" on the "Properties" tab in the "Power" column. USB 2.0 devices typically require 500 mA, while newer 3.0 devices already consume 900 mA. Based on this, it can be assumed that sometimes to connect a device, you first need to disconnect one or even several previously connected, but unused in this moment devices. If you are charging your phone or player from a computer, and the flash drive is not detected in parallel with this, then you should try to disconnect the charging cord for a while. In 90% of cases, this will be enough for the BIOS to see the connected device.
Or maybe the flash drive is to blame?
Have you tried everything but nothing helps? Then there is a chance that the matter is in the device itself. You can read reviews about your flash drive. The BIOS may not be the reason that it is not detected if you come across a device with a factory defect, for example. It is also possible that this model requires some special manipulation or the presence of a USB-HUB for correct operation. There can be many options, so you should explore all existing ways definition of the problem.

Conclusion
If the definition of the problem due to which the BIOS does not see the USB flash drive, and its solution was not crowned with success, then, of course, it is worth contacting service center... But before that, just turn off the power management function of the USB controller from the operating system side. To do this, go to the "Device Manager", find the tab "Controllers of the universal serial bus", Select the subsection" Root USB hub "and double click we call the window "Power management", uncheck the corresponding checkbox and click "OK" to save the changes. And we repeat this procedure for each USB hub. Perhaps this is what will save you from going to the service center.
Why can't the computer see the USB flash drive? Friends ask me at the end of the working day and put the system unit in front of me, to my remark that the computer is not new, I hear the answer: I recently bought it, everything worked for the previous owner, but for some reason they do not have it and put a camera in front of me that needs to be connected , a USB flash drive, and in addition they point to a printer in the corner, I'm very tired, but I need to solve the issue, the USB specifications, compatibility, the USB controller in the BIOS, with which I decided to start, were spinning in my head.
Why can't the computer see the USB flash drive?
If you connect a device to the USB connector of the system unit, it should be automatically detected to be available in the My Computer window, but this does not happen and the device is not detected.

Let's start with the BIOS, and how to get into it? In most cases, you need to often press the F2 or Delete keys at the very initial phase of the computer boot, or read the instructions for your motherboard, or you can use our article
We went into the BIOS, we have it from Award, then go to the tab Advanced and move to the point Integrated peripherals, press Enter

and we see that our USB Controller switched on

but he specifications USB 1.1, so what, our devices should work with it.
Here I had the idea to reinstall the operating system, but first I decided to look inside the system unit and saw a USB 1.1 hub connected to a 9-pin connector on the motherboard, this hub was outputting to back panel the system unit has four USB connectors, on the motherboard itself there are only two USB port 1.1 and you might not even notice them.
- Note: The point is that hubs USB 1.1 cannot be used to connect devices USB 2.0... Of course, the old owner knew about this and tried to connect all the devices directly to the USB ports on the motherboard, but my friends did not.
Let's connect our devices directly to the USB ports on the motherboard.
After turning on the computer, we saw a message from the operating system that a faster device of the USB 2.0 specification is connected to the port.
Flash drive I saw each other quickly, but for a Hewlett-Packard camera I had to download a package of drivers on the official website and only after installing them did it start working. By the way, I tried to connect the camera to system unit with motherboard supporting the USB 2.0 interface, also to no avail. The hardware wizard did not resolve the issue either.
As for the Samsung printer, all the labels with numbers and names were erased, the drivers had to be searched for by the device code, we have a good article about this. When the drivers were found, our printer worked fine.
I will give another example why a computer maybe do not see the flash drive may be useful to you.
I have a laptop at work, a Canon CanoScan LiDE scanner is connected to it, which is powered directly from the USB port. The manufacturer claims to be economical in terms of electricity, which is good, but it is only necessary to connect two more devices to my laptop, for example, a USB interface keyboard, and then a USB flash drive, the laptop stops seeing the scanner or does not see the USB flash drive point-blank, why?
This means that there is a shortage of power for these devices, sometimes the overall level of energy consumption connected to the USB connectors is approaching the limit of its capabilities.
The power of the USB controller on your computer can be found in the device manager Properties- tab Nutrition, it is equal 500 mA for USB 2.0 and 900 mA for version 3.0, and printers and scanners require a lot more power to power.


 Pc radio does not display channel list")
