You can add files to the document library in SharePoint, dragging them from the computer and dragging into the document library.
Dragging to the library of documents
Open the document library to which you want to send a folder or files.
Select files or folders on your computer and drag them to the Document Library page.
Important: Internet Explorer. 11 does not support sending folders.
Adding big files or large number Files to the document library
If you send large files (or many files), which are added to the document library a large volume, you may encounter errors due to limiting file size in SharePoint Online or waiting time errors in internet version Explorer. To avoid these errors, you can use the following solutions:
Tips and notes about adding a folder or files to the document library
Tracking file versions. An existing file can be replaced with a fixed version. If a version tracking is configured in the document library, a fixed file can be added as a new version that becomes part of the file versions log. When sending a new version of the file, you can add changes to changes in current versionSo that it was later easier to track changes through the file version log. For more information about tracking versions, see the article Working with Versions in the List or Library.
Filling out the properties of the file. When adding a file, folder or links to the document library, you may also need to add information about the object added to the form (in the information), such as the description, the name or project number. For details on changing information about the file, folder or link, see View and change the information about the file, folder or link in the document library.
Approval of the sent content. Site owners can customize libraries in such a way that the contents become available to the rest of the library users only after approval. In this case, you view the files in the list and work with them only by their author. For example, the Legal Department may require approval before the documents become publicly available. For more information, see the article requirement of the approval of items in the list or library.
Word about the transfer of folders and versions of browsers
SharePoint uses the ability to send a folder built into Microsoft Edge., Google Chrome. and Mozilla Firefox.. Internet Explorer does not support sending a folder.
The ArchiCAD program is one of the most sought-after tools in architectural activities. To simplify work in this program, special libraries are used. They can be created both in the program itself and in third-party software software. When you first start the ArchiCAD program, the standard Library library is used. To add additional libraries, you will need:
- Files of the required libraries;
Instruction
- Any library must be represented as a folder containing a set of necessary files, such as texture files, specification and other library components. Download libraries allowed from local or network Disc, web resource and ftp server.
- You can also apply as libraries standard projects of the ArchiCAD application, the application independently read the necessary library components. During operation, only those components that were initially installed with this library will be available or fit individually.
- To set libraries, run the ArchiCAD program. Click on the file "File" and specify the "Library Manager" command. After these steps, an additional dialog box contains several pages:
- History;
- Web resources;
- FTP servers;
- The local network.
Open the Local Network page to download components from a local or network disk. In an additional program window, a list of available libraries will be displayed. To add a new library, you need to highlight it and execute the Add command.
- If you need to add a library from the FTP server, then in the downloaded dialog box, go to the appropriate settings page. On this page of the settings there are additional fields in which you want to independently enter the parameters for connecting to the appropriate remote server. Next, the process of adding libraries is identical to the previous step. To add libraries from a specific web resource, go to the appropriate page and enter its data. The process of adding libraries itself is identical everywhere.
- To view the library components, double-click on the Objects option. The "Settings" window will be downloaded, in which you can view the contents of the selected library.
Video: ArchOV. How to download new libraries and 3d items
Installing and connecting the library to Arduino is a fairly common operation, any developer sooner or later necessarily faces it. External plug-in code in all programming languages \u200b\u200bis used to save time. Arduino is no exception: many sensors, modules, screens and engines require sufficiently complex interaction schemes that are difficult to implement in their code. It is much easier and faster to download the desired library, quickly connect it manually or using Arduino IDE, and then use in all your sketches. In this article you will find short instructions for connecting and using libraries.
The library in Arduino is a program code in external filesthat can be installed and connect to your sketch. The library stores various methods and data structures that are needed to simplify operation with sensors, indicators, modules and other components. The use of libraries significantly simplifies work on projects, because it is possible to focus on the basic logic of the program, without spending time to a lot of trifles. Today, a huge number of libraries laid out on the Internet, where they can be easily downloaded, and completely free. Can be found on our website.
From point of view file System The library is a directory containing certain folders. During the compilation and assembly of the Arduino IDE project, it automatically includes those classes, data structures and methods from libraries that are included and used in the Sketch. Thus, the only thing we need to do is set the appropriate instructions to your code, after preparing that the desired library is installed.
How to find out the list of connected libraries to Arduino IDE
Each installed library contains one or more examples to work. They are used to display the capabilities of the device connected to Arduino. Therefore, the fastest way to get a list of all the Arduino libraries set by the list of examples in Arduino IDE. To do this, select a file in the main menu, and then open the submenu examples.
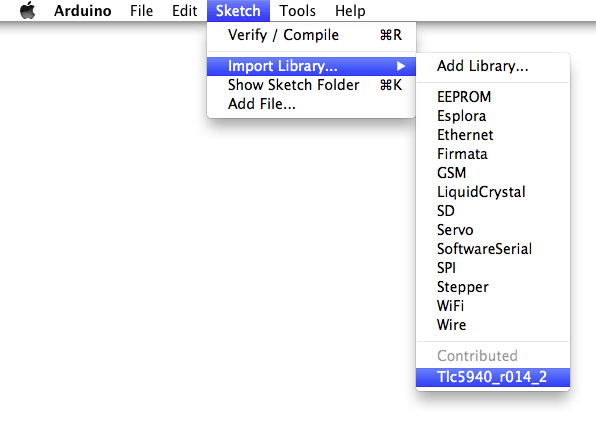
Another way is to use the Skatch menu and submenu - connect the library. There you can also see the list of libraries:

Connection Operator #include header H file
To start using the library, you need to enable the header H file to the Include directive. For example, connecting library LiquidCrystal.h will look like this: #include
You can see a complete example using the library itself.

Required files in the library
Each library must contain at least 2 files - this is a header file with an extension. H and source file with an extension. CPP. The header file contains a description of the class, constants and variables. The second file contains method codes. In addition to two keywords, keywords.txt text documents and the Examples folder with the code of use of the library can be kept. H and CPP files do not necessarily lie in the root
Editing files is not possible in Arduino IDE, all changes can be carried out in any text editoror C ++ development environment. This is due to the fact that in Arduino IDE we do not work with CPP files, the code editor is not intended for "pure" C, it works only with Arduino language.
Where to find the desired library
The required library can be downloaded via the Internet. Most libraries are available on the GitHub website. After downloading the library, it is important to add it to the correct folder so that the compiler can find it and download the sketch. The folder in which all codes are saved is created on the computer after installing Arduino IDE. For the Linux operating system, the folder has the name "SCETCHBOOK" and is located in / home /, on Windows the Arduino folder can be found in the "My Documents" section.
All libraries that are installed additionally are located in the "Libraries" folder. For early versions Arduino folder needs to be created independently, and starting with version 1.0.2, it is added when ARDUINO IDE is installed automatically.
How to install a library. Step-by-step instruction
Once the library is loaded onto a PC, you need to start it. You can install the library in two ways - using the ARDUINO IDE and manually.
Connection using Arduino IDE
The library is downloaded in the form of a zip archive. To enable it in this way, the archive does not need to unpack. To install it, you need to go to the Skatch menu - connect the library - Add.Zip Library.
When the window opens, you need to select the "Download" folder in the "Computer" section. If after loading the library it was saved to another place, you need to specify it.
Then you need to select the downloaded file and click "Open".
The library will be installed, and it can be used. In order to start using examples of the file - examples, you need to reboot the Arduino development environment.
Installing the library manually from the zip file
Before starting the installation, you need to get out of Arduino IDE. The downloaded zip file with the library must be unpaved. As a result, we will receive a folder in which the library files will be located with an extension. CPP I.H and catalogs. The resulting folder will need to be placed in Libraries.

In Windows, the Libraries folder can be found on the route My Documents - Arduino - Libraries. In Linux it will be a Libraries folder with sketches.
In the end, you need to restart Arduino IDE, the downloaded library will be available to enable through the Skatch - connect the library.
Errors when connecting the Arduino library
The list of possible errors is listed below when installing the library and ways to combat them:
- 'XXXX' Does Not Name A Type - Similar error appears if the library has not yet been installed, the folder or library is called incorrectly, the wrong address of the folder is not restored or not restarted aRDUINO development IDE.
- Incorrect folder location - If this error has highlighted, you need to check whether the library is in a folder available for searching the medium.
- Incorrect Library Name - Error appears if the name after #include does not match the library name.
- Incomplete library - may appear if not all the necessary files and folders have been downloaded.
- The dependences of the library - as this type of library works only with additional, you must initially connect them.
The library already has a majority of the code that you will not need to write, the library makes it easier to work with a defined module or one of their types and it only needs to be connected in your Sketch.
For example, if you want to display text on the LCD display without connecting the library, then you need to send it several bytes of commands and data, which will take several lines of code, and most importantly, you need to know the type of microcontroller running the LCD display, the assignment of commands that It is managed to know the architecture of its memory, addresses and purpose of registers, for which it will be necessary to find and re-read its Datasheet.
While writing a code using the library (for example, LiquidCrystal_i2C.h), you can display text on the display by causing only one function of the library:
lcd.print ("MY TEXT");You can connect any library with such a command:
"#Include.<файл.h>"
<файл.h> - This is the same library that we connect.
You can also see an example of connecting the library.
Before starting to use the methods and functions of the library, it is necessary:
- download (Download to your computer),
- set (Place in the desired folder),
- to plug (insert text "#include<файл.h>"In Skatch).
Each library must contain 2 files with extensions. .h. and .cpp.
Files of the first type contain:
- class description
- constants
- variables.
The second type contains method codes.
Additionally, you need to understand that files .h. and .cpp may not lie in the root of the downloaded archive. Also can with basic files go "keywords.txt" and a folder with examples (examples).
How to install the library?
After you downloaded (downloaded) the library to your computer, you need to install it. You can manually install the library or make it by ARDUINO IDE:
Installing the library using Arduino IDE
This we will do through the menu. Go to the menu:
Sketch - Connect the library - Add.Zip library
In the window that appears, click on the "Computer" icon and select the "Download" folder. If when downloading a zip archive from the site, you specified the path to save the file, then instead of the "Downloads" folder, specify the path to the file.

Choose Zip file. The library you downloaded. The file name may not match the name of the library. Then click on the button " Open » ( Open. ).

On this, the installation of the library is complete, you can proceed to connect it to the sketch.
Important! After installing ARDUINO IDE, a separate folder for storing all libraries is created on the computer. For Linux "SCETCHBOOK", it is located in / home. For OS Windows Folder "Arduino" is located in the / My Documents.
Installing a manual library
Unpack the Zip archive downloaded and place the folder (the folder name usually matches the library name) from this archive to the folder:
This computer → Documentation → Arduino. → libraries.

If Arduino IDE has been started during copying, it is necessary to close all the windows of this program, then run (open) Arduino IDE and you can start connecting the library into the sketch.
The fact is that the program is constantly developing and the number of its versions is constantly growing. If you want to install new version Arduino IDE, the libraries are in the folder ( This computer → Documents → Arduino → Libraries) will be available in old, and in the new (installed) version of Arduino IDE, and the libraries are in the folder libraries. Arduino IDE programs old version (which was installed earlier) will be available only in it (until you copy them to a new one).
Where to find the desired library?
For convenience, on our site there is a whole section that is called -. Most libraries can be found online in open access.
Also rows standard sets Can be found on the official site Arduino: arduino.cc.
What libraries already installed?
As we have already discussed - the integrated development environment itself is already with some.
There are two ways to watch installed libraries.
Method 1
To see which set already installed you need to go to the tab:

Method 2
The second way is to use the "Skysch" menu and the "Connect Library" submenu. Thus, you can also see the list of libraries.
We go into the sketch and choose to connect the library:
Skatch → Connect the library

Possible mistakes
Sometimes during the installation of libraries or during their use, some errors may occur. Below we will analyze the main.
'XXXX' Does Not Name A Type
The error appears when the library has not yet been installed.
Also an error occurs if the folder or library has the wrong name.
The wrong address of the folder location or is not restarted by the Arduino IDE development environment.
Incorrect location of the folder
Check if all libraries are located the desired address. Addresses of folders for different operating systems We led above.
Incorrect Library Name
The error appears when the name after the #include tag does not correspond to the name of the library.
Incomplete library
Lack of all the necessary files and folders.
Library dependencies
It is necessary to connect additional dependent libraries without which the correct / correct operation is impossible.
As soon as you get comfortable with software Arduino and perfectly master the standard functions, you will probably want to expand the possibilities of your Arduino with the help of additional libraries.
What is a library?
The library is a set of functions intended to simplify work as much as possible. various sensors, LCD screens, modules, etc. For example, the built-in library LiquidCrystal makes it easy to interact with symbol LCD screens. There are hundreds of additional libraries that can be downloaded on the Internet. Standard Arduino Libraries and a number of the most frequently used additional libraries are listed in the help. But before using additional libraries, you must first install them.
How to install a library
Most often, the library is laid out in the form of a zip archive or simply folders. The name of this folder is the name of the library. Inside the folder there will be a file with extension .cpp, file with extension .h., as well as text file keywords.txt, folder with examples examples.and other files required by the library.
Automatic installation
Starting from version 1.0.5, it is possible to set third-party libraries directly in the development environment.
Do not unpack the downloaded archive with the library - leave it as it is.
In the Arduino development environment, select Menu Sketch\u003e Import Library. At the very top of the drop-down list, select item Add Library. (Add library).
A dialog box will appear offering you to choose the library you would like to add. Go to the downloaded zip file and open it.

Open the menu again Sketch\u003e Import Library. You must see the new library at the bottom of the drop-down list. Now the library can be used in programs.
zip file will be already unpacked in the directory libraries. Inside you working folder Arduino.
Note: After executing the specified actions, the library can be fully used in their programs, however, examples from the installed library will appear in the menu File\u003e Examples. Only after restarting the Arduino environment.
Manual installation
Before installing the library, close Arduino Development Wednesday.
Then unpack the zip archive with the library. Suppose you install the "Arduinoparty" library - unpack the file Arduinoparty.zip.. It should have a folder Arduinoparty.with files Arduinoparty.cpp. and Arduinoparty.h.. (If files with extension .cpp and .h. Lyate not in the folder, then you need to create it. IN this case You need to create a folder named Arduinoparty. and transfer all files from the ZIP archive to it, for example - Arduinoparty.cpp. and Arduinoparty.h.).
Drag folder Arduinoparty.in the directory with Arduino libraries. In Windows, it will lie around here: "My Documents \\ Arduino \\ Libraries", from Mac users - here: "Documents / Arduino / Libraries", and in Linux systems directories " libraries."It will be inside the working folder with sketches.
After moving, your directory with libraries should look something like this (under Windows):
My Documents \\ Arduino \\ Libraries \\ Arduinoparty \\ Arduinoparty.cpp My Documents \\ Arduino \\ Libraries \\ Arduinoparty \\ Arduinoparty.h My Documents \\ Arduino \\ Libraries \\ Arduinoparty \\ Examples ....
or so (on Mac):
Documents / Arduino / Libraries / Arduinoparty / Arduinoparty.cpp Documents / Arduino / Libraries / Arduinoparty / Arduinoparty.h Documents / Arduino / Libraries / Arduinoparty / Examples ...
and similarly on Linux.
In addition to files .cpp and .h. There may be other files here - just make sure that they are now lying here.
(If files .cpp and .h. Located in the root of the "Libraries" folder or invested inside another folder, then the downloaded library will not work. For example:
Documents \\ Arduino \\ Libraries \\ Arduinoparty.cpp and Documents \\ Arduino \\ Libraries \\ Arduinoparty \\ Arduinoparty \\ Arduinoparty.cpp
Do not work example.)
Restart the Arduino Wednesday. Make sure the new library appeared in the menu Sketch-\u003e Import Library.
That's all! You installed the library!
Text this manual Published under the Creative Commons Attribution-Sharealike 3.0 license. Examples of code encountered in the manual are free content.


