Today, in continuation of the topic, we will consider the opposite situation - how to transfer contacts from Android to iPhone, as well as with the help of which applications and Appe services it is most convenient to do this.
Move to iOS application is the simplest and most versatile way
As you already know, many methods and tricks are used to transfer contacts and other information from an iPhone to a smartphone or tablet for Android: some for contacts, others for files, etc. In the opposite situation, everything is much simpler: most users prefer to get by one single application that makes it possible to transfer everything at once. Well, or almost everything, namely:
- telephone and address book;
- message history;
- Chrome web browser bookmarks;
- photographs and videos from the camera;
- accounts on postal services;
- notes and calendar.
The app is called "Move to iOS". Download it from Google play and install on an Android gadget that stores information intended to be transferred to iOS. But before that, make sure that both devices support it.
So, for Move to iOS to work correctly, the following conditions must be met:
- Data carrier - smartphone or tablet, must have Android version not older than 4.0.
- Receiver - iPhone or iPad, must belong to the new generation. Supported iPhone models: 5, 5s, 6, 6s and 7. Supported iPad models: 4, iPad Air, iPad Air 2. Supported Models iPad mini: 2, 3 and 4.
- The Apple device must be running iOS 9 or 10.
- If you are going to transfer bookmarks from Google browser Chrome, it also needs to be updated to the latest version.
During the transfer, both devices (sending and receiving) must be connected to a power source (to avoid damage to content due to unexpectedly dead batteries) and to a private Wi-Fi networks... In addition, there must be sufficient free space on the receiving gadget.
Transfer order:
- On Apple device: go to the "Programs and data" section and select "Transfer data from Android".

- On Android device: Launch Move to iOS, tap the Continue button and accept the license agreement.

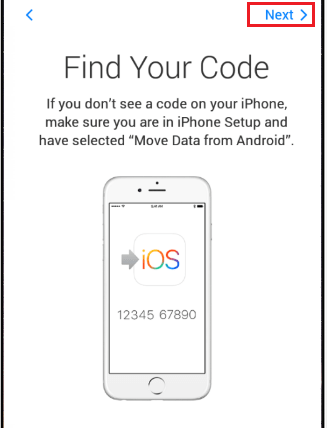
- When the “Find your code” message appears on the screen, click “Next” and pick up your iPhone.
- While in the "Transferring Data from Android" section, tap the "Continue" button. After that, a code will be generated on the device, which you must enter into the Android application.

- After checking the correctness of the code and synchronizing the devices, you will see the message “Transfer Data” on the screen of the Android gadget. Mark in the list what you are going to transfer to iPhone: camera roll (photo and video recordings), messages - messages, Google Account - Gmail account data (calendar and notes), Google contacts - phone and mail contacts and bookmarks - browser bookmarks Google chrome.

- When all data has been successfully transferred, the message "Transfer Complete" will appear on the Android display. To exit the program, click "Done".

- Then pick up your iPhone or iPad again and complete the setup by following the instructions on the screen. This is where it all ends.
Transferring data from Android to iPhone manually
Move to iOS helps you transfer the bulk of what you need from Android to iOS, but, unfortunately, not everything. So, with its help it is impossible to transfer music records, custom files, e-books, documents, contacts of other accounts (for example, Yandex) and applications. All this, with the exception of the last one, can be thrown manually using the capabilities of iTunes and the iCloud service.
Multimedia data
To transfer multimedia files (music, video and photos) with any in an accessible way connect your Android gadget to your PC and copy necessary information on HDD computer. Next, connect the iPhone to the same computer and authorize it in iTunes.
After connecting, synchronize graphic content and music in iTunes:
- Open the "Photos" section. At the top right of the window, check the Synk Photos checkbox. From the "Copy photos from" list, select the folder where the photos transferred from Android are saved. Below, specify the content you want to sync: all pictures and albums, or just selected ones. Of these - only favorites, only containing videos, etc. When you have finished making your selections, click the “Synk” button at the bottom of the window.

- While in iTunes, go to the "Music" section of your library. Open the folder where you saved your Android music, select the desired audio tracks and drag them into the program window. Then open the "Music" section of your device and repeat the above sync operation.
E-books in PDF and ePub formats
Reconnect the Android device to the PC and copy the e-books to the hard drive. We perform further actions in iTunes.
- Authorize the iPhone in the application.
- Open the "iBooks" - "List" tab in iTunes (in the Windows version - the "Books" section) and use the mouse to drag the selected books onto it.
- Go to the settings section of the connected iOS device and expand the "iBooks" section. Synchronize books using the instructions above.
The documents
Another Apple service is used to sync documents - the iCloud Drive cloud. To sync files with your device, open the last iCloud settings and in the "iCloud Drive" section, move the activation slider to the "On" position.


Transfer to iCloud storage Drive required files and folders with documents. Then you can view them on iPhone and iPad.

The availability of documents does not yet guarantee that they will open on your Apple device, because many of them are necessary for this special programs... It makes no sense to transfer applications from Android, since iOS does not support them, but, fortunately, in the vast majority of cases, you will find an analogue of such programs on App Store.
Contacts from other email accounts
In the article about transferring information from iPhone to Android, we talked about how to export phone and address books from iCloud in vCard format. However, vCard files can not only be exported, but also imported into iCloud from any mail account, for example, Yandex, Mail or Gmail.
To do this, log in to the source service, go to the section for storing contacts and save them as a vCard file. Next, open a similar section in iCloud, go to "Options" (they are hidden behind a gear icon) and select "Import vCard".

It remains to specify the path to the file that you just saved. After that, the address book from another device will open on the iPhone.
So, you are finally convinced of the need to "switch to iOS". But all of your photos, videos and messages are still on your old Android phone. Let's try to figure out how to transfer contacts, photos, messages from Android to iPhone.
You bought yourself a new artsy iPhone (for $ 699 on Amazon), or maybe you went broke and got your hands on the iPhone 11 Pro with its amazing three cameras on back cover... The only problem is that all of your data is still on your old Android phone. But just like how Samsung and Google made it easier to switch from iPhone to Pixel 3 ($ 625 at Walmart) or Galaxy Note 10 ($ 950 at Best Buy), Apple has an easy way to transfer all of your data to a new iPhone. It's an Android app called Move To iOS.
This program launches the process of transferring contacts, message history, website bookmarks, mail accounts, calendars, photos and videos, and also allows you to download any Android applications that can be downloaded for free in the store iOS applications... We tested this app and it worked with smartphones running Android 8.1 and earlier. We tried to transfer data from devices on the Android 9 Pie platform, but nothing worked with these phones.
On the one hand, we assume that most users will be migrating data from older phones running on older versions of the Android platform. On the other hand, by the time you read this article, it is possible that Move To iOS will already work with Android 9 Pie. We contacted Apple to clarify the details, but so far we have not received a response.
Transfer data from Android 8.1 or earlier platform to iPhone

How to transfer data from Android 8.1 to iPhone? Since we will be transferring information, the first thing to do is charge both phones. After charging the batteries, connect your Android phone to a Wi-Fi network. If you are using Chrome on your phone and want to transfer bookmarks, before starting the process of transferring data from Android to iPhone, make sure that the application is active. Then turn on your new iPhone and follow the instructions until the Apps & Data screen appears. Select "Move Data From Android". On your Android phone, install the Move To iOS app from the Google Play Store and then open it. Go back to iPhone, click Continue on the Move from Android screen. A 6 or 10 digit code will appear.
Go back to your Android phone and click Continue on the Move to iOS screen, then read " General Provisions and conditions "and click" Agree. "The entry" Find your code "will appear on the screen, click" Next "in the right upper corner... Then enter the 6 or 10 digit code when prompted.
Now, on your Android device, you need to select the content that you want to move to your iPhone. An entry "Data transfer" will appear on the screen, you need to click "Next". The process of transferring data from Android to iPhone has started.
The procedure can take some time, so we recommend starting it before going to bed or at any other time when you are not planning to use your phone. And remember, even if your Android shows that the data transfer process is complete, leave both phones alone until the download bar on your iPhone screen disappears.
Next, follow the onscreen instructions to complete setting up your iPhone. After the data transfer is complete, download all free apps that were found in the App Store. Finally, make sure all your content is carried over: browse your photo gallery, bookmarks, or posts.
Any music, books or PDFs on your Android device will need to be transferred manually. But you are a PC. Then you can add them to iTunes and sync to your iPhone or upload to iCloud Drive.
Transferring data from Android 9 Pie or newer platform versions to iPhone

If you're using an Android 9 Pie phone and transferring it to an iPhone, we still recommend trying the Move To iOS app first. If it doesn't work, there is third party applications for Mac and PC that can start without problems. Many of these programs can be helpful because they can be used to transfer backup whatsapp, viber data and other information from android to iphone. One of the most popular is the application called AnyTrans. Finally, if you actively use Google products, there is no need to say goodbye to them after switching to iPhone. There are many Google applications for iOS, including: Google Chrome, Gmail, Google Drive, Google Calendar, Google Maps, Google Photos, YouTube, Google Play Music, Google Play books and Google Play movies.
We hope our article helped make the transition from Android to iPhone easier. If you have any advice or can you talk about software which was successfully used to transfer Android data on your new iPhone, tell us in the comments.
Purchased an Apple phone and want to transfer contacts from Android to iPhone? - it is simple to do this, and for this there are several ways, which I will describe in this manual. And by the way, you shouldn't use any third party programs(although there are enough of them), because you already have everything you may need. (If you need to transfer contacts to reverse direction: )
Transferring Android contacts to iPhone is possible both online, if the contacts are synchronized with Google, and without using the Internet, but almost directly: from the phone to the phone (almost - because in the interval we need to use the computer). Also you can import contacts from SIM card on an iPhone, I'll write about this too.
The first way is for those who have Android contacts synchronized with Google - in this case, all we need to transfer them is to remember the username and password for your account, which will need to be entered in the iPhone settings.
In order to transfer contacts, go to the iPhone settings, select "Mail, addresses, calendars", then - "Add account».

Further steps may differ (read the description and choose what suits you best):

Attention: if in Google account you have two-factor authentication enabled (an SMS comes when you log in from a new computer), then you need to create an application password before performing the indicated points (both in the first and second cases) and use this particular password when entering. (About what an app password is and how to create one: https://support.google.com/accounts/answer/185833?hl=en)
How to Copy Contacts from Android Phone to iPhone without Syncing
If you go to the "Contacts" application on android, press the menu button, select "Import / Export", and then - "Export to storage", then a vCard file with the extension .vcf will be saved on your phone, containing all your contacts Android and perfectly perceived iPhone and Apple programs.


I think that the listed methods are not all possible, since contacts in the .vcf format are quite universal and can be opened by almost any program for working with this type of data.
How to transfer SIM card contacts
I don't know if it's worth highlighting the transfer of contacts from a SIM card to a separate item, but questions about this often arise.

So, to transfer contacts from a SIM card to an iPhone, you just need to go to "Settings" - "Mail, addresses, calendars" and below the "Contacts" subsection, click the "Import SIM contacts" button. In a matter of seconds, the SIM card contacts will be saved on your phone.
Additional Information
There are also many programs for Windows and Mac that allow you to transfer contacts and other information between Android and iPhone, however, in my opinion, as I wrote in the beginning, they are not needed, because all the same can be easily done manually. Nevertheless, I will give a couple of such programs: suddenly, you have a different view on the appropriateness of their use:
- Wondershare Mobile Transfer
- CopyTrans
In fact, the specified software is intended not so much for copying contacts between phones on different platforms, but for synchronizing media files, photos and other data, but it is also quite suitable for contacts.
Here you will find some of the most convenient ways to transfer data from Android to iPhone.
Using the program "Move to iOS"
The program is purposefully developed by Apple specialists to accomplish this specific task. So that people can seamlessly switch from android mobile devices to using iphone... There is only one drawback of the application. It is intended to be transferred to a new one. activated iphone... In the case of a used device, a reset will have to be done, and this is not always convenient for the user.
The sequence of actions when transferring information by an apple application
- Enable wi-fi on android device.
- Put both gadgets on charging into the power supply network.
- Analyze the correspondence of the amount of memory on both devices (will all the information fit in the apple gadget?).
- If you want to transfer bookmarks of Internet pages from Chrome, you will need to update your browser.
- Open settings in iPhone and "Programs and Data". Here you have to touch "Transfer data from Android OS".
- Open “Move to iOS” application on android device. Then - "Continue" and "Agree". Click on "Next" in the "Code Search" section.
- In the window "Transfer from Android OS" iPhone, tap Continue. This will display the code.
- Dial the code in your android device. This will bring up a window "Data transfer"... Select the information to be thrown and click "Next".
- Wait until the end of the transfer: mail accounts, photos, videos, calendars, message history, directory, bookmarks on the Internet.
- Click on "Done" in the android gadget. Then tap "Continue" on the iphone.
- Required to follow step by step guide on the screen of an apple gadget.
SIM card application
A convenient way to throw a directory using SIM card. The following steps are required:

This method has the disadvantage that not all data is transferred, i.e. photo, full name, etc. will not spill over.
Throwing a directory using the exported file
Steps to be taken to create the exported file in android and transfer to iPhone:
- Open "Contacts" on the android device;
- Click in the export to "SD-card" window;
- Send "vcf" file to iPhone via e-mail;
- Open the file on the iPhone and export the data.
Using the cloud service Google Contacts
Stage 1. Transfer data from Android to Google Contacts:

Stage 2. Transfer data from Google Contacts to iphone:

With the help of "Yandex.Move"
You will need to do the following:

Using the Outlook Express app
To transfer data from an android to a computer, you need to perform the following steps.
Buying a phone has always entailed not the most pleasant procedure of “moving” from an old device to a new one, but recently the need for synchronization and other personal information has been added to the traditional transfer of contacts. It is good if your next smartphone will be on the same platform as the previous one, but if you decide to “go over to the enemy camp”, then the task becomes much more difficult. In this article, we will look at two options for transferring data - from iOS to Android and vice versa.
iOS is able to synchronize contacts, calendar and mail with a Google account, and if you once chose Gmail as your mailbox, there is nothing to worry about - just log into your account on your Android smartphone, and all your information will immediately become available on a new phone.
If you did not expect to “move” from iOS in the future, then most likely this data is tied to iCloud, in which case the procedure will be somewhat more complicated.
Contacts
To transfer contacts to your phone, you need to connect your iCloud account and enable their synchronization (settings - iCloud - (sign in to your account) - enable Contacts). Now they need to be "pulled" out of the cloud - to do this, open the www.icloud.com page on your computer, enter your account, then go to the Contacts item and select the necessary contacts.

After that, in the menu called by pressing the gear button, select the Export vCard item, and a VCF file with a list of contacts will be downloaded to your computer. Now we open the page www.google.com/contacts, in the left menu, select the "Import contacts" item and open the downloaded VCF file (if you already have a preliminary version of the updated "Contacts" in which the import does not work yet, you need to open the "More" list in the similar menu on the left, select import, after which you will be prompted to go to old version of this service). After that, all that remains is to enable contact synchronization in the settings of the new Android smartphone.
Calendar
Moving events in a custom calendar looks very similar - in the iCloud settings we enable calendar synchronization, on the www.icloud.com website, go to the appropriate section and in the list of available calendars, click on the Share icon to the right of its name. In the menu that appears, enable the Public Calendar option and copy the link that appears (webcal: //….). We insert it into the address bar new page, replace webcal with http, then press Enter - as a result, a file with a name of hundreds of characters and without an extension is downloaded to the computer. This is normal text file, which you can easily assign a more decent name. To connect it to Google Calendar, open the page www.google.com/calendar, find the item Other Calendars, select Import calendar in the drop-down menu and open the file you just downloaded from your computer - after that all events from it will be added to your calendar on your Google account.

There shouldn't be any problems with "moving" your mailbox - if you use not Gmail, but iCloud (or any other service), just search on Google Play for any client with its support - for example, Mailbox or myMail.
Bookmarks
Here we will consider the most common option - using the standard iOS Safari browser and "moving" to the popular on Android Chrome and Firefox.
Transferring bookmarks from Safari is also done with using iCloud(in the device settings, of course, you need to enable their synchronization), however, this is not done using the resource website, but the iCloud for Windows client.

It is necessary to mark "Bookmarks" in it, specify the browser (Chrome or Firefox) in the options, click Apply and select Merge. After that, the utility will offer to download the iCloud Bookmarks extension for one of these browsers, and as a result, your bookmarks from mobile Safari will appear in the desktop browser. If you chose Chrome, you do not need to do anything further (provided that you are logged into your Google account in it). With Firefox, the task will be somewhat more difficult (especially if you have not used user data synchronization in this browser before) - you need to configure synchronization in it, for which you need to log into your Firefox account (or create one), do the same on your Android smartphone and enter the code received there in a desktop browser.
If you don't want to install iCloud for Windows, you can use iTunes instead (for this, the sync of bookmarks with iCloud must be turned off in the smartphone settings). To do this, you need to connect the iPhone to your PC, launch iTunes, open the device page in it, go to the "Information" tab, find the "Other" item in it and select the "Synchronize bookmarks with:" item (where there may be options Internet Explorer and Safari), then click Apply. Now bookmarks from the iPhone are combined with the bookmarks of one of these desktop browsers - you just need to launch it and export the bookmarks to an HTML file, and then import them in the standard way into the desktop Chrome versions or Firefox, from where they are "sent" to an Android smartphone in the manner described in the previous paragraph.
Photo / video
To transfer photos / videos, you can use Google service+ Photos - for this you need to install on the iPhone official client Google+, connect to your Google account and enable auto-upload for photos and videos, and then select "Upload all photos and videos". Once the download is complete, you will be able to see all your content in the Photos app on your new Android smartphone. If you do not want to use the Google+ service, you can complete this procedure without connecting to the Internet at all. To do this, you need to connect your iPhone to your computer via USB, open Explorer, right-click on the smartphone icon in the list of devices and disks and select "Import images and videos". After that, the import window will appear, in which you can configure the parameters of this procedure (select a folder, delete files after copying, etc.). Now it is enough to connect an Android smartphone to the PC and use Explorer to copy the resulting folder to its memory (or to an SD card).
Music
Perhaps one of the most difficult tasks when "moving" - if, of course, your music library is stored in iTunes, and not in the form of MP3 tracks sorted into folders (in this case, the whole task is reduced to simple copying files from PC to smartphone using any file manager).
Google itself recommends using its Google Play Music player, which can upload your iTunes library to its "cloud", from which you can then listen to it not only on an Android smartphone, but also in a browser on a PC. To do this, you will have to install the Google Music Manager utility on your PC and indicate in it that your music library is in the iTunes library, and then wait for the download to finish (just this moment the service allows you to download up to 50 thousand tracks, which will be more than enough for any user).

If the streaming "broadcasting" of your own music via the Internet does not appeal to you, and you don’t want to bother with downloading each album separately (or you are using a different audio player instead of Google Play Music), you will have to turn to one of the third-party utilities. Unfortunately, they tend to be shareware - like iSyncr, for example. You can also perform this procedure using the DoubleTwist audio player, for which there is a desktop client with an interface similar to iTunes.
ANDROID → IOS
As noted at the beginning of this article, iOS is able to synchronize contacts, calendar and mail with a Google account, so if you used it on an Android smartphone, the task of "moving" from Android to iOS will be much easier than in the opposite direction.
Contacts
If your contacts on your old phone are linked to your Google account, transferring them will be a breeze. First, you need to make sure that the synchronization of contacts is enabled on the Android smartphone (most likely, Settings - General - Accounts & Sync), and the smartphone itself has connected to the Internet at least once after you last edited contacts. Now it is enough to add a new Gmail account in the iPhone settings (Settings - Mail, addresses, calendars) and enable synchronization for all available items (Mail, Contacts, Calendars, Notes) in it - after which all of the above will appear in the new smartphone.
If you stored contacts locally, in the phone itself, then the task becomes a little more complicated - in the standard "dialer" you must first export all such contacts to a separate VCF file (in internal memory or to an SD card), and then import them back, but not to the phone's memory, but to a Google account. Further actions, as you might guess, repeat the procedure described above. If your contact application does not support import / export of all records in bulk, you will have to edit each contact individually, manually transferring it to your Google account.
If you want to finally break with the "Google past", contacts should be imported into iCloud. To do this, create a copy of them in a VCF file (either on the phone, as described above, or on the site contacts.google.com, where you need to select the vCard format), and then import it on the page www.icloud.com/#contacts (call the menu settings using the gear button and the Import vCard item). Note that in the first case, you may receive the error "Unable to import vCard" without any explanation - most likely, this means that your VCF file was created in 2.x format, while iCloud requires the version not lower than 3.0.

Calendar
Google Calendar automatically connects to your new iPhone together with contacts, mail and notes (according to the procedure described above), so no additional steps need to be taken (unless you make sure that iOS settings sync is also turned on in your Google account settings for calendar).
If you plan to unsubscribe from your Google account, the calendar should be imported into iCloud, which is no longer such a trivial task. Of course, if you have a Mac, everything is simple - on the page www.google.com/calendar you need to select the desired calendar, in its settings, click on the ical button in the "Closed calendar address" section, copy the proposed URL, paste it in a new tab and press Enter - after that the ICS file will be copied to your computer, which you need to "feed" system application Calendar.

For PC owners on Windows based everything is more complicated - they will have to use iTunes for this purpose and Microsoft Outlook because iTunes can sync calendars only with this program. You will need to import the received file into Outlook, then connect your iPhone to your PC, open iTunes on the tab of your device, go to the "Information" sub-item and select the desired calendar in the "Synchronize Calendars" section. Another option is a third-party utility - for example, Copy My Data (Android, iOS), which can transfer not only the calendar, but also contacts and photos / videos.
Of course, the easiest is to keep using your old mailbox in Gmail, but you can also create a new @ icloud.com account. To do this, select the iCloud section in the iOS settings and enable the Mail application in it - after that you will be prompted to register a new mailbox. And in order to receive correspondence sent to it to the old address, you need to enable redirection for it - in Gmail we call the settings (gear in the upper right corner), in which, in the "Forwarding and POP / IMAP" tab, add a new iCloud address using the " Add forwarding address ". After that, a confirmation letter will be sent to it - click on the link, return to the Gmail settings and make sure that the correct address is specified in the "Forward copies of incoming messages to addresses:" line, and then click "Save changes".

Bookmarks
Most likely, on Android you used Chrome, on iOS you will switch to Safari (if you plan to continue using Chrome on iOS, then you can skip this section - the browser itself synchronizes your bookmarks on the new device).
So, in Chrome, select the bookmark manager (Ctrl-Shift-O), click on the gear in the upper right corner and select "Export bookmarks". We import the resulting HTML file into Internet Explorer, then connect the iPhone to the PC, launch iTunes and select “Synchronize bookmarks with: Internet Explorer” in the device properties. Slightly below, in the "Add-ons" section, put a check mark next to the bookmarks and click "Apply" - after that your bookmarks will appear in mobile Safari.

Photo / video
Everything is simple here. We connect the Android smartphone to the PC via USB, copy the photo and video files to any folder on the hard disk (usually they are located on the device in the DCIM folder), then connect the iPhone, launch iTunes, go to the “Photos” tab in the device menu and turn on synchronization, after which we select the folder in which the necessary files are located. If it contains a video, additionally put a checkmark next to "Include video in sync".

If you don't have iTunes (and don't want to install it), you can use third party utilities synchronization - for example, the already mentioned Copy My Data, or PhotoSync (Android, iOS).
Music
The transfer of music, like a photo / video, is also carried out in an elementary way, and according to the same scheme. The music library is copied from an Android smartphone to a PC, dragged into iTunes, and then in the settings connected iPhone on the "Music" tab, synchronization is performed - either the entire library in bulk, or only selected artists.
Outcomes
As you can see, the procedure for transferring personal data, although quite troublesome, is ultimately solvable - after it, all that remains is to "transfer" your favorite applications, or rather, install their versions for a new platform or find the most suitable analogs. However, this is already a topic for a separate material.


