It seems that it may be easier to install an application from the AppStore to iPhone! However, in the course of this procedure, users have difficulties associated most often with the quality of mobile coverage. With malfunction E.even loading a simple utility weighing 10 MB turns into torment - what to talk about professional programs like iMovie.. If the quality of the mobile coating leaves much to be desired, the iPhone will only take miserable attempts to download the application, after which the download is not possible.
The described problem is very relevant for people who live on the outskirts of their cities. Fortunately, to change the operator to get the opportunity to install applications on the iPhone, in this case it is not necessary - it is better to use the facilities of the stationary (wired) Internet.
There are several ways to download the application on the iPhone, and first need to consider the easiest, but requires a stable 3G / 4G connection - the download directly from the "apple" device. From the user you need to perform such actions:
Step 1. Go to the AppStore store - for this you need to click on the blue icon with Litera A.
Step 2.. In the search engine "Vboit" the name of the application that interests you. Then click " To find» (« Search.") In the lower right corner.

You can also search for popular applications in Apple's top charts. To do this, you should use the appropriate tabs in the bottom panel.
Step 3.. After the iPhone finds your application in the store and prompt it, click " Download"(For free software) or a button with a price tag (if the program costs money).

Then click on " Set» (« Install»).

Step 4.. Enter the password OT. Apple ID. If account apple records You have no, it will have to start it. Our site tells about how to create an account on the iPhone.
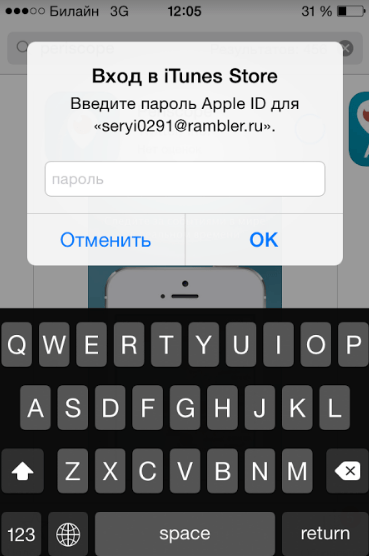
The difference between Android, the Android is that when loading programs, the owner of the iPhone will be forced to enter the password from Apple ID every time. In the case of Android, this is not required.
If the password is entered correctly, on the site of the button " Set»Appears circular Load Indicator.

In addition, you can judge how far the download process has advanced, on the icon on one of the desktops.

Step 5.. Load to complete the download. Installing programs on the iPhone occurs automatically.
The more modern is operating systeminstalled on your iPhone, the higher your chances of downloading the application. Each of the programs in the AppStore makes the requirements for version of iOS.. For example, a popular application Periscope. Download the gadget with the 7th "Operation" is impossible, because this software requires a minimum of iOS 8.0.
About what you should "update", you will learn from a similar message:

How to download applications to iPhone through iTunes?
The second method of downloading applications is a great solution for users whose mobile Internet leaves much to be desired. It is necessary to use the program iTunes. On PC and already through it, transfer the application to the "apple" gadget. Follow such instructions:
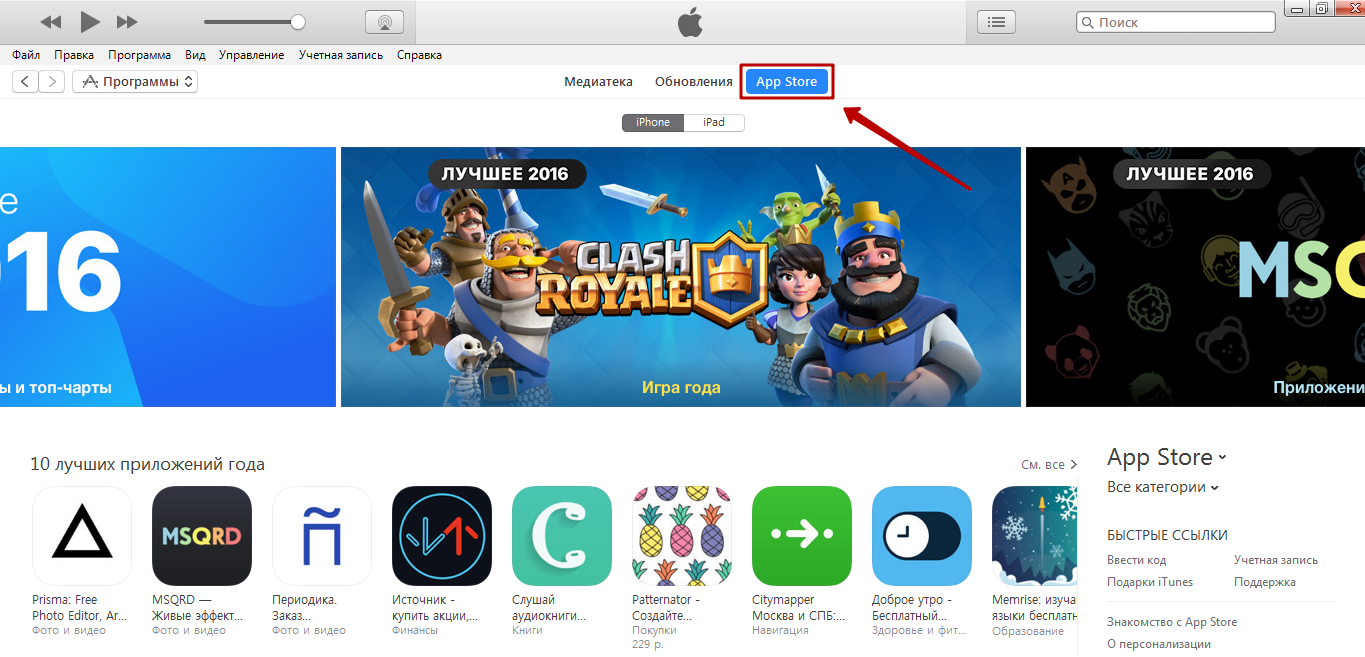
Step 1. Launch Aytyuns. and go to the section " Programs».

Step 2.. Select the " AppStore.».
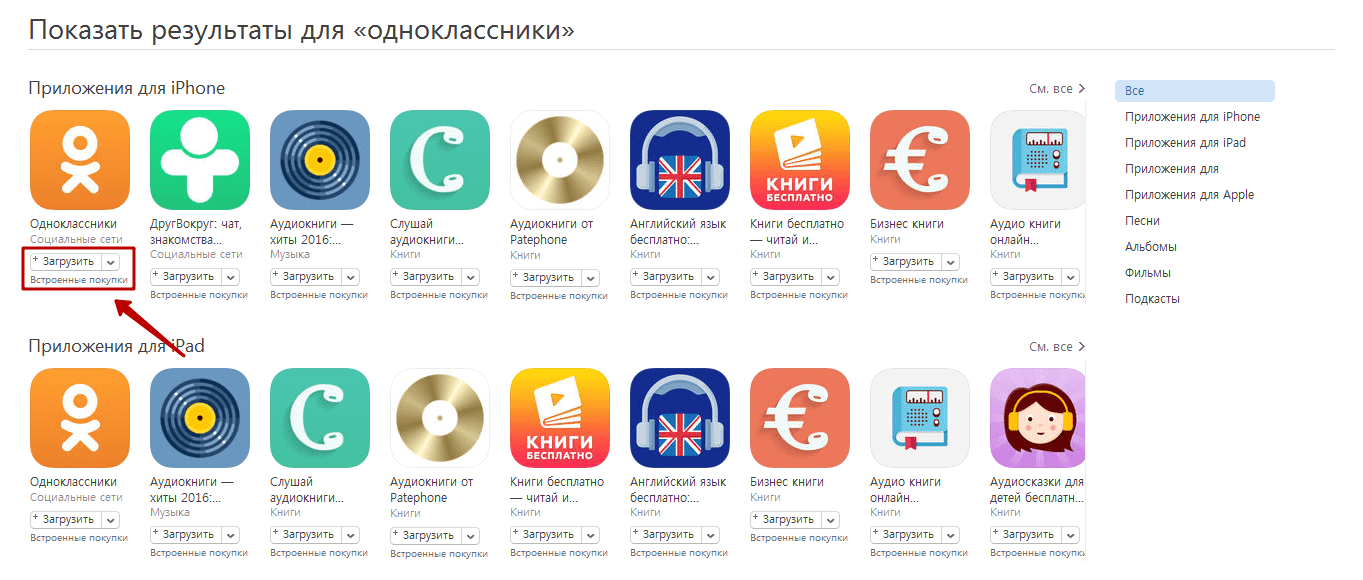
Step 3.. In the search engine string, we write the name of the application you want to download. Then click ENTER.

The PC screen will appear on request in two rows: " Applications for iPhone"And" Applications for iPad." In our case, a program for the iPhone is necessary, so we are looking for in the first row.
Step 4.. Having found the necessary application, click " Download"Located under the icon.
Step 5.. Enter the password OT. Apple ID - As mentioned above, this is a mandatory procedure. Then click " Buy».

With the speeds that the modern wired Internet offers, the loading of most programs occurs in just a few seconds. Go to the " Media Antiatics"- If the application is present in the list, then the download passed successfully.

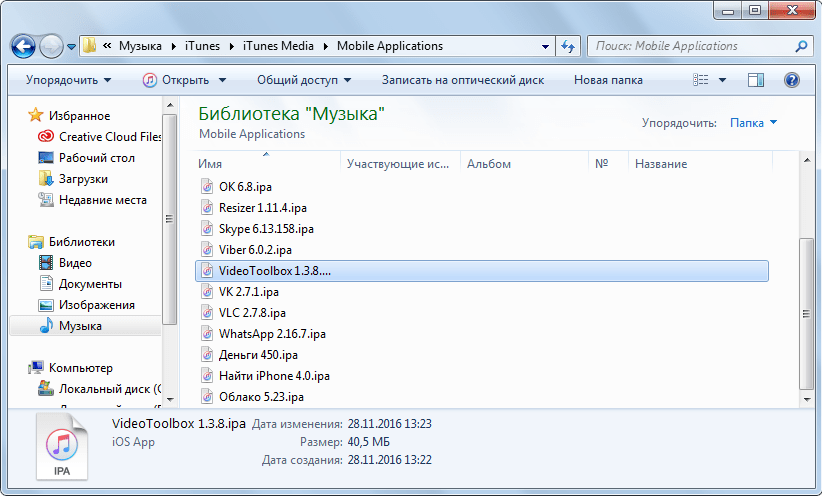
All downloaded applications are stored in the computer's memory in the folder, which can be found along the way C: Users usernameMusicitunesitunes MediaMobile Applications. Application format for iPhone -. iPA..
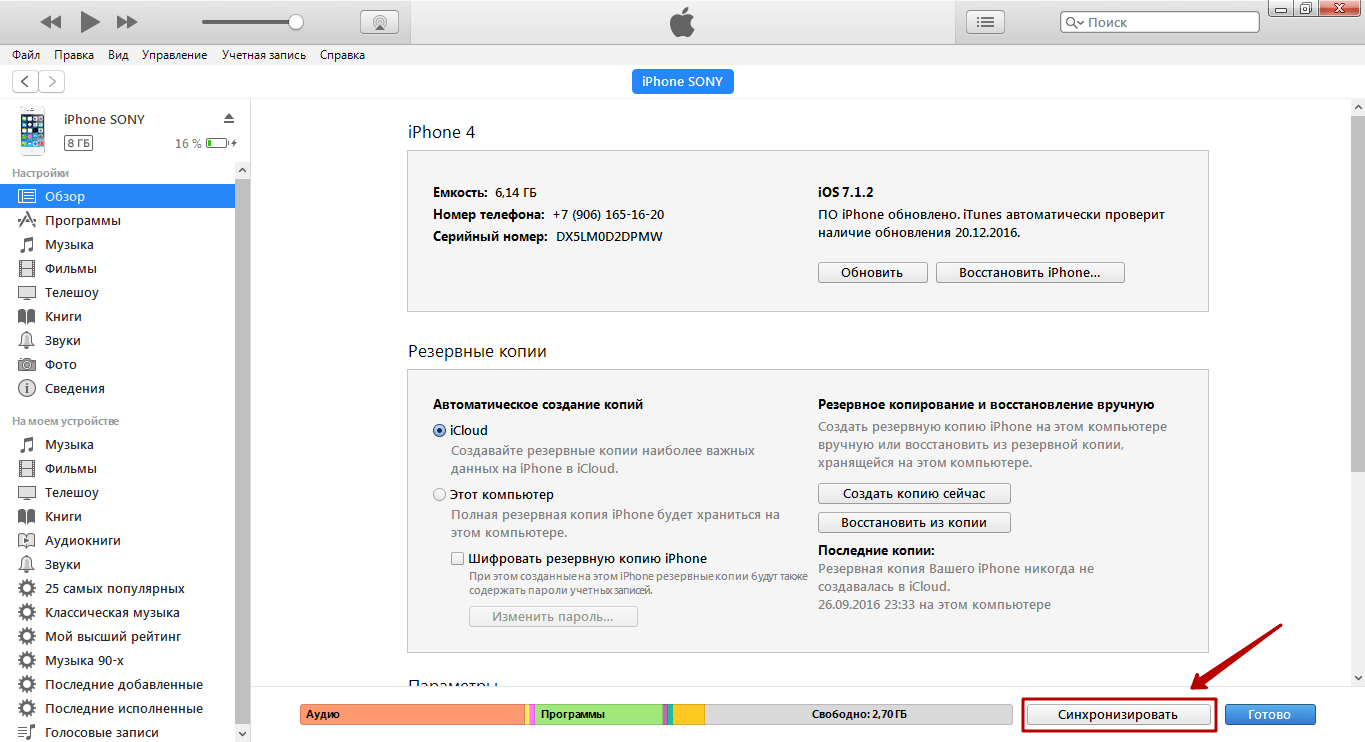
Step 6.. Connect the iPhone to the PC, go to the Device Management Menu by clicking on the button with the image of the smartphone.

Step 7.. Run the mobile device synchronization process and iTunes..
As soon as the process is completed, you will find an application on one of the iPhone desktops. If it is not there, it means that the program copying has not happened because of the insufficient version of the OS.
How to transfer programs from Apple device to a PC and why do you need it?
You can transfer applications not only with a PC to a mobile device, but also in reverse direction. Why do you need to do? Everything is very simple: if the program is stored on the computer, you, if necessary, download it on the iPhone even in the absence of the Internet. By copying the utility on the PC, you can erase it from the memory of the mobile device so that it does not occupy the memory.
Transferring programs from iPhone to the computer is done like this:
Step 1. Launch Aytyuns. and select the " File».

Step 2.. Lay the section " Devices"And click on the item" Move shopping with iPhone"In the menu that opens.

Synchronization will begin, upon completion of which all programs will be saved on the rigid disk of the computer.
How to upload applications on iPhone through third-party file managers?
Copy applications on the iPhone can not only through iTunes., but also by third-party file managerswho have a number of advantages over the official mediacombine:
- Do not require jailbreak and internet connection.
- Do not synchronize.
- Provide high speed data exchange.
Traditionally, the example provides two utilities: iFunBox. and itools.. We will look at how to transfer the application, on the example of the first - you can download it:
Step 1. Download the necessary program from the appstore on the PC and run iFunBox..
Step 2.. Connect your smartphone to a computer over a USB cable and make sure that the device recognized the device. IN top panel There must be the name of the "apple" gadget and its modification.
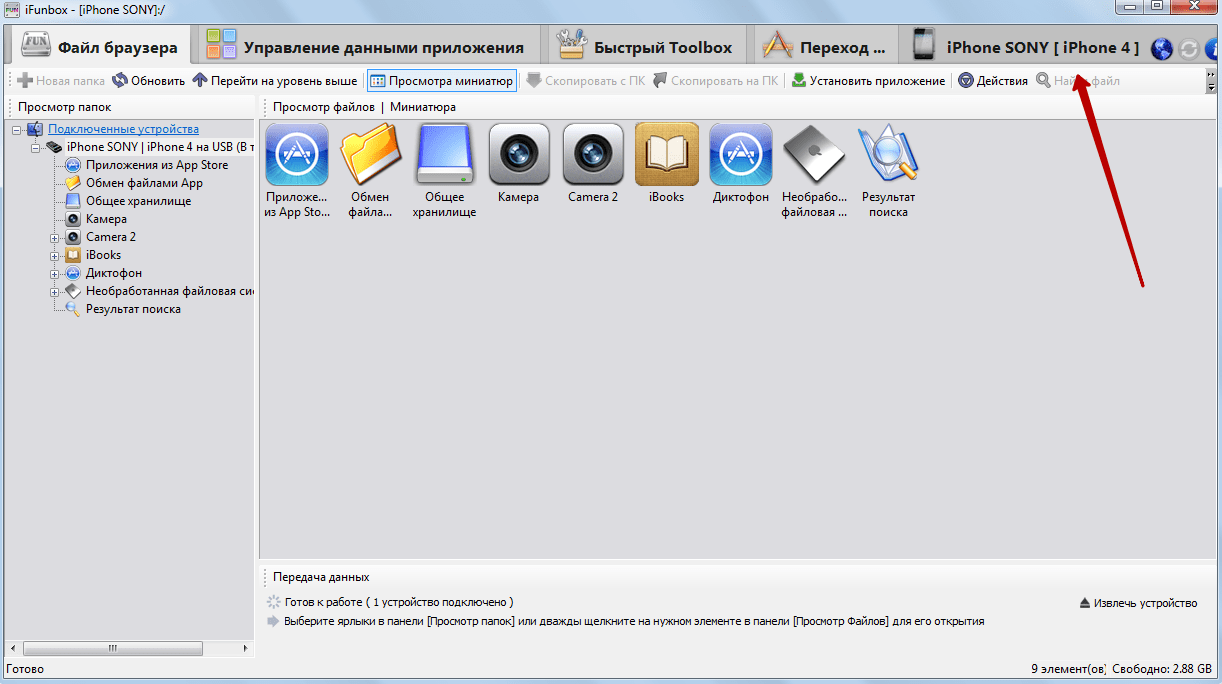
Step 3.. Click on the "button" Install app"And through the conductor, find the program that needs to be transferred on the rigid disk.

Then click " Open" So you run the data transfer process, the progress of which can be monitored using the indicator at the bottom of the utility window.
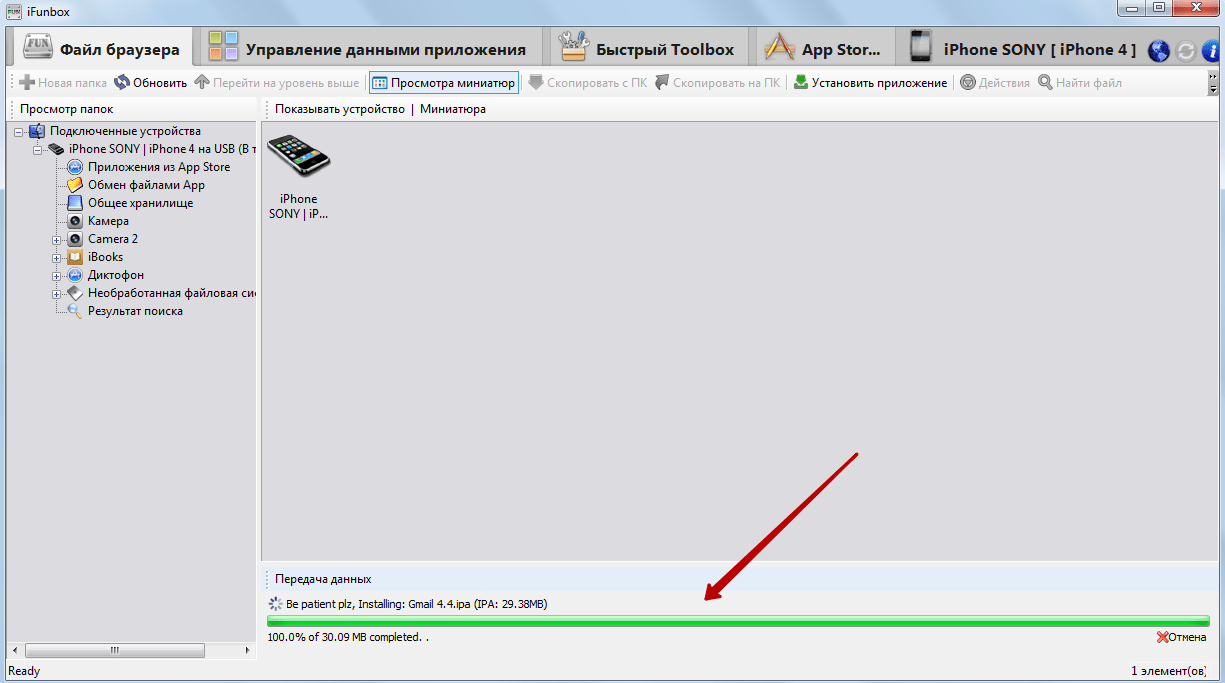
Upon completion of the process, you will see a report in which it will be in how many applications are installed successfully.

Please note that developers iFunBox. Do not recommend downloading the application through your program, the weight of which exceeds 1 GB. A great risk that similar app It will fly immediately after the initial screensaver.
How to download and install tweak on iPhone with jailbreak?
The owners of hacked iPhone should be aware that tweaks, in contrast to applications from the AppStore, have no format iPA., but dEB.. Download tweaks in the store Cydia - "underground" alternative to the AppStore.

Image: ijailbreak.com
How to act if you need to download a tweak?
Step 1. Add the repository from which you intend to download the app. It is done through the button " Sources.».

Image: TiamWeb.com.
Please note that the most popular repositories are offered in the list on the right - in particular, Bigboss. and Modmyi.. To add another to the list, click " Edit.", Then" Add.».
Step 2.. Make B. search string The name of the tweak that interests you and wait for the search results.
Step 3.. Having found the desired tweak, click on it. A page represents the application - here you should click on the button " Install».
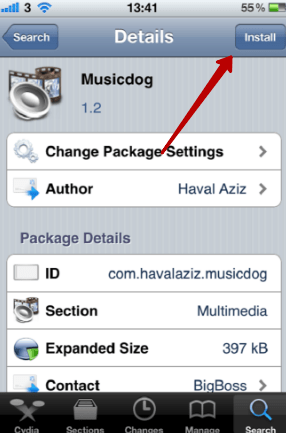
Image: Icydiaos.com
It remains only to wait for the download. As can be seen, the only difference between the procedures for downloading tweaks and official applications is to add repository when used Cydia.
iFunBox. and itools. You can also apply to download tweaks on the iPhone. Another curious application capable of performing the mediator functions - iFILE. If there is such a utility on the mobile device, it is not even necessary to have a computer at hand. You can download dEB.- Packing through any browser on the iPhone - iFILEit will take care of turning such a set of documents into the application.
Conclusion
IPhone users are constantly complaining about the shortage of memory, but at the same time continue to install applications, the importance of which, to put it mildly, is doubtful. Solve the problem with memory is actually simple: it is recommended to postpone all the programs that are stored on the smartphone "on a black day" and are not used regularly, on the PC. For hard disk Computer Place that occupy applications for iPhone - "drop in the sea". Samely mobile device "To draw" it will be much easier.
1. Certificates needed to publish in the AppStore
First of all create an identifier App ID..
The certificate name fits any, ID is Bundle IdentifierYou specify it in advance in the XCode project and then when creating an identifier.
The second step will be the creation of a certificate of distributor - iOS Distribution. In it, we choose the very identifier App ID.


To download all this good in Xcode, there are 2 ways "manual and automatic", it's easier for me. For this, come in Xcode -\u003e Preferences -\u003e Account, choose your developer account and click View Details and in the appeared window Downloads ALL..
But that's not all. Open Build settings of your project and choose your certificates added in xcode iOS Development. and iOS Distribution

For the application we do the same.
2. Sending your application in iTunes Connect
What project name do you choose when creating? I am sure, in most cases it is "test1" or "myfirstproga". So, to not get into this situation in which I got, it is necessary to change the name of the project, otherwise you will not pass the check or your users will show the name "MyFirstCoolProg" (in my case is not so bad, of course) . To do this, enter the correct name here:

And in the appeared window, click Rename.

Now you can proceed to shipment. Complete the project Product -\u003e Run, send an assembly to the archive Product -\u003e Archive. If accidentally closed the window, it can be called so Window - Organizer.. The archive will show all your versions and assemblies.

Choose your assembly you want to send to iTunes Connect and click Validate.. In the window that appears, choose who to approve and click Choose.

After that, a couple more windows will appear, in the first click Validate.and in the second Done. Also in the second window you may tell you that there are "warnings" in the project.
And most importantly, sending to iTunes Connect. Here everything is simple, click Upload To. App Store.
, and further actions identical to Validate
We go to iTunes Connect, select the application (or create, if not yet), go to the desired version (or add) if you do this for the first time, then the version will be 1.0. Near Assembly will be " +
", Click, opens a window with your loaded assembly. True, choose not immediately, it passes a preliminary check within an hour.
3. Configure iTunes Connect for a paid application.
With iTunes Connect, in principle, no questions arose except one. As I wrote earlier, when the paid application is tested, it goes into the state of the expectation of the contract. What to do?
In iTunes Connect, go to the section "Agreements, Taxes and Banking Operations", on against both contracts (PAID and IAD) We click Request Request. After, you will be available CONTACT INFO, BANK INFO, TAX INFO.

Contact Info.
Add contact, and choose it for each role.

Bank info
I didn't even think about the way output of funds, so I was not ready for such a turn of events. For the status of the application "Ready for sale", it is still necessary to fill out all the information. But I fartharled, fortunately, I did not throw a printout of the details of my account and bank (Sberbank). In my case it was like this: I open Bank info, Press Add Bank AccountI choose Russia., I introduce a bika bank in Bank IDENTIFICATION CODE. After that, it is proposed to fill out the data (account number, Inn Bank, FULL NAME, Cor. Account, etc.), all fill, ready! This can be called the option "At the first time", to start the application in the AppStore. Details are easy to get in ATMs, for this you need a map tied to a bill. And in the future, of course, it is worth opening a dollar bill in the bank, which has no% for the translation to Russia. This question was not particularly assessed, but Network recommended VTB24, AlfaBank, Bank24.
Tax info
If you:
- Developer from Russia
- Going to making money on the author's fees (sale of applications), and this can engage individual, without any IP (truth to pay 13% from such fees)
- Not a resident of the United States
- Do not have a business in the USA
In this case, everything is configured simply. Open Tax info, clamp by Set Up. Under U.S. Tax Forms (Because I have already been filled, then the button is shown VIEW.).

Fill in the example: 


Confirm and wait, soon your application will appear in the AppStore.
That's all. Thanks for attention!
We will not talk about how to pay taxes and send declarations through the Internet - we will tell about it somehow in the following publications.
Instead, we will share our experience in the penetration of the AppStore. Thousands of applications come to it every day, the green rivers of crispy paper are flowing into the developers' pockets (and Apple), and hundreds of new programmers and companies are recorded in the IOS Developer developer. The growing popularity of the IOS platform pushed us to thoughts - why not write your own application for the iPhone? By the way, our application is completely free :)
We will not dwell on all the peripeties of the application of the application inside the team, but our experience in registering a company in the Apple developer program may be useful. Speak all the process in detail, by steps and with pictures.
We become Apple Developer
We go directly to the Developer.apple.com/programs/iOS page.First of all, we will be asked - whether we want to join the program as an already registered Apple developer or as a beginner? We are newcomers, so you choose the item "New Apple Developer" with the ability to create new Apple. ID.

On the next screen, the key question is whether we or the developer. Boldly choose the "Company" and preparing for the worst.

We ask us quite a lot of personal and even intimate information - on behalf of the name to the address of the place of work and the phone.

Next, we will be offered to choose the category of applications that we want to develop, to which market we are focusing and under what platform we are going to develop (iOS, Mac OS X or Safari), how many years we are developing and (closely looking into the eyes) ask if we do not develop Applications "to the side" ... in the sense for other mobile platforms.


The last steps are to put a bird under license Agreement (I agree, I confirm, I do not mind, fully and completely for)

And enter a confirmation code that will come to the E-mail specified first.

Congratulations! Now you are now honorary Apple Developer! One of the thousands ... but what!
Registration Companies in IOS Developer Program
In order to register a company in IOS Developer Program, Apple needs to know the name, address and telephone company,
As well as the contact details of the person responsible for registration in iOS Developer Program and having all the authority necessary for this.

Select IOS Developer Program,

I confirm all the information entered on the separate screen.

And wait for Apple confirmation. Usually for consideration of the application goes about a day. After confirming the application, you will need to agree with the Apple license agreement and pay (finally!) Participation in the program.

Since B. Russia Apple. Store has not yet been observed, the only method of payment is to fill a special form (with completely intimate data about one of your bank cards with which Apple is up with greedy handmakers as much as 99 $). We have released a virtual bank card With a limit of $ 100. Folded form must be sent to Apple. After about a day, you will come confirmation of the write-off of funds.
We prove your existence and train spoken English
It would seem - all? Not! Now you have to prove that you are not a camel.Apple should make sure that your company really really officially exists, for which it is necessary to take an extract from the register with information about your company, translate into English and send to Apple ... right, by fax. With the phone, the name of the company and the number of your application, written on a separate sheet. Wherein - important detail! - The name of your company in the translated discharge must accurately coincide with the company declared when registering the company in IOS Developer Program. Follow the patience - the Apple bureaucrats are proceeded by the submitted documents approximately after a week, and any dark speck on some of the pages will entail a polite letter asking for everything re-once again. And wait again.
Then Apple will call you to make sure that you exist at all. And in English, I will report that - Hyp-Hurray! - The documents are all right and you have opened access to the developer portal iTunesConnect.apple.com. On this portal, you can send your application for consideration, watch the daily download statistics, fill in the account details, to which Apple will have to enroll money earned, set your own EULA option ...
By the way, about checking the application. The guys try quite conscientiously and even Russian applications check with all thoroughness. The first time our application was rejected, because they could not log in to Elbe (in mobile application You can only work - register so far through the web application). The second time we have already given test login and password - the application has been approved.
AND?
What will happen next? And then we need to raise our application in the BUSINESS category as high as possible and follow the downloads. And also continue to work on functionality. Well, not to forget once a year to send $ 99 for the use of a store with a well-known AppStore name.Successful registrations!
By the way, I completely forgot :)
1. Certificates needed to publish in the AppStore
In order to publish applications in the AppStore, you need to create an application identifier and a certificate of distributor (in addition to the developer certificate - iOS Development.).First of all create an identifier App ID..
The certificate name fits any, ID is Bundle IdentifierYou specify it in advance in the XCode project and then when creating an identifier.
The second step is to create a certificate of distributor - "iOS Distribution". In it, we choose the very identifier "App ID"


To download all this good in Xcode, there are 2 ways "manual and automatic", it's easier for me. For this, come in Xcode -\u003e Preferences -\u003e Account, choose your developer account and click View Details and in the appeared window Downloads ALL..
But that's not all. Open Build settings of your project and choose your certificates added in xcode iOS Development. and iOS Distribution
For the application we do the same.

2. Sending your application in iTunes Connect
What project name do you choose when creating? I am sure, in most cases it is "test1" or "myfirstproga". So, to not get into this situation in which I got, it is necessary to change the name of the project, otherwise you will not pass the check or your users will show the name "MyFirstCoolProg" (in my case is not so bad, of course) . To do this, enter the correct name here:
And in the appeared window, click Rename.

Now you can proceed to shipment. Complete the project Product -\u003e Run, send an assembly to the archive Product -\u003e Archive. If accidentally closed the window, it can be called so Window - Organizer.. The archive will show all your versions and assemblies.

Choose your assembly you want to send to iTunes Connect and click Validate.. In the window that appears, choose who to approve and click Choose.

After that, a couple more windows will appear, in the first click Validate.and in the second Done. Also in the second window you may tell you that there are "warnings" in the project.
And most importantly, sending to iTunes Connect. Here everything is simple, click Upload to App Store, and further actions identical to Validate
We go to iTunes Connect, select the application (or create, if not yet), go to the desired version (or add) if you do this for the first time, then the version will be 1.0. Near Assembly will be " + ", Click, opens a window with your loaded assembly. True, choose not immediately, it passes a preliminary check within an hour.
3. Configure iTunes Connect for a paid application.
With iTunes Connect, in principle, no questions arose except one. As I wrote earlier, when the paid application is tested, it goes into the state of the expectation of the contract. What to do?In iTunes Connect, go to the section "Agreements, Taxes and Banking Operations", on against both contracts (PAID and IAD) We click Request Request. After, you will be available CONTACT INFO, BANK INFO, TAX INFO.

Contact Info.
Add contact, and choose it for each role.Bank info
I didn't even think about the way output of funds, so I was not ready for such a turn of events. For the status of the application "Ready for sale", it is still necessary to fill out all the information. But I fartharled, fortunately, I did not throw a printout of the details of my account and bank (Sberbank). In my case it was like this: I open Bank info, Press Add Bank AccountI choose Russia., I introduce a bika bank in Bank IDENTIFICATION CODE. After that, it is proposed to fill out the data (account number, Inn Bank, FULL NAME, Cor. Account, etc.), all fill, ready! This can be called the option "At the first time", to start the application in the AppStore. Details are easy to get in ATMs, for this you need a map tied to a bill. And in the future, of course, it is worth opening a dollar bill in the bank, which has no% for the translation to Russia. This question was not particularly assessed, but Network recommended VTB24, AlfaBank, Bank24.Tax info
If you:- Developer from Russia
- Going to making money on the author's fees (sale of applications), and this can engage in an individual, without any IP (the truth is 13% from such fees)
- Not a resident of the United States
- Do not have a business in the USA
In this case, everything is configured simply. Open Tax info, clamp by Set Up. Under U.S. Tax Forms (Because I have already been filled, then the button is shown VIEW.).

Fill in the example:


Confirm and wait, soon your application will appear in the AppStore.
That's all. Thanks for attention!
The sphere of computer technologies is now rapidly developing. In order to put the whole condition, now it is not necessary to work around the clock, it is enough to come up with an interesting idea, collect the developer team, create an iOS application and lay it out in the App Store.
Prospects for creating and publishing applications for iOS
As young developers neither behaved their hopes, a little pleasant in the application market. From a variety of projects, not many are popular. One uncommon American company EPP promo conducted a marketing study and received these results: the majority of the application creators have stated that 60% of games do not bring money at all, and 82% say that they cannot feed themselves. Consequently, they have to work somewhere else.
Apple declares that their playground - a good place For such a kind of earnings, but in the fact of the case are different. In order to make money (well, or at least do not go into minus), you need to get into the top 100 or top 200. Other developers explain this phenomenon by the fact that people will simply be too lazy to shed far down in order to find the product you offer. If you did not scare the above and you still want to create your application - go further.
How to create an iOS application and lay it out in the app store
Let's figure out what needs to be done to get the application and start earning on it.
How to install Xcode development environment
- First action - setting the X Code development environment. With this program, you create all possible applications on iOS. You can get a child of apple tools on their official website, but there is one point: you can only download the application on the poppy, since there are no work versions on Windows and Linux.
- Download the application to work with text documents. Here are very good text editors Jedit and TextMate. Surely you ask, "Why should I download something if I have a notebook?". The answer to this question is very simple - when working with a huge number of code you should not distract anything. Everything should be aimed at improving your performance, and not vice versa.
3. Download graphic program. For any developer, an illustration of his game is important: characters surrounding peace, various objects and so on. When creating this kind of things, Drawberry will help you. If you do this case for the first time, it will suit you. Of course, this is not the only application that can be used in a similar vein - there is also CorelDRAW, Xara Designer, Inkscape, Adobe Illustrator.
4. Learn Objective-C. All games for apple devices are written in this language. He is responsible for working with various objects and data. As you could already guess, Objective C is close to the Languages \u200b\u200bof Group C. If you have programming experience on Java or C, the primitive study of this language will be enough.
5. Think about hiring third-party developers. If you do not understand the computers at all or do not know how to draw, but you want to earn on this check, attract freelancers who understand programming. For a fixed fee, they quickly and efficiently work for you will make a game that will bring you a profit. Take advantage of sites as E Lance and O Desk - local developers - craftsmen for all hands.
Create an application in Xcode
- How to create new project. Open the application. Next, select the "File" menu and click on "Create a new file". Click on the application (Application) under the "iOS" on the left in the window. Go to the template section. Click on empty application (Empty Application).
2. Creating a storyboard. Storyboard is responsible for displaying application screens in your program. Storobrades display what is located on each separate windowand show their interaction. This thing makes it possible to work well your game. Next, we do the following: Select the file, then NEW, then the file. Next, click on "User Interface". Click on the storyboard, choose "Next". In the Device menu, select the device for which your program is intended. In my case - I Phone. We call the Main object.
3. We assign a storyboard to your project. Now we assign a storyboard as the main interface of our program. If you do everything correctly, the storyboard will be available immediately when we launch our program. Here, how to act: Select the name of your file in the left tab, click targets and select your project from this header. Go to the "Generals" menu and select "Deployments Info". In Main Interface, we enter main.Storyboard and go to the next step.
4. Add the first screen. For this we need a type controller. With the help of them, we will be able to generate an approximate view of the application. Initially, you can explore the view controllers and select them from several presets. If suddenly you are a kettle in this business, then it is better to choose from existing ones. So we will see how the application will look like in the hands of an ordinary user. Choose "Mains StoryBoards". We find Object Library. At the bottom of the right part, you can choose this most Object Library. To the right you will see the window that appears, which is called canvas. Drag the "Views Controller" there. When a user launches the application, it will see the boot window. Congratulations!
5. Add objects to our screen. After selecting the type controller, you can add objects to your application. They can be found in all the same Object Library. This library can be found inside the type controller.
6. Change the added objects. Using simple tools, you have the ability to change the interface, which will allow you to give the application of beauty and individuality. In addition, you can add text-tip for the user to help him understand the game. You can also change the size of objects, the font of the text and so on.
7. Adding additional screens. Your application cannot consist of one screen - it simply makes no sense. Therefore, you will need to create them yourself. This is done extremely simple - the view controller on the empty part of the screen.
8. Activate "Navigation Controller". We will use this feature to move between several windows. Achieved using Navigation Controller. Navigation Bar is added at the top of the program. Remember, Navigation Controller is added strictly to primary screen To control the movement on all the rest of the windows. To do this, select the boot screen. Click on Editor, then on Embed In, then poke on Navigation Controller. After the steps done, the navigation panel appears.
9. Add Navigation Controller functionality. When the navigation menu was created, you need to add tools to it. With this feature, the user will be able to "move" by application from one place to another. We offer add standard functionality. Add a header (for this you need to open the Navigation Item item, and then attributes inspector, then enter the title), Navigation Button and provide the properties buttons.
10. We associate the screen with the button. To bind the buttons, press Ctrl, and then drag it to your next screen. Soon the Action Segue item will come out with available options. Select "Push" to move through the windows.
11. With the following steps, you can create a program with a very primitive functionality and interface. If you still want to create a really interesting application with the ability to process data - learn Objective C.
How to test the created application
- Run the iOS simulator. The X Code initially established a feature that allows you to test your applications using emulators. To run, click "Debugs and Simulator" at the top of the window and click on the device you need.
- For proper functioning, the application, as in any other coding program, must be compiled. To do this, click on the green button "Play", which here is called "Build". When the program is compiled, our simulator will open. This step is made.
- Check the program on your device. This process is very simple - we connect the apple to the computer via the USB wire and in the driving window "Device & Debug" click on it. After some time, the program will start on your phone.
- I will look for errors. If you are all done correctly, the application will safely start and will function perfectly. But it happens that the application falls. When falling, errors usually fly out. All you need to do with them - to google, find a solution to the problem on the Internet and correct.
- You need to decide on the amount of memory used. Since the memory is not very much in the iPhone, each time after using the application, the memory will need to be released. This will help you the iPhone SDK tool.
How to publish
- Create a Distribution Collection. Next, choose Build. In the Finder application, we are looking for the "Release-iPhones" folder. Here will be your program that needs to be archived.
- Open iTunes Connect. If you did something not until the end, you will write about it on top. After you finish, you need to enter banking and tax information.
- Fill the info about your application. Select "Manage the Application", and "add a new application". We enter the name, ID Budle and SKU number.
- We train our program in Apple Store.. Select "Ready to Upload Binary", download the Application Uploader Tool. With it, we ship the application in the AppStore.
- Expect verification.
Possible problems and ways to solve them
In the process of verification, your application may not miss due to the fact that it will not pass the initial tests. In this case, Apple will send you possible options solutions to the problems associated with the work of the program. Listen to them and send an application to check again.
Do not forget to follow the sales. You can do it with using iTunes. Connect Mobile. Apple will periodically send you notifications with sales analytics, but will not be superfluous. Successes to you and big sales!


