Notice: Constant HDOM_TYPE_ELEMENT already defined in on line 45
Notice: Constant HDOM_TYPE_COMMENT already defined in /home/httpd/vhosts/site/httpdocs/wp-content/themes/root/inc/assets/simple_html_dom.php on line 46
Notice: Constant HDOM_TYPE_TEXT already defined in /home/httpd/vhosts/site/httpdocs/wp-content/themes/root/inc/assets/simple_html_dom.php on line 47
Notice: Constant HDOM_TYPE_ENDTAG already defined in /home/httpd/vhosts/site/httpdocs/wp-content/themes/root/inc/assets/simple_html_dom.php on line 48
Notice: Constant HDOM_TYPE_ROOT already defined in /home/httpd/vhosts/site/httpdocs/wp-content/themes/root/inc/assets/simple_html_dom.php on line 49
Notice: Constant HDOM_TYPE_UNKNOWN already defined in /home/httpd/vhosts/site/httpdocs/wp-content/themes/root/inc/assets/simple_html_dom.php on line 50
Notice: Constant HDOM_QUOTE_DOUBLE already defined in /home/httpd/vhosts/site/httpdocs/wp-content/themes/root/inc/assets/simple_html_dom.php on line 51
Notice: Constant HDOM_QUOTE_SINGLE already defined in /home/httpd/vhosts/site/httpdocs/wp-content/themes/root/inc/assets/simple_html_dom.php on line 52
Notice: Constant HDOM_QUOTE_NO already defined in /home/httpd/vhosts/site/httpdocs/wp-content/themes/root/inc/assets/simple_html_dom.php on line 53
Notice: Constant HDOM_INFO_BEGIN already defined in /home/httpd/vhosts/site/httpdocs/wp-content/themes/root/inc/assets/simple_html_dom.php on line 54
Notice: Constant HDOM_INFO_END already defined in /home/httpd/vhosts/site/httpdocs/wp-content/themes/root/inc/assets/simple_html_dom.php on line 55
Notice: Constant HDOM_INFO_QUOTE already defined in /home/httpd/vhosts/site/httpdocs/wp-content/themes/root/inc/assets/simple_html_dom.php on line 56
Notice: Constant HDOM_INFO_SPACE already defined in /home/httpd/vhosts/site/httpdocs/wp-content/themes/root/inc/assets/simple_html_dom.php on line 57
Notice: Constant HDOM_INFO_TEXT already defined in /home/httpd/vhosts/site/httpdocs/wp-content/themes/root/inc/assets/simple_html_dom.php on line 58
Notice: Constant HDOM_INFO_INNER already defined in /home/httpd/vhosts/site/httpdocs/wp-content/themes/root/inc/assets/simple_html_dom.php on line 59
Notice: Constant HDOM_INFO_OUTER already defined in /home/httpd/vhosts/site/httpdocs/wp-content/themes/root/inc/assets/simple_html_dom.php on line 60
Notice: Constant HDOM_INFO_ENDSPACE already defined in /home/httpd/vhosts/site/httpdocs/wp-content/themes/root/inc/assets/simple_html_dom.php on line 61
Notice: Constant DEFAULT_TARGET_CHARSET already defined in /home/httpd/vhosts/site/httpdocs/wp-content/themes/root/inc/assets/simple_html_dom.php on line 62
Notice: Constant DEFAULT_BR_TEXT already defined in /home/httpd/vhosts/site/httpdocs/wp-content/themes/root/inc/assets/simple_html_dom.php on line 63
Notice: Constant DEFAULT_SPAN_TEXT already defined in /home/httpd/vhosts/site/httpdocs/wp-content/themes/root/inc/assets/simple_html_dom.php on line 64
Notice: Constant MAX_FILE_SIZE already defined in /home/httpd/vhosts/site/httpdocs/wp-content/themes/root/inc/assets/simple_html_dom.php on line 65
Some computer manufacturers divide hard drives into multiple partitions. One for and the rest for storing your personal files. If you wish, you can combine these sections into one. How to combine partitions hard disk, without losing personal information, read the instructions below. ...
This trick can also be used to delete recovery partitions and free up space that would otherwise be used by recovery data. Or, if you want to have a computer with multiple partitions, you can deselect everything.
Why are some computers' hard drives pre-partitioned into multiple partitions?
Some PC makers seem to believe that allocating one partition for the operating system and another for data provides an explicit demarcation of the two, allowing you to erase the first partition and reinstall the system without affecting your personal data area.
This is convenient for some users, but not at all necessary. will reset all system settings to default without touching your files, even if they are in the same partition. In addition, when dividing the hard disk into two parts, you may run out of space for both programs in system partition and for personal files in the additional.
Instead of working with the disk configuration chosen by the manufacturer, you can change it to suit your needs. It's fast, simple, relatively secure, and is done right from within Windows itself.
Please be aware that some computers may have multiple hard drives installed. You will not be able to combine these disks into one section without additional manipulation.
Delete one section and expand another
We'll start by deleting one of the sections. If you purchased new computer, the first section of which contains system files and the second is empty and called "DATA" or something like that, we will delete the empty section.
If any of your files are already stored in this section, move them to the system section if you do not want to lose them. If there is not enough free space on the system partition, use an external hard disk or a USB flash drive. Just remove these files from the partition, as they will be lost when you delete it.
Merge Sections hard disk using the Disk Management utility. On Windows 10 or 8.1, right-click on the Start button and select "Disk Management." On Windows 7, click Windows key+ R, type "diskmgmt.msc" in the text box of the Run dialog and press Enter.
Find the two sections you want to merge. In the example below, we will be merging the OS section (C :) with the DATA section (D :).
These two partitions must be on the same hard drive. If they are located on different disks, nothing will work. In addition, it is necessary that they are next to each other, otherwise you will have to work a little more.
Delete the second partition by right-clicking on it and choosing Delete Volume. Do not forget that you will lose all the files stored on it!

How to combine two drives into one without losing information? I have a C: drive and an operating system is installed on it. There are two more drives E: and F :, that's what I want to combine into one drive, but both drives have information. This means that using the built-in Windows tools 7 I can't do that. Or I can, but I need to transfer information from the F: drive and delete it, then attach the resulting unallocated space to the E: drive, as a result I get one large E: drive.
In short, there is a lot of information on both disks and it is rather difficult to transfer it anywhere, I do not have a portable hard disk. Found articles on your website about free manager sections "", these articles contain almost everything: how to create a section, enlarge it, reduce it, and most importantly, all this happens without losing information, that is, before working with the program, information does not need to be transferred anywhere. You just don't have an article on how to combine two disks into one, I think a large audience of your resource will be grateful to you for such an article. Gleb.
How to combine two drives into one
Hello, friends! As our reader correctly noted, for these purposes you can use free program"EaseUS Partition Master Free Edition. ”With this program, you can merge two disks into one without losing information on these disks.Our article is suitable for operating systems: Windows XP, Vista, Windows 7 and Windows 8.1.
We return to today's article. The content of the article:
1) We connect two disks into one with the help of the "EaseUS Partition Master Free Edition" program quickly and easily, naturally without loss of information.
2) We connect two disks into one without resorting to any programs, that is, using the tools built into Windows 7. I think this part of the article will also be useful to someone. But we will have to transfer data from the disk that we want to delete, otherwise there is no way.
3) Friends, we also have an article on how to connect two disks into one using the program. This program is the leader among hard drive managers, but unfortunately it is paid.
How to connect two drives into one using EaseUS programs Partition Master Free EditionWe go to the official site http://www.easeus.com/download.htm... We choose " EaseUS Partition Master Free Edition"and click Download

Freeware Download

Download now

The program installer is downloaded. We launch it. Installation of the program is simple, but there are a few points to pay attention to.
If you do not need the TuneUp Utilities 2013 optimizer, then uncheck the box and click Next.

Email is optional

Before starting the program, go to Disk Management. We will not touch the C: drive, but we will connect the E: drive (59 GB) and the F: drive (59 GB), as a result we get one E: drive (119 GB).

We launch the program.

In the main window of the program, click once with the left mouse on the E: drive and click on the Merge tool,
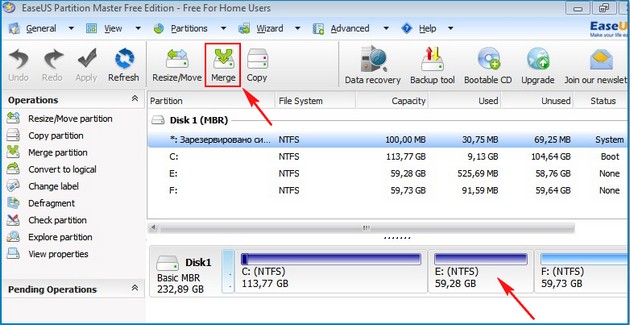
In the window that appears, indicate the drive with which we want to merge the E: drive, this is the F: drive, put a tick on F: and OK.


Our program works in a pending operation mode, press the Apply and OK button,

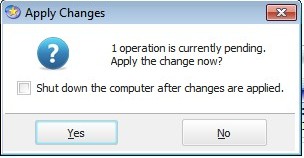
The disc merging process has begun.

Go to Disk Management and see the result. Instead of two drives E: and F :, we now have one drive E: (119 GB).

All data that was on the F: drive migrated to the E: drive, to the folder Local Disk F. 
How to connect two disks into one using the Windows 7 operating system itself, Windows 8 without resorting to any programs
Let's say some users do not want to install additional software on their computer and will try to get by with the tools built into the operating system.

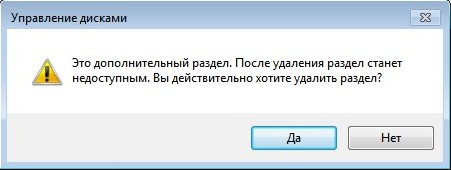
Go to Disk Management. To connect the E: and F: drives, you must first transfer all the data from the F: drive to a portable hard drive or to a USB flash drive, or to the E: drive, then delete the F: drive, right-click on it and select Delete volume, agree Yes.


Once again, right-click on the "Free" space and select Delete Partition.

Are you sure you want to delete the section? Agree Yes.
59 GB of unallocated space appears. We attach this unallocated space to the E: drive. Right-click on the E: drive and select Expand Volume.


Done.

Everything. I would be very glad if I helped someone.
Let's take a closer look at how to merge hard disk partitions.
Content:If your PC has too many unused partitions and you want to remove them, use the following instructions from the article.
Preparing to delete a disk volume
Before you can merge multiple volumes, you need to follow the steps to help preserve your files.
Any editing of a partition in Windows will permanently delete files and folders in this volume.
In most of them, you can use up to 20 GB of space for free (, DropBox, and others).
Merging partitions in Windows 7
In Windows 7, users can merge disk partitions without booting additional programs to your computer. All required settings can be changed as follows:
- Go to the Start menu and open the Run window. This key may not be present in the Home Edition. In this case, just press Win + R to bring up the desired window or edit appearance Start menu in the settings of the working screen;
- In the window that appears, type diskmgmt.msc - the command to open the computer's disk management window. Confirm the action by clicking on "OK".

Fig. 2 - command input
- The following window will open. At the bottom of the window, all connected to the system are displayed hard drives and their conventional division. Each section of the division is a separate volume. It is denoted by a letter, has its own file system type and space;

Fig. 3 - displaying sections in settings
- You need to select the partition you want to delete (merge with the main volume of the C drive). Then click on it with the right mouse button and click on the item "Delete volume". Next, a window will appear with a system message stating that all data on the volume will be deleted and you cannot restore them. Confirm uninstallation. Basically, you are not deleting anything, but simply erasing the section. All space goes to drive C;

Fig. 4 - deleting a volume
After deleting one volume, you can do the same with the others, thus creating free partitions. An "Empty Volume" appears in place of the previous object.
Don't forget to attach it to the section you want. Click on the section in which all objects will be combined and in context menu click on "Expand volume".
In the window that opens, select an available empty section and add it to the main one. Repeat the action until there is no unreserved part of the hard disk left on the computer.

Fig. 5 - expanding a volume in Windows 7
After completing the procedure, be sure to restart Windows work otherwise further work may lead to errors and data deletion.
Instructions for Windows 10
The instructions described in this section of the article are suitable for both, and for everyone Windows versions 8. You can merge partitions using the built-in OS tools.
As in the previous description of the settings, we need a utility "Disk Management"... Follow the instructions:
- Go to the search box and enter the word "Management". The required option will appear in the results. And also, you can press the combination of the Win and X keys, bringing up the menu quick access... It has a link to access "Disk Management";

Fig. 6 - Windows 10 hard disk settings window
- Decide which sections you no longer use. For better orientation, they are marked with letters that correspond to the names of the disks in the window "This computer";
- If you want to keep only one volume, choose which one you will attach the rest of the elements to;
- Then right-click on the object you want to delete. And uninstall it;

Fig. 7 - deleting a partition in Windows 10
- Confirm the action by agreeing to the loss of data;
- Remove the partition space;

Figure 8 - Freeing up space
- Now you will see that the section has become empty, but its division remains. Since it is no longer used in the system, its name and other attributes are removed. The object can be merged with the main disk;
- As a result of the correct execution of all actions, you will see that an inscription appeared in the place of the disk section: "Not allocated"... Now you can start merging the sections.
Click on the main section - in most cases it is the C drive. From the menu, select the volume expansion item.

Fig. 9 - attaching an element
The settings wizard window will open. With its help, you can easily divide free space or combine it into one system storage medium.

Figure 10 - Merging Sections
Working with Acronis Director
Often in standard window"Disk Management" Users are faced with the fact that the "Delete Volume" key is not available or other functions cannot be performed.
This is due to the limitation of group policies.
Maybe, System Administrator forbidden to perform such actions or your OS version does not imply setting disk partitions and other system parameters.
Using third-party utilities will help solve the problem.
Acronis Director is one of the best programs, which allows you to customize the disk configuration and bypasses all prohibitions on changing the settings of your computer.
The main window of the utility contains all the necessary data about the hard data carrier. Sectioning information is also provided in this window.

Fig. 11 - the main window in Acronis Director
To create one disk instead of several partitions, simply select all partitions that you no longer want to use and click on "Merge" on the left side of the window.
In a new window, a detailed setting of the elements will appear. You must select the volume that will be the main one and attach other objects to it one by one.
Merge hard disk partitions FAST!
I will explain how to merge hard disk partitions using simple program Acronis Disk Director. If you still do not know how to do this, then watch my short video tutorial, where I explained everything in detail. It will take you a few minutes of your time to combine the disks and the Acronis Disk Director application.
The question of how to combine two disks into one is one of the most frequently asked among computer users. This can be useful in many situations, including even moments related to setting a single file system for all partitions, converting GPT format or RAW, which may not be perceived by the operating system, installing software that requires a lot of disk space, etc. An ordinary user can be offered two main methods of merging, which will be discussed in more detail below. The proposed solutions work equally well when performing such actions with logical partitions, and when working with RAID arrays, when two or more independent hard drives are installed on the computer.
Benefits of combining hard drives or partitions
It goes without saying that the first and main factor influencing the adoption of a positive decision in favor of merging partitions is the increase in the available disk space on one disk, which is extremely necessary when installing some programs.
On the other hand, as already mentioned, if the disks or partitions are installed different types file systems, quite often you can observe problems with the installation of certain types software... Bringing them, so to speak, to a common denominator, eliminates the problem entirely. Finally, if the system has unreadable RAW partitions or GPT format for hard drives larger than 2 TB, which may not be recognized by the operating system, such a tool is simply irreplaceable.
Combining options
Now a few words about how to merge two disks into one in Windows 7 and above. First, you need to decide in what way the sections will be merged. First of all, we can highlight the ways of combining with the loss of information or with its preservation. The second is the use staff resources system or third-party software.
It should be said right away that the solution to the question of how to combine two disks into one using the built-in Windows toolkit for the safety of data that was originally located in one of the partitions does not imply (this is not provided at all). Therefore, before doing such things, all information from the partition to be deleted (and it will indeed be deleted, and only then attached to the main disk or partition) must first be transferred to another partition or to removable media. As it is already clear, about working capacity installed programs and there is no need to say. When solving the problem of how to combine two disks into one, but so that both the information is preserved and the applications work, it is necessary to use additional third party funds... They will be discussed separately.
How to combine two disks into one in Windows 7 and higher versions by standard means?
First, let's look at the system's own tools. This is the disk management section. It can be accessed through the administration menu, but it's easier to use the Run console, in which you need to write the diskmgmt.msc line.

Here you select the partition at the expense of which you want to merge, and through the RMB menu, the item for deleting the volume is called. The system will immediately warn you that all information on the selected disk will be deleted. We agree.

We repeat a similar operation, but for the section. After that, the so-called unallocated area will appear.

Now you need to use the RMB on the partition to which the attachment will be made, and select the volume expansion line.

At the stage of selecting disks, most likely, free attachable space will be immediately added to the list. If this does not happen, you should use the add button yourself. After that, the continue button is pressed, and in the next window - the end. If you look at the state of the disks and partitions at the end of the operation, you can see the increase in space of one of the partitions at the expense of the other.
How to combine two disks into one using third-party programs
To manage disks and partitions when you want to perform a merge with preservation of data, you can use and third party utilities that look much more powerful than the system's own resources. This includes software packages like Partition Assistant from AOMEI, Disk Director from Acronis, Partition Master from EaseUS and many others.

Let's take a look at the merge process based on the last mentioned utility. For example, we need to merge drive E and drive F, but so that after that there is only one partition E. In the main window of the Partition Manager section, use the Merge button, check the indicated disks (partitions) and click the "OK" button. After checking the merge, the process will be in the pending status. Click the Apply button and confirm the action. After that, the merging process will begin.

When it finishes, only one section (E) will be visible in Disk Management. Explorer will display two hard disk in one hard drive or partition. Only the F drive in the E section will be shown as a local directory (Local Disk F) with all the information that was previously present on it.
Brief conclusions
As a result, it can be noted that if the user needs a quick merge, and on the attached disk or partition is critical important information no, you can use the system tools. If data storage is mandatory, you will need third-party programs. And further. Please note that if there is a second operating system on the combined disks in the attached partition, it will not be possible to start it.
In this little material, I step by step with pictures I'll tell you about how to merge hard disk partitions on Windows 10 into one volume... It is not difficult to find programs on the Internet that can do this. However, in my opinion, there is no need to use the often dubious third party programs when in the operating room itself Windows system 10 has a built-in ability to combine hard disk partitions. That is, we will consider how to combine a hard drive with the built-in tools of Windows 10 itself.
This method is suitable not only for Windows 10, but also for "seven" and "eight".
Step 1. Open the built-in Disk Management utility
In order to combine hard disk partitions into one, first you need to open the built-in Disk Management utility.
You can start it in a new way, which appeared in the top ten - right-click on the Start menu and select "Disk Management"... (if the utility has started, go directly to step 2 - ↓ down through two pictures)
For more early versions Windows are looking for this tool through Search or Control Panel. To do this, we type "Control Panel" (Figure 1), and then open it with a mouse click (Figure 2).
In the window that opens, select and click on the "System and Security" item.
A new window opens. In it, go down and in the "Administration" item click on the "Create and format a hard disk" sub-item.

We are presented with the actual utility "Disk Management".
Step 2. Deleting a volume and partition to merge with another partition in Windows 10
Now we need to select a section that we are going to attach to another section. In my case, this is section F. Click on it with the right mouse button and select the item "Delete volume".

Click "yes".

We have 50 gigabytes of free space. But they still cannot be added to another section. Now on these 50 GB you need to delete the partition. Also, as in the previous step, right-click on the already vacated section and select "Delete section".

The appearance of 50 GB with the inscription "Not allocated" tells us that now we can add this free and unallocated space to any other partition of our hard disk.
Step 3. Adding free unallocated space to the existing hard disk partition

I will add them to section D. To do this, right-click on the appropriate section and select Expand Volume.

The Volume Expansion Wizard starts. Click "Next".

To transfer all the free space to the section we have chosen, simply click "Next".
If you want part of the space to come to one partition (for example, C), and part to another (for example, D), then here you can choose how much free space you will add to a specific hard disk partition in your Windows 10

Click "Finish".

The last picture shows that the 50 GB partition F that originally existed for me has disappeared. Instead, there is an additional 50 gigabytes of free space on the D drive.

P.S .: In some, rather rare cases, the "Disk Management" utility built into the OS may not allow you to combine some partitions of one hard disk. Figured it out by reading the comments below. Looks like Microsoft is playing it safe here. To solve this and other problems with managing the space of the hard drive, I began to look for another option that allows you to manage the hard drive in Windows 10 using third-party, but the most secure and free developments. For those who faced such problems, I wrote an article "


