If you have purchased a TP-Link TL-WR841N Router, but do not know how to configure it correctly, then this article is for you. Thanks to step-by-step detailed instructions, setting up the TP-Link TL-WR841N router will take you no more than 15 minutes. By the way, this model has gained immense popularity around the world. Due safe use, high-quality signal, high data transfer rate and low cost, the device can be called one of best solutions in terms of price-quality ratio in its category.
The first step is getting to know
Let's start with a basic introduction. The router has two antennas - this allows you to significantly increase the range and stability of the signal. The rear view of our device is represented by six connectors and buttons:
- Power on/off button.
- Connector for the power cable that connects the device to a power outlet.
- An Ethernet port is used to connect the Internet cable.
- Lan - connector, connects the router and laptop / computer with a local network.
- Quick Security Setup - a button (quick secure installation) - an analogue of WPS, is a distinctive feature of TP-Link.
- Reset button to factory settings (Reset).
Video review of the TP-Link TL-WR841N router:
The second stage - connecting the device
This stage consists in connecting all the cables necessary for operation.
Step-by-step instruction:

The third stage - software configuration
There are two ways:
Via CD
We insert the disk into the drive, we expect the Easy Setup Assistant application to load automatically. If after a minute nothing appears, open it yourself. We go to the "Computer", open the CD: 
The TL-WR740N router is used as an example, but the installation is identical. In the menu that appears, click on "Master quick setup». 
Choose the language that suits you best, click "start". 
Check if the LAN cable is properly connected to the computer and the router. Also check your internet cable. The same goes for the power adapter.
Read this text carefully, check if everything matches. 
In this menu, select your country of residence, city/region, enter the name of the Internet service provider, and use the Dynamic IP address in the connection type. 
If you want to have a static IP address, then you must enter the data provided by your ISP. This information must be specified in the contract. Didn't find it - go to hotline, call the service specialist of the company at home. 
Use the “I did not find suitable settings” item only if your country is not in the proposed list, or you do not know the name of the provider's server. 
Enter the desired name for the future Wi-Fi network. 
Be sure to choose from the options provided. high level security (WPA2-PSK). The column below shows the default password, you can change it to your liking. 
Just in case, click the suggested item below, this will save data on the type of connection and protection, name, and password in a separate Text Document. 
If everything is entered correctly, an inscription will appear confirming the successful completion of the verification and wifi settings router. Click "next". 
Great, the CD installation is complete.
In browser
To configure the TP-Link TL-WR841N router with this method, you just need to connect your laptop to the Wi-Fi network provided to it immediately after turning on the power. The network name must match the model name, Wi-Fi will not have a password.
Important!You can use for this purpose not only a laptop, but also a phone or tablet- All that matters is access to the internet.
Let's start the setup:
- To avoid possible problems first, we recommend doing a factory reset - press and hold the Reset key on the router for 7 seconds.
- Now open your preferred browser ( Google Chrome Opera, Mozilla Firefox or others), and in the site line enter 192.168.1.1 or 192.168.0.1, press Enter - this will provide an entrance to the router.
- In the window that appears, enter same value login and password - admin, click OK.

- First of all, for greater security, we recommend changing the standard login and password. The procedure is optional, but will provide more protection for your network.
 To enlarge, click on the picture
 - Next, to get a working Wi-Fi, you can connect a dynamic IP address. This will set the IP address for all devices that will connect to the router automatically.
 To enlarge, click on the picture
 - However, if the contract with the provider states that a static IP address is recommended, then select the appropriate type in the subparagraph, and using the data written in the contract, fill in such fields as the IP address, subnet mask, main gateway, primary and secondary DNS address manually.
 To enlarge, click on the picture
 - Another option: select “PPPoE” in the connection type - enter your login and password, and choose between dynamic (it will do everything automatically) or static (some providers provide mandatory IP and netmask for this).
 To enlarge, click on the picture
 - Rarely, but it happens that ISPs request tethering network card the user's computer to the MAC address. To do this, go to the item "Network", then "Clone MAC address" and click "Clone MAC address". After these steps, the network will gain access to the Internet.
 To enlarge, click on the picture
 The note! Check this procedure with the supplier, you may not need it.
- Usually, the purpose of this setting is simply to get access to the Internet for family use, for which you need to deal with the “settings” submenu wireless mode". Indicate in it the desired name of the Wi-Fi network and the region of your stay. In the "mode" column, it is advisable to select "11bgn mixed", it is suitable for 99% of users. We also recommend leaving the channel width and channel in auto mode. In the item of the maximum transfer rate, select the highest number according to the principle "the more the better" (300 Mbps).
Interesting! If in home use are modern smartphones, laptops or computers no older than 3– 4 years (which have new type network cards), then in the mode column you can select« 11n» - this will provide a greater streaming data transfer rate, and will also make both antennas active in a constant mode.
If you want to stabilize and at the same time slightly increase the speed of the Internet, select the channel manually. Many people live in high-rise buildings and use the Internet from a single provider, so when automatic mode channel selection, for some it may coincide, thereby reducing the speed. To select the optimal one, install the application on Android "Wi-Fi Analyzer" and find a less used channel - select it in the settings.
 To enlarge, click on the picture
 One of the keys to using a wireless network is to secure it.
 To enlarge, click on the picture
 If you want to have the maximum speed on a portable device, then be sure to put a password in the "wireless protection" section, because there are a lot of people who want to use someone else's Internet for free. Next, check in the “versions” section WPA2-PSK - the most modern and secure type of protection. In the column "encryption" select AES. Enter your preferred password - this is what you will enter when connecting to this Wi-Fi.
Save.
Now you need to restart the router, for this you can turn it off for 10 seconds from the power supply using the Power button, and turn it on. After that, you can connect all your portable devices to a fully configured Wi-Fi network.
Video on working with the Wi-Fi Analyzer utility:
Setup completed. I hope you made sure to set up TP link router TL WR-841N is not difficult at all.
Modern life is inextricably linked with Internet technologies. In place of traditional cable Ethernet came wireless connection. In any cafe, restaurant, office or apartment there are routers that distribute a wifi network. In this article, we will talk about the features of connecting and managing the most popular budget router of the company Tp-link version tl wr841n. All models manufactured by this company have a pleasant design and provide the distribution of a wi-fi Internet network.
Tp-link devices, including tl wr841n , have similar and recognizable appearance. Speaking specifically about the wr841n wireless router, it is noted that it has excellent technical performance, providing a network with a speed of 300 Mbps.
Appearance
In terms of form, Tp-link did everything stylishly and attractively. The tl wr841n router has rectangular contours, smoothly curving in the corners. As in other models of the budget segment, the package includes only the most necessary components:
- an adapter designed to be connected to a 220V network;
- software disk, usually already outdated at the time of sale;
- a manual containing the necessary information;
- a cable designed to connect a "wi-fi" router to a computer;
- warranty card with the seal and signature of the seller.
The following elements are located on the back panel of the tl wr841n router: 
- power button;
- connector for connection;
- power adapter cables;
- WAN port for connecting a fiber optic cable to the router;
- four LAN ports for connecting the router to a computer or other devices; WPS button and a button that allows you to reset the settings to factory settings;
- button to switch the network to the ON and OFF position.
There are two non-removable antennas at the top, providing high speed the Internet.
Connection and preparation for work
No problem when connecting tp-link version tl wr841n router , does not occur. The power adapter is pre-connected. Then, a cable is inserted into one of the connectors, which was led by the provider to the apartment. After the WAN input has been connected, the router will respond with a color indication.
 Next, the computer or laptop is connected to the router. This can be done either using the cable included in the tl wr841n package, or purchased with your own hands. The standard has a small length, which often causes inconvenience.
After all the manipulations, the power button is pressed, and after 30 seconds, the tl wr841n router should work. This will be indicated by a color indication installed on the housing cover.
Settings
After the above steps, you should configure the router tp link models tl wr841n. This is easy to do even for an inexperienced user, for this it is enough to study the instructions for setting up the router, enclosed in the package, or follow the steps below.
Automatic setting
As in any other Tp-link router, in tl wr841n the setting can be manual or automatic.


Connecting to the Internet manually
Setting up a Tp tk wr841n router manually is not much more difficult. In this case, certain information is required: IP address, main gateway, subnet mask, etc., necessary for the tl wr841n to work. After that, with the help of several actions, everything is written manually. The connection principle for different providers is generally almost the same and differs only in details.
Home ru
First, consider an Internet connection from the provider "Home".
- You need to open the "Network" section, the WAN subsection will automatically open. In it, you should select the required type of connection indicated on the pages of the agreement concluded with the company.
- In the fields "Username" and "Password" the username and password specified in the agreement are indicated.
- Below are hidden Extra options, it is better not to change them unnecessarily, which is additionally indicated by hints.
- Press the "Save" button.
The Internet should work.

« Rostelecom
Similarly, a connection is made for the provider company Rostelecom.
- The "Network" section opens, all the necessary actions are carried out in the WAN subsection.
- The connection type is selected, usually PPPoE.
- The setting is the same for other types. The required fields contain the information specified in the concluded agreement as a login and password.
- The connection mode is set to "Always Active".
"Beeline"
The Internet connection for the Beeline provider is somewhat different.
- First, you need to make a standard transition to the "Network" section and the WAN subsection.
- After that, L2TP / Russia L2TP is set in the "Connection Type" field, unlike the standard PPPoE mentioned above.
- The login and password given by the provider at the official conclusion of the contract for the supply of Internet services are entered in the required fields.
- The connection mode is set to "Always Active" by default.

NetByNet
For the NetByNet provider, the steps are almost the same as setting up PPPoE for Dom.ru and Rostelecom. All items are performed in exactly the same way.
- You need to open the "Network" section. The WAN subsection will open automatically. The type of connection specified in the contract concluded with the company is selected.
- In the fields "Username" and "Password" enter the login and password contained in the agreement.
- The connection mode is set to Always Active.
- Leave the authentication type as default.
- The only difference is the installation of the secondary connection. IN this case the manufacturer recommends setting the value of the "Secondary connection" mode to the "Dynamic IP" position.
Reserve connection via 3G
There is no way to connect the tl wr841n router to the Internet via 3G or 4G. This device does not support connectivity mobile modems. To do this, you will need to purchase a more expensive model.
IPv6 support
After the introduction of the IPv6 standard, users began to be interested in the question: which devices support it. TL wr841n works fine on firmware version v13.
Wireless network
The "Wireless Mode" tab contains everything you need to create a wi-fi network. Set the network name in the "Basic settings" subsection. The mode set by default to position 11bgn is also regulated there. The channel number and its width are selected.

Guest network
In this section, "guests" will be allowed access to local network, and also - isolate the guest network, control throughput. Enabled by setting the value to "Enable". The name of the network is also written there and the number of possible guest users is indicated. The default is undefined. You can set the wireless schedule below.

Setting up as a repeater (repeater), amplifier, adapter or access point
In order to convert tl wr841 to (repeater), amplifier, adapter or access point, you need to use third-party firmware, for example, dd-wrt. There are no functions in the standard data.
iptv
Any TP-Link modems have the ability to support interactive television IPTV. This also applies to tl wr841n. You can connect and watch IPTV over Wi-Fi on any device. If there is a special set-top box, one of the LAN ports is allocated for it for the "bridge" role. All this is done in the "Network" tab, where you need to go to IPTV.

Individual user connection settings
Unfortunately, unlike many models from other manufacturers, the considered tl wr841n does not provide any opportunities for adding additional users with individual rights.
Dynamic DNS
- In order to enable dynamic DNS in tl wr841n, you need to go to the tab of the same name.
- If there is a registration on the resources presented in the drop-down menu, just enter your own login, password and domain, click "Enable DDNS" and proceed further.
- If this is not possible, you should follow the hyperlink and register.

Security Settings
Everything required parameters that ensure the security of the tl wr841n router and the network are located in the "Protection" section.
- In the "Basic protection settings" subsection, enable firewall SPI filtering content and tracking cyber attacks.
- In the “Local control” subsection, computers are registered from which you can control the special interface of the tl wr841n router.
- In addition, it is worth changing the admin password set by the manufacturer to a more complex one, known only to the owner of tl wr841n.

Parental control
To prevent a child from accessing the global network in the absence of adult family members, go to the "Parental Control" section:
- Check the "Enable parental controls" box.
- Enter the MAC address of the host computer.
- The following is the similar information for the computers under control.
- Enter the MAC addresses of all monitored computers below.
- The time of sessions and sites to which you can go are configured.

Change button function
There is no standard mechanism for redefining buttons for tp link tl 841n.
Printer setup
Since the tl wr841n router does not have a USB port, it does not support the print server function.
Setting dlna on the router
The situation is similar with the dlna server. Unfortunately, due to the lack of a USB port, this function will not work.
Setting up a VPN server
- To install a VPN server, you need to go to the "Network" subsection. Then, in the connection type, select "PPTP / PPTP Russia".
- The required fields contain the username and password specified in the agreement with the provider. The address type is set to "Dynamic IP".
- Then, in the "Server IP address" field, enter the address of the desired server - vpn.
- The network connection mode is set to automatic.
- All other fields are not editable.

Setting up a torrent client
TP-Link TL 841n interface page does not have standard ways, allowing you to configure torrent clients. However, you can install a third-party "dd-wrt" firmware that turns almost any router with a USB port into a torrent client. Due to the fact that the tl wr841n router model under consideration does not have one, there is no particular point in changing the firmware to a third-party one.
Possible malfunctions and ways to eliminate them
In the process of working with tl wr841n, problems and malfunctions sometimes occur. It's easy to correct them.
For example, tl wr841n stopped responding to the connection to the mains. This is indicated by non-luminous indicators.
- First, it is checked whether there is electricity in a particular outlet or whether the surge protector is turned on.
- If the answer is yes, it controls whether the power button is on.
- If the answer is yes here, most likely, either the tl wr841n router itself or the power adapter burned out.
Reasons why tl wr841n does not distribute wireless Internet, many. All of them are easily solved.
 The first is the presence of problems on the provider's side. In this case, you should contact technical support and describe the situation. Specialists will check the information received and, if necessary, solve the problem.
If there are no problems on the part of the provider, the cause is probably a malfunction of the tl wr841n. The first solution is to reboot the modem. To do this, just press the power button, wait from 30 seconds to a minute and press again. Most likely, the Internet will work. If that doesn't work, maybe mechanical damage internet cables. An inspection is carried out, if damage is found, you need to call the provider to replace the damaged area.
If everything is in order here, the settings are reset to the factory settings, which will solve the problems that appeared if the tl wr841n was configured incorrectly.
Firmware update
The firmware must be updated. This is due to the fact that the software is regularly upgraded and improved, the degree of protection increases, greater ease of use is provided, and various additional functions appear.
In most cases, this is done through the web interface. You can also use a specially designed mobile application. The tl wr841n model does not provide the ability to update via a USB device due to the lack of the required port.
Via web interface
- On the official TP-Link website, enter the model name or go to the "Downloads" tab, and then again select the tl wr841n model.
- There, find the version of interest and download.
- To avoid failures, you need to update the firmware only through network cable through a computer.
- The router is disconnected from the Internet and connected to the computer via a patch cord. Then follow the installation program instructions.

Via mobile app
If the family has a smartphone or tablet on iOS or Android, just download special application TP Link Tether. With its help, the router is managed and updated. You need to go into it, specify the model tl wr841n, go to the system settings and click "Update".
Reset router settings to factory settings
In case of unsolvable problems, it is worth using a factory reset. This is done in the "System Tools" section and the "Factory Settings" subsection. You can also manually hold down the WPS button for a few seconds.
Output
The tl wr841n router has characteristics inherent in much more expensive models from other manufacturers. In terms of price/quality ratio, the wr841n turned out to be almost perfect. There are no particular problems with it.
pros
The advantages of the router include the following indicators:
- strong signal even in large apartments / houses;
- WPS button;
- excellent cooling;
- high reliability.
Minuses
 TO negative aspects consumers include:
- standard design for the manufacturer;
- more complex admin interface than direct competitors;
- inability to remove antennas;
- no USB port.
The last point is significant, because the router loses many possible functions, but for the budget tl wr841n this is quite logical. Otherwise, it would cost significantly more.
The TP-Link TL WR 841 ND router is a popular device on the market, mainly used for home use. It can be configured without special knowledge and equipment. Now let's take a closer look at this process.
We assemble and connect the device
It looks like this:
After purchase, you need to make sure that it is complete. The TP-Link wireless router must contain in its original packaging (in addition to the router itself) a power supply unit (hereinafter referred to as PSU), a patch cord (a short cable with a network card connector, needed for direct connection to a computer), and a disk with instructions. After making sure the integrity of the kit, proceed to the next step.
Starting to network
We collect the device and connect to the network
This router allows you to do without wires, but you still have to tinker a bit to connect with them. So, we do the following:
- Having carefully opened the factory packaging, we take out a set of our equipment. Tip: compare the current and voltage indicators on the power supply with the factory settings (description in the documentation). There are times when manufacturers put inappropriate models in the kit. The use of a PSU with other current parameters will adversely affect the router - it may fail prematurely.
- We take the PSU and connect it to the router through the appropriate connector (TP-Link WR841N has one round shape, so it's impossible to make a mistake).
- We insert the PSU into the 220V network. The device must fit snugly to avoid short circuits. Therefore, it is undesirable to insert it into sockets of the old ("Soviet") model.

- Press the power button on the router. If the device is in working order, the indicators will light up. The first one on the left should be constantly on, and the one next to it should blink (this indicates that the device is ready for operation).
Tip: if the lights do not light up, try connecting the PSU to another device (most have standard connectors). If it works, the problem is in the wifi router, otherwise in the block itself.
- Next, connect the cable from the provider to the router. It must be inserted into the WAN connector. If the 4th light starts to light up, then there is Internet.
- We connect the router and the PC (or other device) using a patch cord. We install the first end in any of the four LAN connectors of the router, and the second end in the PC network card.
Resetting all settings to factory defaults
This procedure is required if the device was purchased "from hand". Because it can stand non-standard TP link firmware WR841ND, or simply wrong set parameters. However, it is not uncommon for devices in the factory packaging to be incorrectly configured. This is due to the fact that they can be tested in stores.
So, to bring the settings to the default values, press the WPS | Reset button and hold for half a minute. The router will reboot - this will signal that the reset has occurred. If you make fatal mistakes while trying to configure your TP router, this procedure will return everything to its original state.
Working with the interface
Before entering the router settings, make sure that one of the standard browsers is installed on the computer. So, once in the browser, enter these numbers in the address bar (top field): 192.168.0.1. This is the router's "default" address.

Please note: for all models from TP-link there is also a universal address: http://tplinklogin.net.
After entering any of the addresses, press the "Enter" key. As a result, a user interface will open in which you need to log in. At this stage, you need to enter in the fields "Username" and "password" standard layout"admin". At the end, click on the login button. As a result, we will get to the interface where the TP link setup WR841ND.
Login may fail for 2 reasons:
- incorrect network card settings (old drivers, the board is disabled, etc.),
- equipment malfunction.
Changing the default password
This procedure is optional, but if you live in apartment building, then there is a high probability that the neighbors will start using your Internet. In this case, its speed will decrease very much (almost like on a modem). The change is made as follows:

· IN user interface click on the "System Tools" section, then "password".
Enter user data "by default" (admin).
· Then enter a new username and password. Duplicate the values of e and confirm the changes by clicking on the "save" button.
Connecting to the Internet
Before setting up a TP-Link router, you will need to find out the type of connection (in most cases, all you need to do is call the customer support service). You will also need user data from the provider.
Dynamic connection
Usually set by default. If a different type is specified in the interface, then in order to set the dynamic type, you need to do the following:
· In the "connection type" menu, click on "dynamic ip-address".
· Click on the “define” button.
As a result, the system will load the data after a while. Save changes when finished

PPPoE connection
This is the most popular connection method used by the main Internet providers of the CIS countries. After looking at the user data, we do the following:
Enter user data (from the provider, not from the Wi-Fi connection!).
· We confirm.
· Put a tick next to "Connect automatically" and save the settings.

Static Method
A more complex method for TP-Link WR841N, for which you will need to know a number of data: ip-address, main gateway, subnet mask, DNS. Usually these parameters are specified in the contract from the provider, so there should be no problems. If a connection from the current provider has already been organized on your computer, this data can be found in the network card settings. To do this, you need to find it in the device manager and write out the parameters presented above. You can also contact subscriber service provider and request these characteristics.

We go into the WAN connection type, set the "static ip-address" method and enter the characteristics presented above. In the MTU size field, leave the default value only if the contract does not say anything about this item. We set the secondary DNS: 8.8.8.8 (this is google server). At the end, click the "save" button.
Don't forget to update the firmware
Software for network equipment is constantly being improved, so it needs to be updated. To do this, just download the desired distribution on the developer's website (tp-linkru.com). Before flashing the TP-Link WR841N router, look down the case and find out the hardware version (denoted as Ver **, where ** is the version number).

Going to the site, select the version of interest to us and download it. In order not to lose the settings, you only need to update the firmware using a network cable through a computer. That is, you need to disconnect the WAN cable (from the provider) and connect the router to the computer via a patch cord. And then we act according to the instructions of the installation program.
Choosing a router in the wireless network equipment market is quite simple. In most cases, buyers prefer budget representatives with a large set of useful features. But not every router owner can use a wide range of services. From this article, the reader will learn how TP-Link TL-WR841N is produced, because this model is considered the best in the computer market in terms of price-quality. Accordingly, the interest in this wireless device among users is the highest.
Computer preparation and connection
How to physically connect the router to a personal computer or laptop is written in the first chapter of the instructions supplied with the kit. As professionals assure, all you need is a patch cord cable and the ability to distinguish colors. But at the software level, it is not easy to make friends with the TP-Link TL-WR841N router with a computer, especially in cases with individual settings networks from the provider. It's pretty easy to check this:
- connect the provider's cable to the WAN connector (blue);
- connect one connector of the patchcord cable to the network input of the computer (RJ-45), and the second - to any LAN port of the router (yellow).
If the PC has access to the Internet, then you can safely proceed to the settings of the wireless device. Otherwise, you will have to work with your hands. It is immediately recommended to prepare a ballpoint pen and a piece of paper, as well as to find a provider agreement for Internet services (it specifies the network equipment settings).
Forced connection of the PC to the router
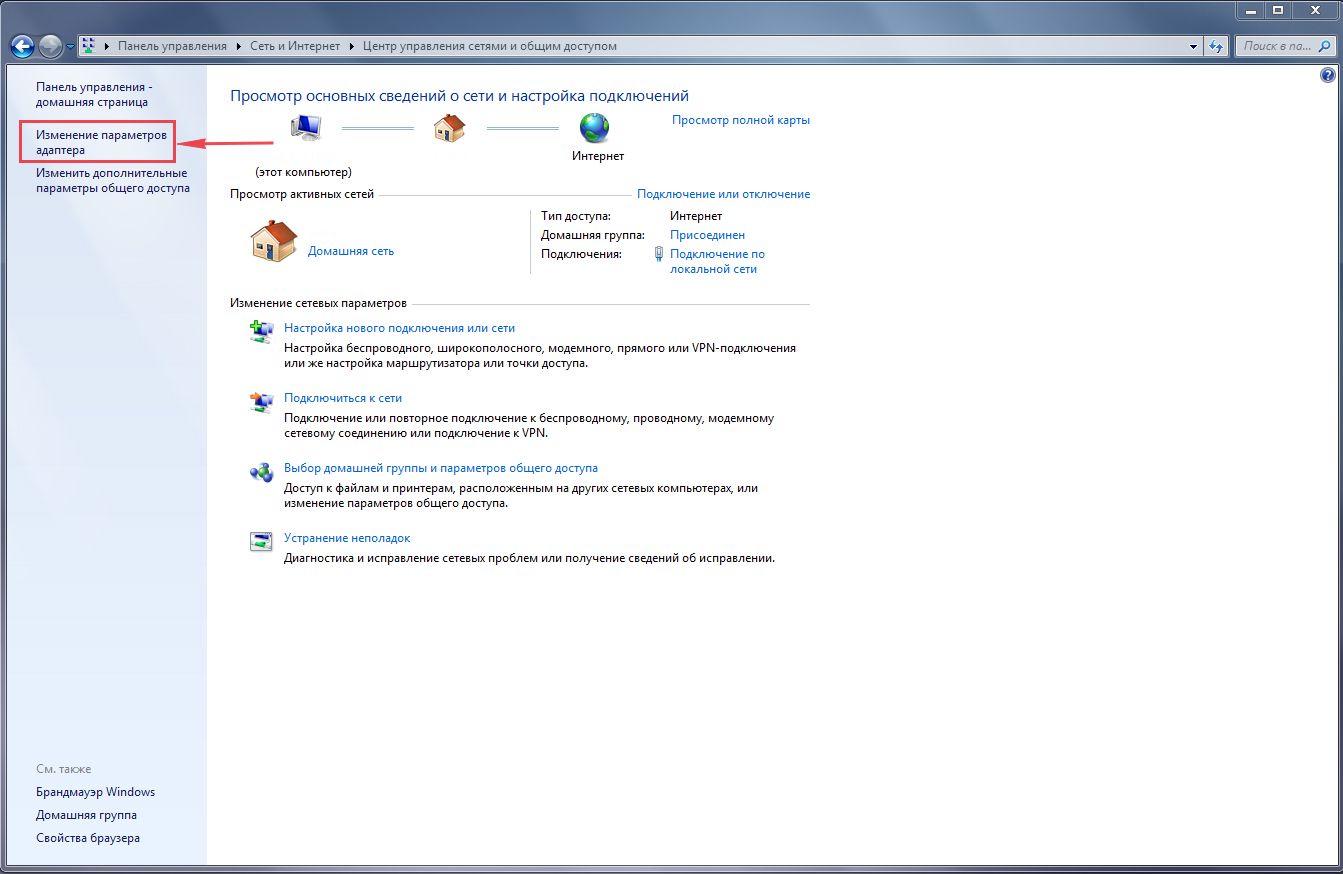
If TP-Link TL-WR841N is not possible due to the fact that the computer does not see the device, then the intervention of the owner is required. After opening the "Computer Control Panel", you need to select "Network Control Center". The item "Change adapter settings" will lead the user to a list of all network devices that exist on the PC. The desired interface will be highlighted in yellow exclamation mark. You need to install on it and press the right key of the manipulator. By selecting "Properties", the user will be taken to the menu for managing network components. In the list, you need to find the "TCP / IPv4" field, place the cursor on it and click the "Properties" button.

Manually written parameters need to be rewritten on a piece of paper: IP address, mask, gateway and DNS. After that, you can safely set 2 selection buttons opposite the "Get automatically" fields, click the "OK" button, and close all working windows. It is worth noting that after such manipulations with the network settings, in the list of network devices, the yellow indicator will disappear on the desired adapter and the message “Connected without access to the Internet” will appear.
Launching the router control panel
Before you configure TP-Link TL-WR841N, you need to run This is done in any browser (IE, Opera, Google Chrome, Mozilla Firefox). You must specify the IP of the router. By the way, network address router, login and password for authorization, are written on the sticker, which is attached to the bottom of the device. In most cases, the IP is "192.168.1.1" and the default login and password is "admin".

The connection procedure is quite simple, the main thing is not to rush, because all data must be entered only using English layout, and the letters themselves should be used only from lower case (not uppercase). A successful connection will end with the user going to the main window of the router control panel.
Internet connection
Fine-tuning the TP-Link TL-WR841N router is not recommended by experts until the device has an Internet connection. If access is in order, then you can proceed to the next section, in other cases, you will have to spend several minutes entering data about the network. By default, the router offers, after the first launch, to use the services of a virtual assistant, who, with the help of a couple of questions, will independently configure the network. There is no need to refuse, because the intelligent system can greatly save time.

With the setting, everything is simple: if a static address was registered in the computer, then you need to select the appropriate parameter and register the IP, mask, gateway and DNS. Otherwise, you need to use the data from the contract, in which the provider has specified its own settings for connecting to the Internet. After entering the data, it is imperative to save the information and confirm the reboot of the device. After 15-30 seconds, access to the Internet should appear.
Alternative option with provider settings
All domestic providers that use their own settings create specialized firmware that is compatible with most equipment on the market. This was done primarily for the convenience of users, because download software and installing it on the router is much more convenient than entering data manually. There is also a firmware for the TP-Link TL-WR841N router on the official website of the provider.

After saving the file on your computer, you need to unzip it and place it on any disk (it is desirable that the storage folder has an English name). Going to the control panel of the router, you need to select the "System Tools" item. In the "Firmware" field, you need to specify the path to the unpacked file and click the "Write" button. Interrupting the operation is not recommended, as this may damage the device. After the firmware, the router will reboot itself.
Trouble Awaiting
By installing the provider's firmware, you can lose access rights to the control panel of the TP-Link TL-WR841N router. Negative reviews are often found in the media about this. Change standard passwords very fond of providers that provide in parallel and services mobile communications. Here it is up to the user to decide what to do - configure the router on their own, entrust the router to the provider, or change the Internet service provider altogether.

The second trouble that may await the owner is the creation of public logins and passwords for both managing the router and wireless networks. After all TP link installation The TL-WR841N is produced by thousands of users, who theoretically could have the same provider. The same firmware - the same settings and passwords. Accordingly, the owner should take care of security.
Simplicity and convenience
According to the settings for wireless connections with the TP-Link TL-WR841N router, the reviews in the media are only positive:
- the control panel is Russified;
- in the right area of the screen, opposite each menu item there is detailed description in Russian;
- the setting is convenient, since all the necessary items are collected in one menu, and not scattered across different categories;
- it is possible to save configuration files to local computer, which is quite convenient when using the router in several places.
You don't have to be an IT guru to set up a Wi-Fi network. First you need to decide on the type of encryption. The default is WPA Personal/WPA2 if the router is used at home. It remains only to set the access password and the visible name of the Wi-Fi network, and you can safely save the settings, reboot the equipment and get down to business.
Finally
As practice shows, the configuration of the TP-Link TL-WR841N router does not contain any pitfalls. There is detailed instructions supplied with the kit, which describes physical connection devices with provider and personal computer. If, after connecting the equipment with a cable, the Internet does not appear, you need to use this article or contact your provider. customize same wireless connection and other functionality of the equipment will be helped by the same instructions and many tips that abound in the control panel of the router.
Before proceeding with setting up the router, let's check the LAN connection settings. For this:
Windows 7
Click on " Start", "Control Panel".
Then click on " View network status and tasks".

LAN connectionProperty".
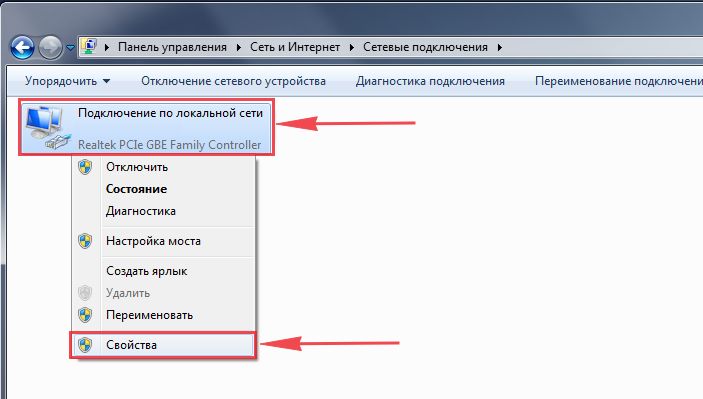
Then select from the list Internet Protocol Version 4 (TCP/IPv4)"and press" Property".

" and "", then press the button " Ok".

Windows 10
Click on " Start", "Parameters".

Then click on " Network and Internet".


In the window that opens we see " ethernet". Click on it with the right mouse button, select " Property".

Then select from the list IP version 4 (TCP/IPv4)"and press" Property".

In the window that opens, you need to check the boxes " Obtain an IP address automatically" And " Obtain DNS Server Address Automatically", then press the button" Ok".

Connecting a TP-Link TL-WR841N router to a computer
The next step is to connect the router TP Link TL-WR841N to your laptop or personal computer(PC). To do this, you need to connect the cable that the provider provided to you to the blue port of the router (that is, this is the cable that goes to your apartment, house, office, etc. from outside), and the cable that came with router, one end into one of the four ports that are marked in yellow on the router, and connect the other end to your laptop or PC. And yes, do not forget to connect the power cable.

TP-Link TL-WR841N router authorization
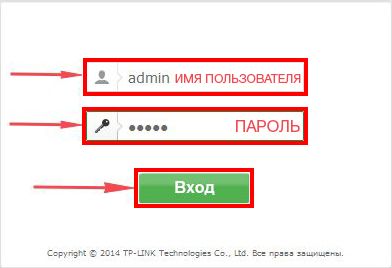
So, we connected the router, now you need to use any browser (be it Google Chrome, Mozilla Firefox, Internet Explorer, etc.) get into its web interface. To do this, open the browser and in the address bar we drive in the address of the router: 192.168.0.1 and press the button " Enter" on your keyboard (on older models this router this address could be: 192.168.1.1 ).
- Username - admin
- Password - admin
So, we drive in the data and click " entrance"

Configuring the Tp-Link TL-WR841N router
And finally, we got to the web interface of the router and now you need to configure the equipment. Let's secure first wireless network by setting a password for wi-fi. Then you will need to find out what type of connection is used to access the Internet, is it PPTP, L2TP or PPPOE. You can find out by calling your provider (this is the organization with which you have entered into an agreement to provide Internet services). So, let's start setting up the router.
Setting a password for wi-fi
I bring to your attention Video instructions for setting a password for wi-fi on a router Tp-Link TL-WR841N
Let's also take a written and illustrative look at setting a password for wi-fi on a router Tp-Link TL-WR841N.
On the Web interface, select the tab " Wireless mode"and get into" Wireless settings". Here it is necessary in the column " Wireless network name:" come up with and specify the name of your wireless network, this name will continue to glow when you connect to the network. Then select " Region:" - Russia. After that press " Save".

Next, go to the menu in the tab " Wireless security". Here we will configure the password for the wireless network invented above, for this we select the type of encryption" WPA/WPA2-Personal(Recommended)" and then below in the " PSK password"we come up with and drive in a password. Then click" Save".

After we pressed " Save"an inscription will appear above this button indicating that the settings have been saved and now we need to restart the router. What we do by clicking on the button" click here" by sending the router to reboot. After rebooting, the name of your wireless network will appear in the network settings of your computer.
PPTP setup
PPTP on the router Tp-Link TL-WR841N using the example of a Tp-Link TL-WR1043ND router.
Let's also write and illustratively PPTP on the router Tp-Link TL-WR841N.
Net", then " WAN".
IN " WAN connection type:"choose" PPTP/PPTP RussiaUsername:") and password (on the line " Password:IP Address/Server Name:
Connect automatically NOT Connect on demand
Save".

Setting up PPTP with a static IP address
Consider connection setup PPTP with static IP on the router Tp-Link TL-WR841N.
So go to the menu in the tab " Net", then " WAN".
IN " WAN connection type:"choose" PPTP/PPTP Russia", below you will be prompted to specify the username (in the line " Username:") and password (on the line " Password:").
Static IP addressIP Address/Server Name:"), ip-address (in the line " IP address:"), subnet mask (in line " Subnet mask:"), default gateway (on line " Main gate:") and DNS (in line " DNS:"). All of the above data is provided to you by the provider (the organization that provided you with the Internet).
All this data is usually prescribed in the contract with the provider. If for some reason you can't find them, you need to call your provider's hotline and find out how to get them.
After you have entered all the necessary data, check the box next to " Connect automatically" (This setting will keep the Internet connection constantly, so if you have NOT unlimited tariff I recommend checking the box next to " Connect on demand", that is, the Internet is connected only when you start using it).
After all the manipulations with the settings, press the button " Save".

Setting L2TP
Consider connection setup L2TP on the router Tp-Link TL-WR841N.
So go to the menu in the tab " Net", then " WAN".
IN " WAN connection type:"choose" L2T/L2T Russia", below you will be prompted to specify the username (in the line " Username:") and password (on the line " Password:"). You will also need to specify the ip-address of the server (in the line " IP Address/Server Name:"). All of the above data is provided to you by the provider (the organization that provided you with the Internet).
All this data is usually prescribed in the contract with the provider. If for some reason you can't find them, you need to call your provider's hotline and find out how to get them.
After you have entered all the necessary data, check the box next to " Connect automatically" (This setting will keep your Internet connection permanent, so if you NOT Unlimited tariff I recommend ticking the box next to " Connect on demand", that is, the Internet is connected only when you start using it).
After all the manipulations with the settings, press the button " Save".

Setting up L2TP with a static IP address
Consider connection setup L2TP with static IP on the router Tp-Link TL-WR841N.
Usually a static IP address is provided legal entities, either as additional service to the basic rate individuals.
So go to the menu in the tab " Net", then " WAN".
IN " WAN connection type:"choose" L2T/L2T Russia", below you will be prompted to specify the username (in the line " Username:") and password (on the line " Password:").
Since the connection uses a static IP address, you check the box next to " Static IP address", then specify the ip-address of the server (in the line " IP Address/Server Name:"), ip-address (in the line " IP address:"), subnet mask (in line " Subnet mask:"), default gateway (on line " Main gate:") and DNS (in line " DNS:"). All of the above data is provided to you by the provider (the organization that provided you with the Internet).
All this data is usually prescribed in the contract with the provider. If for some reason you can't find them, you need to call your provider's hotline and find out how to get them.
After you have entered all the necessary data, check the box next to " Connect automatically" (This setting will keep your Internet connection permanent, so if you NOT Unlimited tariff I recommend ticking the box next to " Connect on demand", that is, the Internet is connected only when you start using it).
After all the manipulations with the settings, press the button " Save".

PPPOE setup
I bring to your attention Video instructions for setting up the type of connection PPPOE on the router Tp-Link TL-WR841N using the example of a Tp-Link TL-WR1043ND router.
PPPOE on the router Tp-Link TL-WR841N.
So go to the menu in the tab " Net", then " WAN".
IN " WAN connection type:"choose" PPPoE/PPPoE Russia", below you will be prompted to specify the username (in the line " Username:"), password (on the line " Password:Confirm the password:"). All of the above data is provided to you by the provider (the organization that provided you with the Internet).
All this data is usually prescribed in the contract with the provider. If for some reason you can't find them, you need to call your provider's hotline and find out how to get them.
After you have entered all the necessary data, check the box next to " Dynamic IP" And " Connect automatically" (This setting will keep your Internet connection permanent, so if you NOT Unlimited tariff I recommend ticking the box next to " Connect on demandConnect on schedule
After all the manipulations with the settings, press the button " Save".

Setting up PPPOE with a static IP address
Consider connection setup PPPOE with static IP address on the router Tp-Link TL-WR841N.
Typically, a static IP address is provided to legal entities, or as an additional service to the basic tariff for individuals.
So go to the menu in the tab " Net", then " WAN".
IN " WAN connection type:"choose" PPPoE/PPPoE Russia", below you will be prompted to specify the username (in the line " Username:"), password (on the line " Password:") and password confirmation (on the line " Confirm the password:"). Since the connection uses a static ip address, you check the box next to " Static IP address", then specify the ip-address (in the line " IP address:"), subnet mask (in line " Subnet mask:").
All of the above data is provided to you by the provider (the organization that provided you with the Internet).
All this data is usually prescribed in the contract with the provider. If for some reason you can't find them, you need to call your provider's hotline and find out how to get them.
After you have entered all the necessary data, check the box next to " Connect automatically" (This setting will keep your Internet connection permanent, so if you NOT Unlimited tariff I recommend ticking the box next to " Connect on demand", that is, the Internet is connected only when you start using it, or " Connect on schedule", that is, the Internet works at a certain time specified by you).
After all the manipulations with the settings, press the button " Save".

Changing the web interface password
I bring to your attention Video instructions for changing the password on the web interface of the router Tp-Link TL-WR841N using the example of a Tp-Link TL-WR1043ND router.
Resetting the web interface password
If you have set a password on the web interface of the router and forgot it, I suggest you watch the Video instruction on resetting the password of the web interface on the router Tp-Link TL-WR841N using the example of a Tp-Link TL-WR1043ND router.
Firmware update
I bring to your attention Video instructions for updating the firmware on the router Tp-Link TL-WR841N using the example of a Tp-Link TL-WR1043ND router.
Connecting a computer to wi-fi
After connecting and configuring the router, you need to connect the computer to a wireless network (wi-fi), consider connecting to wi-fi in two operating systems, this is Windows 7 and Windows 10:
Windows 7
Video instruction

Sultan

Connect automatically" and press
"Connection".


Windows 10
Video instruction
In the lower right corner of the desktop we find the icon for the wireless network (wi-fi), click on it with the left mouse button.

A window pops up with a list of available wireless networks. We select a wireless network, in my case it is a network " Sultanova"(You choose the network whose name was given when).

After selecting a network, check the box next to " Connect automatically" and press " connect".


We wait, perhaps a couple of seconds, and you are connected to your wireless network.


")


 Alice from Yandex Browser")


