Many inquisitive users do not know how to disassemble the tablet and correctly assembled it, at this stage there are a huge number of questions that remain unexplored in most cases. That's why SAMSUNG example Galaxy Note. 10.1, will now be considered detailed instructions, on disassembling a tablet that does not hurt a fixing system and a gadget filling.
Disassembly tool
If you want seriously and make up the repair of tablets for a long time, then it is best to buy a basic set of elements in which must be:
- Blades of a wide variety of forms;
- Plus and minus screwdriver;
- Screenshots type screwdrivers;
- Triangular blades.
In principle, if you just want to try, then all this can be replaced by a pair of unnecessary bank cards And the mediator, however, the screwdriver will still have to be purchased. Since manufacturers prefer to use screws with non-standard heads, such as a polygonal star.
Disassembly Galaxy Note 10.1
The advantage of this model is to use both standard plastic fasteners and screws - it provides good defense From children and excellent maintainability.

First of all, we remove a silver insert - it is very easy: insert the blade or mediator into the hole between the housing and this panel, gently move the tool around the perimeter and decline fasteners. We take a screwdriver and unscrew all the available screws, if this is not done, the further disassembly of the tablet will flash.
All twisted screws are put off in advance prepared containers and subscribe to not forget where they come from.

Open the tablet
Now using a shovel and mediator removing rear coverThe actions are similar as with the panel: insert into the hole and move the tool around the perimeter.

Remove the cover
Disconnecting connectors
As soon as you remove the cover of the eye scatter in different directions, and you will see a huge number of all kinds of loops, however, you should not be afraid of everything they are well disconnected.

Turning off the loop
Now using light movements begin to extract connected loops. You ask how to disassemble the tablet and lose nothing in the process, the answer is simple: write down, draw the scheme, you can even shoot on the video.

Turning off photo flash
Please note that elements may have additional attachments in the form of screws, so you first inspect the item you want to disconnect and only then proceed to it.

Turn off wide loops
Once all the elements around the perimeter were disconnected: go to the battery, only for a start to start disconnecting his cable.
Remove the battery
We undertake a screwdriver again and unscrew the screws to the screws and lay them into another container, do not forget to turn off and holding the cable and connectors.

Turn off the battery
The battery takes the main part of the indoor space, but it can be seen immediately that manufacturers went to extreme measures to somehow reduce its size, so the tablet turned out quite thin.

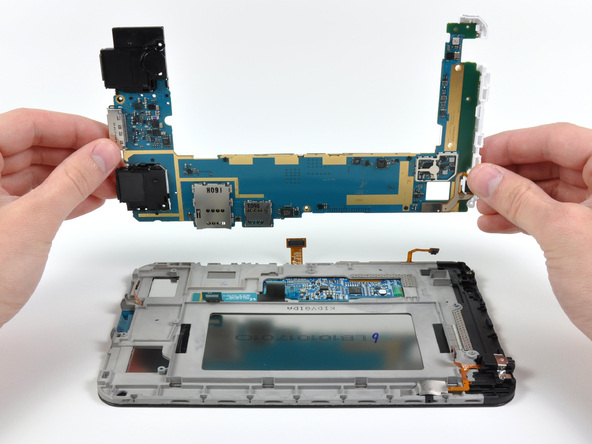
Now you can safely disconnect motherboard, the manufacturer has squeezed over experts and did not come up with some special fasteners: everything is very easily removed.

Clean the motherboard
Important fees elements have special shields that are very easily removed after unscrewing screws.
In some models, they may simply be glued or soldered - this is the worst option for repair.

Other elements
Now we need to get to the matrix, and for this remove the remaining items.

Docking connector
At the bottom we find barely noticeable screws and unscrew the connector for the docking station, scroll through the housing and disconnect the speakers that are practically not fixed. Now the question is how to disassemble the Samsung tablet you will not have, but let's finish the process and then summarize.

We remove the speakers
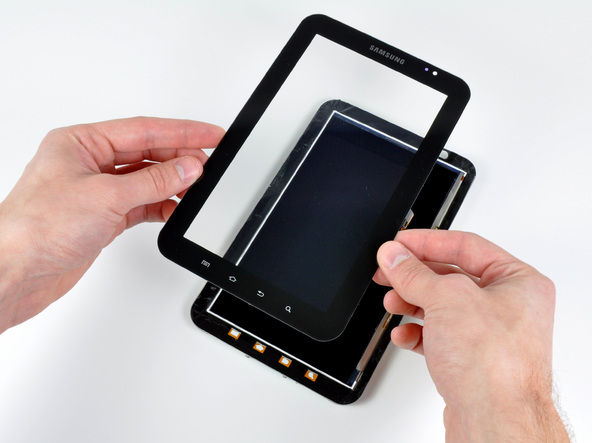
The moment of truth, we try to disconnect the matrix from the protective glass - this is one of the main stages of all disassembly, since it is this indicator that affects the devais repairability.

We subscribe a display
You can sigh with relief - this test Galaxy Note passed on perfectly. Almost all users know how to work with the tablet, but what is hidden under the case - not many. In case of damage to the glass, its replacement will cost much cheaper than, for example, the products of Apple, who should pay attention to it.

Remove the display
End with disassembly
You also need to know how to separate the glass frame. To do this, you should pay attention to the dedicated fasteners - these are rings that are trading through the frame and they will have to break. Fortunately, the frame additionally holds onto the liphone tape.

At this stage, there will have to make a little effort, the main thing is not to overdo it in order to accidentally do not break or damage the frame.

We remove glass
You can congratulate you - Samsung Galaxy Note has been successfully disassembled to bring it again to do the same steps in the reverse order.

Now you have learned how to disassemble the tablet and realized that in principle there is nothing terrible in this, the main thing is to approach everything responsibly and carefully. And so that after assembling a tablet, you randomly did not find unnecessary parts.
Detailed instructions on disassembly
This manual is a translation of articles: http://www.ifixit.com/teardown/samsung-galaxy-tab-teardown/4103/1.
This article is not a guide to action! All responsibility for the collection and analysis of your device lies with you.
Many manufacturers do not bear warranty obligations if the device has been disassembled by the user. If you do not want to lose guarantees in your device, specify the terms of warranty obligations in the documentation or manufacturer of the device.
Used tools
Let's look at the inside of the 7-inch sAMSUNG tablet On the basis of Android! Many thanks to the portal Engadget and the editor of Richard Laa personally for the unearthly device.
It's time to start disassembly!
So, in the hands of IFIXIT specialists Tablet Samsung Galaxy Tab..
It has long been rumored that this tablet will be the "iPad killer". Let's check as far as they are justified.
Specifications:
- Arm Cortex-A8 Hummingbird processor with a clock frequency of 1 GHz for multimedia devices based on Armv7 architecture
- Built-in memory module with a capacity of 16 GB or 32G + External expansion memory MicroSD
- RAM 512 MB
- 3.2 MP Main chamber on the back and 1.3 Mp front camera.
- Operating system Android 2.2 (Froyo) + branded SAMSUNG TOUCHWIZ software shell

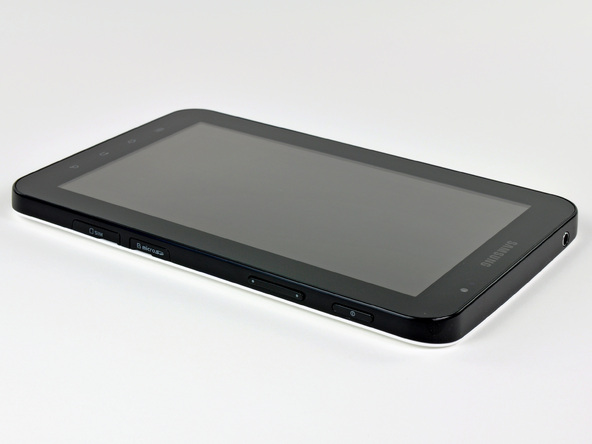
When devices actually consist of one touchscreen, invent the original design is very difficult. However, Samsung firm it succeeded: white rear panel Allocated on the background of the front panel of A la iPad.

At the bottom of the front panel there are standard Android OS controls, like most touchscreen display phones.

3.2-megapixel Main Camera with LED Flash is somehow not enough for the device of such a caliber, because even in much smaller devices like the Droid 2 phone, 5 megapixel cameras are installed.

Galaxy Tab interfaces: headphone connector, SIM card slot, microSD memory slot (with support to 32 GB) and USB docking station.

Moving alongside the tablets Galaxy Tab and iPad for comparison.
Galaxy Tab is much smaller than the opponent in size: 190.1 x 120.6 x 12.0 mm. Dimensions iPad: 242.8 x 189.7 x 13.4 mm.
In units of Galaxy Tab, it takes 275.1 cm3, while the iPad is 617.2 cm3.

Pretty devour eyes the tablet. Let's look at the screws on it.
We use the plastic overlay on both sides of the Apple docking station and detect 2 tri-wing type screws under it.

Three-blade screws are not the strongest barrier to open the tablet by folk craftsmen. We have a set of twig with 26 nozzles (including Tri-Wing) to continue massacre above the tablet.

How much strongly the docking station recalls apple devices? Here is a USB cable for a visual comparison.

Using plastic tools for opening the enclosures and guitar mediators, we use the front panel on the perimeter and discharge from the plastic back of the housing.

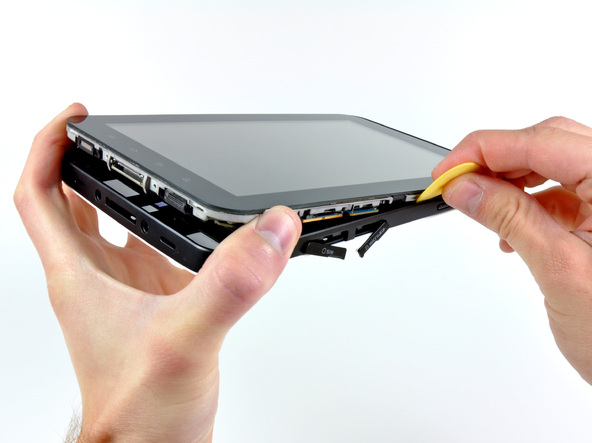
Fortunately, in Galaxy Tab there are no self-disperse copper clamps, unlike iPad.

By unscrewing all plastic latches, you can remove the back of the Galaxy Tab housing.

From the inside of the back of the case, we see a heavy plate of the electromagnetic shield located above the processor and memory chips on the motherboard.
The plastic design of the back of the housing undoubtedly contributes to good reception when used wireless communication. The use of plastic allowed the company Samsung bypass creative methods of designers Apple iPad. By improving signal transmission.

Almost half of the useful area of \u200b\u200bGalaxy Tab occupies a battery.
The battery is attached to the rear panel by a single screw with a crusade.

To disconnect the battery, you need to pull it out its connector from the socket on the motherboard.

The lithium-ion battery Galaxyt AB voltage is 3.7 V has a capacity of 14.8 W / h, or 4000 mAh.
At the conjunction of Samsung, the battery provides enough energy for 7 hours of moving films.
7 hours - not enough to view the favorite movieotrilogy. But the iPad with ease would provide this opportunity.

The Galaxy Tab battery weighs81 grams and is approximately 55% of the weight and 60% capacity of the giant iPad battery.

As can be seen in the picture, battery Galaxy Tab is about 2 times less iPad battery.
With the help of a plastic tool, we will dissemble the plume of the main chamber.


Goodbye, the main camera ...

To make a motherboard, you must first disconnect several loops:
- headphone / Microphone / Microphone Connection Clay (Around Red)
- clay Volume Adjustment Buttons (Around Orange)
- touchscreen cable (circled yellow)
- plume lED backlight Control buttons (closed turquoise)
- data Cable Display (Circled Blue)
The motherboard is attached to the rear panel with 7 screws with a crusade.

To make a motherboard, it needs to be disconnected from the rear panel.
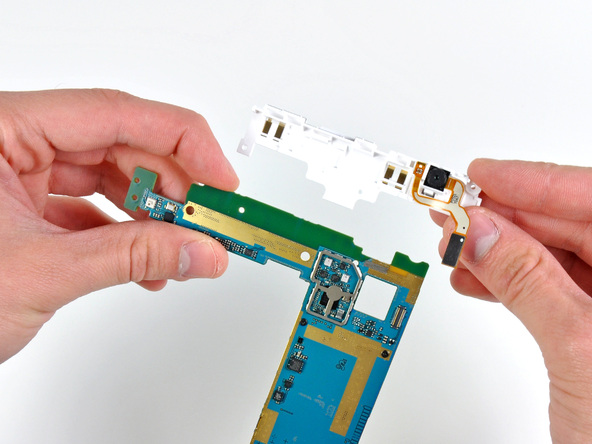
Front-camera It is easily discharged from the motherboard.

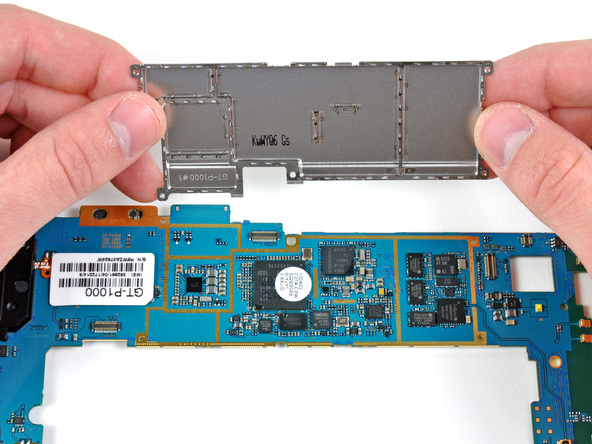
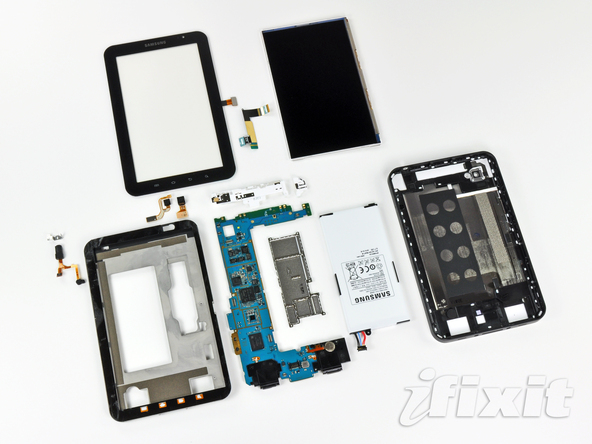
Let's remove these terrible electromagnetic shields and look at electronic circuits Galaxy Tab.
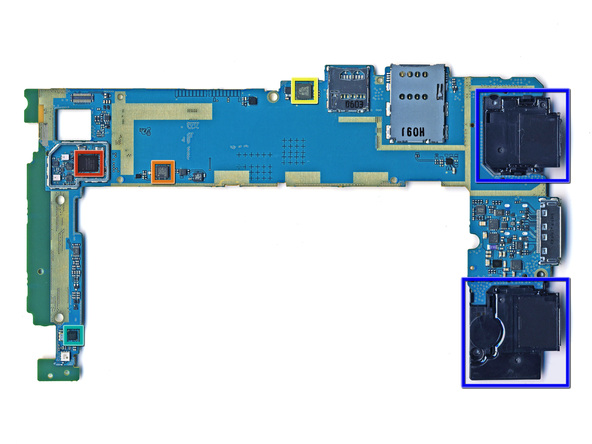
From the front side of the motherboard are (according to the portal UBM Techinsights):
- Nand-flash sandisk Memory SDIN4C2 16 GB MLC (circled red)
- Maxim 8998 power management integrated circuit (circled orange)
- Samsung S5PC110A01 + SAMSUNG KB100D100YM (1 GHz processor for multimedia devices Hummingbird + 8 GB mLC memory Flex OneNand, 1 GB ONEDRAM memory and 3 GB DDR memory for mobile devices) (circled yellow)
- The Infineon PM9801 modem (X-GOLD 616 HSDPA / HSUPA / EDGE) (Around Turquoise)
- Audio codec Wolfson Microelectronics WM8994 (Curved blue)
- Infineon PMB5703 Radio Frequency Releases (Rose)

On the reverse side of the motherboard are:
- Broadcom BCM4329 receiver (Bluetooth / FM / WLAN) (collapsed in red)
- Gyro STMicroelectronics L3G4200D (circled orange)
- ATMEL MXT224 Touch Screen Controller (Arriving Yellow)
- Broadcom BCM4751 GPS receiver (converted turquoise)
- 2 loudspeakers near the dock station form a Galaxy Tab audio system (circled blue)
So what makes Samsung Galaxy Tab with a real competitor iPad? The answer lies in the processor.
The Galaxy Tab has a processor for Multimedia devices Samsung S5PC110A01.
Like the A4 processor in the iPad, the Hummingbird processor with a clock frequency of 1 GHz is built on the basis of Arm architecture performed " housing»To improve the speed and efficiency of internal processes.

The headphone / microphone connector module is mounted on the rear panel with one screw with a crusade.

It needs to be slightly picked up to spare, and remove from the Galaxy Tab housing.

Fortunately, the headphone connector is not attached to the motherboard. So it is easy to replace it with damage if you accidentally drop the tablet with connected headphones.
Such ideas were also from Apple with respect to the iPad.

Slightly Pretty the Date Cable Display, turn off the self-locking connector and disconnect the cable from the front panel module.

Unfortunately, warming up to remove the front panel.
Heat the thermofine panel and carefully subsided, separating it from the case.

The ATMEL's touch screen is protected by a glass facial panel Corning Gorilla Glass.
Apparently, Galaxy Tab can also be used as armored personnel.

The Galaxy Tab has a Super TFT LCD display, providing improved image quality and an angle of view compared to a conventional LCD screen.

Although the Galaxy Tab screen resolution (1024 × 600) is lower, screen iPad. (1024 x 768), he has more pixel density (169 pixels per inch at Galaxy Tab against 132 from iPad).
169 pixels per inch is good, but clearly not enough for us. We prefer the Retina display in iPhone 4 with a density of 326 pixels per inch.

SAMSUNG GALAXY TAB tablet repair simplicity Tab: 6 out of 10 (10 points mean maximum simplicity).
- All components can be reached without the use of the soldering iron.
- The battery is subject to replacing the user.
- TRI-WING-type tri-wing screws are designed to scare off novice repairmen, but they can easily cope with them with good set Screwing with nozzles like ifixit.
- To remove the LCD dispersion, thermofen is needed.
- Opening of the Galaxy Tab is a very heavy task; One plastic tools can not do here.
Like a competitive model, iPad 3G, the Samsung Galaxy Tab tablet did not stand the IFIXIT wizard.
Disassembly completed!
Step-by-step instruction manual samsung galaxy tab tablet
- We subsequent panel latches using the plastic object mentioned above. We do it gradually and gently throughout the perimeter of the tablet.

- Under this panel there are several screws that you want to unscrew the screwdriver.

- Disconnect the battery from the board, and take it out.

- Gently with a plastic card or other thin subject, we will unschedule the camera loop connector.

- Similarly, disconnect all the display loops, volume buttons and others from the main board.

- We take out the board itself, carefully freeing from the grooves at the bottom of the tablet, or unscrew the screws depending on the model.

- To disconnect the headphone jack, unscrew the two screws and disconnect the loop.

- To remove the front panel with a touchscreen, heating with thermofen.

Ready! Your tablet is completely disassembled and you can easily clean his details from dust and dirt. It should be noted that the Samsung tablets are relatively simple, compared to other tablets, even Apple brands.
You can easily hold this procedure at home. To do this, you will not need a lot of tools or time. The most important thing, be extremely neat, so as not to damage the inner details of the tablet, because their repair can do in a very round sum.
We hope that our article gave you a detailed answer to your request.
What is the tablet: hardware and software components
Articles and Lifehakiz What is the tablet? This question worries many owners of this ultra-modern gadget. Someone is just wondering how this device works, someone has been doing professional interest to him, as he plans to repair, and someone just wants to buy all the components and collect the tablet independently (because there is nothing impossible). In any case, an article on the components of the elements tablet computer It will be useful. And at the same time you can personal experience find out what better tablet Or a laptop for study, although, perhaps, this question must be specified in relation to a specific task.
Which elements are the tablet
Any tablet can be conventionally divided into two rather large, but the interdependent parts.
1. The software that includes an operating system and a varietal software consisting of applications and games.
2. Hardware or "iron" part, which, strictly speaking, consists of component tablet.
Hardware components of the tablet
If we talk about what a tablet consists of, then first of all you need to talk about its "iron" (tangible) components, so they constitute the basis this deviceTo which the programs that will provide his work are "attached". So, the tablet consists of the following details:
1. The motherboard (the main component of the device, with a breakdown of which the tablet completely stops working).
2. Dynamics.
3. Components of the hull.
4. Camera.
5. USB ports To connect external devices
6. The screen (which is mandatory to be sensory, so that the touchscreen replacement is not needed on the tablet).
7. Processor (this is a unique integrated circuit that performs machine instructions and is the main part hardware The tablet, in other words, the processor performs the functions of the "brain" in this device).
8. Rechargeable battery (device that allows the tablet to work offline).
9. Wi-Fi-module, Bluetooth, 3G module.
10. Built-in memory (place where applications, games, photos and so on) are stored).
What is still a tablet
As mentioned above, the tablet consists not only from hardware details, a large role in his work plays software, namely the operating system. Today, there are tablets operating on three operating systems:
- Android;
- iOS;
- Windows.
Each of these systems has its own special characteristics, as they were developed for use on devices of different manufacturers, so consumers themselves choose what kind of systems they are suitable. But do not forget about operating system When choosing a tablet, as it provides 50% of its successful work and ease of use.
What is inside the tablet and other mobile devices? - All parts
Today we are more and more using tablet computers. The main quality of such a device can with confidence to call his mobility - the user is not tied to his workplace and can remain in touch as it is necessary, and at the same time constantly be aware of all important events. Today, the tablet does each use to his taste, someone is just a stylish accessory, someone loves to read a lot, someone is needed for holding meetings and demonstrate presentations, and someone just listens to music or watching movies. Compactness and ease of this device allows you to use it even in the school program. More and more parents replace ordinary heavy tutorials on compact plates with electronic book options. Of course, many are curious, which is located inside this device. It is about this that we want to tell you in this article.
The most important components of the tablet computer are:
- touch screen
- display
- motherboard
- accumulator battery
- of course, the case, which, as a rule, consists of two parts - the rear panel and the front part to which the touch screen is attached.

The touch screen is an input device that responds to touch and allows the user to "communicate" with its device on it that is understood for him. The appearance of touch screens in mobile devices allowed us to remove the usual mechanical keyboard, and make a huge display, as well as simplify the surfing on the Internet and expand the multimedia abilities of the device.

But there are no inconvenience. The touch screen consists of the touch panel itself, a loop for connecting to a system board and protective glass that makes the sensor a very fragile spare part, which is why touch screens often need to be repaired or replaced. For the strength of the touch screen, our store offers additional tempered protective glasses, which when the device drops, will take the entire punch. Additional safety glass Most likely breaks, but it is, in any case, replaced easier and cheaper than the touch screen, and at the same time, do not have to disassemble the tablet. In case you still cracked the touch screen, we offer touch screens to most tablets of well-known brands, such as Acer, Apple, Asus, Fly, Lenovo, Samsung, Sony, as well as a huge selection of touchscrees to Chinese-Tablet tablets PC, and other models.
If you have any questions about replacing the touch screen, we advise you to read our article
Typically, the touch screen is attached to the tablet in two ways - either double-sided scotch tape to the plastic frame, or on ultraviolet adhesive directly to the display. We offer a wide selection of high-quality tapes, selected specifically for gluing touch screens, as well as adhesives that solidify under ultraviolet radiation. By the way, we took off a whole video about glue, which you can see here:
Today it is simply impossible to imagine modern gadget without a camera. Tablet manufacturers usually use 2 cameras. The main camera is designed for high-quality video shooting, and, as a rule, has a high resolution And all sorts of elements to stabilize the image. Front (frontal) camera looks directly at you, and mainly used for video communication, has a small resolution for a comfortable signal transmission by mobile networks. The front camera, and sometimes the main, are attached to the plastic frame, which partially serves as the front panel of the tablet case.

If the touch screen is an information entry device, the display is the output device. On it graphically displays information in the format available to understand the person. The higher the resolution of the display, the clearer it will be a picture.

The most common breakdown of the display will always remain mechanical damage, simply speaking - a broken display. If you have such a problem, we are always glad to help you. In our store presented big choice Displays for tablets in different configuration, separately displays, displays complete with touch screens, as well as in the configuration with the frame.
"Skeleton" to which all components of any mobile device are connected is a motherboard. This is a complex multi-layer plate of dielectric, on the surface and in the inner layers of which conductive circuits are placed on electrical circuit. On the system board by the soldering method contains a plurality of electronic components, connectors for mechanical connection with other parts of the device, as well as the user interface.

- Coaxial cable, such antenna cables are connected to a system board with a soldering, or a special connector.
- Speaker (call) of a small size, designed to play melodies, speech, sound tracks movies, sound support games and any other sounds that make up your device.
- Charging connector. Some manufacturers make it separately so as not to occupy uSB portWhen you need to work with the device at the time of recharging, and in some cases charging is carried out only through the Micro-USB connector (in the figure is specified at number 5)
- The MINI HDMI connector is designed to output the video signal to other devices, it can be a TV, monitor or, for example, a projector.
- micro-USB, connector with which you can attach to the tablet external keyboard, Mouse, USB flash drive, is also used when exchanging information from a PC, and in some cases for recharging.
- Microphone. This device is designed to convert mechanical oscillations (sounds) to electrical signals, so that your speech can be recorded, or transferred over the network.
- Connector for a multimedia card. Used to increase the amount of memory in which your data is stored. In the same way, the connector under map sim, In the disassembled example, this module is absent.
- Connector for connecting an external headset. The tablet apply to the ear is not quite convenient, so external headphones with a microphone use to conversate.
- Turning on the tablet button
On the other hand system board Different electrical elements, chips and connectors for connecting the display, touch screen and cameras are soldered. Chip, in other words, an integrated circuit or chip (microchip) is a miniature electronic circuit made on a semiconductor substrate or film, most often placed in an unintended body.

- Module bluetooth Management, Wifi and fm radio
- ROM is a constant storage device, the location where the information recorded by the user, photo, video, documents, programs is stored.
- The nutritional control chip, in other words, the power controller is responsible for charging the tablet, as well as for the nutrition of other internal elements.
- CPU is a central processor device (Central Processing Unit, CPU, literally - central processing device), or just a processor, as we used to call it. It is essential
- RAM is an operational storage device (Random Access Memory, RAM, memory with arbitrary access), simply say "RAM". This type of memory is designed to store information variable, it allows you to change the contents in the process of how the microprocessor performs its operations. It is in it that all performed in this moment Programs and their data.
- Touchscreen controller. This chip, which, using the algorithm recorded in it, calculates the coordinates of the touch point and converts them into a digital code that is clear for the microprocessor. In some embodiments, the microcontroller can be placed directly on the touchscreen plume.
- Connector for connecting the main chamber
- Connector for connecting the front camera
- Display Connector
- Connector for connecting the touchscreen
the main brain of our device, which processes the data by executing arithmetic and logic operations and manages all devices. The main characteristics of the processor are clock purity and performance. Also not an unimportant factor is energy consumption.
In tablets supporting mobile communicationsThe power amplifier is also present, and in more expensive versions, the tablets are equipped with video processors.
Mobility of all this complex device provides, of course, the battery.

Rechargeable batteries differ in chemical composition, voltage, capacity, as well as dimensions. Our store offers a large selection of rechargeable batteries to tablets.
The main designer accent manufacturer puts on the rear plate of the tablet - this is the most overall part of the device.

The design of the back panel depends on how comfortable and nice to keep the tablet in the hands, how stable the device to mechanical damage When falling, well, and, of course, appearance.
The store all parts wishes that your tablets always function without failures and remain unharmed. If you have any questions about the repair of tablets, please contact our specialists in the Technical Support Service.
Shop Team All Parts
Useful articles:

Original article in English:
http://www.ifixit.com/teardown/samsung-galaxy-Tab-Teardown/4103/1.
Let's look together inside the 7-inch Samsung Tablet based on Android! Many thanks to the portal Engadget and the editor of Richard Laa personally for the unearthly device.
It's time to start disassembly!
That's what we need:
- guitar mediator
- thermofen or hair dryer
- special metal blade (Metal Spudger)
- cross dye size # 00
- plastic Tools for Opening Cases
- tri-Wing Tri-Walled Type
Important! All you do is do at your own fear and prom. Remember: After the device's parsing, you lose the manufacturer's warranty.
So, in the hands of IFIXIT specialists Tablet Samsung Galaxy Tab.
It has long been rumored that this tablet will be the "iPad killer". Let's check as far as they are justified.
Specifications:
- Arm Cortex-A8 Hummingbird processor with a clock frequency of 1 GHz for multimedia devices based on Armv7 architecture
- Built-in memory module with a capacity of 16 GB or 32G + External expansion memory MicroSD
- RAM 512 MB
- 3.2 MP Main chamber on the back and 1.3 Mp front camera.
- Operating system Android 2.2 (Froyo) + branded SAMSUNG TOUCHWIZ software shell

When the devices actually consist of one touchscreen, come up with an original design very difficult. However, Samsung This was possible: the white back panel is highlighted against the front panel of a la iPad.

At the bottom of the front panel there are standard Android OS controls, like most touchscreen display phones.

3.2-megapixel Main Camera with LED Flash is somehow not enough for the device of such a caliber, because even in much smaller devices like the Droid 2 phone, 5 megapixel cameras are installed.

Galaxy Tab interfaces: headphone connector, SIM card slot, microSD memory slot (with support to 32 GB) and USB docking station.


Moving alongside the tablets Galaxy Tab and iPad for comparison.
Galaxy Tab is much smaller than the opponent in size: 190.1 x 120.6 x 12.0 mm. Dimensions iPad: 242.8 x 189.7 x 13.4 mm.
In units of Galaxy Tab, it takes 275.1 cm3, while the iPad is 617.2 cm3.

Pretty devour eyes the tablet. Let's look at the screws on it.
We use the plastic overlay on both sides of the Apple docking station and detect 2 tri-wing type screws under it.

Three-blade screws are not the strongest barrier to open the tablet by folk craftsmen. We have a set of twig with 26 nozzles (including Tri-Wing) to continue massacre above the tablet.

How strongly the docking station reminds about Apple devices? Here is a USB cable for a visual comparison.

Using plastic tools for opening the enclosures and guitar mediators, we use the front panel on the perimeter and discharge from the plastic back of the housing.


Fortunately, in Galaxy Tab there are no self-disperse copper clamps, unlike iPad.

By unscrewing all plastic latches, you can remove the back of the Galaxy Tab housing.

From the inside of the back of the case, we see a heavy plate of the electromagnetic shield located above the processor and memory chips on the motherboard.
The plastic design of the back of the housing undoubtedly contributes to good reception when using wireless communication. The use of plastic allowed SAMSUNG to bypass creative methods of Apple iPad designers to improve signal transmission.

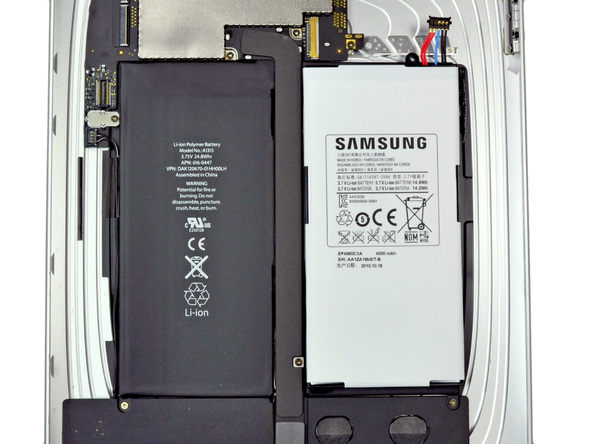
Almost half of the useful area of \u200b\u200bGalaxy Tab occupies a battery.
The battery is attached to the rear panel by a single screw with a crusade.

To disconnect the battery, you need to pull it out its connector from the socket on the motherboard.

The lithium-ion battery Galaxyt AB voltage is 3.7 V has a capacity of 14.8 W / h, or 4000 mAh.
At the conjunction of Samsung, the battery provides enough energy for 7 hours of moving films.
7 hours - not enough to view the favorite movieotrilogy. But the iPad with ease would provide this opportunity.

The Galaxy Tab battery weighs81 grams and is approximately 55% of the weight and 60% capacity of the giant iPad battery.

As can be seen in the picture, the Galaxy Tab battery is about 2 times less than the iPad battery.

With the help of a plastic tool, we will dissemble the plume of the main chamber.


Goodbye, the main camera ...

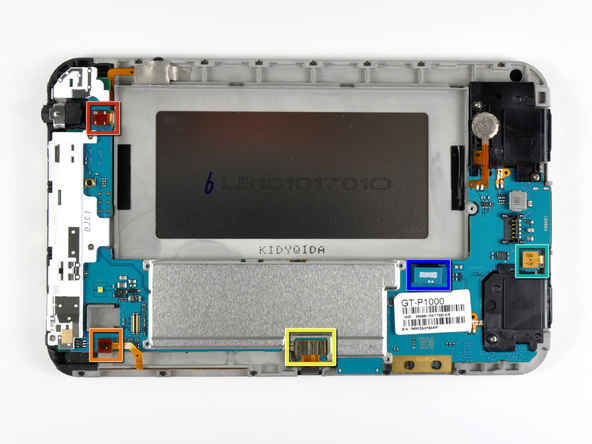
To make a motherboard, you must first disconnect several loops:
- headphone / Microphone / Microphone Connection Clay (Around Red)
- clay Volume Adjustment Buttons (Around Orange)
- touchscreen cable (circled yellow)
- lED backlighting the control buttons (encountered turquoise)
- data Cable Display (Circled Blue)

The motherboard is attached to the rear panel with 7 screws with a crusade.

To make a motherboard, it needs to be disconnected from the rear panel.

The front camera is easily discharged from the motherboard.


Let's remove these terrible electromagnetic shields and look at the Galaxy Tab electronic circuit.

From the front side of the motherboard are (according to the portal UBM Techinsights):
- Nand-flash memory SANDISK SDIN4C2 16 GB MLC (circled red)
- Maxim 8998 power management integrated circuit (circled orange)
- Samsung S5PC110A01 + Samsung KB100D100YM (1 GHz processor for Multimedia devices Hummingbird + 8 GB MLC Flex ONENAND memory, 1 GB ONEDRAM memory and 3 GB DDR memory for mobile devices) (circled yellow)
- The Infineon PM9801 modem (X-GOLD 616 HSDPA / HSUPA / EDGE) (Around Turquoise)
- Audio codec Wolfson Microelectronics WM8994 (Curved blue)
- Infineon PMB5703 Radio Frequency Releases (Rose)

On the reverse side of the motherboard are:
- Broadcom BCM4329 receiver (Bluetooth / FM / WLAN) (collapsed in red)
- Gyro STMicroelectronics L3G4200D (circled orange)
- ATMEL MXT224 Touch Screen Controller (Arriving Yellow)
- Broadcom BCM4751 GPS receiver (converted turquoise)
- 2 loudspeakers near the dock station form a Galaxy Tab audio system (circled blue)

So what makes Samsung Galaxy Tab with a real competitor iPad? The answer lies in the processor.
The Galaxy Tab has a processor for Multimedia devices Samsung S5PC110A01.
Like the A4 processor in the iPad, the Hummingbird processor with a clock frequency of 1 GHz is built on the basis of the Arm architecture performed by the "body" to improve the performance and efficiency of internal processes.

The headphone / microphone connector module is mounted on the rear panel with one screw with a crusade.

It needs to be slightly picked up to spare, and remove from the Galaxy Tab housing.

Fortunately, the headphone connector is not attached to the motherboard. So it is easy to replace it with damage if you accidentally drop the tablet with connected headphones.
Such ideas were also from Apple with respect to the iPad.

Slightly Pretty the Date Cable Display, turn off the self-locking connector and disconnect the cable from the front panel module.

Unfortunately, warming up to remove the front panel.
Heat the thermofine panel and carefully subsided, separating it from the case.

The ATMEL's touch screen is protected by a glass facial panel Corning Gorilla Glass.

Apparently, Galaxy Tab can also be used as armored personnel.

The Galaxy Tab has a Super TFT LCD display, providing improved image quality and an angle of view compared to a conventional LCD screen.

Although the screen resolution of the Galaxy Tab (1024 × 600) is lower than the iPad screen (1024 x 768), it has more pixel density (169 pixels per inch at Galaxy Tab against 132 from the iPad).
169 pixels per inch is good, but clearly not enough for us. We prefer the Retina display in iPhone 4 with a density of 326 pixels per inch.

SAMSUNG GALAXY TAB tablet repair simplicity Tab: 6 out of 10 (10 points mean maximum simplicity).
- All components can be reached without the use of the soldering iron.
- The battery is subject to replacing the user.
- Tri-wing tri-wing screws are designed to scare off beginners, but with them it is easy to cope with the help of a good set of screwdrivers with nozzles, like ifixit.
- To remove the LCD dispersion, thermofen is needed.
- Opening of the Galaxy Tab is a very heavy task; One plastic tools can not do here.
Like a competitive model, iPad 3G, the Samsung Galaxy Tab tablet did not stand the IFIXIT wizard.
Disassembly completed!

SAMSUNG GALAXY TAB 2 video lesson
SAMSUNG GALAXY TAB 3, video lesson
SAMSUNG GALAXY TAB 4 Disassembling Video Lesson
Sometimes there are such problems with the technique that without her disassembly can not do. Most often, this procedure is carried out in order to clean the device from the inside or replace the faulty battery for the working.
To begin with, make sure you are really ready to disassemble your tablet yourself. For a beginner, this process is quite delicate and complex. If you are not sure own power Subsequently, collect all the details in the same sequence, then contact the Samsung Tablet Repair professionals.
Before starting the tablet's parsing, make sure that you have a screwdriver and a thin plastic object on a plastic card. That's all you need to disassemble. If you intend to remove the front panel itself with the sensor, you will additionally need a hairdryer. So, proceed.
Step-by-step instruction manual samsung galaxy tab tablet
- We subsequent panel latches using the plastic object mentioned above. We do it gradually and gently throughout the perimeter of the tablet.
- Under this panel there are several screws that you want to unscrew the screwdriver.
- Disconnect the battery from the board, and take it out.
- Gently with a plastic card or other thin subject, we will unschedule the camera loop connector.
- Similarly, disconnect all the display loops, volume buttons and others from the main board.
- We take out the board itself, carefully freeing from the grooves at the bottom of the tablet, or unscrew the screws depending on the model.
- To disconnect the headphone jack, unscrew the two screws and disconnect the loop.
- To remove the front panel with a touchscreen, heating with thermofen.
Ready! Your tablet is completely disassembled and you can easily clean his details from dust and dirt. It should be noted that the Samsung tablets are relatively simple, compared to other tablets, even Apple brands.
You can easily hold this procedure at home. To do this, you will not need a lot of tools or time. The most important thing, be extremely neat, so as not to damage the inner details of the tablet, because their repair can do in a very round sum.
We hope that our article gave you a detailed answer to your request.
Video: lid removal and simple sAMSUNG parsing Galaxy Tab 3.
Often there are reasons for which you need to make out your technique. Most often, this procedure is carried out for internal cleaning. After it, your technique begins to work more and faster, and the problems that previously disabled you are disappeared.
The procedure for disassembling tablet can be carried out at home, if you take on all responsibility for the consequences. Some service centers will not get to repair your tablet even under warranty after you have disassembled it. It is worth considering, and when doubtful, it is better to contact the Samsung tablet service center.
Most often, when you need to disassemble the tablet, we are confronted with the most ridiculous problems. The very first is usually removing the tablet cover. Yes, you did not hear, remove the lid - it is also not always simple. Difficulties with the opening of the lid are found on Apple tablets. The Samsung Galaxy Tab 3 tablet cover is also tightly and firmly attached to the housing, and many are wondering how to remove it without damaging.
SAMSUNG GALAXY TAB 3 tablet disassembly
To remove the lid you need a thin plastic object (for example, a blade). Pull out the plug for the SIM card and strengthen the rear lid with a spatula, neatly around the perimeter, remove it.

If you needed only to remove the lid, you will not need further instructions. However, if you need to fully disassemble your tablet, go further.
After removing the back cover, you can extract the rest of the details. We start extraction S. rechargeable battery. For this we need a screwdriver. With it, we need to unscrew 4 screws around the edges of the battery. But that's not all. You still need to disconnect the battery from the motherboard. To do this, we take tweezers and carefully disconnect the loop. Ready, battery can be extracted.

Next, you can remove the motherboard. Again, we take tweezers and disconnect the plumes. If there is no tweezers at hand, you can take a screwdriver. She will also fit. Now in the panel will clearly seen cogs on the sides. They need to be unscrewed. These screws should be only 7. The board can be removed.

Now you need to remove the back chamber. This procedure does not differ from the above mentioned. Also laughing the loops to which the camera is attached, and take it out. The front camera is removed a little different than the rear. In order to remove it, you need to dedule the plug.

Ready! Your tablet is disassembled. Now it can be cleaned and in the same sequence to gather back. The procedure for disassembling the Samsung Galaxy Tab 3 tablet is not considered complicated, but if you doubt your abilities, better contact service center.
Good luck to you!


