In Russia WiFi Router TP-LINK TL-WR740N It was quite popular in the market. And its popularity is owned by its low price - this model was one of the cheapest. From here and complaints about poor quality of work, unstable connection And forever buggy WiFi.
At the same time, the TL-WR740N router setting is not particularly different from other Wi-Fi TP-Link routers. In this manual, we will show how to configure the TP-Link 740 router for connecting the Internet and television from Rostelecom, Beeline, Dom.ru and TTK.
Installing and connecting TP-LINK TL-WR740N
The IP address of the TP-LINK router, which is used for the local network, usually or, or. Also, access to the router settings is available both by symbolic address - tplinklogin.net or tplinkwifi.net. You can always clarify this on the sticker, which is from the bottom of the device case.

Login to log in to setting the Wi-Fi router - admin. and password - admin.. Only here there is one point - the password when you first configure the connection usually change to a more complex one. In this case, when through the username and password by default, you will have to do.

How to configure the Internet on TP-LINK TL-WR740N
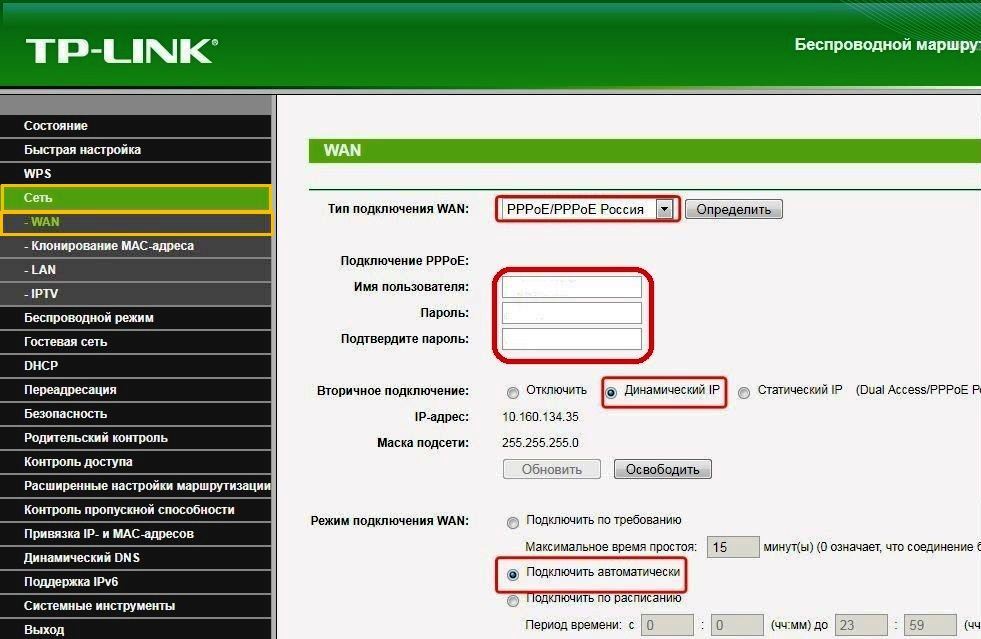
The TL-WR740N router setup process usually begins with configuring it to connect it to the Internet. To do this, go to the menu Network \u003e\u003e\u003e WAN. So you can see - which connection parameters are used at that moment. At this stage, the main task is to choose correctly connection type. If you do not know which type it is necessary to choose to your operator - consult it technical support. Usually for the house.ru uses the PPPoe protocol, for biline - dynamic IP, Rostelecom usually uses PPPoE in most regions, but some can use dynamic IP.
PPPOE connection
In the WAN Connection Type list, select item PPPoE / Russia PPPoe. In this case, it is necessary in the fields below, to register a login and password to connect. They are usually attached to the contract so that the client does not lose.

Usually, besides this, nothing else in the Internet connection settings on the TP-LINK TL-WR740N router is not needed. Just check in order to "Connect Automatically" in the WAN Connection Mode. Press the "Save" button. Connect the provider cable to the router and you can check the Internet access.
Connection Dynamic IP.
If the provider uses the connection type Dynamic IP. (He can also be called DHCP.), then to configure it is enough just to choose this type of connection in the section Network \u003e\u003e\u003e WAN..

No additional parameters should not be prescribed! By the way, the new router from the box is already tuned to such a connection! It is enough just to connect the provider cable to it and it will be able to connect to the Internet itself. Click the Save button and check the Internet access.
WiFi Setup on TL-WR740N router
Setting up wireless wiFi networks TP-LINK TL-WR740N is performed in the following order. First you need to open the menu item Wireless Mode \u003e\u003e\u003e Settings:

In the "Name Name" field, specify the name wireless network - That is, here you can register how your Wi-Fi will be called. To do this, use any word or phrase in English.
"Region" is usually already installed correctly - "Russia".
WiFi channel width on TL-WR740N put 40 MHz. when needed high speed. If you need a large network coverage radius - Leave the value 20 MHz..
Click on the Save button.
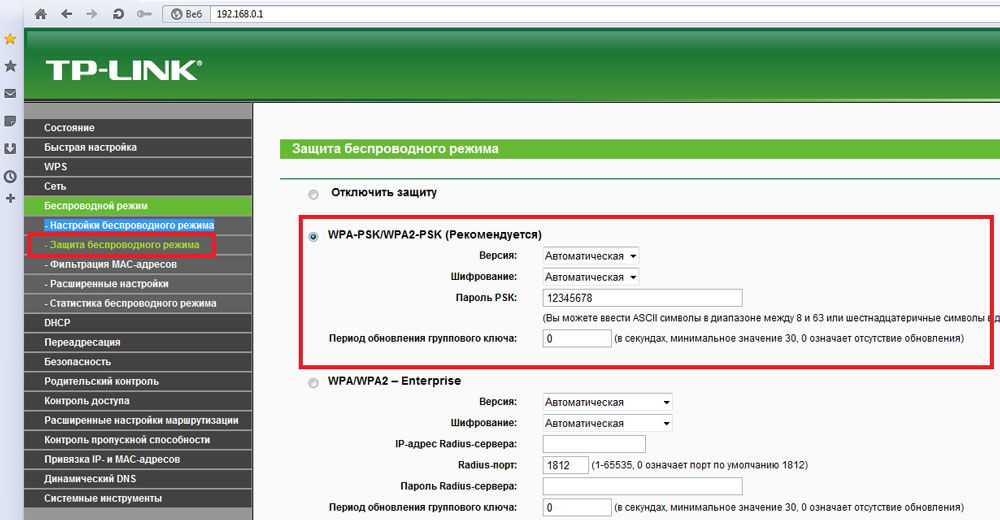
Now you need to open the section Protection wireless mode . Here the password is configured on WiFi at TL-WR740N:

Here, place the flag on the line WPA-PSK / WPA2-PSK (recommended) And register these parameters:
Version - WPA2-PSK Encryption - AES Password PSK - Here enter a password for a length of at least 10 characters
Do not touch anything else and click on the "Save" button. After that, you need to connect a laptop or phone and check the availability of WiFi on TP-Link 740.
Comment: If there is a WPS section in the menu - be sure to go there and disconnect this feature, as it represents a very high network security threat.
How to configure IPTV television on TP-Link TL-WR740N
If you want to configure the digital TV on the TP-LINK TL-WR740N router, you will need to know in the technical support of the Provider settings for this service. Usually at Dom.ru, TTK and Beeline is quite simple separate one LAN port To connect the STB console. To do this go to the section \u003e\u003e\u003e iptv.
Attention! If you have an IPTV item in the router configuration menu at all - update it with the firmware (below in the instructions we will tell you how to do it).

Activate IGMP Proxy mode. Below, in the "Mode" field, place the "Bridge" value and select the port for IPTV - "LAN4". Press the "Save" button. Now you need to connect a TV console to TL-WR740N and check the operation of the service.
There are cases when setup IPTV. On TL-WR740N implies the need to register the VLAN number on the router. Such a scheme is often used by Rostelecom). Then in the "Mode" row, put 802.1Q Tag VLAN.:

In the parameters below check the box Disable VLAN TAG for the Internet. In the "Multicast VLAN identifier for IPTV service" enter the number of the VLAN ID, which you learned technical support. In the line "Multicast VLAN priority for IPTV service, put the number" 4 ". At the bottom of the page, find the line "LAN4 port mode" and put the "IPTV" value in it.
How to open a port on TP-LINK TL-WR740N
In order to open ports on the TP-LINK-LINK TL-WR740N for playing or video surveillance (i.e., make the so-called port forward) to enter the menu section Forwarding \u003e\u003e\u003e Virtual Servers:

To add the port to the open port of the TP-LINK router - click on the Add button. This menu appears:

In the port of the service and in the "Internal Port" line, you need to register the port number to be opened on the TP-Link 740 router. Next, write the IP address of the computer to which the ports are made. In the line "Protocol" more optimally put the value of everything. Otherwise, you will have to separately open the port for the TCP protocol and for the UDP protocol. Click the Save button.
TP-LINK TL-WR740N firmware
If you endade the TP Link 740 router and update the router software, first download last version According to the official website of the manufacturer. You can download TP-LINK TL-WR740N firmware.
Once the file downloaded - unpack it from the archive if it has a ZIP or RAR format. Then in the web interface, open the menu item System Tools \u003e\u003e\u003e Update Built-in:

Click on the "Select File" button to show the device where the file is with software and click on the "Update" button. After that, the firmware of the TL-WR740N router will begin. This cannot be turned off or restart the router. The process itself takes about 2 to 10 minutes, after which the router will reboot. The settings are usually not reset.
Change Password Access to Settings
After adjusting the TL-WR740N router - do not forget to change its factory Admin password to some kind of one, more complex. This must be done to ensure the safety of its home network. To change the password of the TP-Link 740 router, open the menu section System Tools \u003e\u003e\u003e Password:

At the top of the window, you will write the username and password that is currently used. But below will need to specify a new password and its confirmation in the corresponding field. Save the router settings. After that it is advisable to restart it.
Hello.
Setting up the router - the case is quite simple and fast, but sometimes this procedure turns into real "Nataria" ...
TP-LINK TL-WR740N router is a fairly popular model, especially for home use. Allows you to organize a home locale network with Internet access for all mobile and not mobile devices (phone, tablet, laptop, stationary PC).
In this article I wanted to bring a little step-by-step instructions By setting up such a router (in particular, let us touch the Internet, Wi-Fi and LAN).
Connecting a TP-LINK TL-WR740N router to a computer
Connecting the router to the computer standard. The scheme is approximately as follows:
- turn off the cable Internet provider from network card Computer and connect this cable to the internet jack of the router (It is usually marked with blue, see Fig. 1);
- then connect the cable (which comes with a router) Computer network card / laptop with router - yellow jack (their four on the case of the device);
- connect the power supply to the router and turn it into a 220V network;
- actually, the router should start working (on the body will light up and start blinking LEDs);
- next include a computer. When the OS is loaded - you can go to the next setting step ...
Fig. 1. Rear view / front view
Log in to the router settings
For this you can use any modern browser: Internet Explorer., Chrome, Firefox. Opera, etc.
Parameters for entry:
- Address page settings (default): 192.168.1.1
- Login to access: Admin.
- Password: Admin.
Important! If you cannot go to the settings (the browser issues an error that the password is not correct) - the factory settings may be shot down (for example, in the store). On the case of the device from the back there is a reset button - clamp it for 20-30 seconds. As a rule, after this operation, you can easily go to the settings page.
Setting up Internet access
Almost all the settings you need to do in the router will depend on your Internet provider. Usually, all the necessary parameters (logins, passwords, IP addresses, etc.) are contained in your contract compiled when connecting to the Internet.
In many Internet providers (for example: Megaline, ID-NET, TTK, MTS, etc.) use PPPOE connection (I would call it the most popular).
If you do not go into details, then when connected PPPoE, you need to know the password and login to access. In some cases (for example, MTS) use PPPoE + Static Local: i.e. Internet access You will receive when you enter a login and password, but the local network must be configured separately - the IP address, mask, gateway will need.
In fig. 3 shows the Internet Access Settings page (Section: Network - WAN):
- Wan Connection Type: Specify the type of connection (for example, PPPoE, by the way on the type of connection - further settings depend on);
- User Name: Enter login to access the Internet;
- Password: Password - // -;
- if you have a "PPPoe + Static Local" scheme, you specify the STATIC IP and enter the IP address of the local network (in other cases simply select Dynamic IP or Disabled);
- next, save the settings and reboot the router. In most cases, the Internet will already work (if the password and login correctly entered). Most of the "problems" happens with setting up access to a local provider's local network.
Fig. 3. Setting up PPOE connections (used from providers (for example): TTK, MTS, etc.)
By the way, pay attention to the Advanced button (Fig. 3, "Extended") - in this section you can specify DNS (in cases where they are required to access the provider's network).
Fig. 4. Extended PPOE settings (needed in rare cases)
If your Internet provider makes binding to MAC addresses, you need to clone your MAC address of the old network card (through which previously access to the Internet was carried out). This is done in the section Network / Mac Clone .
Fig. 5. Cloning MAC addresses is necessary in some cases (for example, MTS provider at one time brought binding to MAC addresses, as they do not know ..)
By the way, for example, I made a small screenshot of the Internet settings from Billine - see fig. 6.
Settings are as follows:
- connection Type (Wan Connection Type) - L2TP;
- password and login: take from the contract;
- Server IP Address (Server IP Address): TP / Internet.Beeline.Ru
- after that, save the settings and reboot the router.
Fig. 6. Configuring the Internet from Billine in the TP-LINK TL-WR740N router
Setting up Wi-Fi network
For wi-Fi settings You must go to the next section:
- - Wireless / Setup Wi-Fi ... (if English interface);
- - Wireless / wireless mode / configuration (if the Russian interface).
Next you need to set the name of the network: for example, " Auto"(See Fig. 7). Then save the settings and go to section " Protection of wireless network » (To install the password, otherwise your Wi-Fi will be able to use everything neighbors ...).
Fig. 8. Wireless Protection - Password Setup
Connecting to Wi-Fi and Internet access
Connection, in fact, sufficiently simple (I will show you on the example of the tablet).
Going to Wi-Fi settings, the tablet finds several networks. Choose your network (in my example Autoto. ) And try to connect with it. If the password is set - you need to enter it for access.
Actually, all: if the router is configured correctly and the tablet was able to connect with wi-Fi network - The tablet also has access to the Internet (see Fig. 10).
TP-LINK TL-WR740N router is a device designed to provide joint access to the Internet. It is at the same time Wi-Fi router and a network switch for 4 ports. Thanks to the support of 802.11n technology, network speeds up to 150 Mbps and affordable price, this device may be an indispensable element when creating a network in an apartment, a private house or small office. But in order to use the possibilities of the router fully, you need to be able to configure it correctly. This will be discussed further.
Before starting the direct configuration of the router, it is necessary to prepare it for work. This will require:

After that, it remains to turn on the power of the router and proceed to its direct configuration.
Possible settings
To start setting TL-WR740N, you must connect to its web interface. To do this, you will need any browser and knowledge of the entry parameters. Usually this information is applied on the bottom of the device. 
Attention! Today Domain tplinklogin.net No longer belongs to TP-LINK. You can connect to the router settings page at tplinkwifi.net
If you cannot connect to the router on the address specified on the package, you can simply enter the device's IP address instead of it. According to the factory settings for TP-LINK devices, IP address is installed 192.168.0.1 or 192.168.1.1. Login and password - admin.
Entering all the necessary information, the user enters the main router settings menu. 
Her appearance and the list of sections may differ slightly depending on the firmware version installed on the device.
Fast setting
For consumers who are not very sophisticated in the subtleties of adjusting routers, or do not want to bother too, in tP-LINK firmware TL-WR740N features a function fast settings. To launch it, you need to go to the section with the same name and click on the button. "Further".
Further sequence of actions such:

On this, a quick setting of the router is completed. Immediately after the reboot, the Internet will appear and the possibility of connecting via Wi-Fi with the specified parameters.
Manual setup
Despite the quick setup option, many users prefer to configure the router manually. It requires a deeper to understand the functioning of the device and work computer networksHowever, it is also not a great difficulty. The main thing is not to change those settings, the purpose of which is incomprehensible, or unknown.
Configure Internet
To configure yourself the connection with the World Wide Web, you need to do the following:

Some providers other than the above parameters may require the registration of the router MAC. These settings can be viewed in the subsection "Cloning of MAC-Address". Usually there is nothing to change there.
Configuring a wireless connection
All Wi-Fi Connection Settings are installed in the section "Wireless Mode". You need to go there and then do the following:

In the remaining subsections to make any changes optional. It is only required to restart the device and make sure that the wireless network works as needed.
Additional features
The execution of the steps described above is usually enough to provide access to the Internet and distribute it to the device on the network. Therefore, many users on this end the configuration of the router. However, there are still a number interesting functionswhich are becoming increasingly popular. Consider them in more detail.
Access control
The TP-LINK TR-WR740N device allows you to very flexibly adjust access to the wireless network and to the Internet, which allows them to make the network controlled by them more secure. The user is available to the following features:

In TL-WR740N there are other possibilities for managing access to the network, but they are less interesting for an ordinary user.
Dynamic DNS.
Customers who need to access computers in their network from the Internet can use the dynamic DNS function. Its configurations are devoted to a separate section in the TP-LINK TL-WR740N web configurator. In order to activate it, you must first register your domain name Supplier services DDNS. Then take the following steps:
- Find in the DDNS service supplier drop-down in the drop-down list and make registration data received from it to the appropriate fields.
- Enable dynamic DNS., noting checkbox in the relevant paragraph.
- Check for connecting by pressing the button "To come in" and "Go out".
- If the connection has passed successfully, save the created configuration.

After that, the user will be able to access computers on its network from the outside by using a registered domain name.
Parental control
Parental control is a function that is very popular with parents who want to control their child's access to the Internet. To customize it on TL-WR740N, you need to take such steps:

If you wish, the action of the created rule can be configured more flexibly by setting up a schedule in the section "Access control".
Wishing to use the function parental control It should be borne in mind that in TL-WR740N, it acts very peculiar. Enabling function divides all network devices on one controlling, having full access to the network and managed, having limited access According to the rules created. If the device is not attributed to any of these two categories - it will be impossible to exit it to the Internet. If this state of affairs does not suit the user, it is better to use third-party software to make parental control.
IPTV.
Ability to view digital television Via the Internet attracts more and more users. Therefore, in almost all modern routers, IPTV support is provided. It is not an exception to this rule and TL-WR740N. Configure this feature is very simple. The sequence of action is:

If you cannot configure the IPTV function, either such a partition is generally absent on the router settings page, you should update the firmware.
These are the main features of the TP-LINK TL-WR740N router. As can be seen from the review, despite the budget price, this device provides the user with a fairly wide range of opportunities for Internet access and protect its data.
TP-LINK routers are one of the most common devices in the domestic market. The popularity of products from the Chinese manufacturer is due to the optimal price ratio, quality and reliability in work. And the WR740N model of TP-LINK through support for both modern and past network connections, providing data transfer rates up to 150 Mbps and reliable protection from possible attacks from the outside, has become an excellent solution when building a home network.
The TP-LINK WR740N model router refers to high-speed routers based on 802.11n technology and having compatibility with all devices that support IEEE 802.11b / g standards. Its distinctive feature from models based on these standards is a higher data transfer rate and an increased wireless network coating radius. This allows you to view streaming video without any problems, use IP telephony and play online games. Thus, TP-LINK WR740N with its characteristics combines the capabilities of a modern high-speed router with a budget price.
Appearance
 The design of the WR740N model is implemented in accordance with the classical standards of TP-LINK devices. The device is concluded in a stylish plastic body with rounded edges. Elegance She gives a narrowed front part and a harmonious combination of the black strip of the panel of indicators with the matte and white color of the rest of the case.
The TP-LINK WR740N indicators panel does not have signatures, but it does not make it difficult to determine their purpose. All indicator windows are made in the form of pictograms, intuitively understandable even to the novice user. From left to right on the panel are:
- power indicator;
- indicator built-in self-testing. During normal operation should flash;
- wi-Fi module;
- LAN ports (four indicators);
- wireless Device Connection Indicator;
- qSS function indicator.
 On the back of the device there are ports for connecting via a local network (LAN) in the number of four pieces, and one WAN port is to connect the provider cable. In order not to confuse the connectors for local and global networks, the WAN port is indicated by another color. On the sides of the ports are connector for connecting the power supply, the button is turned on / off and the "Wai Fi" antenna, and on the other hand, the WPS / Reset button.
On the bottom of the case there are a cooling grille and holes that allow you to secure the device to the wall. There are no more ventilation devices on the body, so when it is installed, it is necessary to take care that there is a lumen between the bottom and adjacent to it.
In the center of the bottom of the router is an information sticker with the basic parameters of the device.
Connection and preparation for work
Before you begin the TP-LINK WR740N settings, you must select a place to locate it. The optimal router is the placement of the router in the center of the room so that the distance to it from the most remote angles is approximately the same. It should also be borne in mind that walls, doors and overlaps containing metal elements create interference to distribute the signal. The same applies to household electrical appliances: they are not recommended to have it close to the router.
 By choosing a place to locate a router, you need to do the following:
- Connect the cable from the provider to the WAN port on the rear panel of the device. If the Internet access is carried out by connecting the DSL, one of the LAN ports of the router must be connected to the modem LAN-port.
- Connect the TP-LINK WR740N to a computer using a cable through one of the LAN ports.
- Activate the power of the device.
On this connection of the TP-LINK TL router, the WR740N model and the preparation of it is completed.
Settings
Like other devices of the same purpose, the WR740N configuration occurs through the web interface. To enter it, it is necessary that the computer and the router are in one address space. In the overwhelming majority of cases, nothing for this is not necessary to do, as in TP-Link devices, by default, the DHCP server mode is activated, assigning the IP address automatically to all connected devices. It remains only to check that in the settings network connection Automatic IP was installed on the computer.
 In order to go to the TP-LINK router settings, you must:
- In the address bar of the browser dial 192.168.0.1.
- In the window that appears in the "Login" line, enter Admin and then specify the password in the Password string. The default username and password in the TP-LINK routers are identical.
The WR740N router from TP-Link is produced for quite a long time and has undergone a number of changes. Currently, there are six modifications of this model. Therefore, in older devices the default address - 192.168.1.1. You can learn exactly from the sticker on the bottom of the router housing.
Automatic setting
For users who are unsureielded with a computer, or not wanting to delve into the subtleties of its operation, the manufacturer provides the ability to configure the TP-LINK TL WR740N routers in automatic mode. For this created special programsupplied with the CD router.
To take advantage of it, you must take the following steps:
- Insert a CD into the drive and wait until the settings wizard automatically start.
- Select from the list of the proposed TP-LINK WR740N models and in the drop-down list go to the fast installation assistant.
- The next two steps of changes are not made, go through the "Next" button.
- In the "Configuring Router" step, enter authorization data received from the provider.
- Reload the router so that the settings take effect.
Automatic adjustment of the router is possible and using universal utility Easy Setup Assistant designed specifically for TP-Link devices. After running it, it is enough to press the "Next" button to automatically spend the user through all the router settings. The whole process is accompanied by a demonstration. detailed instructions By connecting and configuring the router.

Internet connection manually
To connect to the Internet in manual modeIt is necessary in the WR740N web interface to go to the "Network" section and choose the "WAN" subsection. If dynamic IP is used to connect to the network, it is enough to select it in the WAN Connection Type string and save the settings. The Internet must earn. In other cases, the settings may have differences from different providers.
Dom.ru and Rostelecom
Configuring Internet connections for TP-LINK routers in these popular providers is equally implemented. It can be done in a few simple steps:
- From the main menu of WR740N settings, go to the WAN subsection as it was above.
- Set the type pPPOE connections.
- In the following lines, enter the username and password provided by the provider.
- Put the "Disable" mark in the "Secondary Connection" string.
- Put a box next to "Connect Automatically" ("Connect Automatically") in next line.

After completing the settings, you must click on the "Save" button at the bottom of the window. After a few seconds, refresh the page and make sure that the internet connection is installed.
"Beeline"
The Beeline operator when providing Internet services uses a VPN connection, so the TP-LINK WR740N setting in this case has its own characteristics. It is carried out like this:
- Log in to Settings global Network Wan in the same way as in the previous case.
- Set the L2TP connection type.
- Enter the username and password in the following lines.
- Put the mark in the "Dynamic IP" radio button.
- In the following line, enter the Beeline VPN server address: TP.internet.beeline.ru.
- Save the settings made by clicking on the appropriate button at the bottom of the page.
- After a small pause, click on the "Connect" button, located immediately under the login and password lines.
If all settings have been made correctly, the Internet connection will be installed.
NetBynet.
A feature of the NetByNet provider is that when connecting to the Internet, a binding is made by the MAC address. Therefore, the TP-LINK router setting is as follows: 
- In the main menu of the TP-LINK WR740N settings in the "Network" section, go to the "Cloning of the MAC-Address" subsection.
- In the window that opens in the WAN Address string, indicate the address registered with the provider, or clone it from your computer.
- Go to the "WAN" subsection.
- Install the type of RPRO connection.
- Enter the username and password.
- In the "Secondary Connection" row, set the mark in the "Dynamic IP" radio button.
- Set automatic connection In the next parameter.
- Save settings and restart your TP-LINK.
On this setting the WR740N model from TP-LINK for NetByNet is over.
Regardless of the provider, after the TP WR740N settings are completed from TP-LINK, you cannot launch a high-speed connection to Windows. Access to the global network is now fully regulated by the router. Therefore, it is also recommended to clear the routing table in its operating system.
Backup connection through 3G, 4G
Currently, many users are used as a backup connection to the Internet use access through mobile operator. But to configure such a connection for the home network, a router is required equipped with a USB port. The WR740N model is not suitable for this purpose, as this connector is not provided in it.
Wireless network
To configure the wireless network in WR740N, you need to go to the Wireless tab in your TP web interface.
("Wireless Mode") and select a "Customize Customizing" item there. Then you need to configure the following parameters: 
- In the "Name Name" field, specify the desired name of your WiFi connection or leave what is present there by default. It is recommended, though, come up with your own name in order to make it easier to find your network among other available wireless connections.
- In the line "Region" from the drop-down list, choose your country.
- Save changes by clicking on the appropriate button.
Now you can go to the next Wi-Fi setup step. To do this, you must move to the "Protection of the Wireless Mode" subsection, then do the following: 
- Remove the mark from the Radio Point "Disable Protection" if it is installed. Leaving this parameter enabled gives free access to the network to everyone who is within the limits of the Wi-Fi signal.
- Mark as an active section WPA-PERSONAL / WPA2-PERSONAL.
- In the Password Password field, enter the desired password to connect to Wi-Fi. It should consist of at least eight Latin characters.
On this configuration of the wireless network on WR740N from TP-LINK is considered complete.
Setup in repeater mode (repeater), amplifier, adapter or access point
In cases where the existing coating of the wireless network lacks for users needs, there is a need to expand it in any way. To do this, to the main device, distributing Wi-Fi,). Many Wi-Fi-routers are used in this capacity, including TP-LINK.
For this you need:
- On the main device in the configuration of the wireless network, assign a static channel number (the default is "Auto").
- Change IP address on WR740N, calculated for use as a client. This is necessary to avoid conflict with the main device. At the same time, they must remain in one address space.
- In the "Wireless Mode Settings" section, set the name of the second network and assign the static channel number. It must coincide with the channel number on the main router.
- Put a mark near the "Enable WDS" value.
- In the new rows opened in the SSID item, enter the network name to which it is planned to connect.
- By clicking on the "Search" button, select from the list of available wireless networks that it is planned to establish a connection and click on the "Connect" link.
- Configure network protection by entering the type of encryption and password is similar to how described in the previous section.
- Reboot WR740N.

Alternatively, flash TP-LINK WR740N using an alternative DD-WRT firmware having a repeater mode. but experienced users Do not recommend using TP-Link products with such a goal.
IPTV.
Currently, most providers along with the Internet also provide IPTV digital television services. In the firmware WR740N implemented its support. To configure this feature, you need:
- In the "Network" section, go to the "IPTV" subsection.
- In the mode string, select from the "Bridge" from the drop-down list.
- In the additional field that appears, select the LAN-port to which the television prefix will join.
- Save changes.
All, the IPTV function on TP-LINK is configured.

Individual user connection settings
This functional B. tP-LINK models WR740N is absent.
Dynamic DNS.
Users who are engaged in hosting their website or the FTP server outside the router may need "dynamic DNS". With it, it is possible to assign a constant node name and domain name to the dynamic IP address. Having at its disposal TP-LINK WR740N, it is very simple to do so, since this function is implemented there.
To get a dynamic DNS, you need:
- In the main menu of the WR740N, go to the section with the same name.
- From the drop-down list, select the DDNS service provider.
- Enter the username and password provided by the supplier and specify a domain name.
- Put a tick in the checkbox "Enable DDNS".
- Save changes.

In the future, enter and exit the DDNS mode using the "Login" and "Exit" buttons.
Security Settings
To prevent possible attacks on the network from outside in routers from TP-LINK, it is pretty pretty flexible system protection in the form of a built-in firewater. To configure it in WR740N, you need to open the Safety section in the main menu of the settings. It is based on a basic or advanced configuration of the firewall:
- enable or disable firewall (by default it is turned on);
- set up permissions for VPN tunnels;
- configure the ALG gateway settings.
In extended protection settings, it is possible to configure extra options Security, in particular, protection against DOS attacks and other settings.
Parental control
For those who have the need to control the finding of the child behind the computer and its activity in the network, the function of parental control is provided in WR740N.

To change its parameters, you must log in to the section of the same name from the main menu and do the following:
- enable / disable parental control function;
- add / delete rules for selected resources and customize the schedule of their actions.
All bindings for the rules are carried out on the MAS-address of the computer's computer.
Change buttons function
Such an opportunity on WR740N is not provided.
Setting up DLNA on the router
This feature requires a USB port on the WR740N router.
Configuring a VPN server
WR740N works with VPN connections only as a client.
Torrent customer setting on router
We would have such an opportunity to have many users, but it is unrealistic on the WR740N regular firmware. You should pay attention to alternative firmwareSupported in sufficient on the Internet. But their use is allowed only at their own risk, without any guarantees of the correct operation of the device.
Setting up printer
The WR740N model from TP-LINK does not have the feature of the printer in its functionality. But if a network printer has a network printer that has its own IP address, the router will provide access to it on a par with other devices on the network. It is carried out using a cable connection, and if the printer has Wi-Fi support, then through a wireless network.
Possible malfunctions and ways to eliminate them
Despite the fact that WR740N refers to reliable devices that are uninterrupted to function for many years, malfunctions are also incurred. They are mainly associated with errors made during the configuration of the router.
Most frequent problems In the work of the device to complain about users, there are: 
- Unstable wireless network and low speed download through her. In this case, the wired network is working normally. Help solve this problem can change the Wi-Fi channel.
- The inability to connect to the WR740N web interface at 192.168.0.1. Most likely, the reason for this situation is to change the IP address of the router to work in another address space. If it is not possible if it is possible, it will help rollback to the factory parameters.
- Devices in the network do not see Wi-Fi. The reason for this can be disabling the wireless network on the router. Therefore, you need to connect to it through the wired network and in the web interface to enable Wi-Fi. If everything is active, check the network connection settings on remote devices, in particular, the correctness of the installation of the wireless adapter drivers.
- There is a frequent loss of connection with the Internet. Help solve this problem can update the WR740N firmware.
If no of the methods listed above do not help solve the problem, the reason may lift in physical damage Devices. In this case, it is better to contact the service center.
Update firmware
Firmware support in relevant state is an important point In ensuring reliable operation TP-LINK WR740N. It is recommended to update it immediately after purchasing the device before primary configuration. To do this, you need to download the latest firmware version from the official TP-LINK site. Set new firmware Can be in two ways.
Via web interface
 This is the easiest way to update the firmware for which you need:
- In the main menu, go to the "System Tools" section and select "Update the built-in software".
- In the window that appears, open the conductor using the "Overview" button and specify the path to the firmware downloaded earlier.
- Press the "Update" button.
After the actions produced, the firmware will be updated, after which the router will automatically reboot.
Through a mobile application
If there is no computer or laptop at hand, and it is imperative to configure the WR740N, you can do it using a tablet or smartphone. For this, TP-LINK has developed a special mobile app called TP-Link Tether. It is supported by devices under android management or iOS and available for download Google Play. and App Store.
TP-LINK TETHER has a program convenient interface and many functions. With its help, the same actions are carried out as in the usual way through the web interface. However, there are no functions for updating the firmware in it. But the development of the utility continues and it is likely that in future versions such an opportunity will appear.
Via USB device
This feature is not available due to the lack of the corresponding connector from the router.
RESET OF ROUTER SETTINGS TO FACTORY
There are situations when WR740N starts working with errors that cannot be fixed standard methods, or lost password to access the device. In this case, it helps the reset to the factory parameters of the router, it is done in two steps: 
- Turn on the power of the device.
- Click the WPS / Reset button on the rear panel of the router and hold at least 10 seconds.
Evidence that the operation was successful, is to light all the indicators on the front panel WR740N. After that, the WPS / RESET button release.
If access to the web interface of the router is not lost, the reset to the factory parameters is carried out when switching to the system tools section to the appropriate point and when you click on the Restore button.
Output
Obviously, TP-LINK TP-LINK router is recommended for building a home wireless network or a small office network.
pros
The advantages of the device include: 
- affordable price;
- ease of configuration;
- multifunctionality;
- uninterrupted work.
TP-LINK TL-WR740N router has been successfully used in creating home / office networks. This is an inexpensive, but reliable model that meets most of the requirements for users to equipment for home networks.
Budget version of the network device
The main characteristics of the router suggest that the device does not go beyond the familiar among the models of this class. Here short review Its properties and features:
- wAN + 4 port LAN port, bandwidth each up to 100 Mbps;
- transmitter Wi-Fi Standard IEEE11B / G / N (at the same time "n" provides a channel to 150 Mbps), with a single insubstant antenna power of 5 DBI;
- built-in DHCP server;
- technology of improving the performance of the Wi-Fi network, by preventing conflicts of different channels;
- configuring communication quality priorities for priority tasks;
- selected button for quick protection setting;
- the possibility of filtering clients by IP and MAC addresses, and sites - to addresses and domain names.
To perform basic settings, you need to connect tP-LINK router TL-WR740N to your stationary PC (complete LAN cable) or laptop (here is permissible to connect both cable and with using wi-fi). After that, log in to the web interface (IP router entered in the browser - 192.168.1.1, data for authorization - Admin and Admin).
Connecting to the network
Connecting TP-LINK TL-WR740N to the Internet is performed in the "Network" section, the WAN tab. At the top of the window, the connection type is selected, and the rest of the contents will be changed depending on the selected item:
- when you select PPPoe, you will be prompted to enter a user name and password, then easily configure the connection mode (on request, by time, etc.) and save the "Save" button;

- when assigning the provider to the dynamic IP address router, it is enough to select it in the "Wan Connection Type" field and click "Save";
- those who are assumed to install "Static IP" in accordance with the technology on which the provider works, will have to manually enter IP, gateways, subnet mask and other values \u200b\u200bprovided in the contract.

If you managed to configure everything right, then after rebooting your TP-LINK TL-WR740N connects with the Internet.
Setting up wireless connections
After that you can configure the Wi-Fi network of the router to work mobile gadgets or computers equipped with a Wi-Fi receiver. To do this, go to the Wireless Management Interface section. The first tab assigned to the SSID (Network Name), the channel number is selected, the maximum width and the desired communication standard. Highlight in the "11n only" list if all your devices support the IEEE 802.11n standard or "11BGN Mixed", if you do not know this for sure.

The next tab of this partition offers to configure the protection of your Wi-Fi network. Select the type of encryption and assign security key. If the network is planned as publicly available, then check "DISABLE SECURITY". After completing the setting, save the configuration and restart the router.
Conclusion
We have led the list of basic actions that you will need to configure. tP-LINK router TL-WR740N. As you can see, the process is simple and intuitive, so it should not cause difficulties.


 in Photoshop How to make a grid in photoshop CS6")


")


