TP-LINK network equipment is well known both in Russia and abroad. For those who "grown" from the possibilities of low-cost monanonal devices, the manufacturer offers a wireless mid-level router - TP-LINK TL-WR841N. Being just one and a half times more expensive than one-alone TP-LINK TL-WR740N, it provides twice fast access to wireless network at a speed of 300 Mbps. The internal stuffing of the router will allow not only to provide an Internet apartment or private house, but also to deploy a local network of a small office. The model has undergone several modifications and is still manufactured. What is the difference between routers of different years of release, how to connect them and set up for the most efficient work - the topic of our article.
TP-LINK TL-WR841N router description
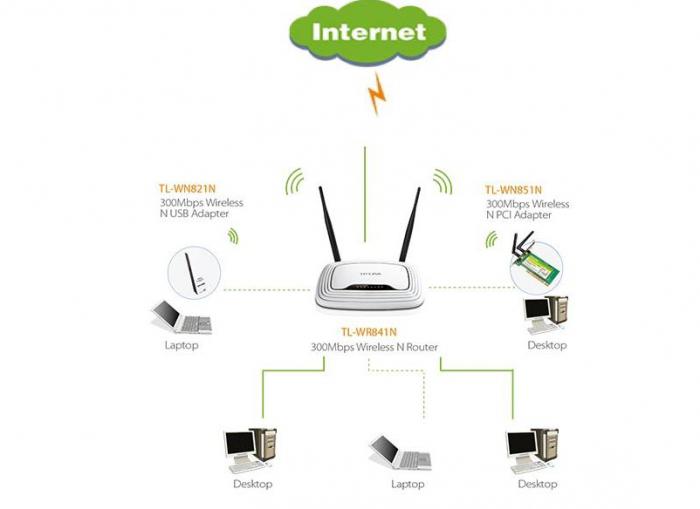
TP-LINK TL-WR841N - router intended for use in the house or small office. It allows you to connect customers to the Internet both by cable (twisted pair) and using a wireless connection (Wi-Fi). You can connect four computers over the cable, and via Wi-Fi is any number of customers. However, with each connected Wi-Fi device Access speed will fall. If one client can operate at a speed of 300 Mbps, two - already at a speed of 150 Mbps and so on.
The router comes in a colorful box painted in branded color manufacturer
The router is present on the market for more than ten years, during which time eight generations (revisions) of this router were released. Each version has two versions - with a removable and stationary antenna. The router with a removable antenna is called TL-WR841ND, where the letter D (Detachable) indicates that the antenna can be turned off and replaced with more powerful.
Appearance and equipment
The router housing is a trapezoidal, with highly rounded corners, white plastic color gives the device to air and weightlessness. The early versions of the antenna were black, the 2017-18 models are equipped with light gray antennas. On the top panel Located black insert, hiding LEDs - indicators of device activity. Displays power, wireless network activity, data transmission over wired ports, as well as Internet connection status.
Router activity indicators display modes of its operation at each time
The router comes in a large colorful box of corporate colors, but the configuration of the device is modest:

Specifications
Almost all revisions of the TL-WR841N router have 32 megabytes random access memory, Continuous memory for storing settings and firmware with a volume of four megabytes and a processor, which, in addition to computing functions, controls the operation of the wireless communication module and the network switch. In two recent versions The router (tenth and eleventh), in addition to a faster processor, doubled the volume of RAM, which is now 64 megabytes. If the router is planned to be used in the office with large quantity Connections, it is better to buy a model of the last revision.
It should also be noted that early versions The router was equipped with a processor cooling radiator. There is no later models, so in the warm time of the year, with an increased load, the router may overheat and "hang". An output from the situation can be the installation of a small radiator, for example, from a faulty motherboard.
Passive radiator on the processor will allow the router to work reliably even hot summer
Table: Comparative characteristics of various versions of TP-LINK TL-WR841N
| Version | v3. | v5. | v7 | v8. | v9. | v10 | v11. |
|---|---|---|---|---|---|---|---|
| Platform | AP81 (AR71xx) | ||||||
| Architecture | MIPS. | ||||||
| Manufacturer | Atheros. | ||||||
| Loader | U-Boot | ||||||
| System Chip: | AR9130. | AR7240 Rev 2. | AR7241-AH1A. | AR9341. | QCA9533-AL3A. | QCA9533-BL3A. | QCA9533-AL3A. |
| Frequency CPU. | 400 MHz | 400 MHz | 400 MHz | 535 MHz | 550 MHz | 650 MHz | |
| Bogomips. | 265.42 | 266.24 | 265.42 | 266.64 | 366.18 | 432.53 | |
| Flash chip. | ST 25P32V6P. | Unknown | cfeon F32-100Hip / Spansion FL032PIF | Spansion FL032PIF. | Spansion FL032PIF. | WinBond 25Q32FVS1G. | Spansion FL032PIF. |
| Volume Flash. | 4 MB | ||||||
| Chip RAM | HYNIX HY5DU561622FTP-5 | Unknown | Zentel A3S56D40FTP-G5 | ESMT M13S2561616A-5T | WinBond W9425G6JH-5 | Zentel A3S56D40GTP-50 | Zentel A3S56D40GTP-50L |
| Volume of RAM | 32 MB | 32 MB | 32 MB | 32 MB | 32 MB | 64 MB | 64 MB |
| Radiatichip | ATHEROS AR9100 Rev: 7 | ATHEROS AR9280 REV: 2 | ATHEROS AR9287-BL1A 2.4GHZ 802.11BGN | AR9341. | QCA9533-AL3A. | QCA9533-BL3A. | QCA9533-AL3A. |
| Svitche | Marvell 88E6060. | Built-in AR7240. | Built-in AR7241. | Built-in AR9341 | Built-in QCA9533-AL3A | Built-in QCA9533-BL3A | Built-in QCA9533-AL3A |
| USB port | Unknown | Modif. | Modif. | Modif. | not | not | not |
| Serial port | there is | there is | there is | there is | We must remove R26. | not | |
| Jtag. | there is | Unknown | Unknown | there is | not | ||
Video: Review and configuration of the TP-LINK TL-WR841N router
Preparation of the router to work
In order for TP-LINK TL-WR841N all your devices in a single home network and provided each client to Internet access, a number of preparatory activities must be made. The router must be connected by cables to the provider's network and home computers, and customer network cards are programmed to automatically receive addresses. After that, you can configure access to the Internet and create a wireless network.
Connecting a router, preparation for configuration
The router connection scheme is simple: the provider cable is included in the Internet jack, the LAN computers in the LAN1-LAN4 network connectors. Smartphones, tablets and other wireless devices are connected using wi-Fi network.
For creating home network The TP-Link router has 4 wired ports and the ability to install an unlimited number of wireless connections.
Configuring a network card computer to work with the router
In the "From the box" router, the DHCP server is automatically activated - the router will result in network addresses to connected computers. Therefore, before starting the router setting, it will be necessary to make sure that network adapter Computer or laptop is configured to automatically receive an IP address.
- Click on the "Start" button with the right mouse button and from the user's menu, select Network Connections.
Open the window network settings From the start menu of Windows
- In the network connections window, select the desired adapter and with the right mouse button, open its properties.
In the properties of each network connection TCP / IP protocol settings are contained for it.
- From the list of protocols, select TCP / IP settings and open them for editing.
All network adapter parameters are set in TCP / IP protocol settings.
- Adjust automatic receipt network Address and addresses dNS serversAnd then click OK.
Automatic address receiving mode is configured by setting the corresponding flags in the mode switch.
Log in to the router settings, login and password by default
The modem web interface, with which most of its settings are performed, is located at 192.168.1.1. Username - Admin, password - admin. Change the access password immediately after the first turn on the router. It will protect your network from outside intervention.
- Open the web interface by entering the address 192.168.1.1 in the Internet browser.
The starting page of the web interface of the router contains its system statistics
- Go to the System Tools section, and select Password from it.
In chapter system settings Router is a login and password installation submenu
- On the Authorization Data Changes page, enter the current login and password, and then their new values. Password must be confirmed to avoid random errors.
To enter a new password, you have to remember the old
- Save the Save button changes.
Internet connection settings
The web interface of the router allows you to configure Internet connection in a semi-automatic (using the setup wizard) and in full manual mode. Before starting the setup, make sure that the Internet connection is activated by the service provider. To do this, try to connect to the Internet without a router, inserting the provider cable to the computer's network card.
Connect the provider cable to the computer LAN socket to check the connection performance
Setting up L2TP connection
L2TP is one of the varieties of VPN in which the "Tunnel" can be installed not only by TCP / IP, but also to interfaces more low level: ATM, X.25 and Frame Relay. The L2TP protocol provides encrypted traffic, so this connection is often used in corporate networksthan to connect to the Internet of individuals.

Configuring PPPOE Connection
Connection via PPPoE is the most common in Internet providers, and configure it easier than the rest, since only login and password are required from the authorization parameters.

Setting up PPTP.
Connecting the PPTP connection is not different from the L2TP setting discussed earlier. Similarly, two types of connection are supported: with static and dynamic addresses. For authorization, the login, password and the name of the VPN server are sufficient. Note that this type of connection creates a larger load on the router processor. If yours tariff plan Provides a connection at a speed of 90 Mbps and above, it is worth thinking about buying a new, more productive router.

Static IP Setup
If you connect to the Internet with a static IP address, the login and password are not required. In the setup settings, you enter the address received from the provider, the subnet mask and the gateway address, after which the router is ready for operation.

Video: Setting up Wi-Fi router TP-LINK TL-WR841N
Routher Operation Settings
After connecting to the provider, you must set the parameters of the internal network - configure the distribution of Wi-Fi, addressing on the local network, ports of ports, etc. If necessary, you can change the firmware version or return the factory settings to the router
Setting up Wi-Fi (Creating an Access Point, Password Setup)
Enable and configuring the wireless access point will allow you to distribute the Internet to devices with Wi-Fi module: laptops, tablets, smartphones.

The password installed for the wireless network is used by the router to encrypt the transmitted data. The more characters in the password, the more reliable the encryption, but also above the load on the router processor. Optimal size Key - 8-13 characters.
Sprinkle ports
Some users need to access their local network resources from the Internet. It can be accessible to home network folders, Picture with home IP camera, remote administration remote programs Administrator or Team Viewer and use still dozen necessary applications. To organize such access, the so-called port timing is required when the router connects the port of the external network with a defined port of the internal. Configure port timing is easy using the router web interface features.

Setup IPTV (digital TV)
The IPTV setting allows you to select one of the four network ports to transfer a digital video stream to it. To this port, you can connect a network media player, Smart-TV or a digital television console.

Video: Setting up PPPoE and IPTV
LAN LAN and DHCP
If you are not satisfied with the default local network settings, for example, due to the presence of one router in it, you can always be changed in the appropriate section.

TP-LINK TL-WR841N Routher Firmware Update
Updating internal software will help eliminate errors, increase the speed and improve the stability of the router.
- Specify the revision of your router, this information is on the sticker located on the bottom cover of the machine.
Memo, located on the bottom of the case, contains information about the revision of the router and the firmware number
- Load the firmware from the TP-LINK FTP server.
The manufacturer's site contains firmware files for all revisions of the router
- From the System Tools section, select Firmware Upgrade.
- Use the "Select File" button. Specify the path to the firmware file and click the UPGRADE button. The router will begin the update procedure that will take about 10 minutes.
After completing the installation, you can make sure that the router version has changed
It is extremely carefully to choose the firmware file.. Software from the router of another revision or even more old version By can do your device completely inoperable. It will be possible to restore it only in the service center.
Video: Updating the firmware of the TP-LINK router
TP-LINK TL-WR841N setting in repeater mode
Regular software Does not support the router switching to repeater mode (repeater). If you decide to use TL-WR841N to expand the area of \u200b\u200bthe wireless coating, you can try to install alternative firmware DD-WRT, in which the repeater mode is configured literally a few clicks.
- Using the internal software update function, install the DD-WRT firmware.
- Disconnect the WAN interface and the DHCP server on the Installation tab (Main Settings section). Enter the network settings of the repeater. The device must be on the same network as the main router. We will have a network of 192.168.128.0/255.255.255.0, the gateway in which the car performs with the address 192.168.128.5. It is also a DNS server. For the future repeater, the DIR-300 is selected free address 192.168.128.2, which is not distributed by a DHCP server.
Make the network address, subnet masks and gateway to configure the repeater
- Wireless network type indicate as a "repeater-bridge", and enter the name of the network on the main router as a wireless network. We have this network Dizar_Net. Save the settings again.
Activate the repeater mode in Wi-Fi settings
- Click the Wi-Fi tab and select the same encryption algorithm and network key, as on the main router.
Network security settings are set on the Wi-Fi tab and should be the same as on the main router.
Unfortunately, the DD-WRT firmware supports not the entire line of TP-LINK TL-WR841N models. On the project site, you can download images of update for revisions 3, 5, 7 and 8.
Video: Setting up the WR841N router in repeater-bridge mode
Reset settings to factory
Reset the router to factory settings may be needed in the case when the device works incorrectly, and access to the web interface is not possible. Fortunately, all TP-Link routers have a hardware return to factory settings.

How to restart the router
The easiest I. an effective way Reloading the router - power off. Disconnect the power adapter from the outlet, wait five to six seconds and turn it on again to the network.
Now we will talk about configuration Wi-Fi Router TP-LINK TL-WR841N. If you have a series TL-WR841N., then this article will be suitable for you. Consider in this article connecting the router, setting internet Wi-FiAnd also show you how to change the password to more difficult in order for your network to be unauthorized user.
A few words about this model. This is the most successful tP-LINK model By the ratio of price quality. For an undemanding user, the best router is nowhere to find and it works by the way very stable.
Connecting router

Connect the power adapter to the router and turn it into the outlet. If the lamps do not burn, turn it on through the button that is on the back side.
To blue ( Wan.) Join connector network cable Your Internet provider. If you are going to adjust the router through the wire, connect the cable one end to Lan. Port in any of the 4 connectors. Who is interested in a separate article as.  Another end to a computer or laptop into the connector network card.
Setting the router via Wi-Fi
If you want to configure the router via Wi-Fi, you can connect via a wireless connection that will appear after you turn on the router TP-LINK TL-WR841N.
In addition, you can connect via a tablet or phone and make setting without a PC.
Included with the router also includes a disk there is a utility for setting the router, but we will make a setting through the Web interface.
The Internet must be connected to the router, your PC, smartphone or tablet should also be connected via cable or Wi-Fi. If you do everything, it's necessary to go to the panel tP-LINK settings.
Customize TP-LINK TL-WR841N
 So, we open on our PC which is connected to the TL-WR841N any browser and drive in search string 192.168.1.1
or 192.168.0.1
. You will find a window where you will request a username and password of the user drive the standard data login and password admin..
So, we open on our PC which is connected to the TL-WR841N any browser and drive in search string 192.168.1.1
or 192.168.0.1
. You will find a window where you will request a username and password of the user drive the standard data login and password admin..  There are cases when the settings panel at the address 192.168.1.1
, or 192.168.0.1
does not open: still such a problem may happen when password admin. Not suitable. In this case, try reset all settings. From the back there must be a button Reset., put on it with something sharp, your router will reboot and return to the factory settings and try to adjust it again. In this case, we have prepared another article:
There are cases when the settings panel at the address 192.168.1.1
, or 192.168.0.1
does not open: still such a problem may happen when password admin. Not suitable. In this case, try reset all settings. From the back there must be a button Reset., put on it with something sharp, your router will reboot and return to the factory settings and try to adjust it again. In this case, we have prepared another article: Setup (WAN) internet
 Most importantly, set up a router so that he worked with your provider. If you do not do this, then the Internet through your router will not work.
 In the settings panel go to the tab Net-Wan. Next, select the connection type depending on which your provider uses if it uses ( dynamic IP.), You do not need to set any parameters just click "Save".
What if you have one of PPPOE, L2TP, and PPTP
 If you have one of the above connection types, you choose the necessary and prescribe the necessary parameters that your provider will tell you, then click "Save".
 The main thing is what you need to achieve in this window so that everything has earned, if everything happens we click to save. If there are difficulties at this stage, call your Internet provider and find out all the items to configure the router.
Configure the network and install the password on Wi-Fi
 We go into the tab Wireless mode - Setting wireless mode
in the window " Name Name"Enter the name of the network that you yourself will think of," Region"Where you live and click" Save ". Put the remaining settings as in the screenshot.
We go into the tab Wireless mode - Setting wireless mode
in the window " Name Name"Enter the name of the network that you yourself will think of," Region"Where you live and click" Save ". Put the remaining settings as in the screenshot.  In order for extraneous users to connect to you, you will need to open the Wireless Mode tab - Protection of the Wireless Mode and select the type of protected mode WPA-PSK / WPA2-PSK (recommended).
In field Password PSK. Come up and write down some kind of complex password that will protect your network from intruders, and save the settings.
Replacing the password admin to protect the personal office TP-LINK TL-WR841N
 So we almost configured our router remains to protect personal Area Router from strangers so that no one can change the settings that you did.
 We go into the tab System tools - Password We enter first old login and password, then come up with a new one and click "Save".
 That's all the setup is complete, after that reboot TP-LINK TL-WR841N by OTB / ON either from the settings panel.
 Over the past few years, many decent devices have appeared on the computer market at a very low price. Most of them are positioned as honest Chinese brands of high quality with sales markets around the world. About one of these devices - this article. Wireless router TP-LINK TL-WR841N with huge functional and high performance. The device description is accompanied by an overview, quick customization instructions and includes reviews of owners and system administrators.
Meet the clothes
A very attractive bright green color box easily pays attention to the buyer's attention. Image of the device in the assembly and brief quickly help make right choice. TP-LINK TL Delivery Kit has everything you need for a complete setting and operation of the device. In addition to the access point there is a power supply, patch cord, two reinforcing antennas, disk with documentation and instruction.
The first acquaintance with the point of access to any owner will only bring pleasant impressions. Available for tP-LINK router TL-WR841N Price of about 1000 rubles provides the buyer a powerful Wi-Fi device made of very high-quality plastic having a magnificent design and a well-thought-out cooling system. As it turned out, the entire body from all sides is littered with ventilation windows. Apparently, the Chinese taking into account the experience of their old devices hanging in the process of work due to overheating.

Tactical and technical characteristics
The TP-LINK TL-WR841N wireless router operates at a frequency of 2.4 GHz in class 802.11b / g / n networks. The control system functions on the ATHEROS AP81 core from 400 MHz and has a built-in 32 MB memory. The device has a built-in switch to four ports running in 100 megabit networks, and one WAN port for connecting the incoming Internet channel. Besides, wireless router Understands WPS technology, allowing without prior settings and authorization to connect devices via Wi-Fi. And if we consider wireless capabilities, then the manufacturer stated according to the 802.11n standard - 300 megabit per second with the support of two spatial streams (MIMO 2x2). Types of connection to the provider are present in full for all technologies in the post-Soviet space: Static and Dynamic IP, PPPoE and PPTP / L2TP with Support Dual Access, manual input MAC addresses, including cloning. Also supported by the gains in Russia IPTV.
Preliminary Routher Settings
Supplied with TP-LINK TL-WR841N The instruction describes the procedure for setting up and connecting the Wi-Fi access point. Still, many owners, judging by their reviews, assure that before activating the device, it is necessary to make a forced reset to factory settings. To do this, you need a sharp item like a selection to press and hold the RESET button for ten seconds located on the rear panel of the router. Naturally, at the time of reset, the access point must be connected to the power supply and at least one indicator should be shining on it. The result of an effective reset will be a change in the light indication on the device control panel.

Preliminary Computer Settings or Laptop
Configuring the TP-LINK router is possible only when the computer is ready to get the automatically desired IP address that provides a wireless device. Therefore, if B. windows system Set up DHCP, then this item is worth skipping. The rest will have to produce small settings. To do this, find "Network Management" and select the "Change Adapter Settings" item. Press alternative mouse button on the active adapter and select the item "Properties". In the window that appears, find the "TCT / IPv4" string, put the cursor on it and select "Properties". If the strings of the opening windows continue to contain numbers, they need everything to rewrite them to a sheet of paper, including the names of the rows. After that, select the parameter in front of the "... automatically" fields. Save and exit settings.
Communication of two devices
According to the instructions supplied with the TP-LINK TL-WR841N router, the setting is carried out in steps:
- The router must be turned on, and the computer is in working condition.
- The provider cable must be connected to the "Internet" jack located on the rear panel of the device. If the provider does not require additional settingsThe second right on the control panel will light up on the control panel, which signals the Internet accessibility.
- Patch cord is inserted with one end to the computer's network adapter, and the second is in any LAN port of the router. A green indicator appears on the control panel of the device, and the computer is connected to the network. If the provider does not limit Internet access, it will immediately be available on the user's computer.

First step in setting
Opening any browser on the computer, you must register an IP router without quotes "192.168.0.1" in the address bar. If the browser issued an error, it is necessary to register another address without quotes "192.168.1.1". Confusion in addresses is pond due to different firmware. Configuring the TP-LINK router begins with the appearance of the authorization menu, in which you want to enter a password and login. Oddly enough, they are identical - "admin". The result of the correct data entry will be opening the control menu of the Wireless Access Point. Not only system administratorsBut many users recommend switching to the "Utilities / System Tools" menu - "Password / Password", located on the left pane of the control window, and change authorization data. Entering in the first two lines "admin", indicate in the third new login, and in the fourth and fifth - a new password. To enter, it is recommended to use English letters. Digital input is not prohibited.
Pressing the settings of the provider
If the Internet appears on the computer when connecting the router, then this item can be skipped, otherwise the provider provides services on your own protocol, and therefore it requires a fine configuration of the TP-LINK router. To do this, go to the "Fast Setup / Quick Setup" section, and following the data requests, make information recorded early to the leaf. In addition to this data, you must specify the connection type that only the administrator of the company providing the Internet services will be prompted. Very often, when drawing up a contract with the provider, the document is provided with information on connecting to the service. Also, all users are worth visiting the official website of their provider and see the "Equipment Settings" section. Many suppliers offer downloadable firmware with prescribed settings for different routers. Perhaps the provider there is a firmware for TP-LINK TL-WR841N. In any case, if there are some difficulties with the setting, it is better to contact a specialist. No one prohibits playing with the settings itself, because the router always can be reset to factory parameters.
Alternative control of the router
Many users will like the ability to control the wireless access point using a special shell Easy Setup Assistant, which can be downloaded from the manufacturer's official website. It will be needed to configure the TP-LINK TL-WR841N router driver under Windows, which is also offered for download. Will not hurt to get acquainted with the presence fresh firmware Under the device that can be installed. And for firmware you need and step-by-step instructionwhich is also present on the official website.
Reading about TP-LINK TL-WR841N Customer Reviews, you can detect a large negative to the developer on alternative control by the router using an assistant. Compared to the Web interface that allows you to get quick access to any configuration, the shell has limited capabilities in the form of an assistant and does not give the user to make its own data. Yes, and the assistant works only under Windows, which limits its abilities.
Wi-Fi Setup
Wireless network in the TP-LINK TL-WR841N router is configured - one pleasure. The menu is so comfortable and informative that the user should have problems:
- The SSID field proposes to enter the name of the network in Latin letters, which will be detected when searching for Wi-Fi.
- In the "Channel" field, you need to leave "Auto", "11 BGN Mixed" mode, and the maximum transfer rate can be set to a maximum.
- The authorization method is better to install universal - "WPA-PSK / WPA2-PSK", and encryption to set "AES". Such a choice will allow you to set a password consisting of numbers and letters of non-fixed length (from 8 to 64 characters).

In addition to standard settings Wireless network and LAN ports TP-LINK TL-WR841N router can boast a mass useful featureswhich will be interesting to advanced users.
- The demilitarized zone "DMZ" allows not only to prohibit access from the Internet to servers located on the user's local network, but also limit the computer of the child than and enjoy the constantly many parents.
- Very simple setup IPTV. Allows you to create a connection in a few minutes and enjoy watching movies in high quality transmitted through the provider's network.
- There is a menu to configure WPS. You can install a simple password, not like on Wi-Fi, and give it to friends wishing to use the Internet service, being visiting. Naturally, you need to press the "WPS" button to connect.
- When configuring Wi-Fi, you can determine the priority of transmitting streaming video "WMM", which will allow you to give the channel resources to view the film if it is engaged in torrent, for example.

Finally
Most about TP-LINK TL-WR841N customer reviews are positive. They mark a large set of functions, which is very often unsuppressed. The users did not leave a reliable and well ventilated design, the presence of an antenna amplifier, the convenience of control and ease of setting. The disadvantages include failures in when the torrent injection. disappears for a few seconds, and then smoothly rises. Many users recommend installing the download speed limit in half, and the problem will be solved forever. In general, the TP-LINK TL-WR841N router for 1000 rubles is more simply impossible to desire.
If you purchased TP-LINK TL-WR841N Router, but do not know how to configure it correctly, then this article is for you. Thanks to the step-by-step detailed instruction, the TP-LINK TL-WR841N router setting will take you at no more than 15 minutes. By the way, this model won tremendous popularity worldwide. Due to safe use, high quality signal, high speed data transfer and low cost device can be called one of best decisions By the ratio of price - quality in its category.
First stage - acquaintance
Let's start with the basic acquaintance. The router has two antennas - it allows you to significantly increase the range and signal stability. The rear view of our device is represented by six connectors and buttons:
- Power on / off button.
- Connector for power cable connecting the device with a socket.
- Ethernet port is used to connect the Internet cable.
- LAN - connector connects the router and laptop / computer to the local network.
- Quick Security Setup - button (fast secure installation) - an analogue of WPS, is a distinctive feature of the TP LINK company.
- Reset button to factory settings (Reset).
TP-LINK TL-WR841N video overview:
Second Stage - Connecting Device
This stage consists in connecting all cable required for the operation.
Step-by-step instruction:

Third Stage - Software Setup
There are two ways:
Via CD
Insert the disk into the drive, we expect the Easy Setup Assistant autoload. If a minute later, nothing appears, open yourself. We go to the "computer", open CD: 
As an example, the TL-WR740N router is used, but the installation is identical. In the menu that appears, click on the "Master fast settings». 
Select the best language for you, click "Start". 
Check if the LAN cable is connected to a computer and a router. Also check the Internet cable. The same applies to the power adapter.
Carefully read this text, check if everything corresponds. 
In this menu, select your stay, city / region, enter the name of the Internet service provider, and in the connection type, use a dynamic IP address. 
If you want to have a static IP address, then you need to enter the data provided by your provider. These data must be spelled out in the contract. Did not find - refer to hot lineCall at the house of the company's service specialist. 
Item "I did not find suitable settings" Use only if your country is missing in the list, or you do not know the name of the provider's server. 
Enter the desired name for the future Wi-Fi network. 
Be sure to choose from the options proposed options high level protection (WPA2-PSK). The column below is the default password, you can change it at your discretion. 
Just in case, click the appointed point below, it will save data on the connection and protection type, name, as well as a password to a separate text document. 
If everything is entered correctly, the inscription will appear on the successful completion of the verification and wi-Fi settings Router. Click "Next". 
Excellent, installation with a CD is completed.
In browser
To configure the TP-LINK TL-WR841N router with this method, you just need to connect your laptop to the Wi-Fi network provided by it immediately after power on. The network name must match the name of the model, Wi-Fi will not have a password.
Important! You can use for this purpose not only a laptop, but also a phone or tablet- Only access to the Internet is important.
We start setting up:
- For avoidance possible problems At first, we recommend to make a reset to the factory settings - press and hold seconds 7 RESET key on the router.
- Now open the browser convenient for you ( Google Chrome., Opera, Mozilla Firefox. Or others), and in the site string, enter 192.168.1.1 or 192.168.0.1, press ENTER - this will provide login to the router.
- In the window that appears, enter the same login and password value - Admin, press OK.

- First of all, for great security, we recommend changing standard login and password. The procedure is optional, but will provide greater protection of your network.
 To enlarge, click on the picture
 - Next, you can connect a dynamic IP address to get a Wi-Fi. This will allow you to set the IP address for all devices that will connect to the router automatically.
 To enlarge, click on the picture
 - However, if a static IP address is recommended in the contract with the provider, we select the appropriate type in subparagraph, and using data written in the contract, fill the fields such as IP address, subnet mask, Main Gateway, Primary and Secondary DNS Address manually.
 To enlarge, click on the picture
 - Another option: Select in the PPPoE connection type - enter the login and password, and the choice, dynamic (exercise automatically) or static (some providers provide for this mandatory to fill IP and network mask).
 To enlarge, click on the picture
 - It rarely, but it happens that Internet service providers request the user's network card binding to the MAC address. To do this, go to the item "Network", then "cloning a MAC address" and click "Cloning the MAC address". After these actions, the network will receive access to the Internet.
 To enlarge, click on the picture
 The note! Specify this procedure Supplier, it is possible for you not needed.
- Usually, the purpose of this setting is simply receiving access to the Internet for family use, for which it is necessary to deal with the sub-clause menu "Wireless Mode" menu. Specify in it the desired name of the Wi-Fi network and the region of your stay. In the column "Mode", it is desirable to select "11BGN mixed", it is suitable for 99% of users. The width of the canal and the channel also recommend to leave in authors. In the maximum transmission rate, select the highest number on the principle of "the more, the better" (300 Mbps).
Interesting! If in domestic use is located modern smartphones, laptops or computers are not older than 3– 4 years old (who have new type network cards), then in the column mode, you can choose« 11N.» - This will ensure a greater streaming data transfer rate, and will also make both antennas in constant mode.
If you want to stabilize and at the same time a little to increase the speed of the Internet - select the channel manually. Many people live in multi-storey houses, and use the Internet from a single provider, so automatic mode Channel selection, some can coincide, thereby reducing speed. To select the optimal, install the application on Android "Wi-Fi Analyzer" and find the less used channel - and select it in the setting.
 To enlarge, click on the picture
 One of the key points of using a wireless network is its protection.
 To enlarge, click on the picture
 If you want to have the maximum speed of work on a portable device, then be sure to place a password in the "Protection of the Wireless Mode", because people wanting to use someone else's Internet full. Next, check in the version "Version" WPA2-PSK - the most modern and secure type of protection. In the encryption column, select AES. Enter your preferred password - it is it that you will be entered when connected to this Wi-Fi.
Save.
Now you need to restart the router, for this you can turn it off for 10 seconds from the power button using the POWER button, and turn on. After that, you can connect all your portable devices to a fully configured Wi-Fi network.
Video to work with Wi-Fi Analyzer utility:
Setup completed. I hope you made sure that the TP-LINK TL WR-841N router is completely simple.
Good day.
In today's next article on configuring home Wi-Fi Router, I would like to stay on TP-Link (300m Wireless N Router TL-WR841N / TL-WR841ND).
Quite many questions set on TP-Link routers, although in general, the setting is not much different from many other routers of this type. And so, let's look at the steps that you need to do to work and the Internet and the local network Wi-Fi.
1. Connecting the router: Features
There are several outlets on the rear wall of the router, we are most interested in LAN1-LAN4 (they are yellow in the picture below) and Intrnet / WAN (blue).
So, using a cable (see the picture below, White), connect one of the LAN outputs of the router with a computer network card. The cable of the Internet provider, which comes from the entrance to your apartment, connect with the WAN output.
Actually everything. Yes, by the way, after turning on the device, you must notice the blinking of the LED + on the computer there should be a local network, while without access to the Internet (we have not yet configured it).
Now you need sii in settings Router. To do this, in any browser, dial in the address bar: 192.168.1.1.
Then enter the password and login: admin. In general, not to repeat, here is a detailed article about whether, by the way, all typical questions are disassembled.
2. Setting up router
In our example, use the type pPPOE connections. What type of choosing to you depends on your provider, all information on the login and passwords, the types of connection, IP, DNS, etc. must be in the contract. We are now in the settings.
2.1. Configure the Internet (PPPoE type)
In the column on the left, select the Network section, the WAN tab. Here are key three points:
1) Wan Connection Type - specify the connection type. It will depend on it, what data you need to enter to connect to the network. In our case, PPPOE / RUSSIA PPPOE.
2) Username, Password - Enter the login and password to access the Internet by PPPoE.
3) Put the Connect Automatically mode - this will automatically connect to your router to the Internet. There are regimes I. hand connections (uncomfortable).
Actually, everything, the Internet is configured, click the SAVE button.
2.2. Configure Wi-Fi Wireless Network
For settings wireless Wi-Fi Networks Go to Wireless Settings section, then open the Wireless Settings tab.
Here you also need to pay for three key parameters:
1) SSID - the name of your wireless network. You can enter any name, then that you will be convenient then conveniently. By default, "TP-LINK" can be left and so.
2) Region - Choose RUSSIA (well, or yours if someone reads a blog not from Russia). This setting is not found in all routers, by the way.
3) Put the ticks at the bottom of the window, opposite the Enable Wireless Router Radio, Enable SSID Broadcast (thereby turn on wi-Fi work network).
Save the settings, Wi-Fi network should start working. By the way, I recommend to protect it with a password. About this little below.
2.3. Enable password on Wi-Fi network
To protect the network Wi-Fi password, Go to the Wireless section, the Wireless Security tab.
At the bottom of the page, there is the ability to select WPA-PSK / WPA2-PSK mode - select it. And then enter a password (PSK Password), which will be used each time you connect to your wireless network.
Then save the settings and restart the router (you can simply turn off the power to 10-20 seconds.).
Important! Some Internet providers register Mac addressand your network card. Thereby, if you change the MAC address - the Internet can be unavailable. When changing a network card or when installing a router, you change this address. There are two ways:
first - this is (I will not repeat here, in the article everything is described in detail; in TP-Link routers there is a special section for cloning: Network-\u003e Mac Clone);
second - Register yours new Mac The address of the provider (most likely it will be enough phone call in those. Support).
That's all. Good luck!


")


