The program for creating a virtual machine on a PC is a software that allows you to emulate the interface of one or another operating system. Ideal for testing any software, or the launch of applications operating only on certain operating systems. The article will talk about troika best programs for imitation of VM on PC, nuances of installing such applications, and a brief instruction By setting up software when you first start.
Top 3 Virtual Machines for Windows 10
The top three most popular programs for creating a virtual machine on Windows 10 looks like this:
- VirtualBox.
- Hyper-V.
Each of these programs has its own characteristics and advantages.
So VirtualBox. It can boast what is distributed completely free.
- The software has an open code, which makes it possible to create and run virtual machines with special properties and functionality.
- Also the most important quality of the application is the support of many OS. So, thanks to this virtual machine, you can run Windows, Linux and MacOS.
Key features Programs are: - Snapshot - analogue of recovery points on the main OS. Allow you to roll back to the status saved state. The option is useful when testing a different kind of settings and applications.
- Support full-screen operation mode.
- The ability to "drag and drop" objects from the window to the window (Drap and Drop).
- You can make several virtual machine clones, and use each copy for different purposes.
- An intuitive interface, it allows you to understand basic functions even to a user who never encounters virtual machines.
The program product interface is as follows:
Concerning Hyper-V., then the program was originally created as a server tool intended for creating a virtual Windows Server 2008.
Later, Windows 8 and 10 were added to the software. It is noteworthy, but when loading the OS, it is not activated, it must be enabled using the admin panel. Compared with VirtualBox.It has much greater functionality. Can be used by local servers.
Benefits can be attributed
- intuitive interface
- no need for download and installation
- snapshot
- the possibility of cloning working virtual machines.
The disadvantages include the fact that when working with the program, the user must have certain skills, as well as available in the Pro Business Pack for Windows 8 and 10. In the "home" version of these OS, the presence of the utility is not provided.

- is a free simplified version of the program VMware Workstation..
Compared to VirtualBox, On "deprived" with a number of options and functions. For example, it is impossible to use snapshot here, making clones, create remote connections.
Nevertheless, the free and presence of the main options allows the user to run various applications.
If you need to test various resource-proof software, or use the "trimmed" options, you can purchase a paid version of the program.
By the way, it is much more functional than a free VirtualBox machine.

How to install Oracle VM VirtualBox
Attention! The process of installing the program in all other cases except Hyper-V is carried out in a similar way.
 Download VirtualBox from the official site
When installing, you need to click on the Next button, and to install a full-featured version of software, you need to select all components offered in the list.

Pressing the button Browse.makes it possible to choose a folder where it will be installed software. Next, a window appears in which the ability to create shortcuts.

After the warning "Warning Network Interface" appears. It means installing new network connections for the program. This action must be confirmed.

The final stage will be the confirmation of the installation of the application.


After installation is completed, you can start directly to install a virtual machine on Windows 10.
First launch VirtualBox
First of all, you need to download the image of the operating system. For example, choose Ubuntu 32-bit version.

Next, B. launched programTo create a virtual machine you need to click on the "Create" button. In the window that opens, the VM name is specified, in the System Type section, Linux is selected, the Ubuntu version.


Next, you need to select "Create a new virtual disk", and confirm the action.

Disc type - "VDI".

The dynamic disk is filled with data to it.

Next, the size of the disk is selected.

Everything, the creation of a VM can be considered completed. Now it remains to install the previously downloaded operating system.
To begin with, you need to click on the Green button "Run", then select the downloaded image, and click "Continue." After that, the usual installation of the operating system on VM will begin.
Installing a virtual machine on Windows 10. Detailed video instruction
VirtualBox (Rus. Virtual Boxing) - it virtual machine From Oracle Corporation. Free programDesigned to virtualize Windows operating systems, MacOS, Linux, FreeBSD, Solaris / OpenSolaris, other platforms are supported.

Advantages of a virtual machine
Using a virtual machine (VM) on your home PC, first of all, will allow you to simultaneously run several operating systems (guest OS).
For example, in this moment On a computer or laptop installed one of the issues of the operating system Microsoft Windows. (host OS). Installing the same virtual machine, in this case VirtualBox allows you to use any other (guest), including MacOS, Linux, Android, Windows, and so on, options here can be very much.
Some features and features of VirtualBox
- Support images hard disks VMDK () and VHD (Microsoft Virtual PC);
- Virtualization of audio devices (optional Emulation AC97 / SOUNDBLASTER 16 / Intel HD Audio);
- Creating, deleting, restoring snapshots (snapshots) VM;
- Shared Folders - Creating common file sharing directories between host and guest systems;
- Support OVF / OVA format;
- Creating protected media to network;
- Support for various connection options: NAT, network bridge, virtual host adapter, etc.;
- Experimental support for hardware 3D acceleration;
- Cross-platform (Virtual Box,);
- Convenient navigation and friendly interface;
- Multilingual Localization - Russian, Ukrainian and other languages;
- The program extends under the GNU GPL 2 license - free software (no restrictions in use).
Download VirtualBox for Windows
On our site, the latest version of Oracle VM VirtualBox for Windows 7, 8.x, 10 (starting with version 5, Virtual Box does not support Windows XP) on our website.
Download VirtualBox for free, without registration.
Spoiler (Oracle VM VirtualBox Extension Pack)
Oracle VM VirtualBox Extension Pack - Components Expanding Virtual Machine Features (RDP Server, uSB support, NVME, PXE and other features).
Download and install Extension Pack only the same version as VirtualBox.
Download the latest version of Oracle VM VirtualBox Extension Pack
[Collapse]
VirtualBox is a virtual machine from Oracle Corporation. Free program designed to virtualize Windows operating systems, MacOS, Linux, FreeBSD, etc.
Version: VirtualBox 6.0.8
Size: 168 MB
Operating system: Windows 10, 8.1, 8, 7
Russian language
Program status: Free
Developer: Oracle
Official site:
What's new in version: list of changes
With the release of Windows Server 2008, the network OS also presented its first Hyper-V virtual machine. For Microsoft is not this new technologySince previously used Virtual PC and Virtual Server.
Since then, the company has developed a more advanced solution called Hyper-V and integrated into windows platform. With the Windows 8 output in 2012, Microsoft made Hyper-V available to Windows users, and is first focused on the consumer, as more reliable. In this article we will look at the use of it.
Creating a virtual machine using Hyper-V in Windows 10
Let's look at creating a virtual machine using the built-in HYPER-V technology. Benefits include the ability to start multiple operating systems, at the same time as long as you have a sufficient number of hardware resources. Personally, I decided to do this because I need to make some compatibility tests. Hyper-V is also a great way to try and test applications before using them on the main production environment.
Prerequisites
- The 64-bit version of Windows 10 Pro or Windows Enterprise (Hyper-V is not available in Windows 10 Home Edition).
- Your processor must support Secondary Level Address Translation technology.
- Virtualization must be enabled in your computer or firmware BIOS.
Enabling virtualization
Restart your computer and log in to the BIOS Setup (usually pressing F2, F10 or the F12 key) on the keyboard before the computer loads the Windows operating system. This process may vary depending on the brand, so refer to your computer's user manual for instructions on how to download the BIOS. On my computer, I have to press the F10 key, select your language, select Security \u003e\u003e System Setup and enable virtualization technology.
Hyper-V Setup
Click Windows Key + R and enter: Optionalfeatures.exe.Click the key Input.
This action will open the inclusion and disabling all Windows components. Mark all options Hyper-V. and click OK.
Then wait until Windows search for the required files will make changes, install and configure Hyper-V. You will be offered RebootTo confirm the changes. A series of reboots will occur.

Setting up a network for a virtual machine
At the first stage, we will create a virtual network connection. Right-click on the Hyper-V Manager, click on Desktop-i1cts2q and start creating a switch. In my case, I allocated an external virtual switch. The "Create Virtual Switch" button will create access to the Internet. OK.

Creating a Virtual Machine Hyper-V
Next, you need to open a hidden menu quick access, Press windows key + X, go to the control panel \u003e\u003e Administer \u003e\u003e Hyper-V Manager. (See Article: How to open a control panel in Windows10) or enter the Hyper-V dispatcher in the Hyper-V Manager window.
In the left panel of the Hyper-V dispatcher, select Desktop-i1cts2q. This choice will allow steps in the bar on the right. Click Create - Virtual machine. The creation of a new virtual machine will start. Click the Next button and follow the instructions on the screen.

Give the virtual machine name and specify the location for storage. So if you have additional sections or disk, then you can view and save it there.
Select the type of generation, which you prefer to use. If you are based on the needs of old applications, the generation is better suitable.

Select how much memory you would like to give a virtual machine. This choice will depend on how much you have. The bigger, the better. If you are limited in the installed physical memory, 2 GB and less, uncheck the "Use dynamic memory for a virtual machine" checkbox.

If you have created a previously network for a virtual machine, install it and click Next to continue. If not, you can always configure the parameters after.
The next window will configure the virtual hDDwhere you will install the operating system. Assign the size you would like to have in a virtual machine. You can also select an existing virtual hard drive if you already have.
Check your settings options. You can click the Back button and make the necessary changes. After you are satisfied, click Finish.
Enabling the Hyper-V virtual machine
After creating, we still have to start the virtual machine, for this, in the Hyper-V dispatcher window, find the virtual machines and click on the window that opens, click the Start button.
Installation of the operating system
Next, I will show you how to install Windows 7 Professional in the Hyper-V virtual machine. You have a wide selection of operating systems that include other windows version, and some Linux distributions. To install Windows, I will use the file ISO image.
IN right panel In the virtual machine name, click Settings. Select in the menu in the tree hardware DVD drive. In the DVD drive, install the boot options from the DVD or the available ISO file.
Installing the operating system on the built-in Hyper-V virtual machine in Windows 10 as you can see it is not difficult. The process is exactly the same as in other programs, such as VM VirtualBox or VMware. You do not need to install third-party software, and as I said earlier, it's free.
As it happens with any other product, still in development, the launch of Windows 10 Technical Preview is a risky business. It describes the most reliable and easy way to install and work with the preliminary version of the next Windows - on the virtual machine.
This article covers recent changes in software for creating virtual machines (VM) and the installation process of Windows 10 Technical Preview (Win10 Preview, if short).
Vm is not only reliable and easy to install, with them almost any operating system can work. And in this case, both Windows 10 Preview and the program for creating a virtual PC is 100 percent are free. The best of this, working in VM, Windows 10 Preview is essentially not a danger to your main system (host). It is as if the Windows 10 system was installed on its own, a separate physical computer.
Three main steps
In these steps, it is assumed that you have not yet installed software to create virtual machines. We will use VirtualBox from Oracle. In addition, it is free, it is still quite developed and it is relatively easy to install. (Note: VirtualBox is often updated. If you have this program already installed, now it's time to get last version.) Steps:
- Download and install VirtualBox on a standard PC;
- In VirtualBox, create a new virtual machine that is optimized to launch Win10 PREVIEW;
- Download Win10 Preview and install it on a new virtual machine.
Important preliminary action
Requirements for windows startup 10 preview inside virtual machines VirtualBox. relatively moderate. The vast majority of today's personal computersworking in any modern version Windows - Vista, Windows 7 or Windows 8.x is likely to match or exceed minimal specifications.
Here is what is required:
At least 3 GB of system RAM. For Win10 Preview, at least 1 GB of RAM is needed, VirtualBox needs another 512 MB, and the host system is usually needed at least 1 GB or so. Add some more memory for shared system functions. It is better to have more than 3 GB of RAM - a typical PC sold today is designed with a volume of 6 to 12 GB. (To quickly check the number of memory installed on your system, press START / CONTROL PANEL / SYSTEM. In the System (System) section, find the title "Installed Memory (RAM)".)
At least 30 GB of available disk space.For Win10 Preview requires approximately 25 GB of free space plus another 4 GB or so for the Win10 installation file, but as with RAM, more free disk space is always better. (You, of course, compensate for this space when you delete VM C Win10.) There is no requirement that the Win10 virtual machine is on the main disk ( C:), But this will make it much easier to simplify the installation process.
Support hardware virtualization. Almost all PCs sold in recent years have built-in virtualization hardware support used in VirtualBox (and similar VPC / VM products). But in older systems of this necessary function may not be.
Here are the ways to determine if there are support for virtualization in your PC:
1) One method is to simply install VirtualBox and install a new virtual machine (more about it will be mentioned below). Then right-click for the installed machine, select the "Configure ..." menu and go to the System section. Click the Acceleration tab and check whether the hardware virtualization option is enabled. Enable VT-X / AMD-VAs shown in Figure 1. (Note: In some systems, you may have to enable hardware virtualization support in BIOS Systems. Look at the Windows Sevenforums forums page to quickly figure it out.

If your system does not support hardware virtualization, it remains easy to remove VirtualBox.
2) Intel offers its free utility "Does My Processor Support Intel Virtualization TECHNOLOGY?" ("Does my processor support Intel virtualization technology?") (). Similarly, AMD offers "AMD Virtualization Technology and Microsoft Hyper-V System Compatibility Check Utility" (Verification utility Compatibility Compatibility of AMD Virtualization and Microsoft Hyper-V Systems) on its own. (Scroll to the bottom of the list or click on this direct to download.) You can also try "Hardware-Assisted Virtualization Detection Tool" ("Virtualization hardware detection tool") from Microsoft (), but the application only works in Windows XP, Vista and Windows 7 - not in Windows 8.
3) You can also search for the model number of your CPU on the manufacturer's website and view listed specifications.
But again, we note that almost all cars sold in recent years have support for virtualization.
And finally, before continuing, check out your current system. (Backup programs). Despite the fact that none of the following steps described are particularly risky, this measure is just a useful habit of backup Before installing the new software or making any changes in the host system.
Step 1st: Download and install VirtualBox
Go to the VirtualBox for Windows (at the time of writing, this is version 4.3.18). This program will work at all current versions of Windows.
Note: Oracle also offers VirtualBox Extension Pack, a separate package that allows the guest operating system to more fully integrate with the host OS. In your particular case, it may be necessary - and maybe there is no - Extension Pack. In order not to complicate the process, I propose to install only the main package VirtualBox. If you need an Extension Pack, then this case will be a tip later. You can then return to useful links on the VirtualBox download page to install Extension Pack.
As soon as the installation file VirtualBox forWindowsfully downloads, click on it to start the program installation process (Figure 2).

After the entering window appears, the VirtualBox will show two custom dialog boxes. Custom Setup. , the first of which is shown in Figure 3. The Technical Preview works well with default settings - without making changes; Just click Next (Hereinafter) in both dialog boxes.

You will receive a warning that your network interfaces will be reset (Figure 4). For VirtualBox, this step is required to integrate your PC network system and allow the VM (Guest) operating system - Windows 10, in this case, to access the Internet.
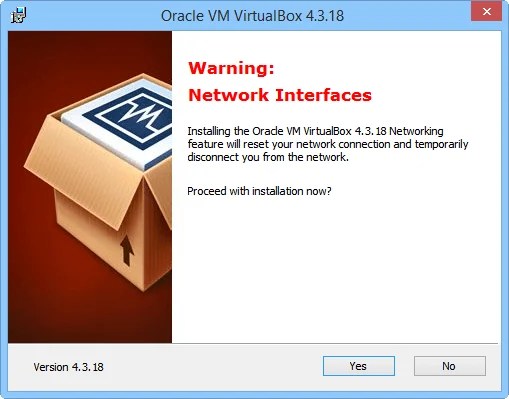
This suspension of the network will be short, but it will temporarily interrupt your Internet connection. Make sure that at the moment you do not have tasks, such as downloading software. Click Yes button to continue the VirtualBox installation.
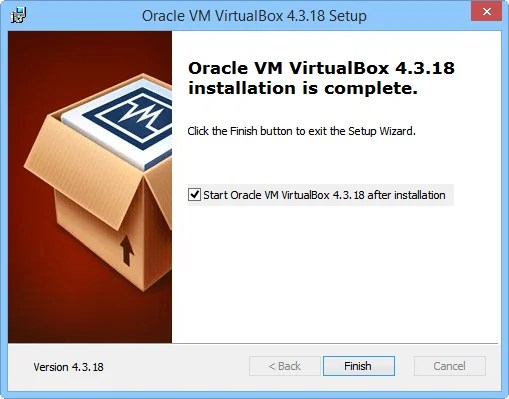
Then you will see the confirmation window. Ready to install(Everything is ready to install). Click Install (Install). From that moment, the process is mainly automated; The program in the course of the process will simply request permission to various powers. Give the required permissions and agree with all the default settings - in the end you will see that the final dialog box (Figure 5) reports that the VirtualBox installation is completed. Press the button FINISH..
Step 2nd: Download Windows 10 Technical Preview
Depending on the speed of your Internet connection, the Win10 PREVIEW boot will take approximately 30 to 45 minutes (the size of the ISO files loaded from 2.91 to 3.96 GB). Only a few minutes will leave for the virtual PC setting. Thus, now it's time to start downloading the Win10 Preview installation file. Let it download in the background until you configure a new virtual windows Machine 10.
For Win10 Preview you do not need to pay, but it is required that you have a Microsoft account and so you joined the Insider windows program Insider Program (). As soon as this is done, click the "Install Technical Preview" link, which will send you to download the ISO file. Choose language and bit (32 or 64) that you need and click Download.
If you are currently working in a 64-bit Windows, you can download and run either 32-bit or 64-bit versions of Win10 Preview; If you have a 32-bit system, you can only use a 32-bit version.
Note that there is only one key - NKJFK-GPHP7-G8C3J-P6JXR-HQRJR - But you probably will not need it.
It should be borne in mind that file iso.-drawing is essentially dVD image. VirtualBox can use the Win10 PREVIEW installation file directly - you will not need to write an image to an optical disk or flash device. Just leave it on your PC in a convenient place, such as the downloads folder (downloads).
Step 3rd: Create a new virtual machine for Windows 10 Technical PREVIEW
When you start the VirtualBox for the first time, its main manager VirtualBox Manager will display the greeting dialog (Figure 6). Start the process of installing a new virtual PC by clicking the blue icon. Create In the upper left corner of the manager.

Now VirtualBox will hold you through a series of installation dialog boxes.
- Specify them and OS type (Virtual PC Name and Operating System): The virtual machine name is better to give simple and speaking. In the following examples, I will install a 64-bit version of Win10 PREVIEW. So in the field Name I entered the absolutely self-evident header: Win10-64 PREVIEW.. Name your virtual machine as you like.
Finally, use such an easy way to select version. Win10 Preview uses the same VIRTUALBOX presets as Windows 8.1. Thus, if you downloaded a 32-bit version of Win10 Preview, select Windows 8.1 (32-bit); If you downloaded the 64-bit version of Win10 Preview, select Windows 8.1 (64-bit). Figure 7 shows that I chose.

- Set up virtual memory size : In the Specify Memory Specifications dialog box (Figure 8), make sure that your win10 is assigned at least 1 GB of RAM. Better, if more. Move the control regulator along the scale to which the color marking is applied, adjusts the total RAM volume, available VM. Install the regulator in the green area so that both Vm and the non-revatual host system have enough memory for normal operation.

- The remaining settings settings : Now you will go through dialogs Choose hard drive, Specify the type(hard disk), Specify storage format (data storage on physical hard drive) as well Specify the name and file size (File location and size). Just confirm the default settings in each dialog box: "Create a Virtual Hard Disk", "VDI (VirtualBox Disk Image)", "Dynamic Virtual Hard Disk" and "25 GB" as size virtual disk.
As a result, you will be created simple, nothing filled and untouched virtual PC, prepared for the installation of a new operating system.
Step 4th: two last settings
By default, the new VM will try to boot from its virtual hard disk. But the virtual disk of your virtual machine is currently empty. To install Win10 Preview on empty diskVM must first download the downloaded ISO file using virtual Optical Drive. (Virtual device for optical disks). (At this point, however, the file is most likely downloaded. Make a break for a cup of coffee).
Selecting a virtual drive on optical disks for VM will require only multiple clicks - as well as the other preset configuration - select the VM cursor manipulator. Let's start with the manipulator.
Select a new virtual machine in the VirtualBox manager and click the "Set up" icon (large orange gear), as shown in Figure 9.

Go to section System In the "Settings" window to enter it. On the tab " Motherboard»Discover the drop-down list Cursor manipulator and select PS / 2. mouse, USB tablet or USB Multi-Touch TabletDepending on which manipulator is used on your host computer. I use a standard PC with the mouse, so I chose PS / 2 mouse (see Figure 10). When you choose what is needed, click " OK.".

Now you need to make the VirtualBox program to use installation file. Win10 Preview (ISO). The thing is to properly insert a virtual installation DVD in a virtual optical drive Vm. (The following few steps are illustrated in Figure 11.)
Click the Main Icon "Configure" again and select "Media". Then, in the "Media Information" section under the device Controller: IDE. click Empty (This is No. 1 in Figure 11). On the right side The "Media" panels will appear new options.
Now in the "Attributes" section, check the box. Live CD / DVD (№2) and then click the disk icon to the right of the inscription Secondary master IDE(Number 3). A pop-up menu appears. Choose Select image optical disk (№4).

This step opens a recognizable window in the form of a conductor. Find you the ISO file loaded by you - most likely in the download folder (downloads) - and select it (usually it is labeled somehow like WindowStechnicalPreView-X.; See Figure 12). Click Open.

The program will then return you to the setup / media dialog. Click OK.
Note: As noted earlier, you may have a dialog box that offers to install VirtualBox Extension Pack. This additional package You do not need to pay and you can download from the same page, where did you get the main VirtualBox installation file.
Congratulations! Now installing the virtual machine is completed, you can install and run Windows 10!
Step 5th: Installing Windows 10 Technical Preview
In the main menu of the VirtualBox manager, or double-click on the Win10 virtual machine, or select it and click the Run icon (Figure 13).

VM will now boot from the installation ISO file located in a virtual DVD drive, and starts installing Win10 Preview. The initial dialog boxes are likely to be familiar to you - they are very similar to those that were in previous versions Windows.
Note: When you first click inside the VM window, the VirtualBox message may appear, which says that your cursor will be temporarily closed within the window. This is the usual situation. If you decide to go beyond the VM window, simply press the left (or in some systems right) ctrl key So that control over the mouse returned to the host computer.
In the first dialog box of the Win10 installation, the program will ask you to confirm or changed the language and keyboard type. Select "RUSSIAN (RUSSIA)" in the drop-down menu "Time and Currency Format" (Figure 14). Then you will see a window with a button. Install Now. (Start installation). Click it. Then you will be asked to adopt the terms of the license agreement - do it.


After some time, VM will reboot. Ignore the offer "Press Any Key to Boot from the CD / DVD" ("Press any key to boot from CD / DVD") and let VM itself boot from its hard disk. After rebooting, the program will guide you through the final series of Win10 settings (default values \u200b\u200bare well suited) and personalization settings, such as accounting data microsoft records.
If you do not have a Microsoft account, or if you do not want to use the existing accountYou can create a new one for free. The final options and functions of the installation procedure speak for themselves; For users of Windows 8 or 8.1, as before, they will be familiar to look.
When you finish, Win10 will be launched and ready for your testing. If you chose the mouse as a manipulator, you will be taken directly to the Win10 desktop shown in Figure 16.

Note: Windows 10 Technical Preview has already had several updates. One of your first tasks is to run Windows Update. (Windows update). (Right-click on the Start button with the Windows flag and in the pop-up menu, select Control Panel, press System and Security / Windows Update (System and Security / Center / Center windows updates), and then click the link Check for Updates. (Update search)).
Some more cooking so that everything is freely loaded
At the moment, your virtual machine is still configured to download from the installation ISO file. If you leave everything as it is, then every time you start your VPC you will receive a request "Press Any Key to Boot from the CD / DVD" ("Press any key to boot from CD / DVD").
To avoid it, you must disconnect ISO file from a virtual DVD drive. It is required to perform only a few simple steps.
Close Win10 as usual - that is, right-click on the START button in Win10 and select SHUT DOWN OR SIGN OUT (Shutdown or exit system), then Shut Down. (Completion of work). When Win10 closes, you will return to the VirtualBox manager. (Note: Most of the virtual PC settings cannot be changed while the virtual machine session continues.)
With the VM C Win10 selected, click the "Set" icon and go to the "Media" section (you came there earlier, see Figure 11.) On the right side of the "Media" window, click the disk icon next to the element Secondary master IDE .
In the Options drop-down list, select Remove drive from the driveAs shown in Figure 17.

Click OK.To close the settings window. Ready!
Experience Windows 10 Technical Preview
If you know Windows 8, then mainly and in Win10 Technical Preview will feel like fish in water. The general concept is mostly the same, but with the addition of many expected improvements. If you have never worked in Windows 8, work in the new OS may be a little difficult for you.
The following information about Windows 10 Technical Preview on our website should help you navigate:
- Microsoft introduced a new Windows 10 OS. Official PrecC-Release Microsoft.
User's manual in Russian.
- Antiviruses for Windows 10 Technical Preview. Information on the official support of the new platform from antivirus vendors, user experience in installing antivirus solutions.
To have several operating systems at once with separate workspaces and applications, you do not need to buy a second (third, fourth, etc.) computer. Because all this will fit in your only PC. How? Thanks virtual machines (VM) - Special programs that create (emulate) inside the main operating system Imaginary (virtual) computers.
Virtual PC is almost like real. He has its own processor, memory, hard disk, network adapter and everything else. Of course it is not physical devicesBut they are made so that the operating systems believed them with such - real.
On one physical Computer At the same time, several virtuals can work. How many exactly - depends on the hardware resources: the chunning processor, the volume of the RAM, the spacious drive, the greater. The usual homemade PC of the average performance based on Windows 10 copes with the simultaneous operation of the three-five lightweight OS (for example, Windows XP, Android and Lubuntu + main system). Or two or three relatively heavy (for example, the main Windows 10 + virtual Windows 7 and Mac OS X). As you already understood, application-emulators of virtual computers allow you to install and run on them a variety of OS.
Virtual machines general purpose (Unlike specialized - such as, for example, VM Java), use:
- To start applications that do not support the main system.
- To protect the system from the potential harm of unverified programs.
- As an additional barrier from viruses when visiting dubious web resources.
- To create an isolated medium to study the activities of malicious software.
- As a test landfill for debugging its own developments.
- To master network construction technologies.
- For dual authorization on some game portals and much more.
And of course, virtual machines are used everywhere to distribute server working resources.
Today we will not concern the industrial use of VM, and consider only what it can be useful to home users of Windows.
Oracle VirtualBox.
Consider the process of creating a new virtual machine and the start of installation in it Windows 10.
- Click B. top panel "Create" button.

- In the first window of the Wizard creation wizard, specify the OS name (it will be displayed in the list of guest systems), its type (Windows, Linux, etc.) and version. In our example, this is Windows 10 32 Bit (you can also put 64 Bit, but it will require more resources). To go to the next step, click Next.

- Continue the size of the RAM's RAM. By default, Windows 10 x86 is given 1 GB, but you can increase this volume by shifting the slider to the right. If there is not a lot of RAM on your PC, do not give a VM more than 2-3 GB, otherwise the main system will slow down due to lack of memory.

- After you create a virtual hard disk. If you put the system for the first time, choose the "Create New" option.

- Virtual disk type will leave the default.

- The storage format is the area on the physical drive of your computer, which is given to VM. It can have a permanent or dynamically expandable volume in the countries that you define on. To save space, choose a dynamic format.

- You also specify the name of the volume (virtual disk C) and its size. Default - 32 GB.

- After pressing the "Create" button in the list, a new virtual machine will appear in the list. On the right in the frame show its parameters.
- To go to install Windows Click on the top panel, the Run button.

- In the window that opens after that, the window will appear "select boot disk" Click the folder icon and specify the path to the system distribution. This may be an image in format.iso or physical media (DVD, flash drive). By selecting the distribution, click "Continue".

- The further installation of the OS installation in the virtual machine does not differ from it to install it on the physical computer.

Some settings of VM and guest system
Click in the virtual machine window captures the mouse cursor (i.e. it will move only within the virtual screen). To return the cursor to the main OS, click Ctrl + Alt.
To access the entire set of functions of the guest OS, you need to establish special additions. Go to the "Devices" menu, click "Connect the disk image of the guest OS add-ons" and follow the further instructions.

To connect to the guest system to share file sharing with the main, click on the "Device" menu item "Shared folders". Click on the "folder +" icon in the window that opens and via the "path to folder" field, specify it in the conductor (the main system directories are shown).
If you want the setting to work constantly, check "Auto-connection" and "Create a Permanent Folder". a shared folder It will be available from the virtual machine conductor as a network.


To change the ordering of the loading device polling (for example, to download a virtual machine with a DVD), complete the operation of the guest OS, open its settings (in the main VirtualBox window) and go to the first section of the System section. In the download order list, mark the desired medium and by pressing the arrow buttons, move it upstairs.

VMWare Workstation Pro.
Some Options of Virtual Machines Hyper-V
To take a picture of the status of a running guest OS, open the upper menu of its "Action" window and click " Check Point" Or press the Ctrl + N combination.
Access to the settings of a separate virtual machine opens from its context menu in the list of the main dispatcher window and hides the "Parameters" button.
Other features of the program are also very uncomplicated and mastered without much difficulty.


