Many users after windows updates 10 there are some malfunctions and malfunctions in the computer device. The main ones are the following:
- Windows 10 won't boot for a long time.
- The system does not want to start and run.
- Black screen.
- The appearance of a blue screen with errors.
To eliminate them, it is necessary to understand the sources of malfunctions and possible ways getting rid of these sources.
If after latest update Windows 10 does not start the system, remember how it behaved before shutting down or rebooting. Perhaps some program was loaded, or the error appeared after connecting a new device and virus software. In the course of fixing such problems, the system may improve or degrade its performance. Therefore, it is necessary to be ready for its restoration and return to its original, working condition.
The system does not start or takes a long time to boot
The system takes a long time to boot or does not boot at all - this problem occurs when starting a large number of additional programs or attaching malware to the process. Therefore, you must immediately check your computer for viruses and prepare an electronic media with installation Windows files 10.
The following steps are taken to solve the problem:
- Using the media, boot the device in safe mode. In the menu, select the source from which the system modules and drivers needed for the computer will be loaded.
- Open Task Manager. This can be done with Ctrl keys+ Shift + Esc. Find the Startup tab.
- Startup contains the entire list of applications that can be loaded with the system startup. It is necessary to select among them the minimum that is needed for the normal operation of the computer, and disable the rest.
These simple steps will help reduce system boot time and improve system startup.
Working with safe mode is useful when removing viruses, unnecessary programs, fixing driver errors, and activating an administrator account.
In addition, you can perform disk optimization and defragmentation:
- Click on Start.
- Select the Computer tab, drive C.
- In the window that opens, find the Properties item, click the Optimize button.
Using the CCleaner program, you can remove all junk files from the disk and erroneous keys from the registry.
If after updating Windows 10 does not work, do a system restore to an earlier working state. This method is only suitable if the computer creates system rollback points, restore points. To do this, you need to carry out the following procedure:
- Reboot the system. Once it turns on, press F8.
- The recovery menu appears.
- Go to the Diagnostics section, then Extra options.
- Find the Recovery tab.
- Following the instructions, select a Rollback Restore Point from the available list.
- Restart your computer. Current version operating system is removed.
The appearance of a blue screen
CRITICAL_PROCESS_DIED. The error code is accompanied by the warning "The computer did not start correctly" or "Windows did not boot correctly."
In such cases, a simple reboot helps.
INACCESSIBLE_BOOT_DEVICE. The error may appear after updating to Windows 10 or BIOS motherboard, when restarting the computer after a system rollback, partitioning the hard drive, when files are damaged.

The easiest way to fix this error is:
- In the Automatic Repair window, select Advanced options.
- Among the list of parameters you need to find Boot options - Restart.
- After restarting the system, press the F6 button to reboot into safe mode using the command prompt.
- Enter command phrases one by one:
- sfc /scannow;
- dism /Online /Cleanup-Image /RestoreHealth;
- shutdown-r.
System files will be checked and restored if damaged.
The appearance of a black screen
There are malfunctions in which it does not turn on computer device and the screen is black after the update. This problem occurs when video card drivers are installed incorrectly, exiting sleep mode, removing a virus, downloading updates.
The screen can have 2 types:
- With mouse cursor.
- No cursor, solid black display.
In the first case, the screen can be not only with a mouse cursor, but also with a spinning wheel. What does this mean and what to do in such cases?
Software failure
This happens when the system only booted for the first time before Windows 10, when it was turned off and immediately turned on or the computer was restarted. Software failure occurs as a result of an update.
To restore the system, you must update it again.
System conflict with primary drivers
Previously installed drivers can create a conflict with the system, so to fix this problem, do the following:
- Find Start - Control Panel. Under Power Options, click System Settings.
- Under Shutdown Options, uncheck the Enable quick launch(recommended).
- Save your settings.
- Click on Start. Find the Computer tab.
- Right-click Properties and do the following: Hardware - Device Manager - Display Adapters.
- Find your graphics card and click Update drivers. Drivers are installed either in automatic mode from the Internet, or from special software.
In the second case, when the screen is only black without a cursor, they use the system startup in safe mode:
- Hold down the Shift key on the keyboard, constantly click on the F8 button to open safe mode. This system start is simple, but does not always work.
- In the window that opens, find the following sections: Diagnostics - Advanced options - Command line.
- Type bcdedit /set (globalsettings) advancedoptions true.
- Click the Enter button.
- In the newly opened window, click Continue. The download continues.
- In the new window, select Enable Safe Mode.
- Press Enter.

Correction of the activity of the virus
If the computer does not boot, the screen is solid, black, then most likely the system was damaged by malicious virus software. Try the easiest way.
Boot Windows 10 in safe mode, check with an antivirus application and delete infected files.
If viruses have damaged the explorer.exe file, which is responsible for the work GUI, you can perform the following operation:
- Press the Ctrl+Alt+Del keys at the same time or open the Start menu.
- Go to Task Manager, then Run a new task.
- In the line write explorer.exe, run the task.
- Through the Run line, pressing the Win + R buttons, enter the regedit command.
- Expand the HKLM branch.
- Go to the Software section.
- Next, click individually tabs Microsoft - Windows NT - Current Version.
- Open the Winlogon folder, then Shell and double click.
- Change the value to explorer.exe.
- Save your settings.
Getting rid of malfunctions in the system after updating it to Windows 10 is not difficult and does not require technical knowledge and skills from the user. After performing one of the operational procedures, the system will boot without delays and failures. The computer will work fine.
Have you upgraded to the next version of Windows 10 1809 and are having trouble using it? If yes, this manual help solve them.
Like the previous version, Windows 10 October 2018 Update 1809 is a major update. It brings with it new functionality and performance improvements personal computers, laptops and tablets. However, each such update carries the risk of introducing new problems.
Typically, major Windows 10 updates contain major changes to the code, which can lead to compatibility issues, driver issues, unexpected bugs, and other issues that can impact performance and usability.
In addition to unknown bugs, other problems that are not caused by changes in the system may appear. Sometimes an update fails to install due to incompatible software, outdated drivers, unusual hardware configurations.
Below we will consider possible problems and options for their solution.
Fixing Issues in Windows 10 October 2018 Update
When switching to new version Windows 10 has two kinds of problems. There may be errors during the installation process, which in themselves are not problems with the new version. And there may be issues related to system design, compatibility, etc.This guide will solve both problems during the installation process and after.
Fix download errors for installation files
If you receive error 0x800F0922, the device is most likely not connected to the Microsoft update servers, or the System Reserved partition is not large enough. Try doing the following:Turn off VPN
Then try installing the update again.Enlarge the System Reserved section

Sometimes third party applications, like antiviruses, can save their data in this section. In this case, there will not be enough space for installation on it. system update. Use third party tools to increase partition size. You need at least 500 MB.
You can also clean Windows installation 10 when a partition of the correct size is automatically created.
Update with Media Creation Tool
When trying to download the installation files, error 0x80246007 may occur. It shows that the file could not be downloaded.In this case, you can use the Media Creation Tool to install a clean version of Windows 10 when the partition is automatically created.
Troubleshoot installation errors

It is recommended to install updates through the update center. However, there may be errors in the work. To solve them, you can use the built-in error fix tool in Windows 10.

To do this, do the following: open the application Settings > Update and security > Troubleshooting > Windows Update > Run the troubleshooter. Click on the "Apply this fix" button, if available. Follow the instructions on the screen.
After that, restart your computer and try to update again by opening Windows Update.
Fixing unexpected installation errors

If there is a problem when trying to download the installation files, you may receive an error number 0x80190001. In this case, use the cleanup tool in the Settings app to remove temporary files. Do the following:

Open the Settings app > System > Device storage > Storage Sense > Free up space now. Select the "Delete temporary Windows installation files" option.
Then try installing the update again. If problems persist, use media settings creation tool.
How to fix problems with USB media
If the Media Creation Tool is not downloading updates

In some cases, downloading cumulative updates may freeze. If the Media Creation Tool cannot download the update, please restart the application. When the installation files have downloaded, disable network cable or wireless connection. When the application times out, the installation of version 1809 will begin.
After installation is complete and initial setup system, reconnect the network to complete the installation process.
Fix installation issues via Media Creation Tool
Usually reloading the Media Creation Tool solves most errors, but if there are problems with dynamic update, the application will continue to hang every time you try to download installation files.In this case, you should start the process manually:
1. Open File Explorer.
2. Navigate to C:\$Windows.~BT\Sources.
3. Double-click the Setupprep.exe file.

After that, the installation process should begin. If this does not happen, you can use the Update Assistant tool.
Fixing errors when creating a bootable flash drive
If you are using one created with the Media Creation Tool bootable flash drive, the installation process may fail. One or more files on the flash drive may be corrupted. It is impossible to fix them, so you should create the installation USB flash drive again. To do this, do the following:1. Download Media Creation Tool from Microsoft server.
2. Double-click the MediaCreationToolxxxx.exe file.
3. Click the "Accept" button.
4. Select Create Installation Media ( USB flash drive, DVD or ISO) to another computer.

5. Click the "Next" button.
6. Select the language, architecture, and revision version.

7. Click the "Next" button.
8. Select the USB flash drive option.

9. Click the "Next" button.
10. Select "Removable Disk" from the list.

11. Click the "Next" button.
12. Click the "Finish" button.
After completing these steps, you will receive a new installation flash drive with no corrupted files. It can install the latest version of Windows 10.
Fixing "The update is not compatible with your device" issue
Although the process of downloading and installing Windows 10 updates occurs automatically, if the device has not been connected to the Internet for a long time or you turned off Windows Update, when using the installation flash drive, an error may appear stating that the update is not applicable to your computer.
To solve the problem, make sure that the computer is connected to the Internet. Go to the update center and check for updates. You can also download and install the update manually.
How to fix Update Assistant issues with October update installation
Troubleshooting "Something Went Wrong"
If you use the Update Assistant to update, you may encounter error 0x8007042B and the message "Something went wrong." After that, the update installation process will be terminated. It is not clear from this message what exactly went wrong. You can try the troubleshooting steps.Try to remove not desired programs and antiviruses, disable unnecessary peripherals. Then run Update Assistant again.
If the error persists, use another update option. Try a clean install of Windows 10 or use the Media Creation Tool to create a bootable flash drive.
Troubleshooting an update download issue via Assistant Update
Although Microsoft created Update Assistant to install updates when Windows Update fails, sometimes the tool itself has problems. For example, problems downloading installation files.Usually in this case, Internet access problems are to blame:
Disconnect and reconnect the network cable. Try unplugging the router and plugging it back in after a few minutes. Restart Update Assistant.
Restart your computer, run Update Assistant.
Try using Media Creation Tool instead of Update Assistant
How to Fix ISO Issues
When trying to update, you may receive error 0x8007025D - 0x2000C, which may indicate that one or more ISO image files are corrupted. To resolve this issue, use the Media Creation Tool to create a new image:1. Download Media Creation from the Microsoft website.
2. Double-click the MediaCreationToolxxxx.exe file to launch the utility.
3. Click the "Accept" button.
4. Select the option "Create installation media ( USB disk, DVD or ISO) to another PC".

5. Select a language, architecture, and edition.

6. Click the "Next" button.
7. Select the "ISO file" option.

8. Click the "Next" button.
After completing these steps, the Media Creation Tool will create a new iso image, which should allow you to upgrade your computer or virtual machine.
If the error persists, you can try creating the image on another computer.
How to fix storage issues
Storage issues during installation
The system requirements say you need to have at least 20 GB of disk space when upgrading from the 64-bit version of Windows 10 and 16 GB when upgrading from the 32-bit version. If there is not enough free space on the hard drive, one of the following errors may appear:0x80070070 - 0x50011
0x80070070 - 0x50012
0x80070070 - 0x60000
0x80070008
0xC190020e

Open the Settings app > System Device storage > Storage sense > Free up space now.
You can select the following files to delete:
Previous settings Windows
Files for reporting Windows errors generated by the system
Windows Defender Antivirus
Windows update log files
Downloads
Sketches
Previous Windows installations
Temporary files
Basket
Temporary internet files
Delivery Optimization Files
DirectX Texture Builder Cache
Important: do not select temporary Windows installation files or installation Windows files ESD because these files are needed for the update.

Click on the "Delete Files" button. After following these steps, you should be able to install Windows 1809 without issue.
If you can't free up enough space, plug in a flash drive or removable HDD. You need at least 16 GB of free space so that Windows 10 can use it as temporary storage for updating.
Fixing missing or corrupted files during installation
If you get errors 0x80073712 and 0x80245006, they mean that one or more installation files are missing or corrupted. The solution to this problem is to open Memory Sense and delete temporary files.
Go to Settings > System > Device storage > Storage sense > Free up space now. Highlight "Previous Windows Installations" or "Temporary Files", click the "Delete Files" button.

After that, check for updates in the update center. You can also use the Media Creation Tool after updating your computer to version 1809.
How to Fix October Update Hardware and Software Compatibility Issues
Fix hardware compatibility issues during installation
You don't need to have the most up-to-date components to run Windows 10, but despite this, you may encounter errors 0xC1900200 - 0x20008 and 0xC1900202 - 0x20008 if the computer does not meet the minimum system requirements.This usually happens when only very old computers are upgraded. The minimum system requirements for Windows 10 are as follows:
Processor: 1 GHz
RAM: 2 GB
Storage: 16 GB for 32-bit and 20 GB for 64-bit
Graphics: Direct X 9 or later with WDDM 1.0 driver
Monitor: resolution from 800 x 600 pixels

Usually, computers already running Windows 10 do not have problems with system requirements when updating. However, budget models difficulties arise from time to time. If you see errors 0xC1900200 - 0x20008 or 0xC1900202 - 0x20008, these are usually problems with RAM. In this case, you should increase the amount of memory.
Fix application and driver compatibility issues during update installation
When trying to install the Windows 10 October Update, there is a chance to see error 0x800F0923. It indicates an application or driver compatibility issue.This is usually a mistake graphics driver, it may be outdated or conflict with old program or antivirus.
To find the specific source of the problem, you need to use the update through the Media Creation Tool or Update Assistant. When you follow the on-screen instructions, these tools detect and report hardware incompatibilities.

If the device driver is at fault, go to the manufacturer's website and download the latest driver. If not, you can uninstall the driver, install the update, and then reinstall the driver.

To do this, do the following: on the desktop, right-click on the "This PC" icon, in context menu click on the "Properties" command. In the "System" window, select "Device Manager" from the menu on the left. Select the device you need, right-click on it, select the "Uninstall driver" command.
After that, try updating Windows 10.
Driver incompatibility
If you are getting error 0x80070490 - 0x20007, one or more device drivers are incompatible. Error 0x80070003 - 0x20007 means that the installation process failed at the driver installation stage.When you see errors 0x80070490 - 0x20007 or 0x80070003 - 0x20007 after you roll back Windows 10 to a previous version, follow the steps above to uninstall your drivers.
Software incompatibilities
When an app is at fault, open the manufacturer's page to download the latest version. You can also temporarily uninstall the app and try updating Windows 10.
Open Settings > Applications, select the desired application from the list and click on the "Uninstall" button. Try installing Windows 10 and then reinstalling the app.
Fix driver compatibility issues during installation
When upgrading to any version of Windows 10, you may encounter an error that starts with code 0xC1900101. This indicates a problem with the driver. The options are:0xC1900101 - 0x20004
0xC1900101 - 0x2000c
0xC1900101 - 0x20017
0xC1900101 - 0x30018
0xC1900101 - 0x3000D
0xC1900101 - 0x4000D
0xC1900101 - 0x40017
There is also an error 0x80090011, which refers to the driver during the data transfer process.
Solutions can be the following:
Disable unnecessary peripherals
To get rid of the driver error, disable peripherals with all drivers. After that, update and connect the devices again. You can turn off all unnecessary devices, such as removable disks, printers, cameras, leave the keyboard and mouse.Update device drivers

If you are getting errors 0xC1900101 or 0x80090011, you need to make sure you have the latest drivers installed. Open the "Task Manager", select the desired device and click on the command "Update driver" in the context menu. You can also temporarily remove your device before you update Windows 10.
Alternatively, you can download the driver from the manufacturer's website and install it manually. There may be separate instructions for installing video card drivers.
Free up disk space

Insufficient disk space can also be the cause of error 0xC1900101. You need to free up at least 20 GB on your hard drive. How to do this, we have already described above.
Restoring the current version of the system
Windows 10 includes the System File Checker (SFC) and Deployment Servicing and Management (DISM) command-line tools to repair your current installation and fix potential device driver issues. Try SFC commands first, then DISM if necessary.Hard drive repair

Windows 10 also includes the CHKDSK command to check and fix hard drive errors. Click on the start menu, type cmd, in the run window type chkdsk /f c: and hit enter. If necessary, type Y and press enter to schedule the scan.
After completing these steps, restart your computer to start checking hard drives.
Manual update
If all else fails, you can perform a clean install of Windows 10 using the Media Creation Tool.Fix app compatibility issues during installation

If you see error 0xC1900208 - 0x4000C, one or more applications are not compatible with the update. The easiest way is to temporarily remove these applications. Third-party antiviruses are usually to blame. How to uninstall applications is described above.
If you uninstall classic desktop applications, you may need to take additional steps. Follow the instructions on the screen.
How to fix issues during the October 2018 Update installation process
Windows 10 fixes before installing a new version
Usually after a long Windows work 10 without proper maintenance, performance starts to drop. Problems are piling up that may show up during the update installation process.To resolve these issues, use the SFC and DISM command line tools.
Fixes for problems at the beginning of the update process

You may receive error 0xC1900107 when you try to stop updating Windows 10. It means that you recently upgraded and need to uninstall the previous version.
Restart your computer and try installing the update again. If this is not possible, go to the "Storage Sense" section and free up space as described above. Then try installing the updates again.
Troubleshooting random reboots during update installation
When installing version 1809, you may see error 0x80200056 after an inadvertent reboot. You need to restart the update process and do not turn off the computer during installation.
Fixing bugs without admin rights
Error 0x80070522 means that you are installing the update through the standard account user. For a successful installation, you must have administrator rights. If it is not home computer, you must contact your system administrator to obtain such rights.Fixing problems with the completion of the update installation
When installing major or cumulative updates, two errors may occur:Error: Unable to complete installation of updates. Cancel changes. Don't turn off your computer.
Error: Unable to configure Windows updates. Cancel changes.

On Windows 10, there are known errors that occur when updates cannot be installed. We need to find the cause of the error.

The page on Windows Update has a section that tracks information about each update and their bugs. Open the Settings app > Update & Security > Windows Update > View update history. Look at the error code. Find a description of this code on the Internet. There may also be described possible solutions Problems.
How to fix problems after installing an update
Solving the October 2018 Update activation problem

If the device is not reactivated, you may receive error 0x803F7001 and the message "Windows is not activated" on the activation page in the Settings app.
You can use the Activation Troubleshooter. You can also wait a couple of days for Windows 10 to reactivate on its own.
Solving network problems
Sometimes, after successfully updating to the latest version of Windows 10, the device may lose internet access or the speed may be slow. Reasons can be varied, including software errors in an update, changing or resetting network settings during the installation of an update, or problems with the network adapter.
To troubleshoot, you need to open the solution tool network problems. Launch Settings app > Network & Internet > Status > Network troubleshooter. Follow the instructions on the screen.
Reset all network adapters

If the method above did not help, you can reset all network adapters. Go to Settings > Network & Internet > Status > Network reset > Reset now. All network adapters will be reset to their default settings.

Solving problems with a black screen after installing the update
Sometimes after installing an update, you may experience graphical problems in the form of a black screen. A Windows 10 update, a cumulative update, or a problem with your graphics card driver may be to blame. You can roll back to a previous version of Windows 10 until the issue is resolved.


Go to Settings > Update & Security > Recovery > Go back to a previous version of Windows 10. Click the "Get Started" button. Select the reason for the return, click "Next", refuse to check for updates, click the "Next" button twice, then the "Return to the previous build" button.
How to fix problems with the dark interface of File Explorer
One of the most notable changes in the October release of Windows 10 is the introduction of a dark File Explorer option. However, there are already reports of problems with this version of File Explorer. Because of these issues, the toolbar, background, and some other elements may appear white.You need to wait until the cumulative update is released, and in the meantime, there are a number of steps you can take.
Turn on and off

Go to Settings > Personalization > Colors > Default App Mode > Light. Then select Dark again.
Change the graphic theme

Go to Settings > Personalization > Themes > Windows.
Using a new account
If the problem persists, you can create a new account. If there is no problem with the color of the conductor, you can switch to work in this account.Fix screen brightness issue
After installing the October update, some users have reported problems with their brightness settings. For some, the brightness dropped to 50%, for others, the ability to adjust the brightness was completely lost. This may be related to the video card drivers. Install the latest drivers. You can download them from the manufacturer's website or update them through the "Task Manager".
If you already have latest version driver, you can delete the device in the "Task Manager" and reinstall the driver.
Microsoft removed the brightness button from the Battery section because it's in the notification center.
How to Fix Intel Audio Driver Issues
If you are trying to update using the Media Creation Tool and Update Assistant, you may receive an error saying "Your Attention Needed". Microsoft claims that Intel Display Audio device drivers have compatibility issues with this update. Because of this, the consumption of system resources and energy can be increased, which will reduce the duration of the work of laptops and tablets.If you see this message, it is recommended that you press the back button and cancel the update installation. Also, Microsoft itself is blocking the appearance of the update on such devices.
How to fix the problem with applications not accessing the Internet
Some users write that after updating the application from the store Microsoft Store lost internet access.Enable TCP/IPv6

Beyond TCP/IPv4 Microsoft applications Store and Edge browser require TCP/IPv6 to be enabled. If you have applications that cannot access the Internet, make sure this protocol is enabled.

Open Control Panel > Network and Sharing Center. In the left panel, click Change adapter settings. Right-click on the desired adapter and select "Properties". Check the box next to "IP version 6 (TCP/IPv6)". Click OK.
Change network profile

If that doesn't work, you can change network profile from private to public.

Open the Settings app > Network & Internet > Status > Edit connection properties. Select "Public".
Reset network settings


Go to Settings > Network & Internet > Status > Edit > Network reset > Reset now.
How to solve problems with the task manager
If the "Task Manager" has stopped correctly displaying the percentage of CPU usage, you are not the only one with this problem. There is no solution yet. Microsoft should release a software update.How to successfully upgrade to Windows 10 October 2018 Update
The process of installing updates on Windows 10 has improved over time, but a large number of possible hardware configurations leads to errors. However, there are simple steps you can take to reduce the likelihood of these errors.Creating backups

Although the probability of errors is small, something can still go wrong. For such situations, Windows 10 has a rollback process, but it may not work. For this reason, it is always recommended to back up your system and user files.
A backup will help you go back to a previous version of Windows if you don't have access to the rollback feature in the Settings app.
If the installation fails, you will not be able to boot your computer. If there are problems after installation, you can use a full copy of the system to restore your computer.
Delete unimportant apps

Application incompatibility is one of the main reasons why you can't update. If you don't know which application is at fault, start with classic desktop programs and antiviruses. Apps are uninstalled in Settings > Apps > Apps & features. Select the desired programs and click on the "Uninstall" button.
In addition to incompatible applications, uninstall third-party antivirus and other security software. Naturally, it is not recommended to work for a long time without such protection. You can also disable Windows Defender Antivirus.
To do this, go to Settings > Update & Security > Windows Security > Open Windows Security > Virus & threat protection > Virus & threat protection settings > Manage settings. Uncheck the "Real-time protection" switch. After installing the Windows 10 update, the antivirus will turn on automatically.
If you remove a third-party antivirus, after installing the update, return it back.
Disabling the firewall

Sometimes built-in or third-party firewalls can cause issues during the upgrade process. If you are using Windows Firewall or other software firewall, disable them before attempting to install Windows 10 updates.

To disable the built-in firewall, in the same Windows Security window, go to the Firewall and Network Security section and click on the section that is marked as Active. Turn off the "Windows Defender Firewall" toggle.
Unblock updates

There is a possibility that you have made changes to the settings that may prevent the update from downloading automatically. In particular, in advanced settings the update center may be prohibited from installing major updates. Open Settings > Update & Security > Windows Update > Advanced options. Under Choose when to install updates, Semi-Annual Channel (Targeted) and 0 days should be selected. The Pause Updates toggle should be disabled.
Disabling metered connections
If your connection is marked as metered, the Windows 10 update may not download automatically. You need to disable this restriction.If you have limited traffic, you need up to 5 GB to download updates. To disable a metered connection, go to Settings > Network & Internet > Status > Change connection properties. Turn off the switch in the "Metered connection" section.
Disabling unimportant peripherals

To avoid driver compatibility issues, disconnect all unnecessary peripherals from your computer. It is enough to leave the monitor, mouse and keyboard. After installing the update, everything can be connected back.
Clean install
If installing updates does not work, you can perform a clean install. This will erase all data on the primary hard drive partition. Before installation, transfer the files you need to another partition or drive. Using the Media Creation Tool, you can create an installation USB flash drive or disk.Conclusion
A major Windows 10 update that comes out every six months is available for installation by all interested users. It is recommended to wait for the automatic installation, which will mean that your computer is compatible with the new version. You can also take your time and wait a few weeks to make sure that there are no problems with this update.02/19/2017 | 13:39 Analytics
Where to find and how to use key tools to fix most problems in Windows 10 PC?
To Microsoft's credit, Windows 10 is more stable than previous versions. Windows versions. However, every operating system has problems. Luckily, Microsoft offers several tools that can be used to fix the most common problems. Some of them are built right into Windows 10, others can be downloaded from the Microsoft website. We will tell you when you might need each of the tools and how to use them.
Troubleshooting Tool Start Menu
When to use: If Cortana or the Start menu is not working properly.
In rare cases, the Start menu may not open when you click the Start button or when you press the Windows key located on your computer keyboard. Something else might break, like the ability to drag app shortcuts from the app list to the Start menu bar, or the tiles pinned to the Start menu bar disappear.
The personal digital assistant Cortana, built into the Start menu, may also not function properly. The Cortana bar might not open when you click on its search box (to the right of the Start button), or Cortana might not respond to search box input or voice prompts (and you know your Internet connection is working).
To fix problems like this, Microsoft's troubleshooting suggestions range from simple (restart Windows 10) to more advanced (create a new user account with administrative rights and then sign in). But the company also provides a Start Menu Troubleshooter, which is likely to be a more effective solution.

The Start Menu Troubleshooter can identify and fix problems with files and settings related to the Start Menu and Cortana.
You can download it from the Microsoft website - on the Microsoft Troubleshooting page, click the "Try the troubleshooter" button and then "Start menu troubleshooter" (Start Menu Troubleshooting Tool), double click to run it (file name "startmenu.diagcab") and follow the instructions. It checks if there are any missing or corrupted files and settings related to the Start menu and Cortana, and then makes adjustments.
If frequent crashes with Start Menu and Cortana persist after you use this tool, the problems may be caused by an incompatible or faulty graphics card driver. The tools described in the next two sections of this article can probably help.
Built-in troubleshooters
When to use: If you're having problems with hardware components (such as network, audio, video, etc.), or if an app from the Windows Store doesn't work properly on Windows 10.
While some of Microsoft's "Troubleshooters" (like the Start Menu Troubleshooter above) need to be downloaded, Windows 10 includes many built-in troubleshooting tools for the operating system. These tools were introduced in Windows 7 and Windows 8. To access them in Windows 10, type “trouble” in the Cortana search box, and select “Troubleshooting” from the search results.
The main troubleshooting panel screen sorts troubleshooting tools into four categories: Programs, Hardware and Sound, Network and Internet, and System and Security. Click the “View all” button in the top left corner to see an alphabetical list of all the tools that are available on your computer. To run the troubleshooter, click on its name.
Many of these tools work in a similar way to the aforementioned Start Menu/Cortana Troubleshooter: The Troubleshooter runs diagnostics on the component you've selected and if it finds any issues, tries to fix them.
The tools show you the most common problems that you are likely to encounter while working with Windows 10:
Blue screen: Run this tool if your computer freezes, restarts or shuts down.
Hardware and Devices: This tool will look for problems with the hardware components of your computer (eg video chip, sound subsystem). You can also run it if the Start menu or Cortana is not working or behaving strangely - a bad graphics card driver could be the cause of the problem.
Incoming connections, Internet connection, network adapter A: Use these three troubleshooting tools to analyze problems while connecting to the Internet.
Audio playback, audio recording: If the Hardware and Devices tool did not find anything strange in the drivers sound card but you're still having problems playing or recording audio, run these two tools. There may be a software problem or a setting that needs to be fixed.
Windows Store Apps: Applies to issues with apps you install through the Windows Store. It is not suitable for cases where the tiles Windows applications The Store will disappear from the Start menu, or if you can't drag the app's shortcut from the app list to the Start menu bar. Problems in the Start menu should be resolved using the Start Menu troubleshooting tool.

The Windows Store Apps troubleshooter tool shows a report of the problems it found.
Windows Update: Run it if Windows 10 can't install official update operating system released by Microsoft. It should be noted that this troubleshooter cannot fix an update that was successfully installed, but as a result, your computer began to malfunction. For example, if an update contains bugs or an incompatible hardware driver. For this type of problem, you need to use the troubleshooter "Hardware and Devices" (Hardware and devices).
And if the Hardware and Devices tool cannot solve this problem, you should consider using the next tool.
Troubleshooting tool "Show or hide updates"
When to use: If a driver update is downloaded and installed via Windows Update and it causes problems with the computer's hardware (for example, if the sound no longer works).
The Windows Update troubleshooter mentioned above may think that the update is OK, but does not resolve the situation when successfully installed update messes up your computer - say, if a new driver doesn't work properly. Worse than that Even if you uninstall the problematic update, Windows Update will usually install it again.

The "Show or hide updates" troubleshooter helps you prevent the installation of problematic updates.
Microsoft has released a tool that allows you to stop the installation specific update(or at least delay it until the company releases best update). Download the "wushowhide.diagcab" file from the Microsoft support site and run it.
It works similarly to the trouble shooters described earlier in this article. This tool scans your computer for computer hardware driver updates and lists them. You can choose which one you want to "hide" and Windows Update will stop trying to install it.
Task Manager
When to use: If the computer takes a long time to start up or runs slowly.
An old app available in the last few generations of Windows, Task Manager, remains a good tool for maintenance or deep windows settings 10. If you feel that you have to wait too long for the desktop to appear when you turn on your computer or when you restart it, this may be due too large quantity programs automatically loaded during startup. Task Manager allows you to prevent such programs from running at startup time. It also allows you to close running programs that hang, eat up system resources, or cause other problems.
To launch Task Manager, right-click on the Start button, and select Task Manager from the pop-up menu. Alternative launch - press Ctrl + Alt + Delete, and select Task Manager from the menu on the blue screen.
Task Manager will display a list of applications (processes) that are actively running on your computer. Let's say one of the programs is stuck and you can't close it. You can close it here by right-clicking on its name and selecting End Task from the pop-up menu. Or you can click on the name of the hung program and then click the End Task button in the lower right corner of the Task Manager window.

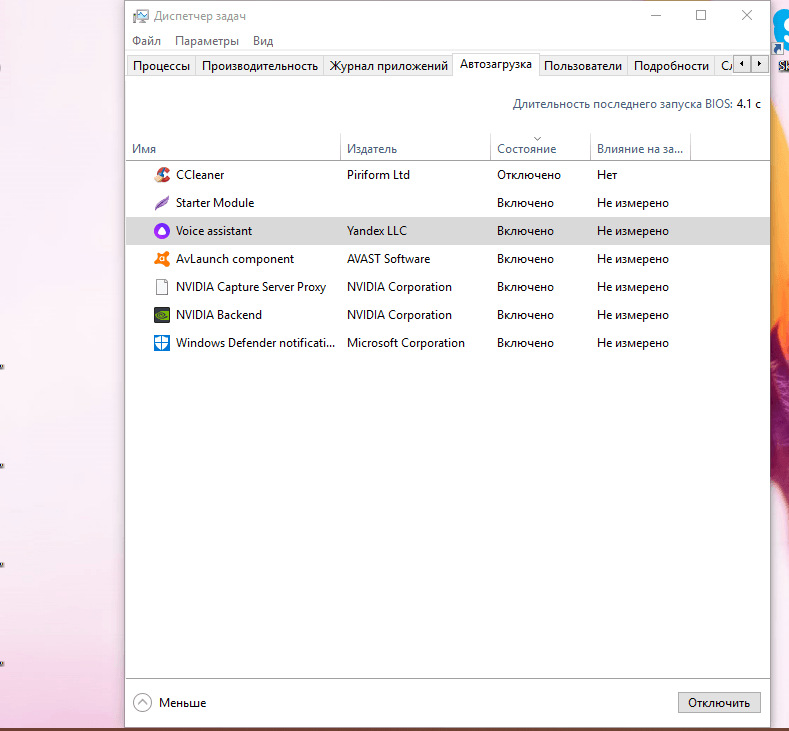
With the help of the task manager, you can prevent automatic start programs when starting Windows 10.
Click the "Details" button in the lower right corner of the Task Manager. Wherein user interface will show section tabs. Click the Startup tab and you will see a list of programs that are set to download in the background when you turn on your computer or restart it. You can prevent most of the programs on this list from running by right-clicking on the name and choosing "Disable" from the pop-up menu. (Or click to highlight the name of the program, and then click the "Disable" button in the lower right corner of the window).
Windows 10 clean install tool
When to Use: If you want to remove all unnecessary software on a new computer.
With the Windows 10 Anniversary Update, Microsoft has provided another choice that can be summed up as "delete everything and start from scratch." It's in the Settings app, at the bottom of the recovery menu: "Learn how to start over with a clean install of Windows" but it's actually a link that takes you to the Microsoft site where you'll download the tool.
This tool installs Windows 10 on a computer without any additional software from the manufacturer. When you run the tool (file name: "RefreshWindowsTool.exe"), you can choose to keep your personal files on your computer during a clean install or let them be erased. Either way, your settings and apps will be deleted.

The Windows 10 clean install tool allows you to reinstall the operating system without bloatware from the PC manufacturer.
Warning: If your computer requires special driver or a device app that is supplied by the manufacturer, a clean install of Windows 10 may not be able to provide it. For example, your computer may have a keyboard with special buttons, which are assigned to perform multimedia tasks, and a clean installation of Windows 10 will not be able to support these keys on the keyboard. If this is the case, then you should visit the computer manufacturer's website, find the Windows 10 drivers that you can download, and install them separately after you have performed a clean installation of Windows 10.
Updating the operating system is an important procedure, so it should be done regularly. Nevertheless, sometimes during the download or the installation of the update itself, errors occur that prevent the installation of a new version of the package. They can be with different codes and messages. It is also possible that the download of an upgrade or its search takes too long and eventually does not end. What exactly can be done for each type of error?
Possible causes of problems installing updates on Windows 10
Problems with Windows Update may occur for the following reasons:
Table: main errors when installing an update in Windows
| Mistake | Description |
| Failed to update Windows. Cancel changes. Don't turn off your computer. | It usually occurs due to the presence of duplicate user profiles on the PC or due to an overflowing update cache. |
| Error that starts with code 0xC1900101 | There are driver problems on the PC. Check the "Device Manager" for errors and, if necessary, fix corrupted files in the "Command Prompt" console. If it doesn't help, use other methods. |
| Errors 0xC1900208 - 0x4000C | This error may indicate that an incompatible application is installed on the computer that is preventing the update process from completing. Remove any incompatible applications, and then try updating again. |
| The update is not applicable to this PC | This error may indicate that the required updates are not installed on the computer. Install all important updates on your computer. |
| Updates installed but not configured. The update was successful but was cancelled. | In this case, it is recommended to find out the exact error code in the update log, which can be opened through Windows Update. The code will let you know what action to take next. |
| Error starting with code 0x80070070 | The code says that there is not enough space on the disk. |
| 0xC1900107 | The cleanup operation of the previous installation attempt is still pending, a system restart is required to continue the update. Reboot your device and run the installer again. If restarting the device does not resolve the issue, use Disk Cleanup to remove temporary and system files. |
| 0x80073712 | A file required by Windows Update is corrupted or missing. Try restoring system files. |
| 0xC1900200 - 0x20008 0xC1900202 - 0x20008 | This error may mean that your computer does not meet minimum requirements to download or install an upgrade to Windows 10. |
| 0x800F0923 | The driver or other software on your computer is not compatible with the Windows 10 upgrade. Please contact Microsoft support for instructions on how to resolve this issue. |
| 0x80200056 | The update process was interrupted because you accidentally restarted your computer or logged out. Try updating again and make sure the computer is plugged in and stays on. |
| 0x800F0922 | Your computer was unable to connect to the Windows Update servers. If you are using a VPN to connect to working network, disconnect from the network and turn off the VPN software (if applicable), and then try updating again. This error can also mean that there is not enough free space on the system reserved partition. |
| 0x80240016, WindowsUpdate_8024401C, 0x8024401C, 0x80070490 | Important system files have been damaged - use the "Command Prompt" and remove viruses from your PC. |
The main ways to solve problems with installing updates on Windows 10
In the "OS" there are many tools and modules that can solve the problem with updating it. Determine the error code and proceed from it using our instructions.
Dozens developers give the following tips for troubleshooting errors during a system update:
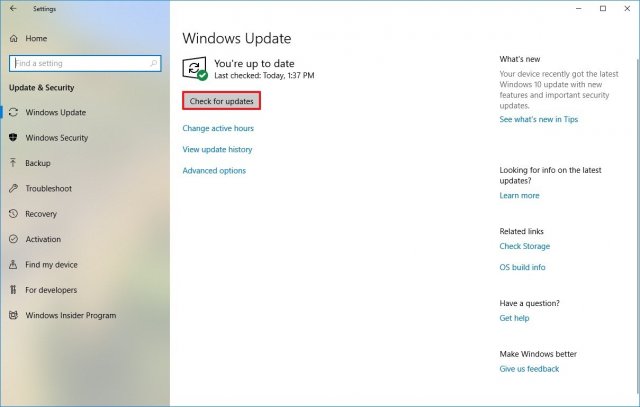
- To start searching for an update, click on the "Check for Updates" button. If the search does not start or an error occurs, close the center, wait 15 minutes, log in again and start the scan.
 In the "Options" window, select the section called "Update and Security"
 - Call up the window " Windows Settings»: press the two buttons Win and I on the keyboard at once. If nothing appears, use the Start menu. Click on the gear above the button to turn off the device.
 Click the gear to open the Windows Settings window
 - On the panel, go to the "Update and security" block.
 Click on the "Check for Updates" button
 - Also click on the link "Advanced options" at the bottom under the button. Set the automatic installation for the update.
 In the drop-down menu, select the first item "Automatic"
This solution can only help in a number of cases, for example, when the download of updates was interrupted due to some single failure in the system or due to a temporary lack of Internet.
Solving Problems with Computer Troubleshooter
The developers have built a special tool into Windows that allows you to find various problems in the system and fix them right there. How to use this tool, we will tell in the instructions:
- We will launch the tool through the "Control Panel". You can open it through the Run module: hold down Win and R, type the control request in the empty field and click OK.
 In the "Open" line, enter the command control
 - You can also launch the panel through the "Search". We enter the appropriate query and open the desktop application in the results.
 Type "Control Panel" into the search bar and open the desktop app
 - On the panel, click on the "Troubleshooting" section.
 In the "Control Panel" window, find and run the "Troubleshooting" block
 - In the left column, click on the second link "View all categories".
 Go to the list of all categories for troubleshooting
 - We are waiting for the system to detect available packages for diagnostics.
 Searching for diagnostic packages will take some time - please wait a bit
 - At the end of the list will be the Windows Update module. Right-click and select the "Run as administrator" option.
 Run the Windows Update troubleshooter as an administrator
 - In the troubleshooting tool window, click on "Next" to start the search.
 Click "Next" to start troubleshooting your computer
 - Again, we wait until the tool finishes the problem detection procedure.
 Wait for the troubleshooting to complete on your device
 - If problems are found, the tool will notify you and immediately provide an opportunity to fix them. For example, a module might offer to run a pending update. Click on "Apply this fix".
 Click on "Apply Fix" to let Windows fix the problem with the update
 - The system may also find any additional problems. You will learn about the success of the operations in the report, where there will be a list of errors and marks next to each - “Fixed”, “Not fixed” or “Detected”. If any problems remain unresolved, run the diagnostic tool again. You can also view additional information about the problems.
 Click "Close" to exit the module
 - If the module does not find any problems in the operation of the update center, move on to other methods of solving.
 The tool may not detect any problems on the PC related to "Windows Update"
Service check
The Windows service corresponding to the Update Center may simply be turned off at the moment on the device. In order for the update to happen, you need to activate it and install automatic switch on with each system start:
- We call the "Run" window using a simple combination of Win + R. In the free field, write services.msc or copy and then paste. Press OK or Enter to execute.
 Paste the short command services.msc into the empty field
 - In the services we find at the very end of the list "Windows Update". We double-click on it so that the second window appears on the display. If the click does not work, right-click - select last element"Properties".
 In the context menu of the service, click on the penultimate item "Properties"
 - For the startup type in the menu, set the value to "Automatic" - the selected service will start its work immediately after loading "Windows". After that, click on "Run" and apply the changes. Close all windows and retry the update in the center.
 Set automatic activation in the "Startup type" menu
Clearing the update cache manually
Removing all data from the update cache is quite simple - even a beginner can do it. Follow the little instructions:
- Before getting rid of information about the previous system update, you must deactivate the service responsible for the operation of the "Update Center" in the "Services" window. Open it using the instructions from the previous section.
- In the list of components, we are looking for "Update Center". In the middle part of the window, click on the "Stop" link. We do not close the window with services yet.
 Temporarily disable the Windows Update service using the Stop link
 - Launching " Windows Explorer» and immediately go to the directories on system drive. Here we need to open the following folders: Windows - SoftwareDistribution - Download.
 On the system drive, open the SoftwareDistribution folder, and in it - the Download directory
 - AT last section select everything with the mouse, right-click and select delete from the options menu.
 Delete all contents of the Download folder using the context menu
 - We return to the "Services" window. We click on the "Start" link so that the update service starts working again. We look to see if the problem with the system update has been resolved. To do this, follow the steps from the "Recommendations from Microsoft Corporation" section.
 Click on "Start" to activate the center service again
Video: what to do if Windows 10 updates do not download
Checking your computer for viruses
Even the presence of an antivirus on a PC cannot guarantee absolute security - a virus can also penetrate through protection. In addition, antivirus software may not be up to date, which means it is vulnerable. Consider how to identify and neutralize a threat on a PC, using the standard Windows Defender antivirus, which is built into the Windows system, as an example:
- Open the Windows tray - down arrow icon in the lower right corner of the display. Click on the small white shield.
- On the screen, you will immediately see a window with the "Security Center". Click immediately on the first tile "Protection from viruses and threats."
 In the "Security Center" window, click on the first tile "Virus and Threat Protection"
 - Click on "Run Check Now". Defender will immediately launch a quick scan. If the program does not reveal anything, follow the link at the bottom of the "Run a new advanced scan" button.
 To get started, you can run a quick scan and, if the defender does not find anything, enable advanced scanning
 - Select the first or third item. Please note that a full check will take a long time, but you can work in parallel on a PC. To perform the third option - standalone - you will need to restart the PC. Within 15 minutes, the defender will search for and remove threats. Click after selecting "Scan Now".
 Select the scan type depending on whether you want to wait a long time for the scan to finish
 - Wait for the end of the check. In the results, you will see a list of actions that can be performed with the detected threat. Select removal for all found viruses, if any.
 Wait for the extended scan to complete and remove viruses if the defender finds them
You can also be helped by a small Dr.Web CureIt! utility that can work with other antiviruses on the device without any conflicts and has a simple and user-friendly interface understandable to a beginner. It is better to download it from the official site. For home use it's free.
Fixing corrupted system files
After checking with an antivirus, it is necessary to “treat” system files - restore them. Of course, they could be damaged and not because of viruses - in any case, checking for damage and fixing it will not hurt. Do the following:
- Expand the "Search" panel through the "Taskbar" (magnifying glass icon). Type cmd in the empty field.
 Write a simple cmd code in search line panels
 - Right-click on the classic Command Prompt application - in the small menu, click on the option to launch the console with administrator rights.
 Click on the "Run as administrator" option
 - Allow the module to make changes in the "OS" by clicking on "Yes".
- Now type or paste the command DISM.exe /Online /Cleanup-image /Restorehealth. After that, immediately press Enter to execute it. The console will start the process of searching for and repairing corrupted system files. Wait for it to finish - the module will provide you with a report on the work done. Then restart your PC and try to update.
 Paste the copied command DISM.exe /Online /Cleanup-image /Restorehealth using the Ctrl + V combination
Video: how to check the integrity of system files and "cure" damaged ones
Cleaning the system disk from "garbage"
Remove temporary files and clear various types of system cache, for example, DNS cache, you can use the built-in Disk Cleanup tool, or third-party utilities. Let us describe the procedure on the example of the well-known free application CCleaner by Piriform developer:
- We launch the official page of the application using any browser. On it we click on the first green button "Download free version».
 Click on the first button "Download free version" if you don't want to buy the Pro version
 - After the file is fully downloaded, run it and install the software, following simple instructions installer.
- Now we open the utility - we immediately get to the desired section "Cleaning". In the columns on the left side of the window, all the necessary checkboxes are already set. You don’t need to change anything in the Windows tab, but in the “Applications” block you can already optionally check the boxes for the browsers that you use most often. If you do not clear their cache, they will collect a lot of unnecessary information on the system disk and work very slowly. Click on "Analysis".
 Select the necessary partitions for cleaning and click on "Analyze"
 - The system will estimate the number of megabytes or even gigabytes that it is recommended to delete, and will also report on the types of data that you can safely get rid of. Click on "Cleanup".
 When the analysis is finished, look at the amount of data that will be freed on the disk and click on "Cleanup"
 - We confirm our desire to get rid of unnecessary information and free the disk. We are waiting for the completion of the procedure, close the utility, restart the device and try to update the system in the center.
 Click on "Continue" to confirm your intention to delete unnecessary system files
Video: smart system cleaning of junk files using CCleaner
Temporarily disable antivirus and Windows Defender Firewall
Deactivate antivirus and firewall Windows Defender» can help install necessary updates that are blocked from downloading protective programs by mistake. First, let's analyze disabling the antivirus using the example of the Avast utility:

You can temporarily deactivate Windows Defender in its settings:
- Open the defender panel through the Windows tray (image of a white shield). In the window, immediately look at the lower left corner - click on the "Parameters" link.
 Click on the "Settings" link at the bottom of the window on the left
 - In the notifications section, click on "Virus and Threat Protection Settings".
 Click on "Virus and Threat Protection Settings"
 - Deactivate the "Real-time protection" option using the switch.
 Click on the first radio button to deactivate standard antivirus protection
 - Click "Yes" to allow the protector to change anything on your device.
 Click on "Yes" so that the "Security Center" can make changes to the system
 - You will see that a cross in a red circle has appeared in the window. Repeat the update in the center. The protection will turn on itself after a while - you do not need to enter the defender again.
 When you disable the antivirus, try again to update the system in the center
Now let's look at how to disable the "Firewall" to bypass the system update blocking download:
- Call the "Control Panel" through the "Run" window and the control command or using the " Windows Search". Find the "Windows Defender Firewall" link and click on it.
 Select among all sections "Windows Defender Firewall"
 - In the left column with links, click on the fourth - "Enable and disable ...".
 Click on the "Turn Firewall on or off" link to go to next page
 - Check the boxes next to the "Disable" values for two types of network at once. Click OK at the bottom of the page to save the parameter change.
 Check the "Disable" checkboxes for the two types of network
 - Red shields with crosses inside will appear on the screen. Please try updating again. After that, be sure to manually enable Windows Defender Firewall protection.
 Make sure that " Windows Firewall» is disabled and try to update the system
Video: how to disable Windows Firewall in several ways
Windows clean restart
Loading the "OS" in clean mode means disabling all third-party services along with the launch of Windows, that is, utility processes that the user independently installed on the device earlier. Thus, all extraneous components that could interfere with the installation of the update will be deactivated:
- On the "Search" panel, type in the msconfig command in the line and run the proposed classic utility with one click. The same code can also be entered in the Run window (Win and R).
 Enter in the "Search" or in the "Run" window the query msconfig
 - In the configuration window, switch immediately to the third section "Services". At the bottom, under the list, click on "Do not display Microsoft services."
- After that, click on the "Disable all" button. Apply the changes and go to the next tab called "Startup".
 Deactivate all extraneous services using a special button
 - To open an additional window, click on the blue link "Open Task Manager".
 In the "Startup" tab, click on the link to launch on the "Task Manager" screen
 - In the manager, one by one, deactivate all the program services in the list using the "Disable" button in the lower right corner or through the corresponding item in the context menu.
 In the "Task Manager" turn off all the services in the list one by one
 - Return to the "System Configuration" window and in the "Startup" section, click on "Apply" and on OK. Restart the device and try updating again in the center. If it doesn't, run the troubleshooter again in clean boot mode using the instructions in the section of the same name in this article.
- On a clean start, the PC will lose some functionality. After a successful update, return everything to its place in the "System Configuration" window - enable all third-party services in the list using the special button.
Checking "Device Manager" for errors
If your PC has corrupted drivers, they can be a barrier to installing updates. You need to check the serviceability in the "Device Manager":
- Going to its window in the "top ten" is quite simple: right-click on the "Start" button in the lower left corner of the display and select the dispatcher from the list that appears.
 In the context menu of the Start button, find the item "Device Manager"
 - If the context menu does not appear for some reason, hold down R and Win and paste the devmgmt.msc code in an empty line. After that, click on OK or Enter to execute it.
 In the "Open" line, enter the request devmgmt.msc and click on OK
 - Look carefully at the list of connected devices and their drivers. Modules that are marked with an exclamation point in yellow triangle or a question mark, are problematic.
 See if there is an exclamation mark next to any device in the list
 - To fix a problem with a driver, update it using a special item in the context menu.
 Click on "Update Driver" in the context menu
 - In the new window, click on "Automatic search".
 Click on the first link to get started automatic search updates for the problematic driver
 - Wait while the system searches for an available upgrade on official resources. If present, it will be successfully downloaded and installed without any action from the user.
 Wait until the end of the search for an update for the driver with which there are problems
 - If there is no update, you will see a corresponding message in the window. In this case, click on Close. Call the context menu of the driver again, but this time click on "Remove device". After a couple of seconds, it will disappear from the list. Try installing the update without this device.
 A message may appear in the window stating that you currently have the latest driver installed.
 - After that, be sure to return it to the place. In the dispatcher top panel there is an "Action" section. Open its panel with one click and select Update Configuration.
 In the "Action" menu, select the first item "Update hardware configuration"
 - If this method does not work, install the driver by downloading it from the official website of the manufacturer of a particular hardware part or the PC itself. It also makes sense to refer to technical support companies to see if your device is compatible with an update that the center cannot install.
Removing duplicate profiles
You can remove an extra account using the "Registry Editor". However, any changes in it must be made as carefully as possible:
- Hold down the Win and R key combination on the keyboard - in the empty field write the regedit code. To execute it, press Enter or OK in the Run window itself.
 In the "Open" line, enter the command regedit and click on OK
 - Click Yes to allow the editor to make changes to the system. double click expand the third branch called HKEY_LOCAL_MACHINE.
 In the ProfileList folder, find directories with long names
 - See if there are directories with long names in the last folder. Open them and note the ProfileImagePath entry. If these files in the folders have the same path, delete one of them. Usually the name of the duplicate has the word bak at the very end.
 If you find a duplicate entry, remove it using the context menu
System rollback
You can return the system to the state that it was before errors occurred with updates using a restore point, a system backup (which is stored in an image file), and also through a reset to initial settings. Consider restoring using a dot. Before applying any important changes to the system, for example, installing updates, the “OS” automatically creates a restore point, so in most cases there are several points on the disk. Let's get started with the instructions:
- On the "Desktop" find standard icon"Windows" "This PC", with which you usually open "Explorer". Right-click on this icon and select the last item "Properties".
 Select "Properties" from the context menu of the "This PC" icon
 - Now click on the "System Protection" link in the left pane of the window.
- You will immediately be taken to the desired tab. Click on the "Restore" button to launch the rollback tool.
 Click on "Restore" to open the module to restore the previous system state
 - On the home screen With this tool, you must either select the last created point (recommended value), or open a list with all available states. Click on "Next" after that.
 You can choose your own restore point in the list or immediately roll back to the previous state
 - If you want to select a point yourself, click on the desired point to select it. You can find out which programs and drivers will be affected when restoring to a specific state using the button at the bottom of the list. Once selected, click Next.
 Select the point with the left mouse button and click on "Next"
 - In the next window, you can see the date and time when the restore point was created and its description. Click on "Finish" - the system will start restoring to the previous state. During the rollback process, the computer will restart. When the procedure is completed, run the system update manually in the "Update Center".
 Click "Finish" to let the module start restoring the system to the previous state
Video: how to roll back to Windows
Installing the update using the Windows Update Minitool utility
windows update Minitool is an alternative method to update the Windows system. The utility allows you to choose which updates to install and which not. Also, the user gets the opportunity to completely abandon them or remove the problematic update directly in the program interface. The application developer is a user under the pseudonym stupid user. He posted the program installer on the forum page, from which it needs to be downloaded. How to use the tool, consider the instructions:
- Click on the Download (Google Drive) link. On the next page, click on the "Download" button. Run the downloaded archive through the "Downloads" panel.
- Run one of the two files depending on the bitness of your system.
- Click "Yes" to allow Minitool to make changes to your device.
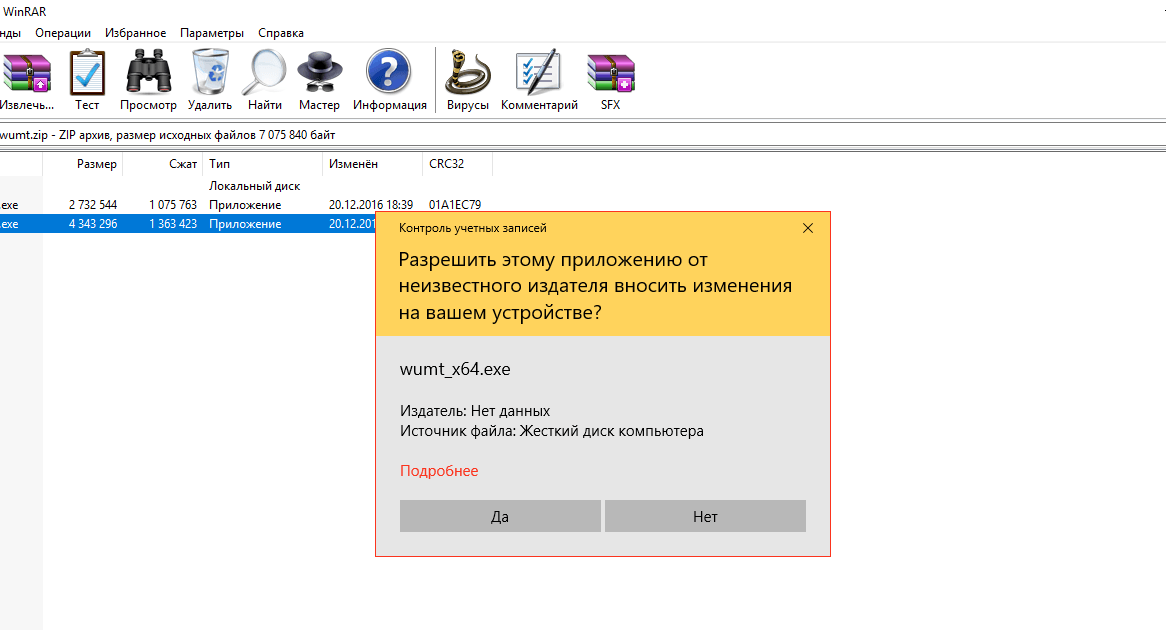 Click on "Yes" to allow Windows Update Minitool to change anything on the system
 - Click on the round icon of two arrows called "Check for Updates". The utility will start searching.
 Click directly on the update icon Windows window Update Minitool to start searching
 - After a while, a list of Windows components available for updating will appear. Select the entire update with checkmarks and click on the "Install" icon - the program will immediately download and install.
 Click on the third icon to install the updates found
 - Wait for the update to complete and restart your device.
- If necessary, set up an automatic update in the lower left corner of the window in the drop-down menu. You have the right to set the value "On schedule". In this case, set the frequency with which the program will check and install updates.
 In the drop-down menu in the lower left corner of the window, select "Automatic"
Downloading offline updates for Windows 10 using the official method
Microsoft Corporation has a catalog of all updates, from which each user of the "OS" has the right to independently download one or another update:
- First you need to determine which OS build you have on your PC. To do this, hold down Win and R on your keyboard, and then enter the command winver in the "Open" field. Click OK.
- In the gray window, look at the version and remember its number.
 Find the update for your package version in the official Windows Update Catalog
 - Look for desired file updates. Pay attention to the bit depth - it should match yours. Click on the "Download" button in the required line.
 Using the appropriate button, download the necessary update for your system, which does not want to be installed in the center
 - Click on the link that appears in the new window.
 Click on the link in a new window to start downloading
 - Open the downloaded archive and run the update installer to update the system manually. Wait for the installation to finish. Then reboot your device for the changes to take effect.
 Click on "Restart now" for all changes after the update to take effect on the PC
If you have problems updating the "dozens", first of all, you need to pay attention to the error code - this is the key to troubleshooting. The user is able to fix the situation with an unfinished update in many ways: from manually starting the search for updates and clearing the update cache to fixing corrupted system files in the "Command Line" and rolling back the system using a restore point.
This article collects the most common startup errors in Windows 10 and how to fix them. We hope this information will make life a little easier for those who switched to the new version of the system and suddenly found themselves between a rock and a hard place.
1. Windows 10: "The computer did not start correctly"
The first common problem when starting Windows 10 is that the system reports some kind of critical error ( CRITICAL_PROCESS_DIED, INACCESSIBLE_BOOT_DEVICE) and then displays a blue screen of "Automatic Repair" with the text .
 Automatic Repair: The computer did not start correctly
 The reason for this error, in most cases, is damage and deletion of system files or registry entries. This may be caused by installing and removing programs, or by the actions of antiviruses or utilities for cleaning the Windows registry.
The solution to the problem is to restore files and registry entries that are damaged:
- Click on the button Extra options on the blue screen, select Troubleshooting> Extra options > Download options.
- Click Reload.
- In the window Download options press the F6 key or the number 6 on numeric keypad to start safe mode with command line support.
- The computer will restart in safe mode and a command prompt will open automatically. In it enter:
The computer will restart and after that Windows will start in normal mode.
2. Windows 10 won't load past the logo
Other known issue is that the system boots up to the Windows logo, after which the computer turns off spontaneously. The reason for this error is also the corruption of system files, however, unlike the first case, the damage is so severe that the system cannot start the recovery itself.
In this case, you will have to create a rescue disk Windows Recovery on another Windows 10 PC:
- In panel Windows controls 10 find and select an item Recovery > Create a recovery drive.
- In the window that appears, set the parameter Run backup system files to the recovery drive and press Dalley.
- Connect an empty USB drive to your computer. Select it in the Create Recovery Drive window and click Next > Create.Wait for the files to finish copying and press Ready.
- Remove the USB drive from your computer, plug it into one that won't run Windows 10, and enable BIOS to boot from it.
- The Windows Recovery Environment will start. It has to choose Restoring a system image, or item Command line, and then enter the commands from the instructions for solving the first problem in it.
 Windows Recovery Environment
 You can also start the System Restore Environment from the disc that you installed Windows from. To do this, you need to boot from the installation disk, in the bootloader instead of Install press System Restore. In the menu that appears, select Troubleshooting> Extra options. The same options window shown above will open.
After recovery, the computer will restart. Return to BIOS boot from the hard drive and the system should start correctly.
3. "Boot Failure" and "An operating system wasn't found" errors
In some cases, when starting Windows 10, instead of loading the operating system, a black screen occurs with one of two errors:
- boot failure. Reboot and Select Proper Boot device or insert boot media in selected boot device.
- An operating system wasn't found. Try disconnecting any drives that don't contain an operating system. Press Ctrl+Alt+Del to restart.
There can be two reasons for this error:
- Wrong boot device order in BIOS or UEFI. Make sure you are booting from the drive where Windows 10 is installed.
- Damage to the system loader. In this case, you will also need installation disk or a Windows 10 emergency recovery disk. After booting from it, in the recovery environment, select the item Boot recovery and let the bootloader files be overwritten.
Also, the problem may be hardware damage to the hard drive from which you are booting.
 boot error Failure
 4. Windows 10 won't start: black screen
A common error when starting Windows 10 is a black screen with no signs of loading the desktop, with or without a frozen cursor on the screen. This often happens as a result of incorrect installation of any drivers: after a reboot, the computer works, but the OS does not boot.

In most cases, the solution to the problem lies in the rollback of the system. To do this, you will also need an installation disk or a Windows 10 emergency recovery disk. After booting from it, in the recovery environment, you can try to select the item System Restore.
This will allow you to roll back the system to the state before the problem occurred. The system will prompt you to select a restore point to which the rollback will be performed, and after confirmation it will perform it. As a rule, after a reboot, the black screen disappears.

5. Windows 10 takes a long time to boot on startup
There is a situation when Windows 10 does not load, the waiting icon is spinning, and that's it. In fact, most likely, nothing bad is happening - the system simply installs the updates that it downloaded the last time you used the computer.
In this situation, it's best to just wait. This state can last for several hours, depending on the number and volume of downloaded updates. It is recommended not to turn off the computer, but to leave it in the boot state for 1-2 hours.
To prevent this error when starting Windows 10 again, you can set up a scheduled computer update so that the system does not download updates without your knowledge. To learn how to edit update policies, read our.


